WPF入门教程系列七——布局之WrapPanel与StackPanel(二)
三. WrapPanel
WrapPanel布局面板将各个控件从左至右按照行或列的顺序罗列,当长度或高度不够是就会自动调整进行换行,后续排序按照从上至下或从右至左的顺序进行。
Orientation——根据内容自动换行。当 Horizontal选项看上去类似于Windows资源管理器的缩略图视图:元素是从左向右排列的,然后自上至下自动换行。Vertical 选项看上去类似于Windows资源管理器的列表视图:元素是从上向下排列的,然后从左至右自动换行。
ItemHeight——所有子元素都一致的高度。每个子元素填充高度的方式取决于它的VerticalAlignment属性、Height属性等。任何比ItemHeight高的元素都将被截断。
ItemWidth——所有子元素都一致的宽度。每个子元素填充高度的方式取决于它的VerticalAlignment属性、Width属性等。任何比ItemWidth高的元素都将被截断。
本次的示例,效果图如下2图,图1是宽度比较小,图2就是拉长了宽度后的结果。大家可以在实际做出来之后,自行拉动窗体的宽度:
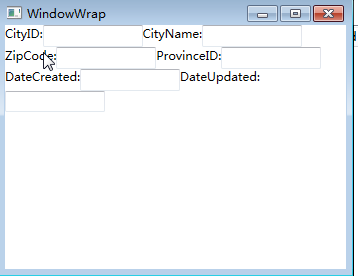
图1
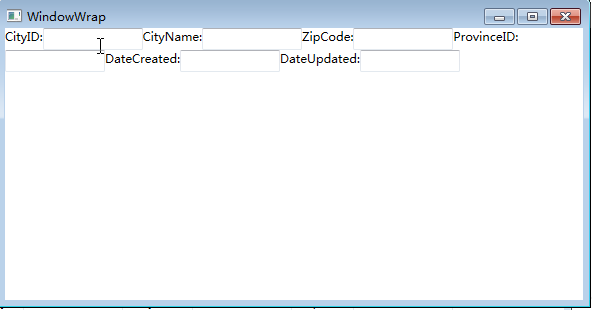
图2
上面两图的XAML代码实现:
<Window x:Class="WpfApp1.WindowWrap"

        xmlns="http://schemas.microsoft.com/winfx/2006/xaml/presentation"

        xmlns:x="http://schemas.microsoft.com/winfx/2006/xaml"

        Title="WindowWrap" Height="300" Width="400">

    <Grid>

        <WrapPanel  Orientation="Horizontal">


                <TextBlock Name="textBlock_CityID" Text="CityID:" />

                <TextBox Name="textBox_CityID" MinWidth="100" />


                <TextBlock Name="textBlock_CityName" Text="CityName:" />

                <TextBox Name="textBox_CityName" MinWidth="100" />


                <TextBlock Name="textBlock_ZipCode" Text="ZipCode:" />

                <TextBox Name="textBox_ZipCode" MinWidth="100"  />


                <TextBlock Name="textBlock_ProvinceID" Text="ProvinceID:" />

                <TextBox Name="textBox_ProvinceID" MinWidth="100"   />


                <TextBlock Name="textBlock_DateCreated" Text="DateCreated:"  />

                <TextBox Name="textBox_DateCreated" MinWidth="100"   />


                <TextBlock Name="textBlock_DateUpdated" Text="DateUpdated:" />

                <TextBox Name="textBox_DateUpdated" MinWidth="100" />


        </WrapPanel>


    </Grid>

</Window>

C#代码实现上图示例:
using System;

using System.Collections.Generic;

using System.Linq;

using System.Text;

using System.Threading.Tasks;

using System.Windows;

using System.Windows.Controls;

using System.Windows.Data;

using System.Windows.Documents;

using System.Windows.Input;

using System.Windows.Media;

using System.Windows.Media.Imaging;

using System.Windows.Shapes;


namespace WpfApp1

{

    /// <summary>

    /// WindowWrap.xaml 的交互逻辑

    /// </summary>

    public partial class WindowWrap : Window

    {

        public WindowWrap()

        {

            InitializeComponent();

        }


        private void btnAddByCode_Click(object sender, RoutedEventArgs e)

        {

            WrapPanel wp = new WrapPanel();

            //把wp添加为窗体的子控件

            this.Content = wp;

            wp.Margin = new Thickness(0, 0, 0, 0);

            wp.Background = new SolidColorBrush(Colors.White);

            //遍历增加TextBlock

            TextBlock block;

            for (int i = 0; i <= 10; i++)

            {

                block = new TextBlock();

                block.Text = "后台代码添加控件:" + i.ToString();

                block.Margin = new Thickness(10, 10, 10, 10);

                block.Width = 160;

                block.Height = 30;

                wp.Children.Add(block);

            }


        }

    }

}
四. StackPanel
StackPanel就是将控件按照行或列来顺序排列,但不会换行。通过设置面板的Orientation属性设置了两种排列方式:横排(Horizontal默认的)和竖排(Vertical)。纵向的StackPanel默 认每个元素宽度与面板一样宽,反之横向亦然。如果包含的元素超过了面板空间,它只会截断多出的内容。 元素的Margin属性用于使元素之间产生一定得间隔,当元素空间大于其内容的空间时,剩余空间将由HorizontalAlignment和 VerticalAlignment属性来决定如何分配。
本示例要实现的效果如下2图,图1是横排,图2是竖排。

图1
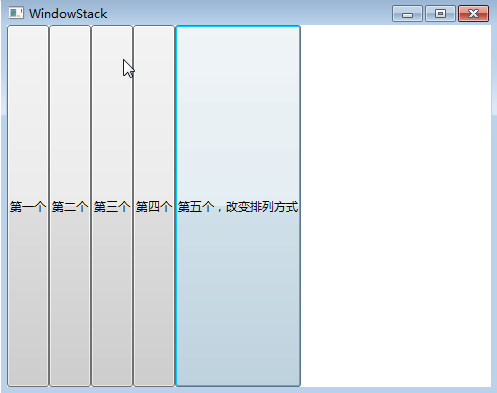
图2
上两图的XAML代码实现:
<Window x:Class="WpfApp1.WindowStack"

        xmlns="http://schemas.microsoft.com/winfx/2006/xaml/presentation"

        xmlns:x="http://schemas.microsoft.com/winfx/2006/xaml"

        Title="WindowStack" Height="400" Width="500">

    <Grid>

        <StackPanel Name="stackPanel" Margin="0,0,0,0" Background="White" Orientation="Vertical">

            <Button Content="第一个"/>

            <Button Content="第二个"/>

            <Button Content="第三个"/>

            <Button Content="第四个"/>

            <Button Content="第五个,改变排列方式" Click="Button_Click"/>

          <Button Content="后台代码实现" Click="Button_Click_1"/>


        </StackPanel>


    </Grid>

</Window>
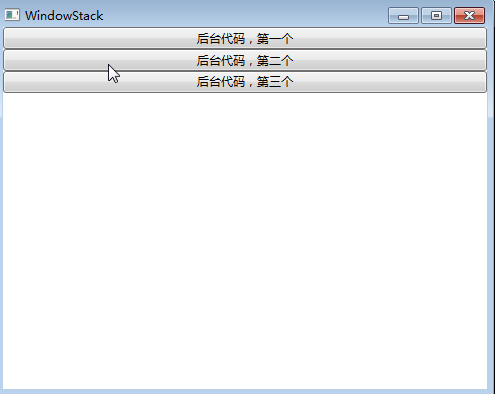
上图示例的C#代码实现:
using System;

using System.Collections.Generic;

using System.Linq;

using System.Text;

using System.Threading.Tasks;

using System.Windows;

using System.Windows.Controls;

using System.Windows.Data;

using System.Windows.Documents;

using System.Windows.Input;

using System.Windows.Media;

using System.Windows.Media.Imaging;

using System.Windows.Shapes;


namespace WpfApp1

{

    /// <summary>

    /// WindowStack.xaml 的交互逻辑

    /// </summary>

    public partial class WindowStack : Window

    {

        public WindowStack()

        {

            InitializeComponent();


        }


        private void Button_Click(object sender, RoutedEventArgs e)

        {

            stackPanel.Orientation=Orientation.Horizontal;

        }

        private void StackPanels()

        {

            StackPanel sp = new StackPanel();

            //把sp添加为窗体的子控件

            this.Content = sp;

            sp.Margin = new Thickness(0, 0, 0, 0);

            sp.Background = new SolidColorBrush(Colors.White);

            sp.Orientation = Orientation.Vertical;

            //Button1

            Button b1 = new Button();

            b1.Content = "后台代码,第一个";

            sp.Children.Add(b1);


            //Button2

            Button b2 = new Button();

            b2.Content = "后台代码,第二个";

            sp.Children.Add(b2);


            //Button3

            Button b3 = new Button();

            b3.Content = "后台代码,第三个";

            sp.Children.Add(b3);


        }


        private void Button_Click_1(object sender, RoutedEventArgs e)

        {

            StackPanels();

        }

    }

}
注: 当把StackPanel的FlowDirection属性设置为RightToLeft,Orientation属性设置为Horizontal,StackPanel将从右向左排列元素

 浙公网安备 33010602011771号