使用Flask部署图像分类模型
转自:https://cloud.tencent.com/developer/article/1670477
理解问题陈述
让我们讨论一下问题陈述,我们想要创建一个包含如下文本框的网页(如下所示)。用户在这里输入网址。
这里的任务是从URL中抓取所有图像。对于每个图像,我们将使用图像分类模型预测图像的类别或类别,并在网页上按类别呈现图像。

下面是端到端模型的工作流-
设置项目工作流
- 「模型构建」:我们将使用预训练的模型「Densenet 121」来预测图像类。它可以在PyTorch的torchvision库中找到。这里,我们的重点不是从头开始构建一个高度精确的分类模型,而是看看如何部署该模型并在web界面中使用它。
- 「创建一个图像Scraper」:我们将使用请求和BeautifulSoup库创建一个web scraper。它将从一个URL下载所有的图像并将其存储,这样我们就可以对其进行预测。
- 「设计网页模板」:我们还将设计一个用户界面,用户可以提交一个网址,也可以得到结果,一旦计算。
- 「对图像进行分类并发送结果」:一旦我们从用户那里得到查询,我们将使用该模型预测图像的类别并将结果发送给用户。
下面是我们刚刚看到的步骤的一个表示:
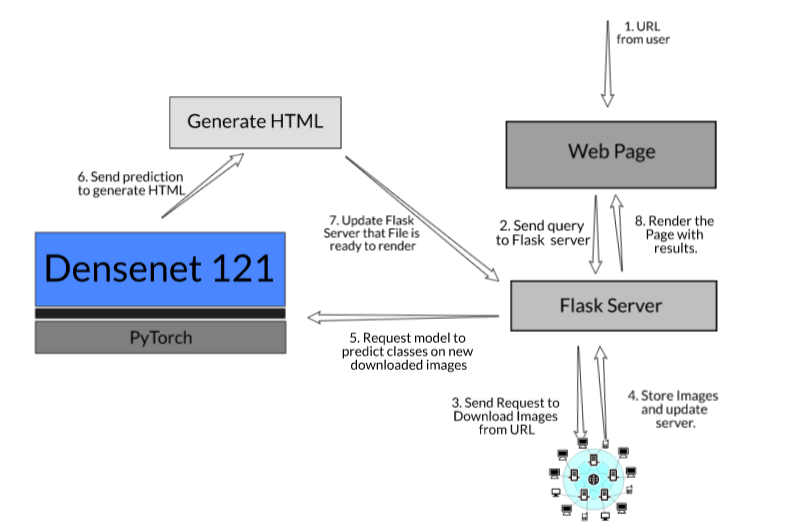
让我们讨论一下项目所需的所有组成部分:
建立预训练的图像分类模型
我们将使用预训练的模型Densenet 121对图像进行分类。
你可以在这里下载完整的代码和数据集。
链接:https://github.com/lakshay-arora/Densenet121-Image-Classification-Deployed-using-Flask
让我们从导入一些必需的库开始,并从torchvision库获取densenet121模型。确保将参数“pretrained”添加为True。
# 导入所需的库
import json
import io
import glob
from PIL import Image
from torchvision import models
import torchvision.transforms as transforms

# 将参数“pretraining”传递为“True”,使用预训练的权重:
model = models.densenet121(pretrained=True)
# 切换到模型到“eval”模式:
model.eval()
现在,我们将定义一个函数来转换图像。它将创建一个转换管道并根据需要转换图像。此方法以字节为单位获取图像数据,并对其应用一系列“转换”函数并返回张量。这段代码取自pytorch文档。
# 定义预处理的函数
def transform_image(image_bytes):
    my_transforms = transforms.Compose([transforms.Resize(255),
                                        transforms.CenterCrop(224),
                                        transforms.ToTensor(),
                                        transforms.Normalize(
                                            [0.485, 0.456, 0.406],
                                            [0.229, 0.224, 0.225])])
    image = Image.open(io.BytesIO(image_bytes))
    return my_transforms(image).unsqueeze(0)
现在,预训练的模型返回预测类id的索引。PyTorch已经为它提供了映射,以便我们可以看到预测类的名称。你可以在这里下载地图。它有1000个不同的类别。
# 加载由pytorch提供的映射
imagenet_class_mapping = json.load(open('imagenet_class_index.json'))
下面是一个示例:
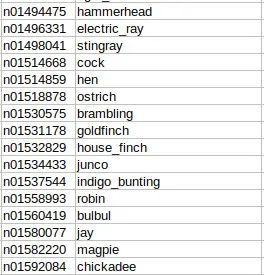
接下来,我们将定义一个函数来获取图像的类别。为此,我们将图像的路径作为唯一的参数传递。
首先,它将打开并读取二进制格式的图像,然后对其进行转换。然后将变换后的图像传递给模型,得到预测类。它将使用映射并返回类名。
# 定义函数来获得图片的预测
# 它接受参数:图片路径并提供预测作为输出
def get_category(image_path):
  #以二进制形式读取图像
    with open(image_path, 'rb') as file:
        image_bytes = file.read()
    # 变换图像
    transformed_image = transform_image(image_bytes=image_bytes)
    # 使用模型来预测类
    outputs = model.forward(transformed_image)
    _, category = outputs.max(1)
    # 返回
    predicted_idx = str(category.item())
    return imagenet_class_mapping[predicted_idx]
让我们在一些图像上尝试此函数:
get_category(image_path='static/sample_1.jpeg')
## ['n02089973', 'English_foxhound']
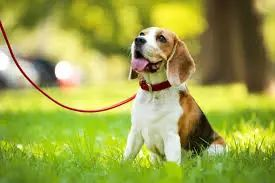
get_category(image_path='static/sample_2.jpeg')
## ['n11939491', 'daisy']
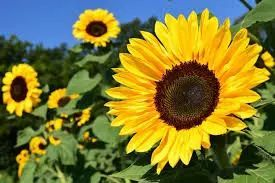
现在,我们的模型可以预测图像的类。让我们从构建图像Scraper开始。
建立一个图像Scraper
在本节中,我们将构建一个web scraper,它将从提供的URL下载图像。我们将使用BeautifulSoup库下载图像。你可以自由使用任何其他库或API来提供图像。
我们将从导入一些必需的库开始。对于我们将抓取的每个url,将创建一个新目录来存储图像。我们将创建一个函数get_path,它将返回为该URL创建的文件夹的路径。
# 导入所需的库
import requests
from bs4 import BeautifulSoup
import os
import time

def get_path(url):
    return "static/URL_" + str(url.replace("/","_"))

headers = {
    'User-Agent': "Mozilla/5.0 (X11; Linux x86_64) AppleWebKit/537.36 (KHTML, like Gecko) Chrome/77.0.3865.90 Safari/537.36"
    }
现在,我们将定义一个函数get_images。它将首先使用get_path函数创建目录,然后发送对源代码的请求。从源代码中,我们将使用“img”标签提取源代码。
在此之后,我们将只选择jpeg格式的图像。也可以添加png格式的图像。我已经过滤掉了,因为大多数png格式的图片都是logo。
最后,启动计数器并将带有计数器名称的图像保存到指定的目录中。
# 定义爬取图像并将其存储在目录中的函数
def get_images(url):
   # get the directory path
    path = get_path(url)
    try:
        os.mkdir(path)
    except:
        pass
    # 从URL请求源代码
    response = requests.request("GET", url, headers=headers)
    # 通过Beautiful Soup解析数据
    data = BeautifulSoup(response.text, 'html.parser')
    # 在源代码中找到图像标记
    images = data.find_all('img', src=True)
    # 从所有的图像标签中提取src
    image_src = [x['src'] for x in images]
    # 只选择jpeg
    image_src = [x for x in image_src if x.endswith('.jpeg') ]
    image_count = 1
    # 在指定目录存储图像
    for image in image_src:
        print(image)
        image_file_name = path+'/'+str(image_count)+'.jpeg'
        print(image_file_name)
        # 以写入二进制形式打开文件并添加图像内容来存储它
        with open(image_file_name, 'wb') as f:
            res = requests.get(image)
            f.write(res.content)
        image_count = image_count+1
让我们试试我们刚刚创造的scraper!
get_images('https://medium.com/@allanishac/9-wild-animals-that-would-make-a-much-better-president-than-donald-trump-b41f960bb171')
现在,创建了一个新目录,并查看它的外观。我们在一个地方下载了所有的图片。

注意:建议仅根据学习目的使用此图像Scraper。始终遵循目标网站的***robots.txt***文件,也称为机器人排除协议。这会告诉网络机器人哪些页面不能爬。
创建网页
我们将创建两个网页一个是“「home.html」另一个是“「image_class.html」”.
- “「home.html」“是默认的,它将有一个文本框,用户可以在其中键入URL。
- “「image_class.html」“将帮助我们按类别渲染图像。
1.home.html

我们需要在home.html文件以收集搜索容器中的数据。在form标签中,我们将使用post方法,并且数据通过名为“search”的输入栏传递。
<!DOCTYPE html>
<html>
<head>
<link rel="stylesheet" href="https://cdnjs.cloudflare.com/ajax/libs/font-awesome/4.7.0/css/font-awesome.min.css">
<style>
* {box-sizing: border-box;}

body {
  margin: 0;
  font-family: Arial, Helvetica, sans-serif;
}

.topnav {
  overflow: hidden;
  background-color: #e9e9e9;
}

.topnav a {
  float: left;
  display: block;
  color: black;
  text-align: center;
  padding: 14px 16px;
  text-decoration: none;
  font-size: 17px;
}

.topnav a:hover {
  background-color: #ddd;
  color: black;
}

.topnav a.active {
  background-color: #2196F3;
  color: white;
}

.topnav .search-container {
  float: right ;
}

.topnav input[type=text] {
  padding: 6px;
  margin-top: 8px;
  font-size: 17px;
  border: none;
  width: 900px;
}

.topnav .search-container button {
  float: right;
  padding: 6px 10px;
  margin-top: 8px;
  margin-right: 16px;
  background: #ddd;
  font-size: 17px;
  border: none;
  cursor: pointer;
  width: 100px;
}

.topnav .search-container button:hover {
  background: #ccc;
}

@media screen and (max-width: 600px) {
  .topnav .search-container {
    float: none;
  }
  .topnav a, .topnav input[type=text], .topnav .search-container button {
    float: none;
    display: block;
    text-align: left;
    width: 100%;
    margin: 0;
    padding: 14px;
  }
  .topnav input[type=text] {
    border: 1px solid #ccc;
  }
}
</style>
</head>
<body>

<div class="topnav">
  <a class="active" href="#home">Home</a>
  <div class="search-container">
     <form action = "http://localhost:5000/" method = "post">
      <input type="text" placeholder="Search" name="search">
      <button type="submit"><i class="fa fa-search"></i></button>
    </form>
  </div>
</div>

<div style="padding-left:16px">
  <h2> Image Classification </h2>
</div>

</body>
</html>
通过这样做,我们的后端代码将能够知道我们收到了一些名为“search”的数据。在后端,我们需要处理并发送数据。
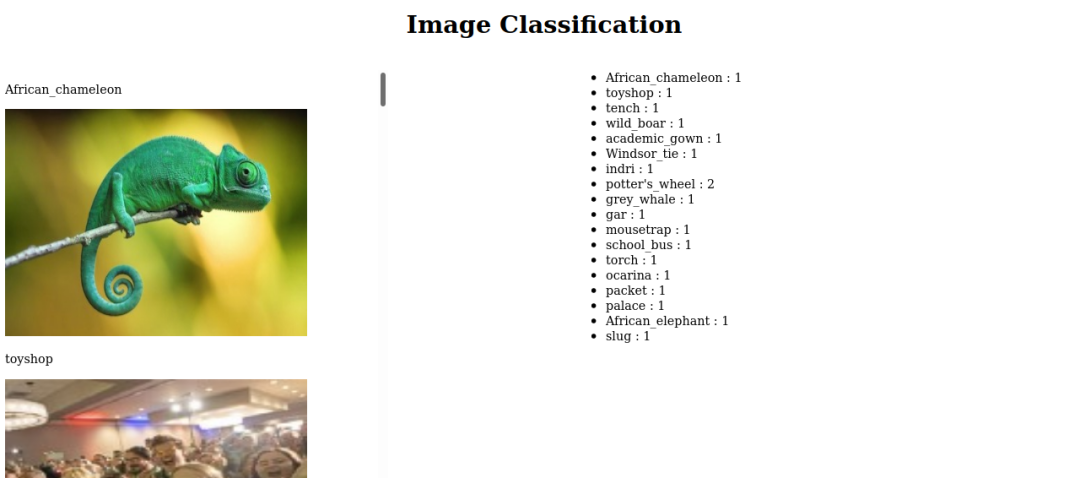
2.image_class.html
在计算结果时,另一个页面将呈现如下结果。本页“image_class.html“将在每次查询时更新。你可以看到我们在网页上显示了以下信息:
- 图像类别
- 图像
- 所有可用图像类别的频率计数
<html>
<head>
<meta name="viewport" content="width=device-width, initial-scale=1.0">
</head>

<style>
#left-bar {
  position: fixed;
  display: table-cell;
  top: 100;
  bottom: 10;
  left: 10;
  width: 35%;
  overflow-y: auto;
}

#right-bar {
  position: fixed;
  display: table-cell;
  top: 100;
  bottom: 10;
  right: 10;
  width: 45%;
  overflow-y: auto;
}

</style>
<body>

<center><h1> Image Classification </h1></center>

<div id= "left-bar" >

<p> proboscis_monkey </p> <picture> <img src= "../static/URL_https:__medium.com_tenderlymag_27-photos-that-celebrate-the-powerful-bond-between-children-and-animals-4bcf47462857/20.jpeg"  height="300" width="400"> </picture><p> dingo </p> <picture> <img src= "../static/URL_https:__medium.com_tenderlymag_27-photos-that-celebrate-the-powerful-bond-between-children-and-animals-4bcf47462857/29.jpeg"  height="300" width="400"> </picture><p> weasel </p> <picture> <img src= "../static/URL_https:__medium.com_tenderlymag_27-photos-that-celebrate-the-powerful-bond-between-children-and-animals-4bcf47462857/24.jpeg"  height="300" width="400"> </picture><p> Walker_hound </p> <picture> <img src= "../static/URL_https:__medium.com_tenderlymag_27-photos-that-celebrate-the-powerful-bond-between-children-and-animals-4bcf47462857/9.jpeg"  height="300" width="400"> </picture><p> peacock </p> <picture> <img src= "../static/URL_https:__medium.com_tenderlymag_27-photos-that-celebrate-the-powerful-bond-between-children-and-animals-4bcf47462857/16.jpeg"  height="300" width="400"> </picture><p> Saluki </p> <picture> <img src= "../static/URL_https:__medium.com_tenderlymag_27-photos-that-celebrate-the-powerful-bond-between-children-and-animals-4bcf47462857/1.jpeg"  height="300" width="400"> </picture><p> Walker_hound </p> <picture> <img src= "../static/URL_https:__medium.com_tenderlymag_27-photos-that-celebrate-the-powerful-bond-between-children-and-animals-4bcf47462857/3.jpeg"  height="300" width="400"> </picture><p> Norwich_terrier </p> <picture> <img src= "../static/URL_https:__medium.com_tenderlymag_27-photos-that-celebrate-the-powerful-bond-between-children-and-animals-4bcf47462857/18.jpeg"  height="300" width="400"> </picture><p> stretcher </p> <picture> <img src= "../static/URL_https:__medium.com_tenderlymag_27-photos-that-celebrate-the-powerful-bond-between-children-and-animals-4bcf47462857/30.jpeg"  height="300" width="400"> </picture><p> guinea_pig </p> <picture> <img src= "../static/URL_https:__medium.com_tenderlymag_27-photos-that-celebrate-the-powerful-bond-between-children-and-animals-4bcf47462857/14.jpeg"  height="300" width="400"> </picture><p> wallaby </p> <picture> <img src= "../static/URL_https:__medium.com_tenderlymag_27-photos-that-celebrate-the-powerful-bond-between-children-and-animals-4bcf47462857/21.jpeg"  height="300" width="400"> </picture><p> rapeseed </p> <picture> <img src= "../static/URL_https:__medium.com_tenderlymag_27-photos-that-celebrate-the-powerful-bond-between-children-and-animals-4bcf47462857/2.jpeg"  height="300" width="400"> </picture><p> cock </p> <picture> <img src= "../static/URL_https:__medium.com_tenderlymag_27-photos-that-celebrate-the-powerful-bond-between-children-and-animals-4bcf47462857/11.jpeg"  height="300" width="400"> </picture><p> basset </p> <picture> <img src= "../static/URL_https:__medium.com_tenderlymag_27-photos-that-celebrate-the-powerful-bond-between-children-and-animals-4bcf47462857/6.jpeg"  height="300" width="400"> </picture><p> hoopskirt </p> <picture> <img src= "../static/URL_https:__medium.com_tenderlymag_27-photos-that-celebrate-the-powerful-bond-between-children-and-animals-4bcf47462857/12.jpeg"  height="300" width="400"> </picture><p> cocker_spaniel </p> <picture> <img src= "../static/URL_https:__medium.com_tenderlymag_27-photos-that-celebrate-the-powerful-bond-between-children-and-animals-4bcf47462857/5.jpeg"  height="300" width="400"> </picture><p> goose </p> <picture> <img src= "../static/URL_https:__medium.com_tenderlymag_27-photos-that-celebrate-the-powerful-bond-between-children-and-animals-4bcf47462857/17.jpeg"  height="300" width="400"> </picture><p> Chihuahua </p> <picture> <img src= "../static/URL_https:__medium.com_tenderlymag_27-photos-that-celebrate-the-powerful-bond-between-children-and-animals-4bcf47462857/23.jpeg"  height="300" width="400"> </picture><p> titi </p> <picture> <img src= "../static/URL_https:__medium.com_tenderlymag_27-photos-that-celebrate-the-powerful-bond-between-children-and-animals-4bcf47462857/26.jpeg"  height="300" width="400"> </picture><p> Angora </p> <picture> <img src= "../static/URL_https:__medium.com_tenderlymag_27-photos-that-celebrate-the-powerful-bond-between-children-and-animals-4bcf47462857/25.jpeg"  height="300" width="400"> </picture><p> tiger_cat </p> <picture> <img src= "../static/URL_https:__medium.com_tenderlymag_27-photos-that-celebrate-the-powerful-bond-between-children-and-animals-4bcf47462857/19.jpeg"  height="300" width="400"> </picture><p> Greater_Swiss_Mountain_dog </p> <picture> <img src= "../static/URL_https:__medium.com_tenderlymag_27-photos-that-celebrate-the-powerful-bond-between-children-and-animals-4bcf47462857/4.jpeg"  height="300" width="400"> </picture><p> porcupine </p> <picture> <img src= "../static/URL_https:__medium.com_tenderlymag_27-photos-that-celebrate-the-powerful-bond-between-children-and-animals-4bcf47462857/27.jpeg"  height="300" width="400"> </picture><p> comic_book </p> <picture> <img src= "../static/URL_https:__medium.com_tenderlymag_27-photos-that-celebrate-the-powerful-bond-between-children-and-animals-4bcf47462857/31.jpeg"  height="300" width="400"> </picture><p> great_white_shark </p> <picture> <img src= "../static/URL_https:__medium.com_tenderlymag_27-photos-that-celebrate-the-powerful-bond-between-children-and-animals-4bcf47462857/28.jpeg"  height="300" width="400"> </picture><p> Ibizan_hound </p> <picture> <img src= "../static/URL_https:__medium.com_tenderlymag_27-photos-that-celebrate-the-powerful-bond-between-children-and-animals-4bcf47462857/13.jpeg"  height="300" width="400"> </picture><p> paddle </p> <picture> <img src= "../static/URL_https:__medium.com_tenderlymag_27-photos-that-celebrate-the-powerful-bond-between-children-and-animals-4bcf47462857/15.jpeg"  height="300" width="400"> </picture><p> Staffordshire_bullterrier </p> <picture> <img src= "../static/URL_https:__medium.com_tenderlymag_27-photos-that-celebrate-the-powerful-bond-between-children-and-animals-4bcf47462857/32.jpeg"  height="300" width="400"> </picture><p> soccer_ball </p> <picture> <img src= "../static/URL_https:__medium.com_tenderlymag_27-photos-that-celebrate-the-powerful-bond-between-children-and-animals-4bcf47462857/8.jpeg"  height="300" width="400"> </picture><p> red_wolf </p> <picture> <img src= "../static/URL_https:__medium.com_tenderlymag_27-photos-that-celebrate-the-powerful-bond-between-children-and-animals-4bcf47462857/10.jpeg"  height="300" width="400"> </picture><p> jaguar </p> <picture> <img src= "../static/URL_https:__medium.com_tenderlymag_27-photos-that-celebrate-the-powerful-bond-between-children-and-animals-4bcf47462857/7.jpeg"  height="300" width="400"> </picture><p> cradle </p> <picture> <img src= "../static/URL_https:__medium.com_tenderlymag_27-photos-that-celebrate-the-powerful-bond-between-children-and-animals-4bcf47462857/22.jpeg"  height="300" width="400"> </picture></div> <div id= "right-bar" ><li> proboscis_monkey : 1 </li><li> dingo : 1 </li><li> weasel : 1 </li><li> Walker_hound : 2 </li><li> peacock : 1 </li><li> Saluki : 1 </li><li> Norwich_terrier : 1 </li><li> stretcher : 1 </li><li> guinea_pig : 1 </li><li> wallaby : 1 </li><li> rapeseed : 1 </li><li> cock : 1 </li><li> basset : 1 </li><li> hoopskirt : 1 </li><li> cocker_spaniel : 1 </li><li> goose : 1 </li><li> Chihuahua : 1 </li><li> titi : 1 </li><li> Angora : 1 </li><li> tiger_cat : 1 </li><li> Greater_Swiss_Mountain_dog : 1 </li><li> porcupine : 1 </li><li> comic_book : 1 </li><li> great_white_shark : 1 </li><li> Ibizan_hound : 1 </li><li> paddle : 1 </li><li> Staffordshire_bullterrier : 1 </li><li> soccer_ball : 1 </li><li> red_wolf : 1 </li><li> jaguar : 1 </li><li> cradle : 1 </li></div>

</body>
</html>
下面是执行此操作的代码:
def get_picture_html(path, tag):
    image_html = """<p> {tag_name} </p> <picture> <img src= "../{path_name}"  height="300" width="400"> </picture>"""
    return image_html.format(tag_name=tag, path_name=path)

# 定义在html文件中添加列表元素的函数
def get_count_html(category, count):
    count_html = """<li> {category_name} : {count_} </li>"""
    return count_html.format(category_name = category, count_ = count)

# 计数
def get_value_count(image_class_dict):
    count_dic = {}
    for category in image_class_dict.values():
        if category in count_dic.keys():
            count_dic[category] = count_dic[category]+1
        else:
            count_dic[category] = 1
    return count_dic

# 函数从image_class字典生成html文件
# 键将是图像的路径,而值将是与之关联的类。
def generate_html(image_class_dict):
    picture_html = ""
    count_html = ""

    # 循环这些键并将图像添加到html文件中
    for image in image_class_dict.keys():
        picture_html += get_picture_html(path=image, tag= image_class_dict[image])

    value_counts = get_value_count(image_class_dict)

    # 循环value_counts并向html文件中添加类的计数
    for value in value_counts.keys():
        count_html += get_count_html(value, value_counts[value])
下一步是建立Flask项目,将这些单独的部分组合起来解决这个挑战。
设置Flask项目
我们在项目中完成了以下任务:
- 图像分类模型工作良好,能够对图像进行分类。
- 我们已经建立了图像Scraper,将下载图像并存储它们。
- 我们已经创建了网页来获取并返回结果。
现在我们需要将所有这些文件连接在一起,这样我们就可以有一个工作项目了。
让我们看看目录结构。
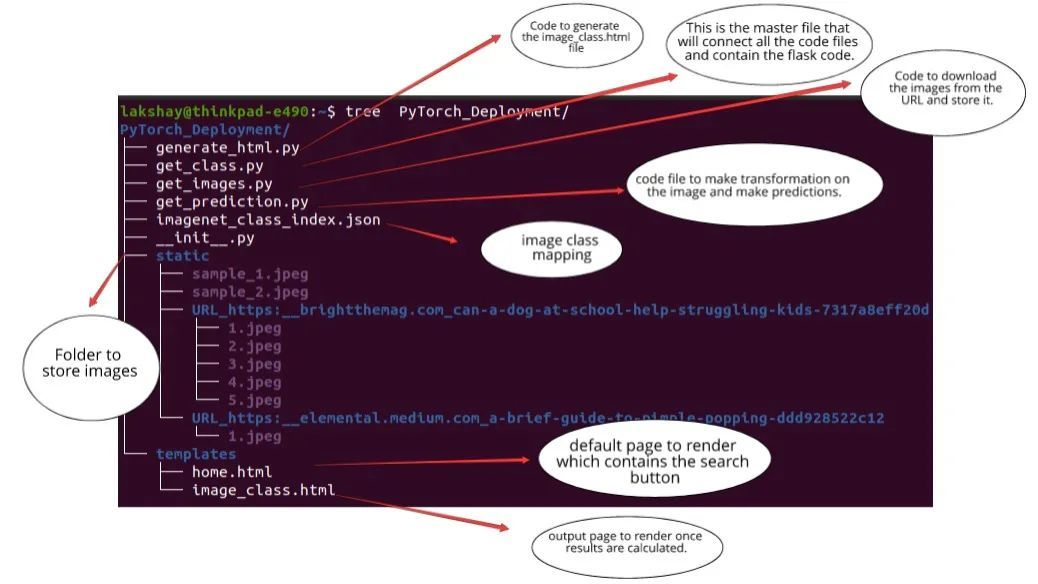
「注意」:请确保将图像保存在「static」文件夹和html 文件放在***templates***文件夹中。Flask只会查找这些名字。如果你改变这些,你会得到一个错误。
运行Flask应用程序
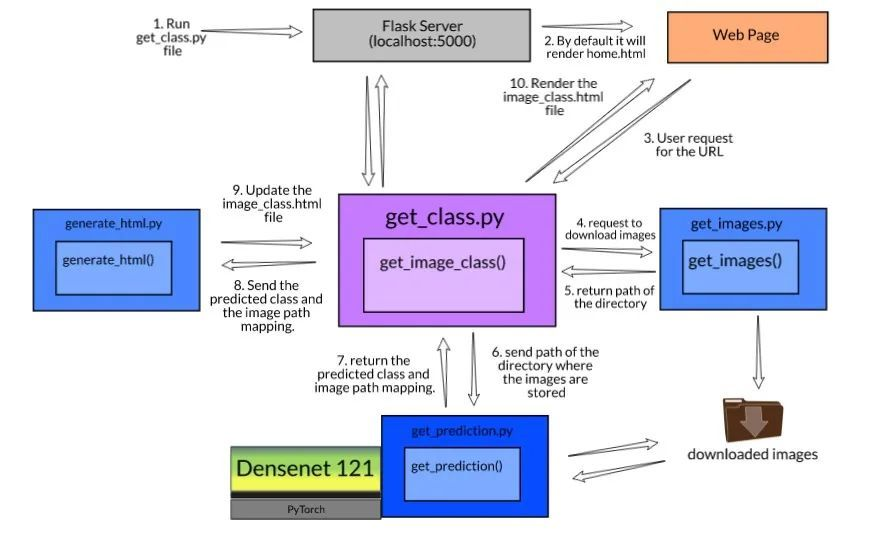
Flask应用程序首先将home.html当有人发送图像分类请求时,Flask将检测一个post方法并调用get_image_class函数。
此函数将按以下步骤工作:
- 首先,它将发送一个请求来下载并存储这些图像。
- 接下来,它将把目录路径发送到「get_prediction.py」将计算并以字典形式返回结果的文件。
- 最后,它将把这个字典发送给「generate_html.py」,用户将返回生成该文件的输出。
# 导入库
from flask import Flask, render_template, request, redirect, url_for
from get_images import get_images, get_path, get_directory
from get_prediction import get_prediction
from generate_html import generate_html
from torchvision import models
import json

app = Flask(__name__)

# 映射
imagenet_class_mapping = json.load(open('imagenet_class_index.json'))

# 使用预训练模型
model = models.densenet121(pretrained=True)
model.eval()

# 定义从url获取图像并预测类的函数
def get_image_class(path):
    # 从URL获取图像并将其存储在给定的路径中
    get_images(path)
    # 根据所提供的目录预测图像的图像类别
    path = get_path(path)
    images_with_tags = get_prediction(model, imagenet_class_mapping, path)
    # 生成html文件以在我们预测类之后呈现
    generate_html(images_with_tags)
一旦以上步骤完成,我们就可以为用户提供结果。我们将调用success函数,该函数将渲染image_class.html文件。
# 根页面为"home.html"
@app.route('/')
def home():
    return render_template('home.html')

@app.route('/', methods=['POST', 'GET'])
def get_data():
    if request.method == 'POST':
        user = request.form['search']
        # 如果搜索按钮被点击,调用函数get_image_class
        get_image_class(user)
        #返回image_class.html
        return redirect(url_for('success', name=get_directory(user)))


@app.route('/success/<name>')
def success(name):
    return render_template('image_class.html')


if __name__ == '__main__' :
    app.run(debug=True)
获取源URL的所有图像的预测
到目前为止,我们已经分别对每幅图像进行了预测。现在,我们将用新参数修改get_category函数来解决这个问题。我们将传递包含多个图像文件的目录路径。
现在,我们将定义另一个函数get_prediction,它将使用get_category函数并返回字典,其中键将是图像路径,值将是图像类。
稍后,我们将把这个字典发送给generate_html.py将为我们创建HTML文件的文件。
# 获取目录中出现的所有图像的类
def get_category(model, imagenet_class_mapping, image_path):
    with open(image_path, 'rb') as file:
        image_bytes = file.read()
    transformed_image = transform_image(image_bytes=image_bytes)
    outputs = model.forward(transformed_image)
    _, category = outputs.max(1)

    predicted_idx = str(category.item())
    return imagenet_class_mapping[predicted_idx]

# 它将创建一个图像路径和预测类的字典
# 我们将使用该字典生成html文件。
def get_prediction(model, imagenet_class_mapping, path_to_directory):
    files = glob.glob(path_to_directory+'/*')
    image_with_tags = {}
    for image_file in files:
        image_with_tags[image_file] = get_category(model, imagenet_class_mapping, image_path=image_file)[1]
    return image_with_tags
现在,所有的代码文件都准备好了,我们只需要将它们与主文件连接起来。
首先,创建一个Flask类的对象,该对象将以当前模块的名称作为参数。route函数将告诉Flask应用程序下一步在网页上呈现哪个URL。
部署模型的工作
你可以在这里下载完整的代码和数据集。
链接:https://github.com/lakshay-arora/Densenet121-Image-Classification-Deployed-using-Flask
现在,我们运行「get_class.py」,Flask服务器就可以在 「localhost:5000」启动

打开web浏览器并转到localhost:5000,你将看到默认主页在那里呈现。现在,在文本框中输入任何URL并按search按钮。这可能需要20-30秒,这取决于网址中的图片数量和网速。
让我们看看部署模型的工作情况。
视频:https://cdn.analyticsvidhya.com/wp-content/uploads/2020/07/pytorch-deployment-2020-07-04-11.mp4
结尾
在本文中,我简要地解释了模型部署、Pytorch和Flask的概念。
然后我们深入了解了使用PyTorch创建图像分类模型并将其与Flask一起部署的过程中涉及的各个步骤。我希望这有助于你构建和部署图像分类模型。
另外,模型被部署在本地主机上。我们也可以把它部署在云服务上,比如Google Cloud,Amazon,github.io等等,我们也将在下一篇文章中讨论这一点。
原文链接:https://www.analyticsvidhya.com/blog/2020/07/deploy-an-image-classification-model-using-flask/


