《Asp.Net Core3 + Vue3入坑教程》 - 3.AutoMapper & Restful API & DI
简介
《Asp.Net Core3 + Vue3入坑教程》 此教程适合新手入门或者前后端分离尝试者。可以根据图文一步一步进操作编码也可以选择直接查看源码。每一篇文章都有对应的源码
教程后期会将 .Net Core 3升级成 .Net Core 5
目录
《Asp.Net Core3 + Vue3入坑教程》系列教程目录
Asp.Net Core后端项目
- 后端项目搭建与Swagger配置步骤
- 配置CROS策略解决跨域问题
- (本文)AutoMapper & Restful API & DI
- EF Core & Postgresql
- (暂未发表敬请期待...).Net Core 3升级成 .Net Core 5
- (暂未发表敬请期待...)JWT
Vue3 前端项目
暂未发表敬请期待...
本文简介
本文为《Asp.Net Core3 + Vue3入坑教程》系列教程的后端第三篇 - AutoMapper & Restful API & DI。本文将利用AutoMapper与依赖注入等内容实现一个简单的Restful API。
实现一个简单的Restful API
引入NewtonsoftJson3.1.12版本的Nuget包
当前项目使用的SKD是 .net core 3后续将SDK升级之后再升级此Nuget包的版本


配置Startup.cs
代码如下:
using Microsoft.AspNetCore.Builder;
using Microsoft.AspNetCore.Hosting;
using Microsoft.Extensions.DependencyInjection;
using Microsoft.Extensions.Hosting;
using Newtonsoft.Json.Serialization;
using Simple_Asp.Net_Core.Data;
using Simple_Asp.Net_Core.ServiceProvider;
using System;

namespace Simple_Asp.Net_Core
{
    public class Startup
    {
        // This method gets called by the runtime. Use this method to add services to the container.
        // For more information on how to configure your application, visit https://go.microsoft.com/fwlink/?LinkID=398940
        public void ConfigureServices(IServiceCollection services)
        {
            services.AddCORS();
            services.AddMvc();
            services.AddSwagger();

            services.AddControllers().AddNewtonsoftJson(s =>
            {
                s.SerializerSettings.ContractResolver = new CamelCasePropertyNamesContractResolver();
            });
        }

        // This method gets called by the runtime. Use this method to configure the HTTP request pipeline.
        public void Configure(IApplicationBuilder app, IWebHostEnvironment env)
        {
            if (env.IsDevelopment())
            {
                app.UseDeveloperExceptionPage();
                app.UseSwagger();
                app.UseSwaggerUI(c =>
                {
                    c.SwaggerEndpoint("/swagger/v1/swagger.json", "ApiHelp V1");
                });
            }

            app.UseCors("CorsTest");

            app.UseRouting();
            app.UseEndpoints(endpoints => endpoints.MapDefaultControllerRoute());
        }
    }
}
新建文件夹Models,新建实体Command.cs

代码如下:
using System.ComponentModel.DataAnnotations;

namespace Simple_Asp.Net_Core.Models
{
    public class Command
    {
        [Key]
        [Required]
        public int Id { get; set; }

        [Required]
        [MaxLength(250)]
        public string HowTo { get; set; }

        [Required]
        public string Line { get; set; }

        [Required]
        public string Platform { get; set; }
    }
}
新建Data文件夹 新建 ICommanderRepo 仓储层接口,用来定义与数据库交互的接口
using Simple_Asp.Net_Core.Models;
using System.Collections.Generic;

namespace Simple_Asp.Net_Core.Data
{
    public interface ICommanderRepo
    {
        IEnumerable<Command> GetAllCommands();
    }
}
现在我们还没有数据库,就先模拟数据返回!新建MockCommanderRepo.cs来实现ICommanderRepo接口
using Simple_Asp.Net_Core.Models;
using System.Collections.Generic;

namespace Simple_Asp.Net_Core.Data
{
    public class MockCommanderRepo : ICommanderRepo
    {

        public IEnumerable<Command> GetAllCommands()
        {
            var commands = new List<Command>
            {
                new Command{Id=0, HowTo="Boil an egg", Line="Boil water", Platform="Kettle & Pan"},
                new Command{Id=1, HowTo="Cut bread", Line="Get a knife", Platform="knife & chopping board"},
                new Command{Id=2, HowTo="Make cup of tea", Line="Place teabag in cup", Platform="Kettle & cup"}
            };

            return commands;
        }
    }
}
新建Dtos文件夹,新建类CommandReadDto.cs
上一步模拟实现了从数据库返回Command实体,但是在返回给前端的时候不能直接返回实体,而是需要转换成Dto。根据不同的业务场景需要建立不同的Dto
namespace Simple_Asp.Net_Core.Dtos
{
    public class CommandReadDto
    {
        public int Id { get; set; }

        public string HowTo { get; set; }

        public string Line { get; set; }
    }
}
实现ICommanderRepo的依赖注入
生命周期是依赖注入里非常重要的内容,具体可以参照官方的文档
https://docs.microsoft.com/en-us/dotnet/core/extensions/dependency-injection#service-lifetimes
这里使用的注册方式是AddScoped,让每一次请求都会创建一个实例
For web applications, a scoped lifetime indicates that services are created once per client request (connection). Register scoped services with AddScoped.
Startup.cs代码调整成如下:
using Microsoft.AspNetCore.Builder;
using Microsoft.AspNetCore.Hosting;
using Microsoft.Extensions.DependencyInjection;
using Microsoft.Extensions.Hosting;
using Newtonsoft.Json.Serialization;
using Simple_Asp.Net_Core.Data;
using Simple_Asp.Net_Core.ServiceProvider;
using System;

namespace Simple_Asp.Net_Core
{
    public class Startup
    {
        // This method gets called by the runtime. Use this method to add services to the container.
        // For more information on how to configure your application, visit https://go.microsoft.com/fwlink/?LinkID=398940
        public void ConfigureServices(IServiceCollection services)
        {
            services.AddCORS();
            services.AddMvc();
            services.AddSwagger();

            services.AddScoped<ICommanderRepo, MockCommanderRepo>();

            services.AddControllers().AddNewtonsoftJson(s =>
            {
                s.SerializerSettings.ContractResolver = new CamelCasePropertyNamesContractResolver();
            });
        }

        // This method gets called by the runtime. Use this method to configure the HTTP request pipeline.
        public void Configure(IApplicationBuilder app, IWebHostEnvironment env)
        {
            if (env.IsDevelopment())
            {
                app.UseDeveloperExceptionPage();
                app.UseSwagger();
                app.UseSwaggerUI(c =>
                {
                    c.SwaggerEndpoint("/swagger/v1/swagger.json", "ApiHelp V1");
                });
            }

            app.UseCors("CorsTest");

            app.UseRouting();
            app.UseEndpoints(endpoints => endpoints.MapDefaultControllerRoute());
        }
    }
}
在编写Restful API之前还差最后一步,AutoMapper的使用
前面已经创建了Command实体与CommandReadDto Dto,现在我们要让这Commond实体能够自动转换成CommandReadDto Dto
AutoMapper引入Nuget包

再一次配置Startup.cs
代码如下:
using Microsoft.AspNetCore.Builder;
using Microsoft.AspNetCore.Hosting;
using Microsoft.Extensions.DependencyInjection;
using Microsoft.Extensions.Hosting;
using Newtonsoft.Json.Serialization;
using Simple_Asp.Net_Core.Data;
using Simple_Asp.Net_Core.ServiceProvider;
using System;

namespace Simple_Asp.Net_Core
{
    public class Startup
    {
        // This method gets called by the runtime. Use this method to add services to the container.
        // For more information on how to configure your application, visit https://go.microsoft.com/fwlink/?LinkID=398940
        public void ConfigureServices(IServiceCollection services)
        {
            services.AddCORS();
            services.AddMvc();
            services.AddSwagger();

            services.AddAutoMapper(AppDomain.CurrentDomain.GetAssemblies());

            services.AddScoped<ICommanderRepo, MockCommanderRepo>();

            services.AddControllers().AddNewtonsoftJson(s =>
            {
                s.SerializerSettings.ContractResolver = new CamelCasePropertyNamesContractResolver();
            });
        }

        // This method gets called by the runtime. Use this method to configure the HTTP request pipeline.
        public void Configure(IApplicationBuilder app, IWebHostEnvironment env)
        {
            if (env.IsDevelopment())
            {
                app.UseDeveloperExceptionPage();
                app.UseSwagger();
                app.UseSwaggerUI(c =>
                {
                    c.SwaggerEndpoint("/swagger/v1/swagger.json", "ApiHelp V1");
                });
            }

            app.UseCors("CorsTest");

            app.UseRouting();
            app.UseEndpoints(endpoints => endpoints.MapDefaultControllerRoute());
        }
    }
}
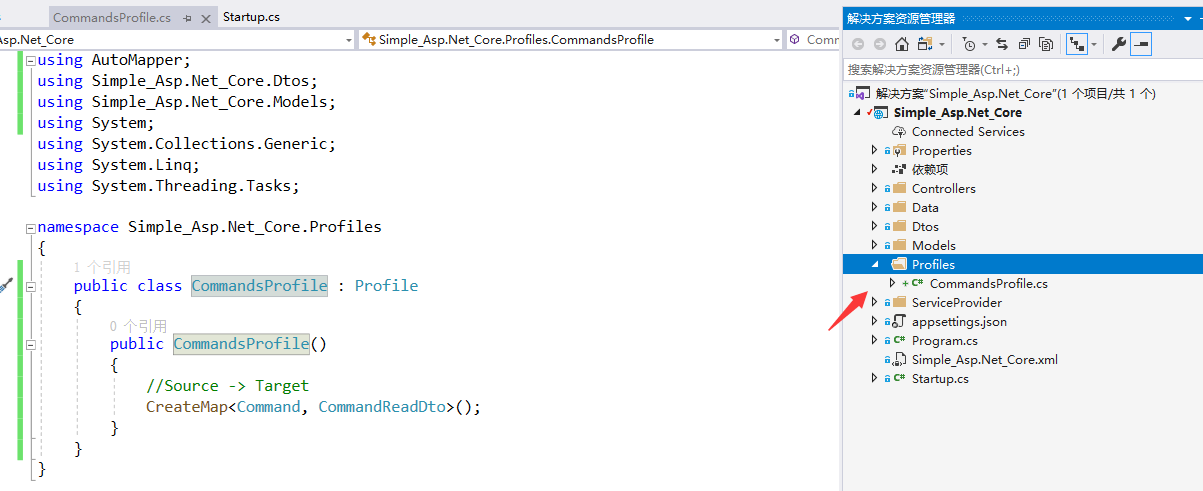
新建Profiles文件夹,新建CommandsProfile.cs AutoMpper映射配置类

代码如下:
using AutoMapper;
using Simple_Asp.Net_Core.Dtos;
using Simple_Asp.Net_Core.Models;

namespace Simple_Asp.Net_Core.Profiles
{
    public class CommandsProfile : Profile
    {
        public CommandsProfile()
        {
            //Source -> Target
            CreateMap<Command, CommandReadDto>();
        }
    }
}
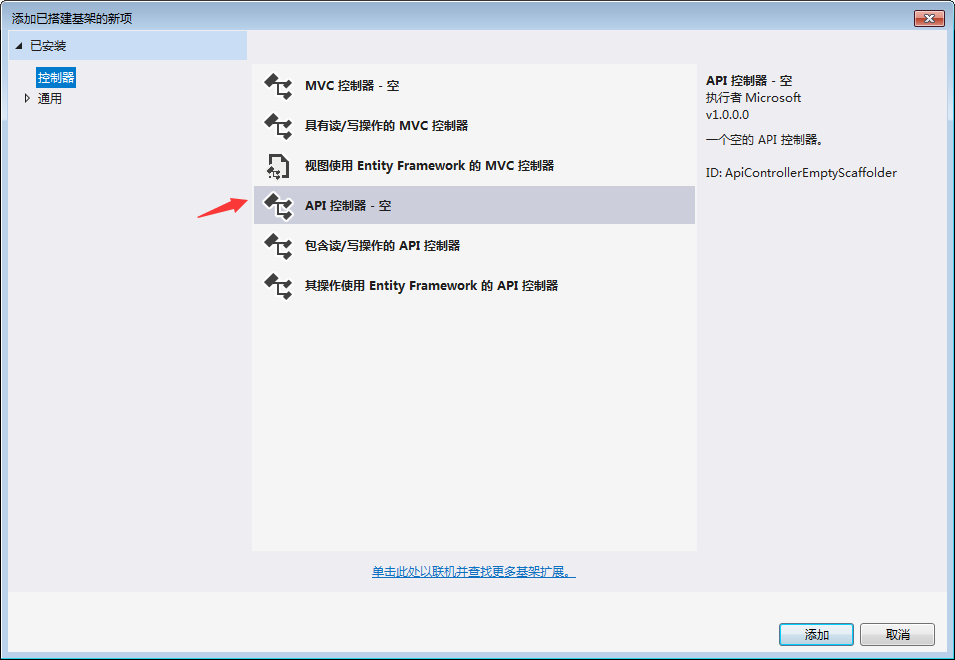
在Controllers文件夹下新建控制器CommandsController.cs

将接口注入至 CommandsController 构造函数中
这里为了演示直接将仓储层的接口注入至Controller中,实际开发中不能这样处理!
private readonly ICommanderRepo _repository;
private readonly IMapper _mapper;
public CommandsController(ICommanderRepo repository, IMapper mapper)
{
   _repository = repository;
   _mapper = mapper;
}
这时候我们就可以实现 Commands 中 api/commands 请求
//GET api/commands
[HttpGet]
public ActionResult<IEnumerable<CommandReadDto>> GetAllCommmands()
{
    var commandItems = _repository.GetAllCommands();

    return Ok(_mapper.Map<IEnumerable<CommandReadDto>>(commandItems));
}
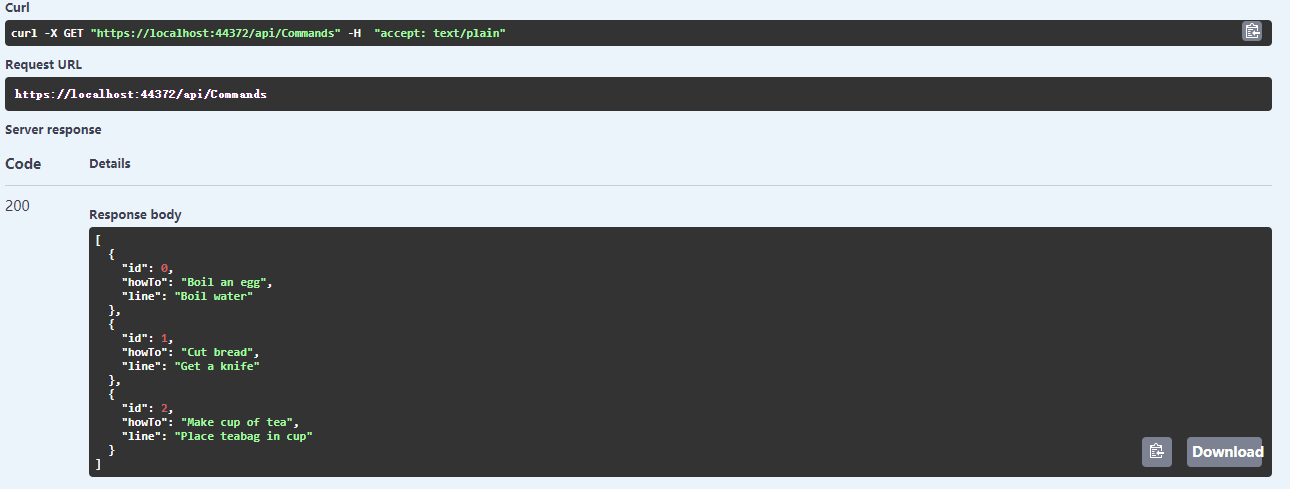
调试项目使用swagger调用api/commands接口,后端能够成功返回数据!

接下来就完成剩下的几种请求
在Dtos文件夹下新建CommandUpdateDto.cs 与 CommandCreateDto.cs
代码如下:
using System.ComponentModel.DataAnnotations;

namespace Simple_Asp.Net_Core.Dtos
{
    public class CommandCreateDto
    {
        [Required]
        [MaxLength(250)]
        public string HowTo { get; set; }

        [Required]
        public string Line { get; set; }

        [Required]
        public string Platform { get; set; }
    }
}
using System.ComponentModel.DataAnnotations;

namespace Simple_Asp.Net_Core.Dtos
{
    public class CommandUpdateDto
    {
        [Required]
        [MaxLength(250)]
        public string HowTo { get; set; }

        [Required]
        public string Line { get; set; }

        [Required]
        public string Platform { get; set; }
    }
}
修改CommandsProfile.cs
代码如下:
using AutoMapper;
using Simple_Asp.Net_Core.Dtos;
using Simple_Asp.Net_Core.Models;

namespace Simple_Asp.Net_Core.Profiles
{
    public class CommandsProfile : Profile
    {
        public CommandsProfile()
        {
            //Source -> Target
            CreateMap<Command, CommandReadDto>();
            CreateMap<CommandCreateDto, Command>();
            CreateMap<CommandUpdateDto, Command>();
            CreateMap<Command, CommandUpdateDto>();
        }
    }
}
修改ICommanderRepo.cs
代码如下:
using Simple_Asp.Net_Core.Models;
using System.Collections.Generic;

namespace Simple_Asp.Net_Core.Data
{
    public interface ICommanderRepo
    {
        bool SaveChanges();

        IEnumerable<Command> GetAllCommands();
        Command GetCommandById(int id);
        void CreateCommand(Command cmd);
        void UpdateCommand(Command cmd);
        void DeleteCommand(Command cmd);
    }
}
修改MockCommanderRepo.cs
模拟仓储层我们就不做过多的实现,在下一章内容会与数据库Postgresql进行对接,到时候再实现!
代码如下:
using Simple_Asp.Net_Core.Models;
using System.Collections.Generic;

namespace Simple_Asp.Net_Core.Data
{
    public class MockCommanderRepo : ICommanderRepo
    {
        public void CreateCommand(Command cmd)
        {
            throw new System.NotImplementedException();
        }

        public void DeleteCommand(Command cmd)
        {
            throw new System.NotImplementedException();
        }

        public IEnumerable<Command> GetAllCommands()
        {
            var commands = new List<Command>
            {
                new Command{Id=0, HowTo="Boil an egg", Line="Boil water", Platform="Kettle & Pan"},
                new Command{Id=1, HowTo="Cut bread", Line="Get a knife", Platform="knife & chopping board"},
                new Command{Id=2, HowTo="Make cup of tea", Line="Place teabag in cup", Platform="Kettle & cup"}
            };

            return commands;
        }

        public Command GetCommandById(int id)
        {
            return new Command { Id = 0, HowTo = "Boil an egg", Line = "Boil water", Platform = "Kettle & Pan" };
        }

        public bool SaveChanges()
        {
            throw new System.NotImplementedException();
        }

        public void UpdateCommand(Command cmd)
        {
            throw new System.NotImplementedException();
        }
    }
}
修改CommandsController.cs
代码如下:
using AutoMapper;
using Microsoft.AspNetCore.JsonPatch;
using Microsoft.AspNetCore.Mvc;
using Simple_Asp.Net_Core.Data;
using Simple_Asp.Net_Core.Dtos;
using Simple_Asp.Net_Core.Models;
using System.Collections.Generic;

namespace Simple_Asp.Net_Core.Controllers
{
    [Route("api/[controller]")]
    [ApiController]
    public class CommandsController : ControllerBase
    {
        private readonly ICommanderRepo _repository;
        private readonly IMapper _mapper;
        public CommandsController(ICommanderRepo repository, IMapper mapper)
        {
            _repository = repository;
            _mapper = mapper;
        }

        //GET api/commands
        [HttpGet]
        public ActionResult<IEnumerable<CommandReadDto>> GetAllCommmands()
        {
            var commandItems = _repository.GetAllCommands();

            return Ok(_mapper.Map<IEnumerable<CommandReadDto>>(commandItems));
        }

        //GET api/commands/{id}
        [HttpGet("{id}", Name = "GetCommandById")]
        public ActionResult<CommandReadDto> GetCommandById(int id)
        {
            var commandItem = _repository.GetCommandById(id);
            if (commandItem != null)
            {
                return Ok(_mapper.Map<CommandReadDto>(commandItem));
            }
            return NotFound();
        }

        //POST api/commands
        [HttpPost]
        public ActionResult<CommandReadDto> CreateCommand(CommandCreateDto commandCreateDto)
        {
            var commandModel = _mapper.Map<Command>(commandCreateDto);
            _repository.CreateCommand(commandModel);
            _repository.SaveChanges();

            var commandReadDto = _mapper.Map<CommandReadDto>(commandModel);

            return CreatedAtRoute(nameof(GetCommandById), new { Id = commandReadDto.Id }, commandReadDto);
        }

        //PUT api/commands/{id}
        [HttpPut("{id}")]
        public ActionResult UpdateCommand(int id, CommandUpdateDto commandUpdateDto)
        {
            var commandModelFromRepo = _repository.GetCommandById(id);
            if (commandModelFromRepo == null)
            {
                return NotFound();
            }
            _mapper.Map(commandUpdateDto, commandModelFromRepo);

            _repository.UpdateCommand(commandModelFromRepo);

            _repository.SaveChanges();

            return NoContent();
        }

        //PATCH api/commands/{id}
        [HttpPatch("{id}")]
        public ActionResult PartialCommandUpdate(int id, JsonPatchDocument<CommandUpdateDto> patchDoc)
        {
            var commandModelFromRepo = _repository.GetCommandById(id);
            if (commandModelFromRepo == null)
            {
                return NotFound();
            }

            var commandToPatch = _mapper.Map<CommandUpdateDto>(commandModelFromRepo);
            patchDoc.ApplyTo(commandToPatch);

            if (!TryValidateModel(commandToPatch))
            {
                return ValidationProblem(ModelState);
            }

            _mapper.Map(commandToPatch, commandModelFromRepo);

            _repository.UpdateCommand(commandModelFromRepo);

            _repository.SaveChanges();

            return NoContent();
        }

        //DELETE api/commands/{id}
        [HttpDelete("{id}")]
        public ActionResult DeleteCommand(int id)
        {
            var commandModelFromRepo = _repository.GetCommandById(id);
            if (commandModelFromRepo == null)
            {
                return NotFound();
            }
            _repository.DeleteCommand(commandModelFromRepo);
            _repository.SaveChanges();

            return NoContent();
        }
    }
}
实现HttpPatch的时候需要引入JsonPath Nuget包,可以直接如图所示直接引入,也可以使用Nuget包管理界面进行引入

调试项目,可以看到Restful API 已开发完成!

重点说明 HttpPatch 请求
PUT 和 PATCH 方法用于更新现有资源。 它们之间的区别是,PUT会替换整个资源,而PATCH 仅指定更改。
接来下我们用swagger来验证

参数如下:
[
{
    "op":"add",
    "path":"/Line",
    "value":"Barry"
}
]
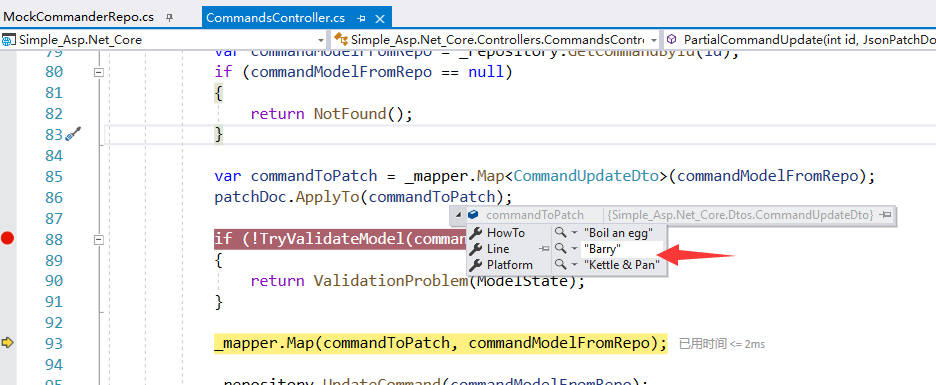
调试后端代码,可以看到值已经被我们正确修改了 !

更多Patch语法说明可以参考
https://docs.microsoft.com/zh-cn/aspnet/core/web-api/jsonpatch?view=aspnetcore-5.0
总结
本文主要对Simple项目使用了AutoMapper与依赖注入等内容实现了简单的Restful API开发。在实际开发过程中需要根据不同的业务场景需要建立不同的Dto,不要因为偷懒让相近的业务功能使用相同的Dto,这样会让后续的代码维护成本变得更大!
目前针对AutoMpper的使用并不是非常的便捷,后续可以考虑进行提升。依赖注入使用的是自带的方式实现,后续可以结合第三方组件实现依赖注入
文中提到生命周期是依赖注入里非常重要的内容,在实际开发过程中要根据具体的业务情况使用正确的生命周期!
GitHub源码
注意:源码调试过程中如果出现xml文件路径错误,需要参照第一章(后端项目搭建与Swagger配置步骤)Swagger配置“配置XML 文档文件”步骤,取消勾选然后再选中 ,将XML路径设置成与你的电脑路径匹配!
参考资料
官网文档-依赖注入生命周期(推荐学习) https://docs.microsoft.com/en-us/dotnet/core/extensions/dependency-injection#service-lifetimes
Restful API 案例来源 https://www.youtube.com/watch?v=fmvcAzHpsk8
微软官方文档 https://docs.microsoft.com/zh-cn/aspnet/core/?view=aspnetcore-5.0
DTO理解 https://docs.microsoft.com/en-us/previous-versions/msp-n-p/ff649585(v=pandp.10)?redirectedfrom=MSDN
官网文档-Patch请求详解 https://docs.microsoft.com/zh-cn/aspnet/core/web-api/jsonpatch?view=aspnetcore-5.0
作者:Iannnnnnnnnnnnn
出处:https://www.cnblogs.com/Iannnnnnnnnnnnn
本文版权归作者和博客园共有,欢迎转载,但未经作者同意必须保留此段声明,且在文章页面明显位置给出原文连接,否则保留追究法律责任的权利。


