sionna-初步认识
学习sionna
此示例将指导了解Sionna的基本原理和主要功能,通过很少的代码可以通过兼容5G的组件来模拟物理层链路级别的性能,包括可视化的结果。
加载需要的包
必须安装sionna python包
import numpy as np
import tensorflow as tf
#导入 sionna
try:
    import sionna
except ImportError as e:
    #如果包还没有被安装再进行安装
    import os
    import sionna
#用IPython中的“magic function”进行在线绘图
%matplotlib inline
import matplotlib.pyplot as plt
提示:可以通过操作符在 Jupyter 中运行 bash 命令
!nvidia-smi
Mon Mar 20 17:06:17 2023
+-----------------------------------------------------------------------------+
| NVIDIA-SMI 525.78.01    Driver Version: 525.78.01    CUDA Version: 12.0     |
|-------------------------------+----------------------+----------------------+
| GPU  Name        Persistence-M| Bus-Id        Disp.A | Volatile Uncorr. ECC |
| Fan  Temp  Perf  Pwr:Usage/Cap|         Memory-Usage | GPU-Util  Compute M. |
|                               |                      |               MIG M. |
|===============================+======================+======================|
|   0  NVIDIA GeForce ...  Off  | 00000000:01:00.0  On |                  N/A |
| 40%   32C    P8    16W / 120W |    511MiB /  6144MiB |     10%      Default |
|                               |                      |                  N/A |
+-------------------------------+----------------------+----------------------+

+-----------------------------------------------------------------------------+
| Processes:                                                                  |
|  GPU   GI   CI        PID   Type   Process name                  GPU Memory |
|        ID   ID                                                   Usage      |
|=============================================================================|
|    0   N/A  N/A      1100      G   /usr/lib/xorg/Xorg                157MiB |
|    0   N/A  N/A      1370      G   /usr/bin/gnome-shell               81MiB |
|    0   N/A  N/A      1918      G   /usr/lib/firefox/firefox          270MiB |
+-----------------------------------------------------------------------------+
如果有多个GPU,需要限制notebook使用单GPU。另外,当初始化和设置memory_growth为激活时,避免notebook实例化整个GPU内存。 sionna也可以在cpu上运行,但将会需要更长的时间。
# Configure the notebook to use only a single GPU and allocate only as much memory as needed
# For more details, see https://www.tensorflow.org/guide/gpu
gpus = tf.config.list_physical_devices('GPU')
print('Number of GPUs available :', len(gpus))
if gpus:
    gpu_num = 0 # Index of the GPU to be used
    try:
        #tf.config.set_visible_devices([], 'GPU')
        tf.config.set_visible_devices(gpus[gpu_num], 'GPU')
        print('Only GPU number', gpu_num, 'used.')
        tf.config.experimental.set_memory_growth(gpus[gpu_num], True)
    except RuntimeError as e:
        print(e)
Number of GPUs available : 1
Only GPU number 0 used.
sionna数据流和设计范式
sionna本质上通过并行批处理进行模拟,在批处理维度中每个元素都是独立模拟的。
这意味着第一个张量维度总是用于帧间并行化,类似于matlab/numpy模拟中的外部for循环。
为了保持高效的数据流,sionna遵循一些简单的设计原则:
- 信号处理组件作为单独的keras层实现;
- tf.float32分别被用作首选的数据类型和tf.complex64复数数值类型;允许更简单的使用组件(如相同的干扰层可用作二进制输入和LLR值);
- 可以在eager模式下通过简单快速修改系统参数来开发模型
- 可以在更快的图形模式下执行数字运算模拟,甚至大多数组件都可以使用XLA加速
- 只要有可能,组件就会通过自动梯度自动微分,来简化深度学习的设计流程;
- 代码被构造成不同任务的子包,例如通道编码、映射等
划分单独的块简化了部署,所有的层和功能都带有单元测试来保证正确的执行。
这些范例简化了组件在广泛的通信相关的应用程序中的可靠性和可用性。
开始-第一层(Eager模式)
提示:使用API文档可以查找现有组件的概述(https://nvlabs-github-io.translate.goog/sionna/api/sionna.html?_x_tr_sl=auto&_x_tr_tl=zh-CN&_x_tr_hl=zh-CN)。
现在通过AWGN信道传输一些符号。首先,需要初始化相应的层。
channel = sionna.channel.AWGN() #初始化AWGN信道层
在第一个示例中,给一些定值x添加高斯噪声;
请记住-第一个维度是batch-dimension;
模拟2个消息帧,每个帧包含4个符号;
备注:AWGN通道被定义为复值。
# 定义一个张量(复值)去传输
x = tf.constant([[0., 1.5, 1., 0.],[-1., 0., -2, 3]], dtype = tf.complex64)

#可以查看数值
print("Shape of x: ", x.shape)
print("Values of x: ", x)
Shape of x:  (2, 4)
Values of x:  tf.Tensor(
[[ 0. +0.j  1.5+0.j  1. +0.j  0. +0.j]
 [-1. +0.j  0. +0.j -2. +0.j  3. +0.j]], shape=(2, 4), dtype=complex64)
所仿真信道的SNR为5dB,可以简单的调用先前定义的channel层;
如果之前没有用过Kears,可以认为该层为一个函数:可以输入和返回处理后的输出;
备注:每次执行该调用时都会产生一个新噪声。
ebno_db = 5

#根据给定的EbNo中计算噪声方差
no = sionna.utils.ebnodb2no(ebno_db = ebno_db,
                           num_bits_per_symbol=2,  #QPSK
                           coderate=1)
y = channel([x, no])

print("Nosiy symbols are: ", y)
Nosiy symbols are:  tf.Tensor(
[[-0.2494878 +0.27850857j  1.3023019 +0.22901851j  0.8967059 +0.18036386j
  -0.20032923+0.00795806j]
 [-1.1511786 -0.03588736j -0.23323424+0.4133369j  -2.1000252 -0.29301503j
   2.9481902 +0.12242064j]], shape=(2, 4), dtype=complex64)
batches 和多维张量
sionna原生支持多维张量;
大多数层在最后一个张量上运行,可以具有任意输入的形状(保留输出);
假设对长度为500的64个码字添加CRC-24校验(如每个子载波使用不同的CRC),此外,希望对一批100个样本进行并行模拟;
batch_size = 100  #并行输出层
num_codewords = 64   #每个样本批次的码字
info_bit_length = 500  #每个码字的bits位

source = sionna.utils.BinarySource()  #产生随机bits

u = source([batch_size, num_codewords, info_bit_length])    #调用资源层
print("shape of u: ", u.shape)

#使用符合标准的CRC24A多项式编码器
encoder_crc = sionna.fec.crc.CRCEncoder("CRC24A")
decoder_crc = sionna.fec.crc.CRCDecoder(encoder_crc)  #连接编码器

#将CRC添加到信息bit u
c = encoder_crc(u)  #返回一个表[c.crc_calid]
print("shape of c: ", c.shape)
print("Processed bits: ", np.size(c.numpy()))

#验证结果
#返回一个列表-[没有CRC bit的信息位, CRC成立的指示器]
u_hat, crc_valid = decoder_crc(c)
print("shape of u_hat: ", u_hat.shape)
print("Shape of crc_valid: ", crc_valid.shape)

print("Valid CRC check of first codeword: ", crc_valid.numpy()[0,0,0])
shape of u:  (100, 64, 500)
shape of c:  (100, 64, 524)
Processed bits:  3353600
shape of u_hat:  (100, 64, 500)
Shape of crc_valid:  (100, 64, 1)
Valid CRC check of first codeword:  True
针对5个独立的用户再做一次仿真
可以简单的添加另一个维度,而不是定义5个不同的张量。
num_users = 5
u = source([batch_size, num_users, num_codewords, info_bit_length])
print("shape of u: ", u.shape)

# 可以用之前相同的编码器
c = encoder_crc(u)
print("shape of c: ", c.shape)
print("Processed bits: ", np.size(c.numpy()))
shape of u:  (100, 5, 64, 500)
shape of c:  (100, 5, 64, 524)
Processed bits:  16768000
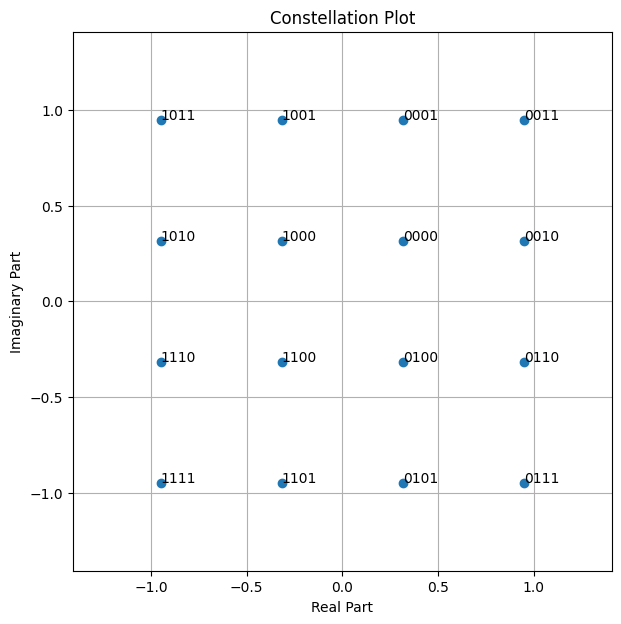
通常好的可视化结果可以帮助获取新的研究思路,因此sionna内置有绘图功能。
以下为16-QAM星座。
constellation = sionna.mapping.Constellation("qam", num_bits_per_symbol=4)
constellation.show();

第一次链路层仿真
已经可以通过一些简单的命令构建强大的代码。
如前所述,sionna旨在将系统的复杂性隐藏在Keras层中,但依然会提供尽可能多的灵活性。因此大多数的层都有参数初始化的选择,但默认的选择通常是比较好的开始。
提示:API 文档提供了许多有用的参考资料和实施细节。
# 系统参数
n_ldpc = 500  #LDPC 码字长度
k_ldpc = 250  #每个LDPC码字的信息位数
coderate = k_ldpc / n_ldpc
num_bits_per_symbol = 4   #映射到每个字符的位数
通常会实现几种不同的算法,如解映射器支持“ture app”解映射,但也支持“最大对数”解映射。
LDPC BP解码器的校验节点更新功能通常支持数种算法。
demapping_method = "app" # try "max-log"
ldpc_cn_type = "boxplus" # try also "minsum"
初始化给定系统参数的所有必须的组件。
binary_source = sionna.utils.BinarySource()
encoder = sionna.fec.ldpc.encoding.LDPC5GEncoder(k_ldpc, n_ldpc)
constellation = sionna.mapping.Constellation("qam", num_bits_per_symbol)
mapper = sionna.mapping.Mapper(constellation=constellation)
channel = sionna.channel.AWGN()
demapper = sionna.mapping.Demapper(demapping_method,
                                   constellation=constellation)
decoder = sionna.fec.ldpc.decoding.LDPC5GDecoder(encoder,
                                                 hard_out=True, cn_type=ldpc_cn_type,
                                                 num_iter=20)
可以在eager模式下运行,这允许在任意时间修改结构,即可以尝试不同的batch_ch或者不同的SNR ebno_db
# 仿真参数
batch_size = 1000
ebno_db = 4

#生成一个随机位向量的批次
b = binary_source([batch_size, k_ldpc])

#使用5G LDPC 码对位进行编码
print("Shape before encoding: ", b.shape)
c = encoder(b)
print("Shape after encoding: ", c.shape)

#将位映射到星座符号
x = mapper(c)
print("Shape after mapping: ", c.shape)

#通过AWGN信道传输,其中SNR为ebno_db
no = sionna.utils.ebnodb2no(ebno_db, num_bits_per_symbol, coderate)
y = channel([x,no])
print("Shape after demapping: ", y.shape)

#解映射到LLRs
llr = demapper([y, no])
print("Shape after demapping: ", llr.shape)

#使用20 BP迭代的LDPC解码
b_hat = decoder(llr)
print("Shape after decoding: ", b_hat.shape)

#计算 BERs
c_hat = tf.cast(tf.less(0.0, llr), tf.float32)  #hard-decided bits before dec.
ber_uncoded = sionna.utils.metrics.compute_ber(c, c_hat)

ber_coded = sionna.utils.metrics.compute_ber(b, b_hat)

print("BER uncoded = {:.3f} at EbNo = {:.1f} dB".format(ber_uncoded, ebno_db))
print("BER after decoding = {:.3f} at EbNo = {:.1f} dB".format(ber_coded, ebno_db))
print("In total {} bits were simulated".format(np.size(b.numpy())))
Shape before encoding:  (1000, 250)
Shape after encoding:  (1000, 500)
Shape after mapping:  (1000, 500)
Shape after demapping:  (1000, 125)
Shape after demapping:  (1000, 500)
Shape after decoding:  (1000, 250)
BER uncoded = 0.119 at EbNo = 4.0 dB
BER after decoding = 0.011 at EbNo = 4.0 dB
In total 250000 bits were simulated
总结:模拟了250000比特的传输,包括高阶调制和信道编码
但可以通过TF图形执行的更快!
设置端到端的模型
现在定义一个更加便利和蒙特卡洛模拟的Keras模型。
模拟一个时变多径的信道传输(来自3GPP TR38.901的TDA-A模型),为此,使用了OFDM和更高阶调制的传统交错比特编码调制(BICM)方案。信息位由符合5G标准的LDPC码保护。
提示:由于参数较多,将其定义为字典。
class e2e_model(tf.keras.Model): # 继承自keras.model
    """Example model for end-to-end link-level simulations.

    Parameters
    ----------
    params: dict
        A dictionary defining the system parameters.

    Input
    -----
    batch_size: int or tf.int
        The batch_sizeused for the simulation.

    ebno_db: float or tf.float
        A float defining the simulation SNR.

    Output
    ------
    (b, b_hat):
        Tuple:

    b: tf.float32
        A tensor of shape `[batch_size, k]` containing the transmitted
        information bits.

    b_hat: tf.float32
        A tensor of shape `[batch_size, k]` containing the receiver's
        estimate of the transmitted information bits.
    """
    def __init__(self,
                params):
        super().__init__()


        # 定义OFDM资源网格对象
        self.rg = sionna.ofdm.ResourceGrid(
                            num_ofdm_symbols=params["num_ofdm_symbols"],
                            fft_size=params["fft_size"],
                            subcarrier_spacing=params["subcarrier_spacing"],
                            num_tx=1,
                            num_streams_per_tx=1,
                            cyclic_prefix_length=params["cyclic_prefix_length"],
                            pilot_pattern="kronecker",
                            pilot_ofdm_symbol_indices=params["pilot_ofdm_symbol_indices"])

        # 创建流管理对象
        self.sm = sionna.mimo.StreamManagement(rx_tx_association=np.array([[1]]),
                                               num_streams_per_tx=1)

        self.coderate = params["coderate"]
        self.num_bits_per_symbol = params["num_bits_per_symbol"]
        self.n = int(self.rg.num_data_symbols*self.num_bits_per_symbol)
        self.k = int(self.n*coderate)

        # 初始化层
        self.binary_source = sionna.utils.BinarySource()
        self.encoder = sionna.fec.ldpc.encoding.LDPC5GEncoder(self.k, self.n)
        self.interleaver = sionna.fec.interleaving.RowColumnInterleaver(
                                        row_depth=self.num_bits_per_symbol)
        self.deinterleaver = sionna.fec.interleaving.Deinterleaver(self.interleaver)
        self.mapper = sionna.mapping.Mapper("qam", self.num_bits_per_symbol)
        self.rg_mapper = sionna.ofdm.ResourceGridMapper(self.rg)
        self.tdl = sionna.channel.tr38901.TDL(model="A",
                           delay_spread=params["delay_spread"],
                           carrier_frequency=params["carrier_frequency"],
                           min_speed=params["min_speed"],
                           max_speed=params["max_speed"])

        self.channel = sionna.channel.OFDMChannel(self.tdl, self.rg, add_awgn=True, normalize_channel=True)
        self.ls_est = sionna.ofdm.LSChannelEstimator(self.rg, interpolation_type="nn")
        self.lmmse_equ = sionna.ofdm.LMMSEEqualizer(self.rg, self.sm)
        self.demapper = sionna.mapping.Demapper(params["demapping_method"],
                                                "qam", self.num_bits_per_symbol)
        self.decoder = sionna.fec.ldpc.decoding.LDPC5GDecoder(self.encoder,
                                                    hard_out=True,
                                                    cn_type=params["cn_type"],
                                                    num_iter=params["bp_iter"])

        print("Number of pilots: {}".format(self.rg.num_pilot_symbols))
        print("Number of data symbols: {}".format(self.rg.num_data_symbols))
        print("Number of resource elements: {}".format(
                                    self.rg.num_resource_elements))

        print("Pilot overhead: {:.2f}%".format(
                                    self.rg.num_pilot_symbols /
                                    self.rg.num_resource_elements*100))

        print("Cyclic prefix overhead: {:.2f}%".format(
                                    params["cyclic_prefix_length"] /
                                    (params["cyclic_prefix_length"]
                                    +params["fft_size"])*100))

        print("Each frame contains {} information bits".format(self.k))

    def call(self, batch_size, ebno_db):

        # 生成一个随机位向量批次
        # 需要两个虚拟维度分别表示发射器的数量和每个发射机的流。
        b = self.binary_source([batch_size, 1, 1, self.k])

        # 使用全零虚拟编码器对位进行编码
        c = self.encoder(b)

        # 映射之前交错比特(BICM)
        c_int = self.interleaver(c)

        # 映射比特到星座符号
        s = self.mapper(c_int)

        # 映射符号到OFDM资源网格
        x_rg = self.rg_mapper(s)

        # 通过噪声多径信道传输
        no = sionna.utils.ebnodb2no(ebno_db, self.num_bits_per_symbol, self.coderate, self.rg)
        y = self.channel([x_rg, no])

        # 最近导频插值的LS信道估计
        h_hat, err_var = self.ls_est ([y, no])

        # LMMSE 均衡
        x_hat, no_eff = self.lmmse_equ([y, h_hat, err_var, no])

        # 解映射到LLRs
        llr = self.demapper([x_hat, no_eff])

        # 解码之前进行解交织
        llr_int = self.deinterleaver(llr)

        # 解码
        b_hat = self.decoder(llr_int)

        # 仿真比特的数量
        nb_bits = batch_size*self.k

        # 解码后传输的比特数和接受机的估计
        return b, b_hat
将模拟的系统参数定义为字典
sys_params = {
    # Channel
    "carrier_frequency" : 3.5e9,
    "delay_spread" : 100e-9,
    "min_speed" : 3,
    "max_speed" : 3,
    "tdl_model" : "A",

    # OFDM
    "fft_size" : 256,
    "subcarrier_spacing" : 30e3,
    "num_ofdm_symbols" : 14,
    "cyclic_prefix_length" : 16,
    "pilot_ofdm_symbol_indices" : [2, 11],

    # Code & Modulation
    "coderate" : 0.5,
    "num_bits_per_symbol" : 4,
    "demapping_method" : "app",
    "cn_type" : "boxplus",
    "bp_iter" : 20
}
并初始化模型
model = e2e_model(sys_params)
Number of pilots: 512
Number of data symbols: 3072
Number of resource elements: 3584
Pilot overhead: 14.29%
Cyclic prefix overhead: 5.88%
Each frame contains 6144 information bits
和之前一样,可以很容易调用这个模型来模拟给定仿真参数的BER
#仿真参数
ebno_db = 10
batch_size = 200

# 调用模型
b, b_hat = model(batch_size, ebno_db)

ber = sionna.utils.metrics.compute_ber(b, b_hat)
nb_bits = np.size(b.numpy())

print("BER: {:.4} at Eb/No of {} dB and {} simulated bits".format(ber.numpy(), ebno_db, nb_bits))
2023-03-23 16:01:29.012595: I tensorflow/core/util/cuda_solvers.cc:179] Creating GpuSolver handles for stream 0x78c61b0


BER: 0.003465 at Eb/No of 10 dB and 1228800 simulated bits
运行一些吞吐量测试
sionna不仅仅有易于使用的库,而且速度也快,可以通过上面定义的模型测试吞吐量
比较了eager和图形执行模式,以及带有XLA的eager,(详见https://www.tensorflow.org/xla#enable_xla_for_tensorflow_models) 请注意,需要激活sionna.congig.xla_compat功能才能使XLA工作
提示:更改batch_size查看批处理并行性如何提高吞吐量,根据个人的机器不同,batch_size 可能不大。
import time # 这部分需要timeit库

batch_size = 500
ebno_db = 5 # 评估 SNR point
repetitions = 4 # 吞吐量是多次运行的平均值

def get_throughput(batch_size, ebno_db, model, repetitions=1):
    """ Simulate throughput in bit/s per ebno_db point.

    The results are average over `repetition` trials.

    Input
    -----
    batch_size: int or tf.int32
        Batch-size for evaluation.

    ebno_db: float or tf.float32
        A tensor containing the SNR points be evaluated

    model:
        Function or model that yields the transmitted bits `u` and the
        receiver's estimate `u_hat` for a given ``batch_size`` and
        ``ebno_db``.

    repetitions: int
        An integer defining how many trails of the throughput
        simulation are averaged.

    """


    # 调用一次模型确保能够正常编译
    # 否则也会测量图形构建的时间.
    u, u_hat = model(tf.constant(batch_size, tf.int32),
                     tf.constant(ebno_db, tf.float32))

    t_start = time.perf_counter()
    # 多次运行平均值
    for _ in range(repetitions):
        u, u_hat = model(tf.constant(batch_size, tf.int32),
                            tf.constant(ebno_db, tf. float32))
    t_stop = time.perf_counter()

    # 吞吐量 in bit/s
    throughput = np.size(u.numpy())*repetitions / (t_stop - t_start)

    return throughput

# eager mode - 仅仅调用模型
def run_eager(batch_size, ebno_db):
    return model(batch_size, ebno_db)

time_eager = get_throughput(batch_size, ebno_db, run_eager, repetitions=4)

# the decorator "@tf.function" enables the graph mode
@tf.function
def run_graph(batch_size, ebno_db):
    return model(batch_size, ebno_db)

time_graph = get_throughput(batch_size, ebno_db, run_graph, repetitions=4)

# the decorator "@tf.function(jit_compile=True)" enables the graph mode with XLA
# 需要激活sionna.config.xla_compat功能
sionna.config.xla_compat=True
@tf.function(jit_compile=True)
def run_graph_xla(batch_size, ebno_db):
    return model(batch_size, ebno_db)

time_graph_xla = get_throughput(batch_size, ebno_db, run_graph_xla, repetitions=4)
# 停用sionna.config.xla_compat以便该单元可以多次运行
sionna.config.xla_compat=False

print(f"Throughput in eager execution: {time_eager/1e6:.2f} Mb/s")
print(f"Throughput in graph execution: {time_graph/1e6:.2f} Mb/s")
print(f"Throughput in graph execution with XLA: {time_graph_xla/1e6:.2f} Mb/s")
Throughput in eager execution: 1.69 Mb/s
Throughput in graph execution: 3.19 Mb/s
Throughput in graph execution with XLA: 17.04 Mb/s
显然,图形执行(XLA)的吞吐量最高,所以对于消耗性的训练和蒙特卡洛模拟该模式是首选
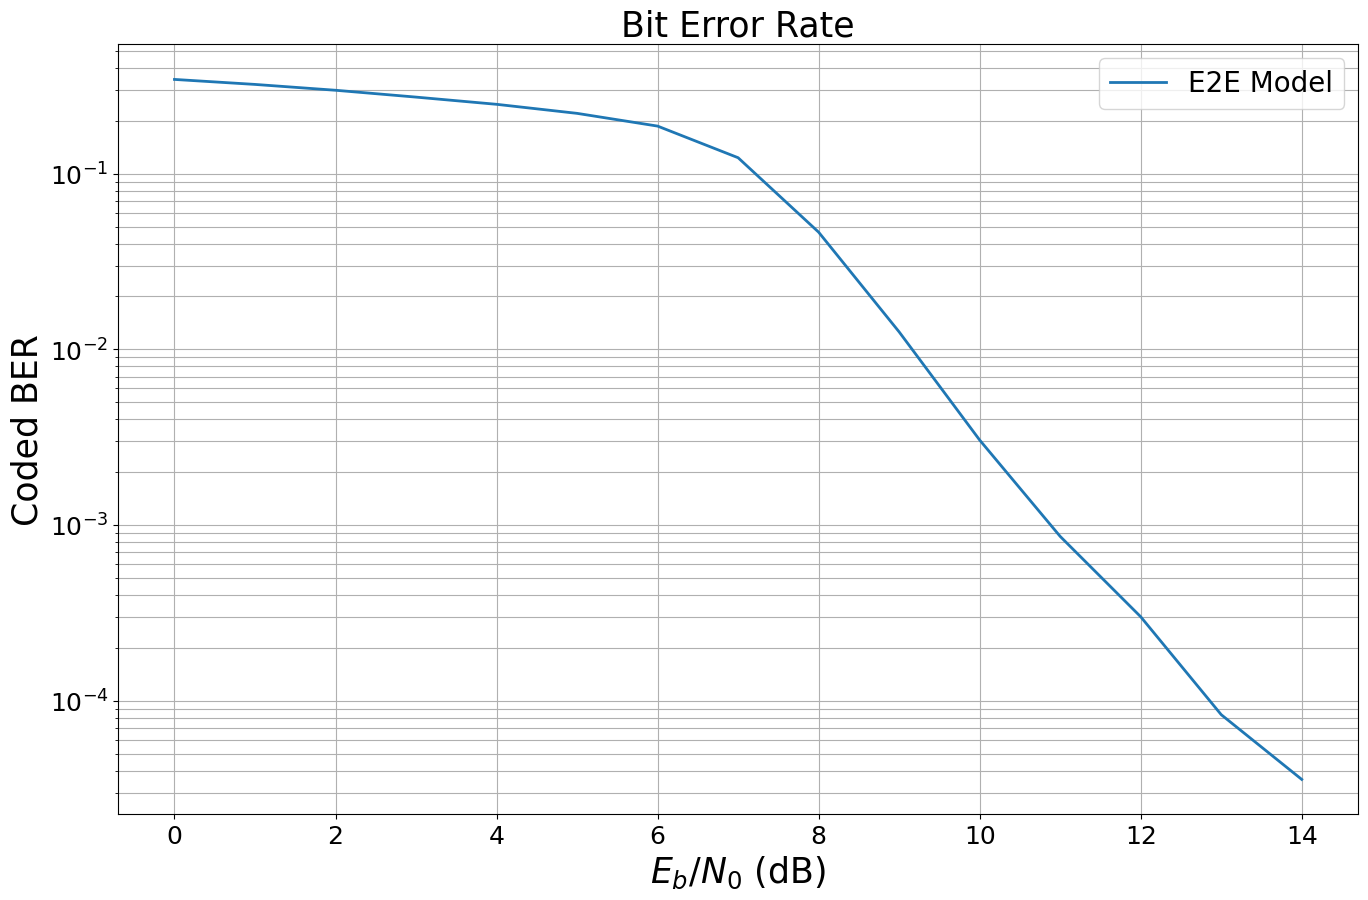
误码率(BER)蒙特卡洛模拟
蒙特卡洛模拟在当今的通信研究和发展中无处不在,由于其高效的实现,sionna可以直接用于仿真误码率,其性能可以与编译语言相媲美,但是还拥有脚本语言的灵活性。
ebno_dbs = np.arange(0, 15, 1.)
batch_size = 200 # 如果有内存不足错误,请减少该数值

max_mc_iter = 1000 # 转到下一个SNR point之前最大化蒙特卡洛迭代次数
num_target_block_errors = 500 # 在目标数错误之后继续下一个SNR point

# 使用来自sionna内置的ber模拟器功能,该功能使用并在达到num_target_errors之后提前停止
sionna.config.xla_compat=True
ber_mc,_ = sionna.utils.sim_ber(run_graph_xla, # 也可以直接评估模型
                                ebno_dbs,
                                batch_size=batch_size,
                                num_target_block_errors=num_target_block_errors,
                                max_mc_iter=max_mc_iter,
                                verbose=True) # 输出状态和摘要
sionna.config.xla_compat=False
EbNo [dB] |        BER |       BLER |  bit errors |    num bits | block errors |  num blocks | runtime [s] |    status
---------------------------------------------------------------------------------------------------------------------------------------
      0.0 | 3.4404e-01 | 1.0000e+00 |     1268252 |     3686400 |          600 |         600 |         1.9 |reached target block errors
      1.0 | 3.2221e-01 | 1.0000e+00 |     1187794 |     3686400 |          600 |         600 |         0.2 |reached target block errors
      2.0 | 2.9849e-01 | 1.0000e+00 |     1100353 |     3686400 |          600 |         600 |         0.3 |reached target block errors
      3.0 | 2.7285e-01 | 1.0000e+00 |     1005826 |     3686400 |          600 |         600 |         0.2 |reached target block errors
      4.0 | 2.4827e-01 | 1.0000e+00 |      915228 |     3686400 |          600 |         600 |         0.2 |reached target block errors
      5.0 | 2.2051e-01 | 1.0000e+00 |      812880 |     3686400 |          600 |         600 |         0.2 |reached target block errors
      6.0 | 1.8660e-01 | 1.0000e+00 |      687886 |     3686400 |          600 |         600 |         0.2 |reached target block errors
      7.0 | 1.2328e-01 | 9.9000e-01 |      454449 |     3686400 |          594 |         600 |         0.2 |reached target block errors
      8.0 | 4.6463e-02 | 4.9583e-01 |      342564 |     7372800 |          595 |        1200 |         0.5 |reached target block errors
      9.0 | 1.2570e-02 | 1.3917e-01 |      278021 |    22118400 |          501 |        3600 |         1.5 |reached target block errors
     10.0 | 3.0459e-03 | 3.2308e-02 |      291935 |    95846400 |          504 |       15600 |         6.5 |reached target block errors
     11.0 | 8.6133e-04 | 9.5802e-03 |      277300 |   321945600 |          502 |       52400 |        21.2 |reached target block errors
     12.0 | 3.0045e-04 | 3.0979e-03 |      297934 |   991641600 |          500 |      161400 |        64.5 |reached target block errors
     13.0 | 8.3250e-05 | 9.0000e-04 |      102297 |  1228800000 |          180 |      200000 |        79.0 |reached max iter
     14.0 | 3.5631e-05 | 3.3500e-04 |       43783 |  1228800000 |           67 |      200000 |        78.7 |reached max iter
可以看可视化结果
sionna.utils.plotting.plot_ber(ebno_dbs,
                               ber_mc,
                               legend="E2E Model",
                               ylabel="Coded BER");

总结
还有更多sionna功能等待发掘:
- 可以进行Tensor调试
- 可以很简单的扩展到多个GPU
- 关于更高级的示例,请查看教程
该项目是开源的,可以随时修改添加扩展组件!
总结
还有更多sionna功能等待发掘:
- 可以进行Tensor调试
- 可以很简单的扩展到多个GPU
- 关于更高级的示例,请查看教程
该项目是开源的,可以随时修改添加扩展组件!


