silverlight 图像降噪的研究
手机照相机上自动降噪挺好玩的,于是研究了一下,但具体的算法都没找到。于是自己想了一下,使用平均对比度方法,降低像素颜色的差别。
原理如下:
- 在相片一定范围内计算平均值(修正半径)
- 得出平均值后,对没个像素进行修正(修正强度:0.0到1.0)
假设下图是图像颜色曲线:
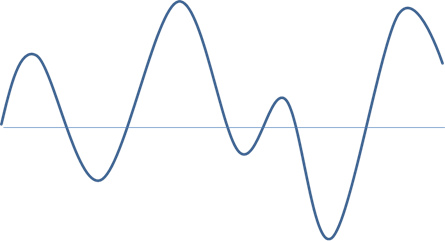
通过修正强度值为0.5修正后曲线如下:

这时,图像像素点间对比对会减小,从而实现降噪的效果。
当然,这种方法缺点也比较明显,修正后,相片模糊失真。
主要代码如下:
/// <summary>
/// 图像降噪
/// </summary>
/// <param name="srcBmp">原图像</param>
/// <param name="radius">半径</param>
/// <param name="strength">强度</param>
/// <returns></returns>
public WriteableBitmap ClsNoise(WriteableBitmap srcBmp, int radius, double strength)
{
WriteableBitmap newBitmap = new WriteableBitmap(srcBmp.PixelWidth, srcBmp.PixelHeight);
Color pixelPercent, pixelSrc;
byte r, g, b;
for (int yRow = 0; yRow < srcBmp.PixelHeight; yRow++)
{
for (int xCol = 0; xCol < srcBmp.PixelWidth; xCol++)
{
pixelSrc = srcBmp.GetPixel(xCol, yRow);
pixelPercent = this.GetPercentileColor(srcBmp, yRow, xCol, radius);
if (pixelSrc == pixelPercent)
{
newBitmap.SetPixel(xCol, yRow, pixelSrc);
}
else
{
r = (byte)(pixelSrc.R + (pixelPercent.R - pixelSrc.R) * strength);
g = (byte)(pixelSrc.G + (pixelPercent.G - pixelSrc.G) * strength);
b = (byte)(pixelSrc.B + (pixelPercent.B - pixelSrc.B) * strength);
newBitmap.SetPixel(xCol, yRow, Color.FromArgb(255, r, g, b));
}
}
}
return newBitmap;
}
/// <summary>
/// 获取平均值
/// </summary>
/// <param name="srcBmp"></param>
/// <param name="yRow"></param>
/// <param name="xCol"></param>
/// <param name="radius"></param>
/// <returns></returns>
private Color GetPercentileColor(WriteableBitmap srcBmp, int yRow, int xCol, int radius)
{
int r = 0, g = 0, b = 0, start_yRow, end_yRow, start_xCol, end_xCol, c = 0;
start_yRow = yRow - radius;
if (start_yRow < 0)
{
start_yRow = 0;
}
end_yRow = yRow + radius;
if (end_yRow > srcBmp.PixelHeight - 1)
{
end_yRow = srcBmp.PixelHeight - 1;
}
start_xCol = xCol - radius;
if (start_xCol < 0)
{
start_xCol = 0;
}
end_xCol = xCol + radius;
if (end_xCol > srcBmp.PixelWidth - 1)
{
end_xCol = srcBmp.PixelWidth - 1;
}
for (int y = start_yRow; y <= end_yRow; y++)
{
for (int x = start_xCol; x <= end_xCol; x++)
{
Color color = srcBmp.GetPixel(x, y);
r += color.R;
b += color.B;
g += color.G;
c++;
}
}
if (c == 0)
{
return srcBmp.GetPixel(xCol, yRow);
}
else
{
return Color.FromArgb(255, (byte)(r / c), (byte)(g / c), (byte)(b / c));
}
}
如果你用过WriteableBitmap 类,就会发现没有 GetPixel 和 SetPixel 方法的,我是通过扩展方法提供的,如:
public static class WriteableBitmapExtension
{
public static Color GetPixel(this WriteableBitmap bitmap, int xCol, int yRow)
{
byte[] bytes = BitConverter.GetBytes(bitmap.Pixels[bitmap.PixelWidth * yRow + xCol]);
return Color.FromArgb(bytes[3], bytes[2], bytes[1], bytes[0]);
}
public static void SetPixel(this WriteableBitmap bitmap, int xCol, int yRow, Color color)
{
byte[] bytes = new byte[] { color.B, color.G, color.R, color.A };
bitmap.Pixels[bitmap.PixelWidth * yRow + xCol] = BitConverter.ToInt32(bytes, 0);
}
}
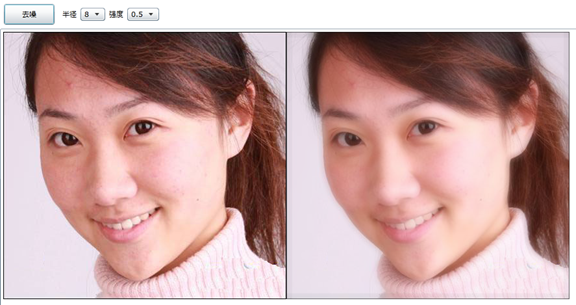
最终效果如下: