
最新亲测可用Tendis 安装 三主三从 主从复制 集群搭建教程、热搬迁迁移,主从测试,常见问题
Tendis数据库教程
Tendis是一个redis的存储版(存硬盘上),腾讯互娱团队开发。
官方性能数据:48核心2.5GHZ机器 写入set 48万次每秒
完全支持redis协议,因此可以使用Redis desktop这类的工具通过redis协议来操作,操作不了是有问题。
http://tendis.cn/#/
环境:linux
示范java操作tendis 项目代码:https://gitee.com/HumorChen/springboot_tendis_demo
配置出来的集群完整包:我博客资源文件里有
热搬迁迁移参照我的另外一篇博客:https://blog.csdn.net/HumorChen99/article/details/112916427
-
环境依赖:gcc cmake 有的就不需要这步,基本环境不写安装步骤,没有的自行百度
- g++ (required by c++17, version >= 5.5)
- cmake (version >= 3.13.0)
-
下载 Tendis
地址:https://github.com/Tencent/Tendis/releases
下载tendisplus-2.1.2-rocksdb-v5.13.4.tgz 117 MB
-
解压
tar -zxvf tendisplus-2.1.2-rocksdb-v5.13.4.tgz -
目录结构
- bin
- scripts
-
将bin目录添加到PATH
echo 'export PATH=$PATH:/usr/local/share/tendisplus-2.1.2-rocksdb-v5.13.4/bin' >> /etc/profile source /etc/profile -
启动单个数据库
#进入解压后的目录 cd tendisplus-2.1.2-rocksdb-v5.13.4 #执行启动脚本 sh ./scripts/start.sh #我们看一下这个启动脚本,把库引入到环境变量里了,创建三个目录 db dump log 使用bin下面的tendisplus根据配置文件tendisplus.conf来启动 export LD_LIBRARY_PATH=$LD_LIBRARY_PATH:../bin/deps dir=home mkdir -p ${dir}/db mkdir -p ${dir}/dump mkdir -p ${dir}/log ../bin/tendisplus ./tendisplus.conf #再看下配置文件tendisplus.conf 基本上就端口,日志级别,日志目录等等配置项,文档地址在官方的配置参数有 port 51002 loglevel notice logdir ./home/log dumpdir ./home/dump dir ./home/db pidfile ./home/tendisplus.pid slowlog ./home/log/slowlog rocks.blockcachemb 4096 executorThreadNum 48 -
启动后可看到
#查看绑定端口的进程
netstat -tunlp
#可以看到已经启动成功
tcp        0      0 127.0.0.1:51002         0.0.0.0:*               LISTEN      16004/../bin/tendis
三主三从Tendis集群搭建
我们启动6个节点,然后把6节点配置成三主三从。
-
将script目录复制1份
cp -r scripts scripts3001 -
修改配置
cd scripts3001
vi tendisplus.conf
#绑定ip
#改端口  将port 51002 改为port 3001
#加入cluster-enabled yes
#改完的如下所示
# tendisplus 配置 # tendisplus configuration for testing bind 192.168.108.148 cluster-enabled yes port 3001 loglevel notice logdir ./home/log dumpdir ./home/dump dir ./home/db pidfile ./home/tendisplus.pid slowlog ./home/log/slowlog rocks.blockcachemb 4096 executorThreadNum 48#stop.sh 内容 ip=192.168.108.148 port=3001 echo shutdown |../bin/redis-cli -h ${ip} -p ${port} -
将上述script3001目录复制五份(并且把每一份配置里的端口改好),以及停止的shell脚本也需要改
cp -r scripts3001 scripts3002 cp -r scripts3001 scripts3003 cp -r scripts3001 scripts3004 cp -r scripts3001 scripts3005 cp -r scripts3001 scripts3006 -
写个脚本一次性启动这6个节点
#进入tendis解压后的目录 cd /usr/local/share/tendisplus-2.1.2-rocksdb-v5.13.4 mkdir run cd run vi startAll.sh #输入的文本如下 #保存文件退出 #给执行权限 chmod 755 ./startAll.sh #执行启动 sh ./startAll.sh- 启动全部节点(因为使用的相对路径,终端必须在run文件夹内执行)
cd ../scripts3001 sh ./start.sh cd ../scripts3002 sh ./start.sh cd ../scripts3003 sh ./start.sh cd ../scripts3004 sh ./start.sh cd ../scripts3005 sh ./start.sh cd ../scripts3006 sh ./start.sh- 关闭全部节点(与上同理)
cd ../scripts3001 sh ./stop.sh cd ../scripts3002 sh ./stop.sh cd ../scripts3003 sh ./stop.sh cd ../scripts3004 sh ./stop.sh cd ../scripts3005 sh ./stop.sh cd ../scripts3006 sh ./stop.sh- 使用netstat -tunlp查看下是不是启动成功了,可以看到已经绑定了3001 到3006这6个端口
root@ubuntu:/usr/local/share/tendisplus-2.1.2-rocksdb-v5.13.4/scripts3006# netstat -tunlp 激活Internet连接 (仅服务器) Proto Recv-Q Send-Q Local Address Foreign Address State PID/Program name tcp 0 0 192.168.108.148:13004 0.0.0.0:* LISTEN 21217/../bin/tendis tcp 0 0 192.168.108.148:13005 0.0.0.0:* LISTEN 21558/../bin/tendis tcp 0 0 192.168.108.148:13006 0.0.0.0:* LISTEN 21899/../bin/tendis tcp 0 0 0.0.0.0:80 0.0.0.0:* LISTEN 1192/nginx: master tcp 0 0 127.0.0.53:53 0.0.0.0:* LISTEN 651/systemd-resolve tcp 0 0 0.0.0.0:22 0.0.0.0:* LISTEN 938/sshd tcp 0 0 127.0.0.1:631 0.0.0.0:* LISTEN 121703/cupsd tcp 0 0 192.168.108.148:3001 0.0.0.0:* LISTEN 19743/../bin/tendis tcp 0 0 192.168.108.148:3002 0.0.0.0:* LISTEN 20143/../bin/tendis tcp 0 0 192.168.108.148:51002 0.0.0.0:* LISTEN 50572/../bin/tendis tcp 0 0 127.0.0.1:6010 0.0.0.0:* LISTEN 1947/sshd: root@pts tcp 0 0 192.168.108.148:3003 0.0.0.0:* LISTEN 20496/../bin/tendis tcp 0 0 127.0.0.1:6011 0.0.0.0:* LISTEN 86304/sshd: root@pt tcp 0 0 192.168.108.148:3004 0.0.0.0:* LISTEN 21217/../bin/tendis tcp 0 0 192.168.108.148:3005 0.0.0.0:* LISTEN 21558/../bin/tendis tcp 0 0 192.168.108.148:3006 0.0.0.0:* LISTEN 21899/../bin/tendis tcp 0 0 192.168.108.148:13001 0.0.0.0:* LISTEN 19743/../bin/tendis tcp 0 0 192.168.108.148:13002 0.0.0.0:* LISTEN 20143/../bin/tendis tcp 0 0 192.168.108.148:13003 0.0.0.0:* LISTEN 20496/../bin/tendis tcp6 0 0 :::22 :::* LISTEN 938/sshd tcp6 0 0 ::1:631 :::* LISTEN 121703/cupsd tcp6 0 0 ::1:6010 :::* LISTEN 1947/sshd: root@pts tcp6 0 0 ::1:6011 :::* LISTEN 86304/sshd: root@pt udp 0 0 127.0.0.53:53 0.0.0.0:* 651/systemd-resolve udp 0 0 0.0.0.0:68 0.0.0.0:* 943/dhclient udp 0 0 0.0.0.0:631 0.0.0.0:* 121706/cups-browsed udp 0 0 0.0.0.0:5353 0.0.0.0:* 729/avahi-daemon: r udp 0 0 0.0.0.0:38491 0.0.0.0:* 729/avahi-daemon: r udp6 0 0 :::5353 :::* 729/avahi-daemon: r udp6 0 0 :::48694 :::* 729/avahi-daemon: r -
配置三主三从
#进入tendis解压后的目录 cd /usr/local/share/tendisplus-2.1.2-rocksdb-v5.13.4 #进入bin cd bin #连接3001 redis-cli -p 3001 #后续步骤如下 #联通六个节点 root@ubuntu:/usr/local/share/tendisplus-2.1.2-rocksdb-v5.13.4/scripts3006# redis-cli -h 192.168.108.148 -p 3001 192.168.108.148:3001> cluster meet 192.168.108.148 3002 OK 192.168.108.148:3001> cluster meet 192.168.108.148 3003 OK 192.168.108.148:3001> cluster meet 192.168.108.148 3004 OK 192.168.108.148:3001> cluster meet 192.168.108.148 3005 OK 192.168.108.148:3001> cluster meet 192.168.108.148 3006 OK #给master节点分配slot root@ubuntu:/usr/local/share/tendisplus-2.1.2-rocksdb-v5.13.4/scripts3006# redis-cli -h 192.168.108.148 -p 3001 cluster addslots {0..5461} OK root@ubuntu:/usr/local/share/tendisplus-2.1.2-rocksdb-v5.13.4/scripts3006# redis-cli -h 192.168.108.148 -p 3003 cluster addslots {5462..10922} OK root@ubuntu:/usr/local/share/tendisplus-2.1.2-rocksdb-v5.13.4/scripts3006# redis-cli -h 192.168.108.148 -h 192.168.108.148 -p 3005 cluster addslots {10923..16383} OK #查看所有节点信息 root@ubuntu:/usr/local/share/tendisplus-2.1.2-rocksdb-v5.13.4/scripts3006# redis-cli -h 192.168.108.148 -p 3001 192.168.108.148:3001> cluster nodes 4c9a29f65df0a513f02a9efcd7511c87be67a293 192.168.108.148:3006@13006 master - 0 1611111588000 5 connected 1e30390ffbfec5d14d44096e59443aa6b87c2f84 192.168.108.148:3005@13005 master - 0 1611111589000 4 connected 10923-16383 535f0efa0e13d9c4e87ac3d80f6fec195bbafb12 192.168.108.148:3001@13001 myself,master - 0 1611111586000 0 connected 0-5461 3d4bd72dd7271b541b575817a66184c4d1aa1ce0 192.168.108.148:3003@13003 master - 0 1611111589592 2 connected 5462-10922 0dca64228ec2d47675ebdf9501f9c6cad589fbc1 192.168.108.148:3002@13002 master - 0 1611111587000 1 connected 516f486e6f11a43fa4d46a513e08d4e0dea0f217 192.168.108.148:3004@13004 master - 0 1611111588591 3 connected #配置从节点(第一个的那个3002是从的,后面的md5值是主的md5,从上面那个查看集群信息的时候能看到) root@ubuntu:/usr/local/share/tendisplus-2.1.2-rocksdb-v5.13.4/scripts3006# redis-cli -h 192.168.108.148 -p 3002 cluster replicate 535f0efa0e13d9c4e87ac3d80f6fec195bbafb12 OK root@ubuntu:/usr/local/share/tendisplus-2.1.2-rocksdb-v5.13.4/scripts3006# redis-cli -h 192.168.108.148 -p 3004 cluster replicate 3d4bd72dd7271b541b575817a66184c4d1aa1ce0 OK root@ubuntu:/usr/local/share/tendisplus-2.1.2-rocksdb-v5.13.4/scripts3006# redis-cli -h 192.168.108.148 -p 3006 cluster replicate 1e30390ffbfec5d14d44096e59443aa6b87c2f84 OK #过一会再看集群信息(三主三从已经搭建好) root@ubuntu:/usr/local/share/tendisplus-2.1.2-rocksdb-v5.13.4/scripts3006# redis-cli -h 192.168.108.148 -p 3001 192.168.108.148:3001> cluster nodes 4c9a29f65df0a513f02a9efcd7511c87be67a293 192.168.108.148:3006@13006 slave 1e30390ffbfec5d14d44096e59443aa6b87c2f84 0 1611111758148 5 connected 1e30390ffbfec5d14d44096e59443aa6b87c2f84 192.168.108.148:3005@13005 master - 0 1611111756141 4 connected 10923-16383 535f0efa0e13d9c4e87ac3d80f6fec195bbafb12 192.168.108.148:3001@13001 myself,master - 0 1611111757000 0 connected 0-5461 3d4bd72dd7271b541b575817a66184c4d1aa1ce0 192.168.108.148:3003@13003 master - 0 1611111756000 2 connected 5462-10922 0dca64228ec2d47675ebdf9501f9c6cad589fbc1 192.168.108.148:3002@13002 slave 535f0efa0e13d9c4e87ac3d80f6fec195bbafb12 0 1611111759150 1 connected 516f486e6f11a43fa4d46a513e08d4e0dea0f217 192.168.108.148:3004@13004 slave 3d4bd72dd7271b541b575817a66184c4d1aa1ce0 0 1611111758000 3 connected -
Java连接Tendis集群
-
maven依赖
<dependency> <groupId>redis.clients</groupId> <artifactId>jedis</artifactId> <version>2.9.0</version> </dependency> <dependency> <groupId>org.springframework.boot</groupId> <artifactId>spring-boot-configuration-processor</artifactId> <optional>true</optional> </dependency> <dependency> <groupId>org.springframework.boot</groupId> <artifactId>spring-boot-starter-data-redis</artifactId> </dependency> <dependency> <groupId>org.springframework.boot</groupId> <artifactId>spring-boot-starter-web</artifactId> </dependency> <dependency> <groupId>org.projectlombok</groupId> <artifactId>lombok</artifactId> <optional>true</optional> </dependency> <dependency> <groupId>org.springframework.boot</groupId> <artifactId>spring-boot-starter-test</artifactId> <scope>test</scope> </dependency> <!--开发阶段使用:springboot热启动(热部署):项目有更改,自动编译:需配置idea true生效--> <dependency> <groupId>org.springframework.boot</groupId> <artifactId>spring-boot-devtools</artifactId> <optional>true</optional> </dependency> <dependency> <groupId>com.alibaba</groupId> <artifactId>fastjson</artifactId> <version>1.2.47</version> </dependency> -
配置接收类
@Component @ConfigurationProperties(prefix = "spring.redis.cluster") @Data //使用了lombok的标签 如果未引用lombok需写getter 和 setter方法 public class RedisClusterConfigProperties { private List<String> nodes; private Integer maxAttempts; private Integer connectionTimeout; private Integer soTimeout; // private String password; } -
序列化器
/** * 基于FastJSON的一个序列化器 * @Author:humorchen * @Date 2020/11/8 13:32 */ @Component public class FastJson2JsonRedisSerializer<T> implements RedisSerializer<T> { public static final Charset DEFAULT_CHARSET = Charset.forName("UTF-8"); static { //由于fastjson有autotype检查,将自己的包前缀加进去防止反序列化失败 ParserConfig.getGlobalInstance().addAccept("com"); } private Class<T> clazz; public FastJson2JsonRedisSerializer() { this((Class<T>) Object.class); } public FastJson2JsonRedisSerializer(Class<T> clazz) { super(); this.clazz = clazz; } @Override public byte[] serialize(T t) throws SerializationException { if (t == null) { return new byte[0]; } return JSON.toJSONString(t, SerializerFeature.WriteClassName).getBytes(DEFAULT_CHARSET); } @Override public T deserialize(byte[] bytes) throws SerializationException { if (bytes == null || bytes.length <= 0) { return null; } String str = new String(bytes, DEFAULT_CHARSET); return (T) JSON.parseObject(str, clazz); } } -
springboot 上加@EnableCaching
-
配置类
@Configuration public class RedisConfig extends CachingConfigurerSupport { @Resource private RedisClusterConfigProperties clusterProperties; @Bean public RedisClusterConfiguration getClusterConfig() { RedisClusterConfiguration rcc = new RedisClusterConfiguration(clusterProperties.getNodes()); rcc.setMaxRedirects(clusterProperties.getMaxAttempts()); //密码 // rcc.setPassword(RedisPassword.of(clusterProperties.getPassword())); return rcc; } @Bean public JedisCluster getJedisCluster() { JedisPoolConfig poolConfig = new JedisPoolConfig(); // 截取集群节点 String[] cluster = clusterProperties.getNodes().toArray(new String[0]); // 创建set集合 Set<HostAndPort> nodes = new HashSet<HostAndPort>(); // 循环数组把集群节点添加到set集合中 for (String node : cluster) { String[] host = node.split(":"); System.out.println(host[0]+"-"+host[1]); //添加集群节点 nodes.add(new HostAndPort(host[0], Integer.parseInt(host[1]))); } return new JedisCluster(nodes, clusterProperties.getConnectionTimeout(), clusterProperties.getSoTimeout(), clusterProperties.getMaxAttempts(), poolConfig); //使用密码的 /// return new JedisCluster(nodes, clusterProperties.getConnectionTimeout(), clusterProperties.getSoTimeout(), clusterProperties.getMaxAttempts(), clusterProperties.getPassword(), poolConfig); } @Bean public JedisConnectionFactory redisConnectionFactory(RedisClusterConfiguration cluster) { return new JedisConnectionFactory(cluster); } @Autowired private FastJson2JsonRedisSerializer fastJson2JsonRedisSerializer; /** * RedisTemplate配置 * key 为String类型 * value 为 Object 类型 * 都使用Jackson2JsonRedisSerializer进行序列化 */ @Bean public RedisTemplate<String, Object> redisTemplate2(RedisConnectionFactory factory) { RedisTemplate<String, Object> template = new RedisTemplate<>(); RedisSerializer<String> stringSerializer = new StringRedisSerializer(); ObjectMapper om = new ObjectMapper(); template.setConnectionFactory(factory); template.afterPropertiesSet(); template.setKeySerializer(stringSerializer); template.setHashKeySerializer(stringSerializer); template.setHashValueSerializer(stringSerializer); om.setVisibility(PropertyAccessor.ALL, JsonAutoDetect.Visibility.ANY); om.enableDefaultTyping(ObjectMapper.DefaultTyping.NON_FINAL); template.setValueSerializer(fastJson2JsonRedisSerializer ); template.afterPropertiesSet(); return template; } -
测试的Controller
@RestController
public class TendisTestController {

    @Autowired
    private RedisTemplate<String,String> redisTemplate;

    @GetMapping("/set")
    public String set(String key,String value){
        redisTemplate.opsForValue().set(key,value);
        return "success";
    }

    @GetMapping("/get")
    public String get(String key){
        return redisTemplate.opsForValue().get(key);
    }
}
-
-
设置密码 requirepass 连接的时候带 -a 123456 ,或者先连上去然后auth 123456
master节点配置加 requirepass “123456”
slave节点配置加 masterauth “123456”
root@ubuntu:/usr/local/share/tendisplus-2.1.2-rocksdb-v5.13.4# cat scripts3001/tendisplus.conf
# tendisplus configuration for testing
cluster-enabled yes
requirepass "123456"
port 3001
loglevel notice
logdir ./home/log
dumpdir ./home/dump
dir ./home/db
pidfile ./home/tendisplus.pid
slowlog ./home/log/slowlog
rocks.blockcachemb 4096
executorThreadNum 48
搭建过程遇到的问题汇总
无可用节点 redis.clients.jedis.exceptions.JedisNoReachableClusterNodeException: No reachable node in cluster
能连接上集群就是操作不了是由于搭建过程中没有绑定外网IP,需要重新搭建。
1、检查cluster nodes是否节点都在
2、用netstat -tunlp检查你的所有节点是否都启动好了
3、如果是一开始搭建集群的时候没有指定ip或者用的127.0.0.1现在要用外部IP来访问的话需要重新搭建,并在搭建的过程全部要使用外网IP!!!!!
-
主从,主挂掉测试
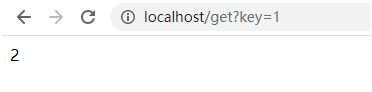
首先存入一个key=1 value=2的kv,然后看存在哪里
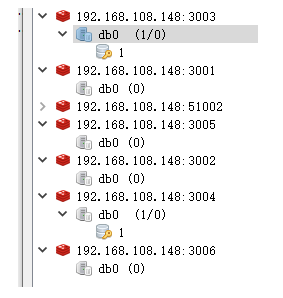
可以看到存在master 3003和slave 3004,我们把3003直接kill掉,然后看会怎样
访问接口仍然正常返回2,而查看集群状态的时候可以看到,3004已经升级为master
192.168.108.148:3001> cluster nodes
4c9a29f65df0a513f02a9efcd7511c87be67a293 192.168.108.148:3006@13006 slave 1e30390ffbfec5d14d44096e59443aa6b87c2f84 0 1611121977000 5 connected
1e30390ffbfec5d14d44096e59443aa6b87c2f84 192.168.108.148:3005@13005 master - 0 1611121976261 4 connected 10923-16383
535f0efa0e13d9c4e87ac3d80f6fec195bbafb12 192.168.108.148:3001@13001 myself,master - 0 1611121977000 0 connected 0-5461
3d4bd72dd7271b541b575817a66184c4d1aa1ce0 192.168.108.148:3003@13003 master,fail - 1611121381721 1611121378000 2 disconnected
0dca64228ec2d47675ebdf9501f9c6cad589fbc1 192.168.108.148:3002@13002 slave 535f0efa0e13d9c4e87ac3d80f6fec195bbafb12 0 1611121978276 1 connected
516f486e6f11a43fa4d46a513e08d4e0dea0f217 192.168.108.148:3004@13004 master - 0 1611121979282 6 connected 5462-10922
我们再次启动3003节点可以发现,3003节点变成了slave,而3004仍然是master
192.168.108.148:3001> cluster nodes
4c9a29f65df0a513f02a9efcd7511c87be67a293 192.168.108.148:3006@13006 slave 1e30390ffbfec5d14d44096e59443aa6b87c2f84 0 1611122227000 5 connected
1e30390ffbfec5d14d44096e59443aa6b87c2f84 192.168.108.148:3005@13005 master - 0 1611122227000 4 connected 10923-16383
535f0efa0e13d9c4e87ac3d80f6fec195bbafb12 192.168.108.148:3001@13001 myself,master - 0 1611122225000 0 connected 0-5461
3d4bd72dd7271b541b575817a66184c4d1aa1ce0 192.168.108.148:3003@13003 slave 516f486e6f11a43fa4d46a513e08d4e0dea0f217 0 1611122228923 6 connected
0dca64228ec2d47675ebdf9501f9c6cad589fbc1 192.168.108.148:3002@13002 slave 535f0efa0e13d9c4e87ac3d80f6fec195bbafb12 0 1611122227920 1 connected
516f486e6f11a43fa4d46a513e08d4e0dea0f217 192.168.108.148:3004@13004 master - 0 1611122226917 6 connected 5462-10922
我们把3003和3004全部下掉看会怎样,集群瘫痪
java.net.SocketTimeoutException: connect timed out
JedisConnectionException: Could not get a resource from the pool
本文来自博客园,作者:HumorChen99,转载请注明原文链接:https://www.cnblogs.com/HumorChen/p/18039668

 浙公网安备 33010602011771号