SpringCloud之Config配置中心学习笔记步步截图(附带学习时写的源码项目)
SpringCloud
整个spring cloud学习时写的项目源码:git@gitee.com:HumorChen/spring-cloud-parent.git
上一篇博客为:eureka(服务治理)SpringCloud服务注册发现(服务治理)之Eureka学习笔记步步截图(附带学习时写的源码项目)
读这篇博客前先下载上面的git项目。
初识Spring Cloud
什么是微服务
- "微服务”一词源于Martin Fowler的名为Microservices的博文,可以在他的官方博客上找到
http://martinfowler.com/articles/microservices.html - 微服务是系统架构上的一种设计风格,它的主旨是将一个原本独立的系统拆分成多个小型服务,这些小型服务都在各自独立的进程中运行,服务之间一般通过HTTP的RESTfuLAPI进行通信协作。
- 被拆分成的每一个小型服务都围绕着系统中的某一项或些耦合度较高的业务功能进行构建,并且每个服务都维护着白身的数据存储、业务开发自动化测试案例以及独立部署机制。

SpringCloud简介
-
spring cloud 是一系列框架的有序集合
-
spring cloud 并没有重复制造轮子,它只是将目前各家公司开发的比较成熟的、经得起实际考验的框架组合起来
-
通过Spring Boot 风格进行再封装屏蔽掉了复杂的配置和实现原理,最终给开发者留出了一套简单易懂、易部署和易维护的分布式系统开发工具包
-
它利用Spring Boot的开发便利性巧妙地简化了分布式系统基础设施的开发,如服务注册发现、配置中心、消息总线、负载均衡、断路器、数据监控等,都可以用Spring Boot的开发风格做到一键启动和部署。
-
Spring Cloud版本命名方式采用了伦敦地铁站的名称,同时根据字母表的顺序来对应版本时间顺序,比如:最早的Release版本: Angel,第二个Release版本: Brixton,然后是Camden、Dalston、Edgware,Finchley,Greenwich,Hoxton
-
spring cloud版本和springboot版本对应关系
![在这里插入图片描述]()

Spring Cloud 与Dubbo对比

- Spring Cloud 与 Dubbo都是实现微服务有效的工具。
- Dubbo只是实现了服务治理,而Spring Cloud子项目分别覆盖了微服务架构下的众多部件。
- Dubbo使用RPC通讯协议,Spring Cloud使用RESTful完成通信,Dubbo效率略高于Spring Cloud。
小结
- 微服务就是将项目的各个模块拆分为可独立运行、部署、测试的架构设计风格。
- Spring公司将其他公司中微服务架构常用的组件整合起来,并使用SpringBoot简化其开发、配置。称为Spring Cloud
- Spring Cloud 与Dubbo都是实现微服务有效的工具。Dubbo性能更好,而Spring Cloud功能更全面。
Config配置中心
Config配置中心介绍
- Spring Cloud Config解决了在分布式场景下多环境配置文件的管理和维护。
- 好处:
- 集中管理配置文件
- 不同环境不同配置,动态化的配置更新
- 配置信息改变时,不需要重启即可更新配置信息到服务

Config快速入门
- 使用gitee创建远程仓库,上传配置文件
- 搭建config server模块
- 导入config-server依赖
- 编写配置,设置gitee远程仓库地址
- 测试访问远程配置文件
-
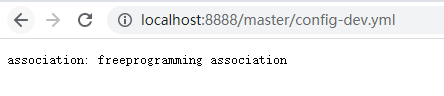
在gitee里创建一个名为spring-cloud-config的公开仓库,在本地克隆这个项目,在里面新建一个config-dev.yml配置文件,内容为
association: freeprogramming association -
添加到git管理并commit提交并push推送到gitee上
-
新建config-server模块,引入依赖
<?xml version="1.0" encoding="UTF-8"?> <project xmlns="http://maven.apache.org/POM/4.0.0" xmlns:xsi="http://www.w3.org/2001/XMLSchema-instance" xsi:schemaLocation="http://maven.apache.org/POM/4.0.0 http://maven.apache.org/xsd/maven-4.0.0.xsd"> <parent> <artifactId>spring-cloud-parent</artifactId> <groupId>com.fpa</groupId> <version>1.0-SNAPSHOT</version> </parent> <modelVersion>4.0.0</modelVersion> <artifactId>config-server</artifactId> <dependencies> <!-- spring cloud config--> <dependency> <groupId>org.springframework.cloud</groupId> <artifactId>spring-cloud-config-server</artifactId> </dependency> </dependencies> </project> -
创建启动类com.fpa.config.ConfigServerApp
package com.fpa.config; import org.springframework.boot.SpringApplication; import org.springframework.boot.autoconfigure.SpringBootApplication; import org.springframework.cloud.config.server.EnableConfigServer; @SpringBootApplication @EnableConfigServer //启用config server配置功能 public class ConfigServerApp { public static void main(String[] args) { SpringApplication.run(ConfigServerApp.class,args); } } -
复制一份配置文件,修改
application.yml
spring:
  profiles:
    active: dev
  application:
    name: config-server
  cloud:
    # spring cloud config配置
    config:
      server:
        # git的远程仓库地址
        git:
          uri: https://gitee.com/HumorChen/spring-cloud-config.git
      label: master # 分支配置
application-dev.yml
server:
  port: 8888
application-prod.yml
server: port: 8888 -
启动项目并访问http://localhost:8888/master/config-dev.yml,证明config-server模块已经能正确读取到配置文件了
Config客户端使用配置启动
- 导入starter-config 依赖
- 配置config server 地址,读取配置文件名称等信息
- 获取配置值
- 启动测试
-
创建 config-provider项目,从histrix复制依赖以及main文件夹过来,加入starter-config依赖
<?xml version="1.0" encoding="UTF-8"?> <project xmlns="http://maven.apache.org/POM/4.0.0" xmlns:xsi="http://www.w3.org/2001/XMLSchema-instance" xsi:schemaLocation="http://maven.apache.org/POM/4.0.0 http://maven.apache.org/xsd/maven-4.0.0.xsd"> <parent> <artifactId>spring-cloud-parent</artifactId> <groupId>com.fpa</groupId> <version>1.0-SNAPSHOT</version> </parent> <modelVersion>4.0.0</modelVersion> <artifactId>config-provider</artifactId> <dependencies> <!--spring boot web--> <dependency> <groupId>org.springframework.boot</groupId> <artifactId>spring-boot-starter-web</artifactId> </dependency> <!-- eureka-client --> <dependency> <groupId>org.springframework.cloud</groupId> <artifactId>spring-cloud-starter-netflix-eureka-client</artifactId> </dependency> <!-- hystrix --> <dependency> <groupId>org.springframework.cloud</groupId> <artifactId>spring-cloud-starter-netflix-hystrix</artifactId> </dependency> <!-- hystrix-dashboard --> <dependency> <groupId>org.springframework.cloud</groupId> <artifactId>spring-cloud-starter-netflix-hystrix-dashboard</artifactId> </dependency> <!-- actuator --> <dependency> <groupId>org.springframework.boot</groupId> <artifactId>spring-boot-starter-actuator</artifactId> </dependency> <!-- config --> <dependency> <groupId>org.springframework.cloud</groupId> <artifactId>spring-cloud-starter-config</artifactId> </dependency> </dependencies> </project> -
删除之前的application的三个yml配置文件新建一个bootstrap.yml配置文件
spring: profiles: active: dev application: name: provider-app --- # 开发环境 # 配置config-server地址 # 配置获得配置文件的名称等信息 spring: profiles: dev cloud: config: # 配置config server 地址 uri: http://localhost:8888 #配置文件的名称 name: config label: master # 分支名 profile: dev # profile指定后会拼接成 config-dev.yml server: port: 8000 eureka: instance: hostname: localhost client: service-url: defaultZone: http://localhost:8761/eureka #eureka服务器地址 --- # 生产环境 # 配置config-server地址 # 配置获得配置文件的名称等信息 spring: profiles: prod cloud: config: # 配置config server 地址 uri: http://localhost:8888 #配置文件的名称 name: config label: master # 分支名 profile: dev # profile指定后会拼接成 config-dev.yml server: port: 8000 eureka: instance: hostname: localhost client: service-url: defaultZone: http://localhost:8761/eureka #eureka服务器地址 -
修改controller,注入配置并返回
package com.fpa.provider.controller; import com.fpa.provider.bean.Goods; import com.fpa.provider.service.GoodsService; import com.netflix.hystrix.contrib.javanica.annotation.HystrixCommand; import com.netflix.hystrix.contrib.javanica.annotation.HystrixProperty; import org.springframework.beans.factory.annotation.Autowired; import org.springframework.beans.factory.annotation.Value; import org.springframework.web.bind.annotation.GetMapping; import org.springframework.web.bind.annotation.PathVariable; import org.springframework.web.bind.annotation.RequestMapping; import org.springframework.web.bind.annotation.RestController; @RestController @RequestMapping("/goods") public class GoodsController { @Autowired private GoodsService goodsService; @Value("${association}") private String association; @GetMapping("/{id}") @HystrixCommand(fallbackMethod = "findOne_fallback", commandProperties = { @HystrixProperty(name = "execution.isolation.thread.timeoutInMilliseconds", value = "3000"),//超时时间 @HystrixProperty(name = "circuitBreaker.sleepWindowInMilliseconds", value = "5000"),//监控时间黑认5000毫秒 @HystrixProperty(name = "circuitBreaker.requestVolumeThreshold", value = "20"),//失败次数。默认20次 @HystrixProperty(name = "circuitBreaker.errorThresholdPercentage", value = "50")//失败率默认50% })//指定降级后执行的方法名字 public Goods findOne(@PathVariable("id") int id) { //故意制造一个异常出来 // int a = 1/0; //故意制造一个超时,因为hystrix默认也是1秒超时 /*try { Thread.sleep(2000); }catch (Exception e){}*/ //熔断器测试 if (id == 1) { int a = 1 / 0; } Goods goods = goodsService.findOne(id); goods.setTitle(association); return goods; } /** * 上面的方法一旦降级后就执行这个方法的逻辑 * * @param id * @return */ public Goods findOne_fallback(int id) { Goods goods = new Goods(); goods.setTitle("服务降级了呀"); return goods; } } -
启动eureka-server放到8761端口,再启动config-provider项目,测试接口


配置加载正常
Config配置热刷新功能
- 在config客户端引入actuator依赖
- 获取配置信息类上,添加@RefreshScope注解
- 添加配置
management.endpoints.web.exposure.include: refresh - 使用curl工具发送post请求
curl -X POST http://localhost:8001/actuator/refresh
-
需要actuator依赖
<!-- actuator --> <dependency> <groupId>org.springframework.boot</groupId> <artifactId>spring-boot-starter-actuator</artifactId> </dependency> -
给需要刷新的地方加上注解@RefreshScope
package com.fpa.provider.controller; import com.fpa.provider.bean.Goods; import com.fpa.provider.service.GoodsService; import com.netflix.hystrix.contrib.javanica.annotation.HystrixCommand; import com.netflix.hystrix.contrib.javanica.annotation.HystrixProperty; import org.springframework.beans.factory.annotation.Autowired; import org.springframework.beans.factory.annotation.Value; import org.springframework.cloud.context.config.annotation.RefreshScope; import org.springframework.web.bind.annotation.GetMapping; import org.springframework.web.bind.annotation.PathVariable; import org.springframework.web.bind.annotation.RequestMapping; import org.springframework.web.bind.annotation.RestController; @RestController @RequestMapping("/goods") @RefreshScope // 开启刷新功能 public class GoodsController { @Autowired private GoodsService goodsService; @Value("${association}") private String association; @GetMapping("/{id}") @HystrixCommand(fallbackMethod = "findOne_fallback", commandProperties = { @HystrixProperty(name = "execution.isolation.thread.timeoutInMilliseconds", value = "3000"),//超时时间 @HystrixProperty(name = "circuitBreaker.sleepWindowInMilliseconds", value = "5000"),//监控时间黑认5000毫秒 @HystrixProperty(name = "circuitBreaker.requestVolumeThreshold", value = "20"),//失败次数。默认20次 @HystrixProperty(name = "circuitBreaker.errorThresholdPercentage", value = "50")//失败率默认50% })//指定降级后执行的方法名字 public Goods findOne(@PathVariable("id") int id) { //故意制造一个异常出来 // int a = 1/0; //故意制造一个超时,因为hystrix默认也是1秒超时 /*try { Thread.sleep(2000); }catch (Exception e){}*/ //熔断器测试 if (id == 1) { int a = 1 / 0; } Goods goods = goodsService.findOne(id); goods.setTitle(association); return goods; } /** * 上面的方法一旦降级后就执行这个方法的逻辑 * * @param id * @return */ public Goods findOne_fallback(int id) { Goods goods = new Goods(); goods.setTitle("服务降级了呀"); return goods; } } -
修改配置加入下面的
management: endpoints: web: exposure: include: ['health','info','refresh'] -
启动项目,查看接口返回的,修改gitee上的配置,再次查看接口返回的没有变,查看config-server的变了,然后发个post请求到http://localhost:8000/actuator/refresh就可以刷新接口的了。

Config Server注册到eureka
-
加入eureka依赖
<?xml version="1.0" encoding="UTF-8"?> <project xmlns="http://maven.apache.org/POM/4.0.0" xmlns:xsi="http://www.w3.org/2001/XMLSchema-instance" xsi:schemaLocation="http://maven.apache.org/POM/4.0.0 http://maven.apache.org/xsd/maven-4.0.0.xsd"> <parent> <artifactId>spring-cloud-parent</artifactId> <groupId>com.fpa</groupId> <version>1.0-SNAPSHOT</version> </parent> <modelVersion>4.0.0</modelVersion> <artifactId>config-server</artifactId> <dependencies> <!-- eureka-client --> <dependency> <groupId>org.springframework.cloud</groupId> <artifactId>spring-cloud-starter-netflix-eureka-client</artifactId> </dependency> <!-- spring cloud config--> <dependency> <groupId>org.springframework.cloud</groupId> <artifactId>spring-cloud-config-server</artifactId> </dependency> </dependencies> </project> -
修改配置
server: port: 8888 eureka: instance: hostname: localhost client: service-url: defaultZone: http://localhost:8761/eureka #eureka服务器地址 -
给启动类加上注解@EnableEurekaClient
package com.fpa.config; import org.springframework.boot.SpringApplication; import org.springframework.boot.autoconfigure.SpringBootApplication; import org.springframework.cloud.config.server.EnableConfigServer; import org.springframework.cloud.netflix.eureka.EnableEurekaClient; @SpringBootApplication @EnableConfigServer //启用config server配置功能 @EnableEurekaClient //启用eureka客户端 public class ConfigServerApp { public static void main(String[] args) { SpringApplication.run(ConfigServerApp.class,args); } } -
重启config-server,已经注册上了

- 重启provider即可
本文来自博客园,作者:HumorChen99,转载请注明原文链接:https://www.cnblogs.com/HumorChen/p/18039560

 浙公网安备 33010602011771号