消息中间件学习二 --ActiveMQ
1.概述
ActiveMQ是由Apache出品的,一款最流行的,能力强劲的开源消息中间件。
ActiveMQ是一个完全支持JMS1.1和J2EE 1.4规范的 JMS Provider实现,
它非常快速,支持多种语言的客户端和协议,
而且可以非常容易的嵌入到企业的应用环境中,并有许多高级功能。
2.安装
下载地址:http://activemq.apache.org/download.html
运行服务:
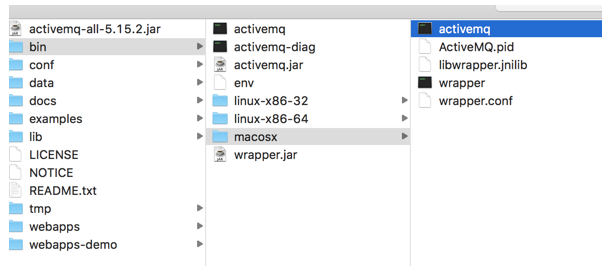
第一步:解压后找到脚本目录

第二步:在服务器上执行下面命令

注:
访问默认页面,地址http://127.0.0.1:8161/admin/
默认页面访问端口是8161
默认用户和密码都是admin
3.特性
(1)多种语言和协议编写客户端。语言: Java, C, C++, C#, Ruby, Perl, Python, PHP。
    应用协议: OpenWire,STOMP REST,MQTT,AMQP
(2)完全支持JMS1.1和J2EE 1.4规范 (持久化,分布式事务消息,事务)
(3)对Spring的支持,ActiveMQ可以很容易内嵌到使用Spring的框架中去
(4)连接模式多样化,支持多种传输协议:in-VM,TCP,SSL,NIO,UDP,JGroups,JXTA
(5)支持通过JDBC和journal提供快速的消息持久化
(6)为高性能集群,客户端-服务器,点对点通信场景而设计
(7)可以轻松地与CXF、Axis等Web Service技术整合
(8)可以被作为内存中的JMS提供者,非常适合JMS单元测试
(9)提供了REST API接口
(10)支持以AJAX方式调用
4.使用场景
(1)多个项目之间集成,跨平台 ,多语言
(2)降低系统间模块的耦合度,解耦
(3)系统前后端隔离
5.java使用
点对点模式
public static void main(String[] args) {
        //1.创建工厂
        ConnectionFactory connectionFactory = new ActiveMQConnectionFactory
        (ActiveMQConnectionFactory.DEFAULT_USER,
         ActiveMQConnectionFactory.DEFAULT_PASSWORD,
         ActiveMQConnectionFactory.DEFAULT_BROKER_BIND_URL);
        Connection connection = null;
        Session session = null;
        try {
            //2.创建连接
            connection = connectionFactory.createConnection();
            connection.start();
            //3.创建session
            //Session.AUTO_ACKNOWLEDGE: 接收到消息时,自动ack确认消息
            //Session.CLIENT_ACKNOWLEDGE:接收到消息时,客户端调用message.acknowledge(),显式对消息确认。
            session = connection.createSession(Boolean.FALSE,Session.AUTO_ACKNOWLEDGE);
            //4.创建Destination
            Destination destination = session.createQueue("hello");
            //5.创建生产者/消费者
            MessageProducer messageProducer = session.createProducer(destination);
            MessageConsumer messageConsumer = session.createConsumer(destination);
            //6.设置持久化方式
            messageProducer.setDeliveryMode(DeliveryMode.NON_PERSISTENT);
            //7.定义消息对象并发送/接受
            TextMessage textMessage = session.createTextMessage();
            textMessage.setText("helloworld");
            messageProducer.send(textMessage);
            TextMessage receiveMessage = (TextMessage) messageConsumer.receive();
            System.out.println(receiveMessage.getText());
        } catch (JMSException e) {
            e.printStackTrace();
        }finally {
            if(connection!=null){
                try {
                    connection.close();
                } catch (JMSException e) {
                    e.printStackTrace();
                }
            }
            if(session!=null){
                try {
                    session.close();
                } catch (JMSException e) {
                    e.printStackTrace();
                }
            }
        }
    }

发布订阅模式
public class TestPublish {
    private static final String TOPIC  = "TestPublish.";
    private static final String[] topics = {"A", "B", "C"};
    public static void main(String[] args) {
        Publisher publisher = new Publisher();
        publisher.setTopics(topics);
        for (int i = 0; i < 10; i++) {
            publisher.sendMessage(topics);
        }
        publisher.close();

    }
    public static class Listener implements MessageListener {
        @Override
        public void onMessage(Message message) {
            try {
                MapMessage map = (MapMessage)message;
                String msg = map.getString("msg");
                double version = map.getDouble("version");
                System.out.println(msg+" version is "+version);
            } catch (Exception e) {
                e.printStackTrace();
            }
        }

    }
    public static class Customer{
        public static void main(String[] args) {
            Customer customer = new Customer();
            try {
                for (String topic : topics) {
                    Destination destination = customer.getSession().createTopic(TOPIC + topic);
                    MessageConsumer messageConsumer = customer.getSession().createConsumer(destination);
                    messageConsumer.setMessageListener(new Listener());
                }
            } catch (JMSException e) {
                e.printStackTrace();
            }
        }
        private Connection connection = null;
        private Session session;
        public Customer() {
            ConnectionFactory connectionFactory = new ActiveMQConnectionFactory(
                  ActiveMQConnectionFactory.DEFAULT_USER,
                  ActiveMQConnectionFactory.DEFAULT_PASSWORD,
                  ActiveMQConnectionFactory.DEFAULT_BROKER_BIND_URL);
            try {
                connection = connectionFactory.createConnection();
                connection.start();
                session = connection.createSession(Boolean.FALSE, Session.AUTO_ACKNOWLEDGE);
            } catch (JMSException e) {
                e.printStackTrace();
            }
        }

        public Session getSession() {
            return session;
        }
    }
    public static class Publisher {
        private Connection connection = null;
        private Destination[] destinations;
        private Session session;
        private MessageProducer messageProducer;

        public Publisher() {
            ConnectionFactory connectionFactory = new ActiveMQConnectionFactory(
                       ActiveMQConnectionFactory.DEFAULT_USER,
                       ActiveMQConnectionFactory.DEFAULT_PASSWORD,
                       ActiveMQConnectionFactory.DEFAULT_BROKER_BIND_URL);
            try {
                connection = connectionFactory.createConnection();
                connection.start();
                session = connection.createSession(Boolean.FALSE, Session.AUTO_ACKNOWLEDGE);
                messageProducer = session.createProducer(null);
            } catch (JMSException e) {
                e.printStackTrace();
            }
        }

        public void setTopics(String[] topics) {
            destinations = new Destination[topics.length];
            for (int i = 0; i < topics.length; i++) {
                try {
                    destinations[i] = session.createTopic(TOPIC + topics[i]);
                } catch (JMSException e) {
                    e.printStackTrace();
                }
            }
        }

        private Message createTestMessage(String msg, Session session) {
            MapMessage message = null;
            try {
                message = session.createMapMessage();
                message.setString("msg", msg);
                message.setDouble("version", 1.00);
            } catch (JMSException e) {
                e.printStackTrace();
            }
            return message;
        }

        public void sendMessage(String[] msgs) {
            for (int i = 0; i < msgs.length; i++) {
                Message message = createTestMessage(msgs[i], session);
                try {
                    messageProducer.send(destinations[i], message);
                } catch (JMSException e) {
                    e.printStackTrace();
                }
            }
        }

        public void close() {
            if (connection != null) {
                try {
                    connection.close();
                } catch (JMSException e) {
                    e.printStackTrace();
                }
            }
        }
    }
}
6.配置详情
jetty-realm.properties:该配置文件主要用于配置MQ登录页面的用户和密码
jetty.xml:ActiveMQ内置jetty启动,该配置文件包含了管理功能的相关配置
activemq.xml
7.activemq.xml配置文件包含了很多主要功能的配置
1).配置传输连接:
如果想提高吞吐性,则可以在uri中使用"auto+nio"前缀
<transportConnectors>
<!-- DOS protection, limit concurrent connections to 1000 and frame size to 100MB -->
<transportConnector name="openwire" uri="tcp://0.0.0.0:61616?maximumConnections=1000&wireFormat.maxFrameSize=104857600"/>
<transportConnector name="amqp" uri="amqp://0.0.0.0:5672?maximumConnections=1000&wireFormat.maxFrameSize=104857600"/>
<transportConnector name="stomp" uri="stomp://0.0.0.0:61613?maximumConnections=1000&wireFormat.maxFrameSize=104857600"/>
<transportConnector name="mqtt" uri="mqtt://0.0.0.0:1883?maximumConnections=1000&wireFormat.maxFrameSize=104857600"/>
<transportConnector name="ws" uri="ws://0.0.0.0:61614?maximumConnections=1000&wireFormat.maxFrameSize=104857600"/>
</transportConnectors>
高级协议
Failover:一种重连机制,工作于上面介绍的连接协议之上,用于建立可靠的传输
配置语法:
failover:(tcp://localhost/61616,tcp://remotehost:61616)?initialReconnectDelay=100

Fanout:一种重连和复制机制,也是工作于其他连接协议之上, 采用复制的方式把消息复制到多台消息服务器上
配置语法:
fanout:(tcp://localhost/61616,tcp://localhost:61617,tcp://localhost:61618)
2).持久化存储模式:
1.AMQ消息存储—5.0及以前默认的消息存储,存放在Data Log中
<amqPersistenceAdapter directory="${activemq.base}/data" maxFileLength="32mb"/>
2.KahaDB消息存储—比AMQ消息存储更好的可扩展性和可恢复性—5.3以后推荐使用的消息存储
<persistenceAdapter>
    <kahaDB directory="${activemq.data}/kahadb"/>
</persistenceAdapter>
3.LevelDB消息存储—5.6以后推出的,使用自定义的索引代替了常用的BTree索引,性能高于KahaDB
<persistenceAdapter>
    <levelDB directory="${activemq.data}/levelDB"/>
</persistenceAdapter>
4.JDBC消息存储—基于JDBC存储
<persistenceAdapter>
    <jdbcPersistenceAdapter  dataSource="#mysql-ds"/>
    <!--with ActiveMQ Journal-->
    <!--克服了JDBC Store的不足,使用快速的缓存写入技术,大大提高了性能。-->
    <!--<journalPersistenceAdapterFactory journalLogFiles="4"
        journalLogFileSize="32768" useJournal="true"
        useQuickJournal="true" dataSource="#mysql_ds"
        dataDirectory="activemq-data">-->
</persistenceAdapter>
<bean id="mysql-ds" class="org.apache.commons.dbcp.BasicDataSource" destroy-method="close">
    <property name="driverClassName" value="com.mysql.jdbc.Driver"/>
    <property name="url" value="jdbc:mysql://localhost/activemq?relaxAutoCommit=true"/>
    <property name="username" value="activemq"/> <property name="password" value="activemq"/>
    <property name="maxActive" value="200"/> <property name="poolPreparedStatements" value="true"/>
</bean>
5.Memory消息存储—基于内存的消息存储
<broker persistent="false"> </broker>
6.其他配置详细
<destinationPolicy>
    <policyMap>
      <policyEntries>
        <!-- 订阅/发布-->
        <policyEntry topic=">" producerFlowControl="true" optimizedDispatch="true"  memoryLimit="16mb">
          <!--
              消息限制策略,面向Slow Consumer的
              此策略只对Topic有效,只对nondurable订阅者有效,当通道中有大量的消息积压时,broker可以保留的消息量。
              为了防止Topic中有慢速消费者,导致整个通道消息积压。(对于Topic而言,一条消息只有所有的订阅者都消费才
              会被删除)
          -->
          <pendingMessageLimitStrategy>
            <!--
                ConstantPendingMessageLimitStrategy: 保留固定条数的消息,如果消息量超过limit,将使用
                “MessageEvictionStrategy”移除消息
                PrefetchRatePendingMessageLimitStrategy: 保留prefetchSize倍数条消息。
            -->
            <!-- 如果prefetchSize为100,则保留10 * 100条消息 -->
            <prefetchRatePendingMessageLimitStrategy multiplier="10"/>
          </pendingMessageLimitStrategy>

          <!--
              消息剔除策略 面向Slow Consumer的
              配合PendingMessageLimitStrategy,只对Topic有效,只对nondurable订阅者有效。当PendingMessage的数量超过
              限制时,broker该如何剔除多余的消息。当Topic接收到信息消息后,会将消息“Copy”给每个订阅者,在保存这
              个消息时(保存策略"PendingSubscriberMessageStoragePolicy"),将会检测pendingMessages的数量是否超过限
              制(由"PendingMessageLimitStrategy"来检测),如果超过限制,将会在pendingMessages中使用
              MessageEvicationStrategy移除多余的消息,此后将新消息保存在PendingMessages中。
          -->
          <messageEvictionStrategy>
            <!--
                OldestMessageEvictionStrategy: 移除旧消息,默认策略。
                OldestMessageWithLowestPriorityEvictionStrategy: 旧数据中权重较低的消息,将会被移除。
                UniquePropertyMessageEvictionStrategy: 移除具有指定property的旧消息。开发者可以指定property的名称
                ,从此属性值相同的消息列表中移除较旧的(根据消息的创建时间)。
            -->
            <OldestMessageWithLowestPriorityEvictionStrategy />
          </messageEvictionStrategy>


          <!--
            慢速消费者策略
            Broker将如何处理慢消费者。Broker将会启动一个后台线程用来检测所有的慢速消费者,并定期关闭关闭它们。
          -->
          <slowConsumerStrategy>
            <!--
                AbortSlowConsumerStrategy: 中断慢速消费者,慢速消费将会被关闭。abortConnection是否关闭连接
                AbortSlowConsumerStrategy: 如果慢速消费者最后一个ACK距离现在的时间间隔超过阀maxTimeSinceLastAck,
                则中断慢速消费者。
            -->
            <abortSlowConsumerStrategy abortConnection="false"/><!-- 不关闭底层链接 -->
          </slowConsumerStrategy>


          <!--转发策略 将消息转发给消费者的方式-->
          <dispatchPolicy>
            <!--
             RoundRobinDispatchPolicy: “轮询”,消息将依次发送给每个“订阅者”。“订阅者”列表默认按照订阅的先后
                                        顺序排列,在转发消息时,对于匹配消息的第一个订阅者,将会被移动到“订阅者
                                        ”列表的尾部,这也意味着“下一条”消息,将会较晚的转发给它。
             StrictOrderDispatchPolicy: 严格有序,消息依次发送给每个订阅者,按照“订阅者”订阅的时间先后。它和
                                        RoundRobin最大的区别是,没有移动“订阅者”顺序的操作。
             PriorityDispatchPolicy: 基于“property”权重对“订阅者”排序。它要求开发者首先需要对每个订阅者指定
                                      priority,默认每个consumer的权重都一样。
             SimpleDispatchPolicy: 默认值,按照当前“订阅者”列表的顺序。其中PriorityDispatchPolicy是其子类。
            -->
            <strictOrderDispatchPolicy/>
          </dispatchPolicy>

          <!--恢复策略 ActiveMQ重启如何恢复数据-->
          <subscriptionRecoveryPolicy>
            <!--
                FixedSizedSubscriptionRecoveryPolicy: 保存一定size的消息,broker将为此Topic开辟定额的RAM用来保存
                                                      最新的消息。使用maximumSize属性指定保存的size数量
                FixedCountSubscriptionRecoveryPolicy: 保存一定条数的消息。 使用maximumSize属性指定保存的size数量
                LastImageSubscriptionRecoveryPolicy: 只保留最新的一条数据
                QueryBasedSubscriptionRecoveryPolicy: 符合置顶selector的消息都将被保存,具体能够“恢复”多少消息
                                                        ,由底层存储机制决定;比如对于非持久化消息,只要内存中还
                                                        存在,则都可以恢复。
                TimedSubscriptionRecoveryPolicy: 保留最近一段时间的消息。使用recoverDuration属性指定保存时间 单位
                                                 毫秒
                NoSubscriptionRecoveryPolicy: 关闭“恢复机制”。默认值。
            -->
            <!--恢复最近30分钟内的信息-->
           <timedSubscriptionRecoveryPolicy recoverDuration="1800000"/>
          </subscriptionRecoveryPolicy>


          <!--"死信"策略 如何处理过去消息
                缺省死信队列(Dead Letter Queue)叫做ActiveMQ.DLQ;所有的未送达消息都会被发送到这个队列,以致会非常
                难于管理。 默认情况下,无论是Topic还是Queue,broker将使用Queue来保存DeadLeader,即死信通道通常为
                Queue;不过开发者也可以指定为Topic。
          -->
          <deadLetterStrategy>
            <!--
             IndividualDeadLetterStrategy: 把DeadLetter放入各自的死信通道中,queuePrefix自定义死信前缀
             ,useQueueForQueueMessages使用队列保存死信,还有一个属性为“useQueueForTopicMessages”,此值表示是否
             将Topic的DeadLetter保存在Queue中,默认为true。
             <individualDeadLetterStrategy  queuePrefix="DLQ." useQueueForQueueMessages="true"/>

             SharedDeadLetterStrategy: 将所有的DeadLetter保存在一个共享的队列中,这是ActiveMQ broker端默认的策略
             。共享队列默认为“ActiveMQ.DLQ”,可以通过“deadLetterQueue”属性来设定。还有2个很重要的可选参数
             ,“processExpired”表示是否将过期消息放入死信队列,默认为true;“processNonPersistent”表示是否将“
             非持久化”消息放入死信队列,默认为false。
             <sharedDeadLetterStrategy deadLetterQueue="DLQ-QUEUE"/>

             DiscardingDeadLetterStrategy: broker将直接抛弃DeadLeatter。如果开发者不需要关心DeadLetter,可以使用
             此策略。AcitveMQ提供了一个便捷的插件:DiscardingDLQBrokerPlugin,来抛弃DeadLetter。
             下面这个必须配置plugins节点中才对,
             丢弃所有死信
             <discardingDLQBrokerPlugin dropAll="true" dropTemporaryTopics="true" dropTemporaryQueues="true" />
             丢弃指定死信
             <discardingDLQBrokerPlugin dropOnly="MY.EXAMPLE.TOPIC.29 MY.EXAMPLE.QUEUE.87" reportInterval="1000"
             />
             使用丢弃正则匹配到死信
             <discardingDLQBrokerPlugin dropOnly="MY.EXAMPLE.TOPIC.[0-9]{3} MY.EXAMPLE.QUEUE.[0-9]{3}"
             reportInterval="3000" />
            -->
             <individualDeadLetterStrategy  queuePrefix="DLQ.TOPIC." useQueueForQueueMessages="true"/>
          </deadLetterStrategy>

          <!--非耐久待处理消息处理策略 类似于:pendingQueuePolicy(在下面自己找找)-->
          <pendingSubscriberPolicy>
            <!--支持三种策略:storeCursor, vmCursor和fileCursor。-->
             <fileCursor/>
          </pendingSubscriberPolicy>
          <!--耐久待处理消息处理策略 类似于:pendingQueuePolicy(在下面自己找找)-->
          <pendingDurableSubscriberPolicy>
            <!--支持三种策略:storeDurableSubscriberCursor, vmDurableCursor和 fileDurableSubscriberCursor。-->
            <storeDurableSubscriberCursor/>
          </pendingDurableSubscriberPolicy>
        </policyEntry>

        <!--消息队列-->
        <policyEntry queue=">" producerFlowControl="true" optimizedDispatch="true" memoryLimit="16mb">
             <pendingMessageLimitStrategy>
                <prefetchRatePendingMessageLimitStrategy multiplier="10"/>
             </pendingMessageLimitStrategy>
             <messageEvictionStrategy>
                <OldestMessageWithLowestPriorityEvictionStrategy />
             </messageEvictionStrategy>
             <slowConsumerStrategy>
                <abortSlowConsumerStrategy abortConnection="false"/>
            </slowConsumerStrategy>
            <dispatchPolicy>
                <strictOrderDispatchPolicy/>
            </dispatchPolicy>
            <subscriptionRecoveryPolicy>
                <timedSubscriptionRecoveryPolicy recoverDuration="1800000"/>
            </subscriptionRecoveryPolicy>
           <deadLetterStrategy>
                <individualDeadLetterStrategy  queuePrefix="DLQ.QUEUE." useQueueForQueueMessages="true"/>
           </deadLetterStrategy>
           <!--
                pendingQueuePolicy 待消费消息策略
                通道中有大量Slow Consumer时,Broker该如何优化消息的转发,以及在此情况下,“非持久化”消息达到内存
                限制时该如何处理。

                当Broker接受到消息后,通常将最新的消息写入内存以提高消息转发的效率,提高消息ACK的效率,减少对对底
                层Store的操作;如果Consumer非常快速,那么消息将会立即转发给Consumer,不需要额外的操作;但当遇到
                Slow Consumer时,情况似乎并没有那么美好。

                持久化消息,通常为:写入Store->线程轮询,从Store中pageIn数据到PendingStorage->转发给Consumer->从
                PendingStorage中移除->消息ACK后从Store中移除。

                对于非持久化数据,通常为:写入内存->如果内存足够,则PendingStorage直接以内存中的消息转发->如果内
                存不足,则将内存中的消息swap到临时文件中->从临时文件中pageIn到内存,转发给Consumer。

                AcitveMQ提供了几个的Cursor机制,它就是用来保存Pending Messages。

                1) vmQueueCursor: 将待转发消息保存在额外的内存(JVM linkeList)的存储结构中。是“非持久化消息”的默
                认设置,如果Broker不支持Persistent,它是任何类型消息的默认设置。有OOM风险。
                2) fileQueueCursor: 将消息保存到临时文件中。文件存储方式有broker的tempDataStore属性决定。是“持久
                化消息”的默认设置。
                3) storeCursor: “综合”设置,对于非持久化消息,将采用vmQueueCursor存储,对于持久化消息采用
                fileQueueCursor。这是强烈推荐的策略,也是效率最好的策略。
            -->
            <pendingQueuePolicy>
                <storeCursor>
                    <nonPersistent>
                        <fileQueueCursor/>
                    </nonPersistent>
                </storeCursor>
            </pendingQueuePolicy>
        </policyEntry>
      </policyEntries>
    </policyMap>
</destinationPolicy>
8.部署模式
Master-Slave部署方式
(1). Shared Filesystem Master-Slave方式
     支持N个AMQ实例组网,但由于他是基于kahadb存储策略,
     亦可以部署在分布式文件系统上,应用灵活、高效且安全。
(2). Shared Database Master-Slave方式
     与shared filesystem方式类似,只是共享的存储介质由文件系统改成了数据库而已,
     支持N个AMQ实例组网,但他的性能会受限于数据库。
(3). Replicated LevelDB Store方式
     ActiveMQ5.9以后才新增的特性,使用ZooKeeper协调选择一个node作为master。
     被选择的master broker node开启并接受客户端连接。其他node转入slave模式,
     连接master并同步他们的存储状态。slave不接受客户端连接。
     所有的存储操作都将被复制到连接至Master的slaves。
     如果master死了,得到了最新更新的slave被允许成为master。
Broker-Cluster部署方式
(1). Static Broker-Cluster部署
(2). Dynamic Broker-Cluster部署
9. 示例(基于Shared Filesystem Master-Slave方式)
第一步:修改jetty.xml 和ActiveMQ.xml,
保证在同一台机器上部署不会冲突,
并创建共享文件夹,然后修改默认kahaDB配置
<!--jetty-->
<bean id="jettyPort" class="org.apache.activemq.web.WebConsolePort" init-method="start">
<property name="host" value="0.0.0.0"/>
<property name="port" value="8163"/>
</bean>
<!--activeMQ-->
<transportConnectors>
<transportConnector name="openwire"
uri="tcp://0.0.0.0:61618?maximumConnections=1000&wireFormat.maxFrameSize=104857600;
wireFormat.maxInactivityDuration=0" discoveryUri="multicast://default"/>
</transportConnectors>
<persistenceAdapter>
<kahaDB directory="D:\software\MqSharedData" enableIndexWriteAsync="true" enableJournalDiskSyncs="false"/>
</persistenceAdapter>
<!--客户端配置文件修改-->
brokerURL="failover:(Master,Slave1,Slave2)?randomize=false"
<!--策略配置:从5.6版本起,在destinationPolicy上新增的选择replayWhenNoConsumers,
    这个选项使得broker2上有需要转发的消息但是没有消费者时,把消息回流到它原来的broker1上,
    同时需要把enableAudit设置为false,为了防止消息回流后被当做重复消息而不被分发-->

<!--这里一定要注意空格和换行符的格式,否则无法启动,而且必须每个都要配置,否则无法回流-->
<policyEntry queue=">" enableAudit="false">
   <networkBridgeFilterFactory>
     <conditionalNetworkBridgeFilterFactory replayWhenNoConsumers="true"/>
   </networkBridgeFilterFactory>
</policyEntry>
<!--Static Broker-Cluster-->
<!--duplex=true配置允许双向连接-->
<!--备注:也可以在两个broker中都配置,使得其可以相互通信,则上面的配置就可以不需要了,但是未验证-->
<!--static:静态协议。用于为一个网络中的多个代理创建静态配置,这种配置协议支持复合的URL。
multicast:多点传送协议。消息服务器会广播自己的服务,也会定位其他代理服务。-->
<networkConnectors>
    <!--备用broker端口-->
    <networkConnector uri="static:(tcp:// 127.0.0.1:61617)"duplex="false"/>
</networkConnectors>
<!--Dynamic Broker-Cluster-->
<networkConnectors>
   <networkConnectoruri="multicast://default"
   dynamicOnly="true"
   networkTTL="3"
   prefetchSize="1"
   decreaseNetworkConsumerPriority="true" />
</networkConnectors>
10.ActiveMQ与Spring整合实例
第一步:引入jar(pom.xml)
<?xml version="1.0" encoding="UTF-8"?>
<project xmlns="http://maven.apache.org/POM/4.0.0"
         xmlns:xsi="http://www.w3.org/2001/XMLSchema-instance"
         xsi:schemaLocation="http://maven.apache.org/POM/4.0.0 http://maven.apache.org/xsd/maven-4.0.0.xsd">
    <modelVersion>4.0.0</modelVersion>

    <groupId>springmvc</groupId>
    <artifactId>springmvc</artifactId>
    <version>1.0-SNAPSHOT</version>
    <packaging>war</packaging>
    <properties>
        <springframework>4.1.8.RELEASE</springframework>
    </properties>

    <dependencies>
        <dependency>
            <groupId>junit</groupId>
            <artifactId>junit</artifactId>
            <version>4.10</version>
            <scope>test</scope>
        </dependency>


        <!-- JSP相关 -->
        <dependency>
            <groupId>jstl</groupId>
            <artifactId>jstl</artifactId>
            <version>1.2</version>
        </dependency>
        <dependency>
            <groupId>javax.servlet</groupId>
            <artifactId>javax.servlet-api</artifactId>
            <version>3.0.1</version>
        </dependency>
        <dependency>
            <groupId>commons-logging</groupId>
            <artifactId>commons-logging</artifactId>
            <version>1.1.1</version>
        </dependency>
        <dependency>
            <groupId>log4j</groupId>
            <artifactId>log4j</artifactId>
            <version>1.2.16</version>
        </dependency>
        <dependency>
            <groupId>org.slf4j</groupId>
            <artifactId>slf4j-api</artifactId>
            <version>1.7.7</version>
        </dependency>
        <dependency>
            <groupId>org.slf4j</groupId>
            <artifactId>slf4j-log4j12</artifactId>
            <version>1.7.7</version>
        </dependency>

        <!-- spring -->
        <dependency>
            <groupId>org.springframework</groupId>
            <artifactId>spring-core</artifactId>
            <version>${springframework}</version>
        </dependency>
        <dependency>
            <groupId>org.springframework</groupId>
            <artifactId>spring-context</artifactId>
            <version>${springframework}</version>
        </dependency>
        <dependency>
            <groupId>org.springframework</groupId>
            <artifactId>spring-tx</artifactId>
            <version>${springframework}</version>
        </dependency>
        <dependency>
            <groupId>org.springframework</groupId>
            <artifactId>spring-webmvc</artifactId>
            <version>${springframework}</version>
        </dependency>
        <dependency>
            <groupId>org.springframework</groupId>
            <artifactId>spring-web</artifactId>
             <version>${springframework}</version>
         </dependency>
        <dependency>
            <groupId>org.springframework</groupId>
            <artifactId>spring-aop</artifactId>
            <version>${springframework}</version>
        </dependency>
        <dependency>
            <groupId>org.springframework</groupId>
            <artifactId>spring-test</artifactId>
            <version>${springframework}</version>
            <scope>test</scope>
        </dependency>
        <dependency>
            <groupId>org.springframework</groupId>
            <artifactId>spring-jms</artifactId>
            <version>${springframework}</version>
        </dependency>

        <!-- xbean 如<amq:connectionFactory /> -->
        <dependency>
            <groupId>org.apache.xbean</groupId>
            <artifactId>xbean-spring</artifactId>
            <version>4.6</version>
        </dependency>
        <!-- activemq -->
         <dependency>
            <groupId>org.apache.activemq</groupId>
             <artifactId>activemq-core</artifactId>
             <version>5.7.0</version>
         </dependency>
        <dependency>
            <groupId>org.apache.activemq</groupId>
            <artifactId>activemq-pool</artifactId>
            <version>5.11.1</version>
        </dependency>
        <!--activeMQ5.14以上版本中集成了spring一些包,导致冲突。-->
        <!--解决方法:使用activeMQ5.11.1及以下版本即可。-->
        <dependency>
            <groupId>org.apache.activemq</groupId>
            <artifactId>activemq-web</artifactId>
            <version>5.11.1</version>
        </dependency>
        <!-- 自用jar包,可以忽略-->
        <dependency>
            <groupId>commons-httpclient</groupId>
            <artifactId>commons-httpclient</artifactId>
            <version>3.1</version>
        </dependency>

    </dependencies>

</project>
第二步:配置applicationContext.xml
<?xml version="1.0" encoding="UTF-8"?>
<beans xmlns="http://www.springframework.org/schema/beans"
       xmlns:xsi="http://www.w3.org/2001/XMLSchema-instance"
       xmlns:context="http://www.springframework.org/schema/context"
       xmlns:mvc="http://www.springframework.org/schema/mvc"
       xsi:schemaLocation="http://www.springframework.org/schema/beans
                http://www.springframework.org/schema/beans/spring-beans.xsd
                http://www.springframework.org/schema/context
                http://www.springframework.org/schema/context/spring-context.xsd
                http://www.springframework.org/schema/mvc
                http://www.springframework.org/schema/mvc/spring-mvc.xsd">
    <!-- 指定spring组件扫描的基本包路径 -->
    <context:component-scan base-package="com.micheal" >
        <context:exclude-filter type="annotation" expression="org.springframework.stereotype.Controller"></context:exclude-filter>
    </context:component-scan>
    <mvc:annotation-driven />
</beans>
第三步:配置applicationContext-ActiveMQ.xml
<?xml version="1.0" encoding="UTF-8"?>
<beans xmlns="http://www.springframework.org/schema/beans"
xmlns:xsi="http://www.w3.org/2001/XMLSchema-instance"
xmlns:amq="http://activemq.apache.org/schema/core"
xsi:schemaLocation="http://www.springframework.org/schema/beans
http://www.springframework.org/schema/beans/spring-beans.xsd
http://activemq.apache.org/schema/core
http://activemq.apache.org/schema/core/activemq-core-5.11.1.xsd">
<!--<amq:connectionFactory id="amqConnectionFactory"-->
<!--brokerURL="failover:(tcp://localhost:61616,tcp://localhost:61617,tcp://localhost:61618)?randomize=false"/>-->
<amq:connectionFactory id="amqConnectionFactory"
brokerURL="failover:(tcp://localhost:61616)?randomize=false"/>
<!-- 配置JMS连接工长 -->
<bean id="connectionFactory"
class="org.springframework.jms.connection.CachingConnectionFactory">
<constructor-arg ref="amqConnectionFactory" />
<property name="sessionCacheSize" value="100" />
</bean>
<!-- 定义消息队列(Queue) -->
<bean id="demoQueueDestination" class="org.apache.activemq.command.ActiveMQQueue">
<!-- 设置消息队列的名字 -->
<constructor-arg>
<value>demotest</value>
</constructor-arg>
</bean>
<bean id="demoTopicDestination" class="org.apache.activemq.command.ActiveMQTopic">
<!-- 设置消息队列的名字 -->
<constructor-arg>
<value>chat1</value>
</constructor-arg>
</bean>
<!-- 配置JMS模板(Queue),Spring提供的JMS工具类,它发送、接收消息。 -->
<bean id="jmsTemplate" class="org.springframework.jms.core.JmsTemplate">
<property name="connectionFactory" ref="connectionFactory" />
<property name="defaultDestination" ref="demoTopicDestination" />
<property name="receiveTimeout" value="10000" />
<!-- true是topic,false是queue,默认是false,此处显示写出false -->
<property name="pubSubDomain" value="true" />
</bean>
<!-- 配置消息队列监听者(Queue) -->
<bean id="queueMessageListener" class="com.micheal.mq.listener.QueueMessageListener" />
<!-- 配置消息队列监听者(Topic) -->
<bean id="topicMessageListener" class="com.micheal.mq.listener.TopicMessageListener" />
<!--<!– 显示注入消息监听容器(Queue),配置连接工厂,监听的目标是demoQueueDestination,监听器是上面定义的监听器 –>-->
<!--<bean id="queueListenerContainer"-->
<!--class="org.springframework.jms.listener.DefaultMessageListenerContainer">-->
<!--<property name="connectionFactory" ref="connectionFactory" />-->
<!--<property name="destination" ref="demoQueueDestination" />-->
<!--<property name="messageListener" ref="queueMessageListener" />-->
<!--</bean>-->
<!-- 显示注入消息监听容器(Topic),配置连接工厂,demoTopicDestination,监听器是上面定义的监听器 -->
<bean id="topicListenerContainer"
class="org.springframework.jms.listener.DefaultMessageListenerContainer">
<property name="connectionFactory" ref="connectionFactory" />
<property name="destination" ref="demoTopicDestination" />
<property name="messageListener" ref="topicMessageListener" />
</bean>
<bean id="topicListenerContainer1"
class="org.springframework.jms.listener.DefaultMessageListenerContainer">
<property name="connectionFactory" ref="connectionFactory" />
<property name="destination" ref="demoQueueDestination" />
<property name="messageListener" ref="queueMessageListener" />
</bean>
</beans>
第四步:配置spring-mvc.xml
<?xml version="1.0" encoding="UTF-8"?>
<beans xmlns="http://www.springframework.org/schema/beans"
       xmlns:xsi="http://www.w3.org/2001/XMLSchema-instance"
       xmlns:context="http://www.springframework.org/schema/context"
       xmlns:mvc="http://www.springframework.org/schema/mvc"
       xsi:schemaLocation="http://www.springframework.org/schema/beans
         http://www.springframework.org/schema/beans/spring-beans.xsd
         http://www.springframework.org/schema/mvc
         http://www.springframework.org/schema/mvc/spring-mvc.xsd
         http://www.springframework.org/schema/context
         http://www.springframework.org/schema/context/spring-context.xsd">
    <!-- 指定spring组件扫描的基本包路径 -->
    <context:component-scan base-package="com.micheal" >
        <context:include-filter type="annotation" expression="org.springframework.stereotype.Controller"></context:include-filter>
    </context:component-scan>
    <mvc:annotation-driven>
        <!--支持异步,用来实现前端ajax发送监听消息功能-->
        <mvc:async-support default-timeout="5000"/>
    </mvc:annotation-driven>
    <!-- 视图解析器配置-->
    <bean id="viewResolver" class="org.springframework.web.servlet.view.InternalResourceViewResolver">
        <property name="prefix" value="/views/" />
        <property name="suffix" value=".jsp" />
        <!--  定义其解析视图的order顺序为1 -->
        <property name="order" value="1" />
    </bean>
</beans>
第五步:配置web.xml
<?xml version="1.0" encoding="UTF-8"?>
<web-app xmlns="http://xmlns.jcp.org/xml/ns/javaee"
         xmlns:xsi="http://www.w3.org/2001/XMLSchema-instance"
         xsi:schemaLocation="http://xmlns.jcp.org/xml/ns/javaee http://xmlns.jcp.org/xml/ns/javaee/web-app_3_1.xsd"
         version="3.1">
    <display-name>springMvc</display-name>
    <welcome-file-list>
        <welcome-file>/views/index.jsp</welcome-file>
    </welcome-file-list>
    <servlet-mapping>
        <servlet-name>default</servlet-name>
        <url-pattern>*.js</url-pattern>
    </servlet-mapping>
    <!--用于实现ajax前端调用ActiveMQ,必须要要支持异步-->
    <context-param>
        <param-name>org.apache.activemq.brokerURL</param-name>
        <param-value>tcp://localhost:61616</param-value>
    </context-param>
    <servlet>
        <servlet-name>AjaxServlet</servlet-name>
        <servlet-class>org.apache.activemq.web.AjaxServlet</servlet-class>
        <load-on-startup>2</load-on-startup>
        <async-supported>true</async-supported>
    </servlet>

    <servlet-mapping>
        <servlet-name>AjaxServlet</servlet-name>
        <url-pattern>/views/amq/*</url-pattern>
    </servlet-mapping>

    <!-- 加载spring的配置文件 -->
    <context-param>
        <param-name>contextConfigLocation</param-name>
        <param-value>
            classpath:applicationContext*.xml;
        </param-value>
    </context-param>

    <listener>
        <listener-class>org.springframework.web.context.ContextLoaderListener</listener-class>
    </listener>

    <servlet>
        <servlet-name>springMVC</servlet-name>
        <servlet-class>org.springframework.web.servlet.DispatcherServlet</servlet-class>
        <init-param>
            <param-name>contextConfigLocation</param-name>
            <param-value>classpath:spring-mvc.xml</param-value>
        </init-param>
        <load-on-startup>1</load-on-startup>
        <async-supported>true</async-supported>
    </servlet>
    <servlet-mapping>
        <servlet-name>springMVC</servlet-name>
        <url-pattern>/</url-pattern>
    </servlet-mapping>

    <!-- 处理编码格式 -->
    <filter>
        <filter-name>encodingFilter</filter-name>
        <filter-class>org.springframework.web.filter.CharacterEncodingFilter</filter-class>
        <async-supported>true</async-supported>
        <init-param>
            <param-name>encoding</param-name>
            <param-value>UTF-8</param-value>
        </init-param>
        <init-param>
            <param-name>forceEncoding</param-name>
            <param-value>true</param-value>
        </init-param>
    </filter>
    <filter-mapping>
        <filter-name>encodingFilter</filter-name>
        <url-pattern>/*</url-pattern>
    </filter-mapping>
</web-app>
第六步:相关代码
/**
 * @description:生产者
 * @author: micheal
 * @date:2018/7/8
 */
@Service("producerService")
public class ProducerService {
    @Resource
    private JmsTemplate jmsTemplate;

    public void sendMessage(final String msg){
        Destination destination = jmsTemplate.getDefaultDestination();
        System.out.println(Thread.currentThread().getName()+"向默认队列"+destination+"发送消息");
        jmsTemplate.send(session -> session.createTextMessage(msg));
    }
}
/**
 * @description:消费者
 * @author: micheal
 * @date:2018/7/8
 */
@Service("customerService")
public class CustomerService {
    @Resource
    private JmsTemplate jmsTemplate;

    public TextMessage receive(){
        Destination destination = jmsTemplate.getDefaultDestination();
        TextMessage textMessage = (TextMessage) jmsTemplate.receive(destination);
        return textMessage;
    }
}
/**
 * @author micheal
 */
public class TopicMessageListener implements MessageListener {
    @Override
    public void onMessage(Message message) {
        try {
            System.out.println("从队列:"+message.getJMSDestination()+"获取到消息:"+((TextMessage)message).getText());
        } catch (JMSException e) {
            e.printStackTrace();
        }
    }
}
第七步:前端代码(实现前端页面聊天室)
<%--
  Created by IntelliJ IDEA.
  User: michael
  Date: 2018/7/10
  Time: 01:26
  To change this template use File | Settings | File Templates.
--%>
<%@ page contentType="text/html;charset=UTF-8" language="java" %>
<%
    request.setAttribute("org.apache.catalina.ASYNC_SUPPORTED", true);
%>
<html>
<head>
    <meta charset="UTF-8">
    <title>消息接受页面</title>
   <%-- ActiveMQ的demo下有需要引入的js,复制过来即可--%>
<script type="text/javascript" src="../js/jquery-1.4.2.min.js"></script>
<script type="text/javascript" src="../js/amq_jquery_adapter.js"></script>
<script type="text/javascript" src="../js/amq.js"></script>
<script>
    $(function(){
        var amq = org.activemq.Amq;
        var myDestination='topic://chat1';
        amq.init({
            uri: '/views/amq', //AjaxServlet所配置对应的URL
            logging: true,//激活日志记录
            timeout: 20,//保持连接时长,单位为秒
            clientId:(new Date()).getTime().toString() //防止多个浏览器窗口标签共享同一个JSESSIONID
        });

        //发送消息
        $("#sendBtn").click(function(){
            var msg=$("#msg").val();
            var name=$("#name").val();
            amq.sendMessage(myDestination, "<message name='"+name+"' msg='"+msg+"'/>");
            $("#msg").val("");
        });

        //接收消息
        var myHandler =
            {
                rcvMessage: function(message)
                {
                    //alert("received "+message);
                    $("#distext").append(message.getAttribute('name')+":"+message.getAttribute('msg')+"\n");
                }
            };

        amq.addListener('handler',myDestination,myHandler.rcvMessage);

    });

</script>
</head>
<body>
<h1>发送 ajax JMS 消息</h1>
消息窗口<br>
<textarea rows="10" cols="50" id="distext" readonly="readonly"></textarea>
<br>
<br/>
昵称:<input type="text" id="name"><br/>
消息:<input type="text"  id="msg">
<input type="button" value="发送消息" id="sendBtn"/>
</body>
</html>
学习来源:https://www.jianshu.com/p/684cf74ab443


