2019 SDN上机第6次作业
1.实验拓扑
-
实验拓扑

-
要求
使用Python脚本完成拓扑搭建,并连接ryu控制器。#!/usr/bin/python #Creating Inernet Topo from mininet.topo import Topo from mininet.net import Mininet from mininet.node import RemoteController,CPULimitedHost from mininet.link import TCLink from mininet.util import dumpNodeConnections class MyTopo(Topo): def __init__(self): #Initialize Topology Topo.__init__(self) L1 = 2 L3 = 3 c = [] #add core ovs for i in range(L1): sw = self.addSwitch('s{}'.format(i+1)) c.append(sw) #add Hosts count = 1 for sw1 in c: for i in range(0, 3): host = self.addHost('h{}'.format(count)) count+=1 self.addLink(sw1,host,i+1,1) #add Links sw3=c[0] sw4=c[1] self.addLink(sw3,sw4,4,4) topos = {'mytopo':(lambda:MyTopo())}运行拓扑:
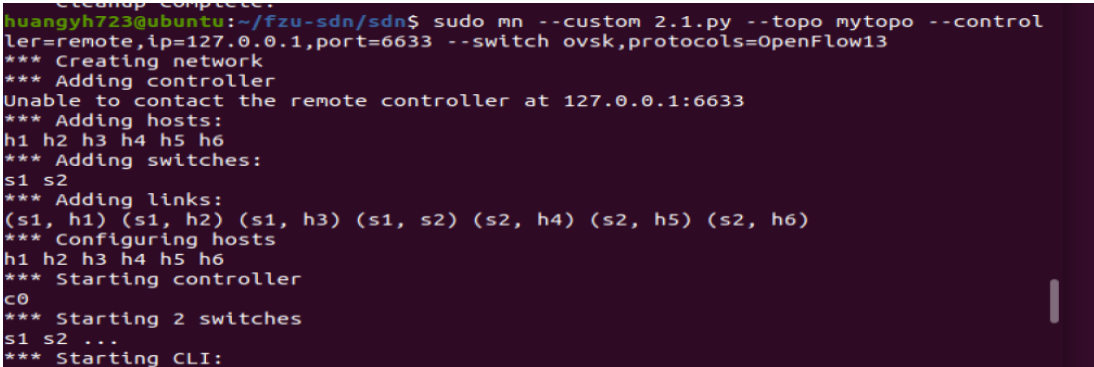
PINGALL一下:

连接Ryu控制器:

2.使用Ryu的REST API下发流表实现和第2次实验同样的VLAN
参考 Ryu控制器的API文档:ryu.app.ofctl_rest ,编写如下JSON文件:dpid根据交换机s1,s2分别为1,2
s1交换机下:
#s1
#端口号1发来数据
curl -X POST -d '{
    "dpid": 1,
    "priority":1,
    "match":{
        "in_port":1
    },
    "actions":[
        {
            "type": "PUSH_VLAN",     # s1将从主机发来的数据包打上vlan_tag
            "ethertype": 33024       # 帧类型0x8100(=33024): 表示IEEE 802.1Q的VLAN数据帧
        },
        {
            "type": "SET_FIELD",
            "field": "vlan_vid",     # 设置VLAN ID
            "value": 4096            # 设置vlan_id的值
        },
        {
            "type": "OUTPUT",
            "port": 4
        }
    ]
}' http://127.0.0.1:8080/stats/flowentry/add

#端口号2发来数据
curl -X POST -d '{
    "dpid": 1,
    "priority":1,
    "match":{
        "in_port":2
    },
    "actions":[
        {
            "type": "PUSH_VLAN",     # s1将从主机发来的数据包打上vlan_tag
            "ethertype": 33024       # 帧类型0x8100(=33024): 表示IEEE 802.1Q的VLAN数据帧
        },
        {
            "type": "SET_FIELD",
            "field": "vlan_vid",     # 设置VLAN ID
            "value": 4097            # 设置vlan_id的值
        },
        {
            "type": "OUTPUT",
            "port": 4
        }
    ]
}' http://127.0.0.1:8080/stats/flowentry/add

#端口号3发来数据
curl -X POST -d '{
    "dpid": 1,
    "priority":1,
    "match":{
        "in_port":3
    },
    "actions":[
        {
            "type": "PUSH_VLAN",     # s1将从主机发来的数据包打上vlan_tag
            "ethertype": 33024       # 帧类型0x8100(=33024): 表示IEEE 802.1Q的VLAN数据帧
        },
        {
            "type": "SET_FIELD",
            "field": "vlan_vid",     # 设置VLAN ID
            "value": 4098            # 设置vlan_id的值
        },
        {
            "type": "OUTPUT",
            "port": 4
        }
    ]
}' http://127.0.0.1:8080/stats/flowentry/add


#向端口1转发
curl -X POST -d '{
    "dpid": 1,
    "priority":1,
    "match":{
        "dl_vlan": "0"
    },
    "actions":[
        {
            "type": "POP_VLAN",     # 给进入交换机的包去除 vlan_tag
        },
        {
            "type": "OUTPUT",
            "port": 1
        }
    ]
}' http://localhost:8080/stats/flowentry/add

#向端口2转发
curl -X POST -d '{
    "dpid": 1,
    "priority":1,
    "match":{
        "dl_vlan": "1"
    },
    "actions":[
        {
            "type": "POP_VLAN",     # 给进入交换机的包去除 vlan_tag
        },
        {
            "type": "OUTPUT",
            "port": 2
        }
    ]
}' http://localhost:8080/stats/flowentry/add

#向端口3转发
curl -X POST -d '{
    "dpid": 1,
    "priority":1,
    "match":{
        "dl_vlan": "2"
    },
    "actions":[
        {
            "type": "POP_VLAN",     # 给进入交换机的包去除 vlan_tag
        },
        {
            "type": "OUTPUT",
            "port": 3
        }
    ]
}' http://localhost:8080/stats/flowentry/add
s2交换机下
#s2
#端口号1发来数据
curl -X POST -d '{
    "dpid": 2,
    "priority":1,
    "match":{
        "in_port":1
    },
    "actions":[
        {
            "type": "PUSH_VLAN",     # s1将从主机发来的数据包打上vlan_tag
            "ethertype": 33024       # 帧类型0x8100(=33024): 表示IEEE 802.1Q的VLAN数据帧
        },
        {
            "type": "SET_FIELD",
            "field": "vlan_vid",     # 设置VLAN ID
            "value": 4096            # 设置vlan_id的值
        },
        {
            "type": "OUTPUT",
            "port": 4
        }
    ]
}' http://127.0.0.1:8080/stats/flowentry/add

#端口号2发来数据
curl -X POST -d '{
    "dpid": 2,
    "priority":1,
    "match":{
        "in_port":2
    },
    "actions":[
        {
            "type": "PUSH_VLAN",     # s1将从主机发来的数据包打上vlan_tag
            "ethertype": 33024       # 帧类型0x8100(=33024): 表示IEEE 802.1Q的VLAN数据帧
        },
        {
            "type": "SET_FIELD",
            "field": "vlan_vid",     # 设置VLAN ID
            "value": 4097            # 设置vlan_id的值
        },
        {
            "type": "OUTPUT",
            "port": 4
        }
    ]
}' http://127.0.0.1:8080/stats/flowentry/add

#端口号3发来数据
curl -X POST -d '{
    "dpid": 2,
    "priority":1,
    "match":{
        "in_port":3
    },
    "actions":[
        {
            "type": "PUSH_VLAN",     # s1将从主机发来的数据包打上vlan_tag
            "ethertype": 33024       # 帧类型0x8100(=33024): 表示IEEE 802.1Q的VLAN数据帧
        },
        {
            "type": "SET_FIELD",
            "field": "vlan_vid",     # 设置VLAN ID
            "value": 4098            # 设置vlan_id的值
        },
        {
            "type": "OUTPUT",
            "port": 4
        }
    ]
}' http://127.0.0.1:8080/stats/flowentry/add


#向端口1转发
curl -X POST -d '{
    "dpid": 2,
    "priority":1,
    "match":{
        "dl_vlan": "0"
    },
    "actions":[
        {
            "type": "POP_VLAN",     # 给进入交换机的包去除 vlan_tag
        },
        {
            "type": "OUTPUT",
            "port": 1
        }
    ]
}' http://localhost:8080/stats/flowentry/add

#向端口2转发
curl -X POST -d '{
    "dpid": 2,
    "priority":1,
    "match":{
        "dl_vlan": "1"
    },
    "actions":[
        {
            "type": "POP_VLAN",     # 给进入交换机的包去除 vlan_tag
        },
        {
            "type": "OUTPUT",
            "port": 2
        }
    ]
}' http://localhost:8080/stats/flowentry/add

#向端口3转发
curl -X POST -d '{
    "dpid": 2,
    "priority":1,
    "match":{
        "dl_vlan": "2"
    },
    "actions":[
        {
            "type": "POP_VLAN",     # 给进入交换机的包去除 vlan_tag
        },
        {
            "type": "OUTPUT",
            "port": 3
        }
    ]
}' http://localhost:8080/stats/flowentry/add
将文件保存,之后运行.sh文件,发现提示Command curl Not Found,
百度一下:
安装:sudo apt-get install curl,问题解决。
控制器端显示下发的流表已被接收

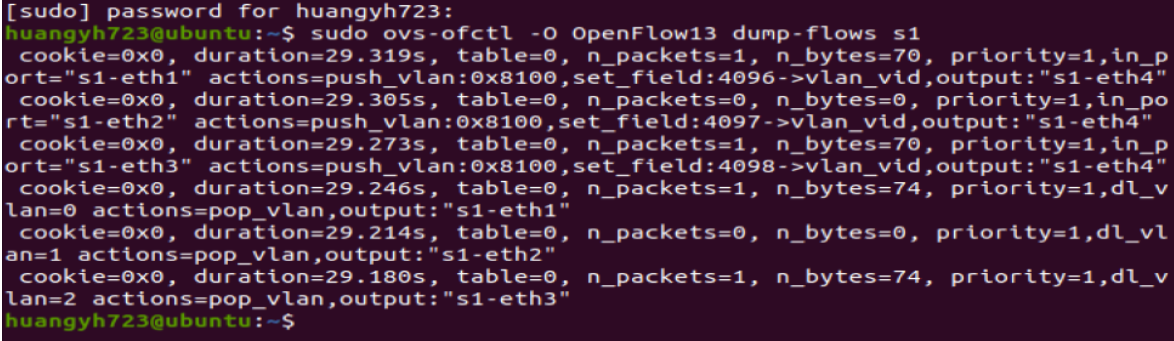
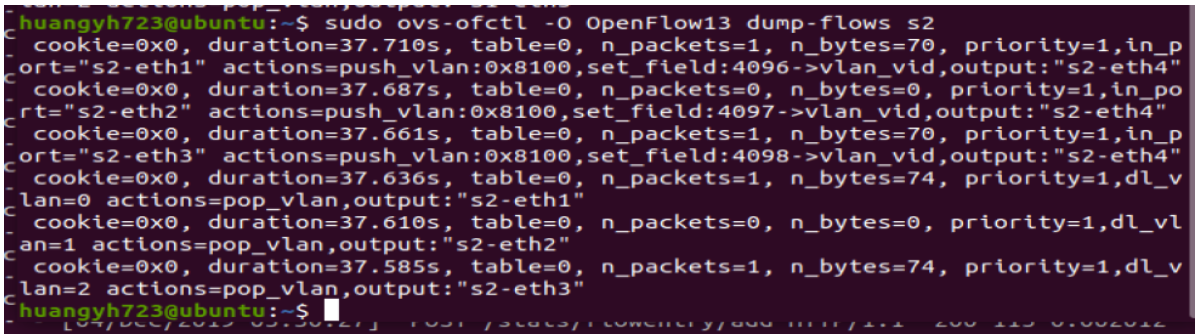
完成所有下发流表后,使用命令查看s1, s2流表
sudo ovs-ofctl -O OpenFlow13 dump-flows s1
sudo ovs-ofctl -O OpenFlow13 dump-flows s2
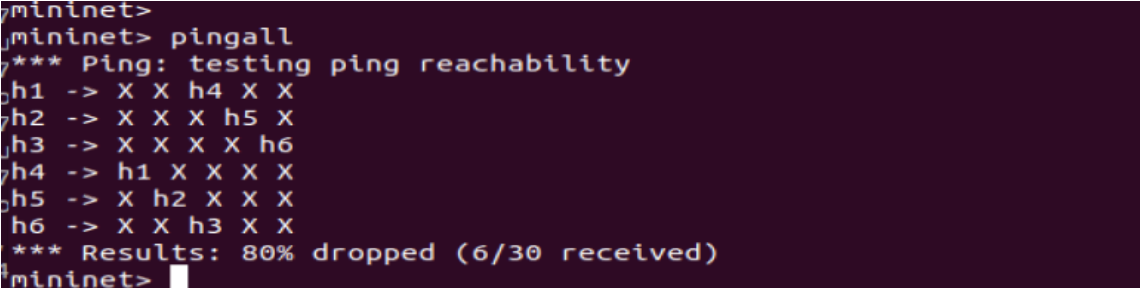
最后使用PINGALL查看其连通性
3.对比两种方法,写出你的实验体会
心得体会,第二种感觉更高大上一点,而且不用安装软件非常快乐!!!
