第 11 章 表格元素
这里将要介绍的是用来制作表格的HTML元素。表格的主要用途是以网格的形式显示二维数据。然而在HTML的早期版本中,用表格控制页面内容布局的现象很常见。在HTML5中已经不再允许这样做,取而代之的是新增的CSS表格特性。
生成基本的表格
有三个元素是每个表格都必须要有的:table、tr和td。表(table元素)概括了table元素。
table元素


下一个核心表格元素是tr,它表示表格中的行。HTML表格基于行而不是列,每个行必须分别标记。表(tr元素)概括了tr元素。
tr元素
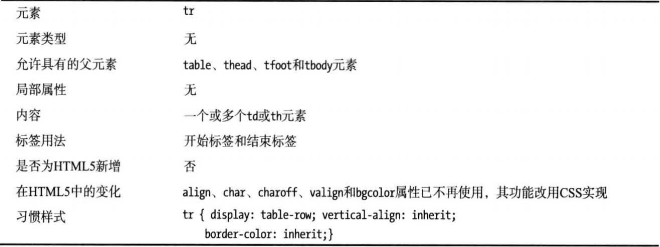
三个核心元素中的最后一个是td,它表示表格中的单元格。表(td元素)概括了td元素。
td元素
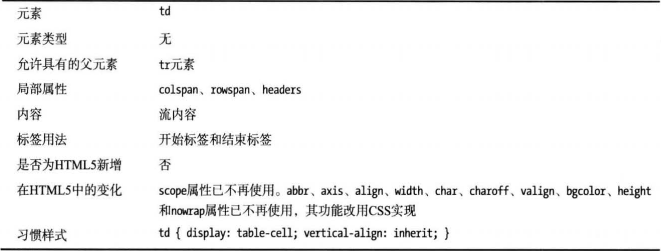
有了这三个元素,就可以用它们组装出表格,如代码清单1所示。
代码清单1 用table、tr和td元素制作表格
<!DOCTYPE HTML>
<html>
    <head>
        <title>黄子涵</title>
        <meta name="作者" content="黄子涵"/>
        <meta name="描述" content="黄子涵是帅哥!"/>
        <link rel="shortcut icon" href="C:\Users\Administrator\Desktop\front end\favicon.ico" type="image/x-icon"/>
    </head>
    <body>
        <table>
            <tr>
                <td>你会成为你想的那个人</td>
                <td>你被写在我的歌里</td>
                <td>意外</td>
            </tr>
            <tr>
                <td>明明就</td>
                <td>往事只能回味</td>
                <td>晴天</td>
            </tr>
        </table>
    </body>
</html>
此例定义了一个两行(分别由两个tr元素表示)的表格。每行有三列,一个td元素代表一列。td元素可以包含任何流内容,但本例只使用了文字。以习惯样式显示的这个表格如图(显示简单表格)所示。

这个表格非常简单,不过足以显示出基本的结构。浏览器会调整行与列的尺寸以维持表格的形式。下面做个试验,给这个表格添加点更长的内容看看会有什么变化,如代码清单2所示。
代码清单2 添加一些内容更长的单元格
<!DOCTYPE HTML>
<html>
    <head>
        <title>黄子涵</title>
        <meta name="作者" content="黄子涵"/>
        <meta name="描述" content="黄子涵是帅哥!"/>
        <link rel="shortcut icon" href="C:\Users\Administrator\Desktop\front end\favicon.ico" type="image/x-icon"/>
    </head>
    <body>
        <table>
            <tr>
                <td>你会成为你想的那个人</td>
                <td>你被写在我的歌里</td>
                <td>意外</td>
            </tr>
            <tr>
                <td>明明就</td>
                <td>往事只能回味</td>
                <td>晴天</td>
            </tr>
            <tr>
                <td>学不会</td>
                <td>你曾是少年</td>
                <td>曾经是情侣</td>
            </tr>
        </table>
    </body>
</html>
每个新添加的td元素中的内容都比原有两行中的单元格的内容长。浏览器会调整其他单元格,让它们宽度一致,如图(重新调整单元格的大小以容纳更长的内容)所示。

table元素最棒的特性之一是作者不必操心尺寸的问题。浏览器会保证让列的宽度足以容纳最宽的内容,让行的高度足以容纳最高的单元格。
添加表头单元格
th元素表示表头的单元格,它可以用来区分数据和对数据的说明。表(th元素)概括了th元素。
th元素
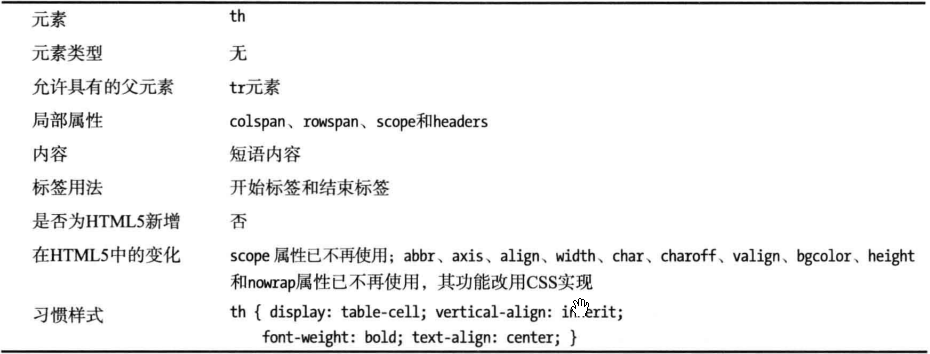
代码清单3在表格中添加了一些th元素,用以说明td元素中包含的数据的含义。
代码清单3 为表格添加表头单元格
<!DOCTYPE HTML>
<html>
    <head>
        <title>黄子涵</title>
        <meta name="作者" content="黄子涵"/>
        <meta name="描述" content="黄子涵是帅哥!"/>
        <link rel="shortcut icon" href="C:\Users\Administrator\Desktop\front end\favicon.ico" type="image/x-icon"/>
    </head>
    <body>
        <table>
            <tr>
                <th>周杰伦</th><th>梁博</th>
                <th>薛之谦</th><th>林俊杰</th>
            </tr>
            <tr>
                <th>歌曲一:</th>
                <td>你会成为你想的那个人</td>
                <td>你被写在我的歌里</td>
                <td>意外</td>
            </tr>
            <tr>
                <th>歌曲二:</th>
                <td>明明就</td>
                <td>往事只能回味</td>
                <td>晴天</td>
            </tr>
            <tr>
                <th>歌曲三:</th>
                <td>学不会</td>
                <td>你曾是少年</td>
                <td>曾经是情侣</td>
            </tr>
        </table>
    </body>
</html>
从代码清单中可以看到:可以在一行中混合使用th和td元素,也可以让一行包含清一色的th元素。这个文档在浏览器中的显示结果如图(为表格添加表头单元格)所示。

为表格添加结构
基本表格有了,但现在遇到一个问题。在设置表格样式的时候就会发现,要区别全是th元素的行中的th元素和与数据单元格混在一行中的th元素并不容易。只要用点心思,这是可以办到的。代码清单4展示了一种处理办法。
代码清单4 区分表格中的不同th元素
<!DOCTYPE HTML>
<html>
    <head>
        <title>黄子涵</title>
        <meta name="作者" content="黄子涵"/>
        <meta name="描述" content="黄子涵是帅哥!"/>
        <link rel="shortcut icon" href="C:\Users\Administrator\Desktop\front end\favicon.ico" type="image/x-icon"/>
        <style>
            tr > th { text-align: left; background: lightgrey; color: grey; }
            tr > th:only-of-type { text-align: right; background: lightgrey; color: grey; }
        </style>
    </head>
    <body>
        <table>
            <tr>
                <th>周杰伦</th><th>梁博</th>
                <th>薛之谦</th><th>林俊杰</th>
            </tr>
            <tr>
                <th>歌曲一:</th>
                <td>你会成为你想的那个人</td>
                <td>你被写在我的歌里</td>
                <td>意外</td>
            </tr>
            <tr>
                <th>歌曲二:</th>
                <td>明明就</td>
                <td>往事只能回味</td>
                <td>晴天</td>
            </tr>
            <tr>
                <th>歌曲三:</th>
                <td>学不会</td>
                <td>你曾是少年</td>
                <td>曾经是情侣</td>
            </tr>
        </table>
    </body>
</html>
此例使用了两个选择器。一个选择器匹配所有th元素,另一个只匹配tr元素的子元素中唯一的th元素。样式的效果如图(为不同的th元素应用不同的样式)所示。

这个办法效果不错,却有失灵活。要是在数据行中再添加别的th元素,第二个选择器就不起作用了。
要想灵活处理这个问题,可以使用thead、tbody和tfoot元素。这些元素可以用来为表格添加结构。表格有了结构之后的一大好处是区别处理不同部分更简单了,尤其是在涉及CSS选择器的时候。
表示表头和表格主题
tbody元素表示构成表格主体的全体行————不包括表头行和表脚行(它们分别由thead和tfoot元素表示,稍后就会介绍)。表(tbody元素)概括了tbody元素。
tbody元素
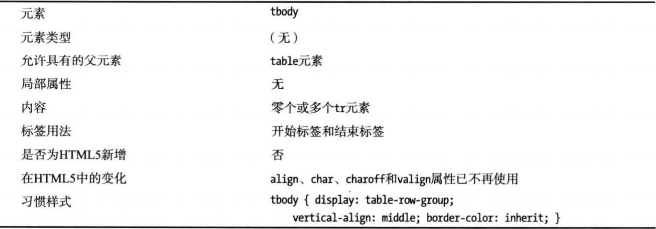
顺便提一句,即便在文档中表格没有用到tbody元素,大多数浏览器在处理table元素的时候都会自动插入tbody元素。因此完全根据文档中的表格结构来设计的CSS选择器有可能不管用。例如,由于浏览器在table和tr元素之间插了一个tbody元素,所以table > tr这个选择器会失效。为了应对这种情况,需要使用table > tbody > testable tr (没有字符〉)这样的选择器,或者干脆写成tbody > tr。
thead元素用来标记表格的标题行。表(thead元素)概括了thead元素。
thead元素
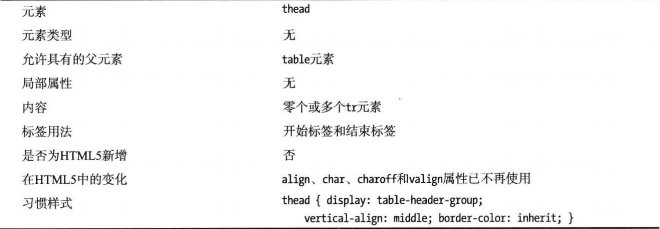
如果没有thead元素的话,所有tr元素都会被视为表格主体的一部分。代码清单5在示例表格中添加了thead和tbody元素,并且相应地使用了更为灵活的CSS选择器。
代码清单5 为表格添加thead和tbody元素
<!DOCTYPE HTML>
<html>
    <head>
        <title>黄子涵</title>
        <meta name="作者" content="黄子涵"/>
        <meta name="描述" content="黄子涵是帅哥!"/>
        <link rel="shortcut icon" href="C:\Users\Administrator\Desktop\front end\favicon.ico" type="image/x-icon"/>
        <style>
            thead th { text-align: left; background: grey; color: grey; }
            tbody th { text-align: right; background: lightgrey; color: grey; }
        </style>
    </head>
    <body>
        <table>
            <thead>
                <tr>
                    <th>周杰伦</th><th>梁博</th>
                    <th>薛之谦</th><th>林俊杰</th>
                </tr>
            </thead>
            <tbody>
                <tr>
                    <th>歌曲一:</th>
                    <td>你会成为你想的那个人</td>
                    <td>你被写在我的歌里</td>
                    <td>意外</td>
                </tr>
                <tr>
                    <th>歌曲二:</th>
                    <td>明明就</td>
                    <td>往事只能回味</td>
                    <td>晴天</td>
                </tr>
                <tr>
                    <th>歌曲三:</th>
                    <td>学不会</td>
                    <td>你曾是少年</td>
                    <td>曾经是情侣</td>
                </tr>
            </tbody>
        </table>
    </body>
</html>
这个改变看似不大,但是表格增加了这些结构之后,区别处理不同类型的单元格就容易多了, 也不再那么容易受表格设计改动的影响。
添加表脚
tfoot元素用来标记组成表脚的行。表(tfoot元素)概括了tfoot元素。
tfoot元素
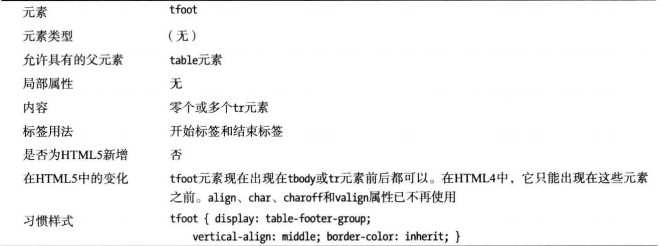
代码清单6示范了如何用tfoot元素为表格生成表脚。在HTML5之前,tfoot元素只能岀现在tbody元素(如果省略tbody元素,则是第一个tr元素)之前。在HTML5中则可以把tfoot元素放在tbody元素之后或最后一个tr元素之后,这与浏览器显示表格的方式更为一致。代码清单6中的tfoot位于第一种位置————其实哪种位置都行。我觉得以编程方式用模板生成HTML代码时把tfoot放在tbody之前通常更方便一点,而手工编写HTML代码时把tfoot放在tbody之后要更自然一点。
代码清单6 使用tfoot元素
<!DOCTYPE HTML>
<html>
    <head>
        <title>黄子涵</title>
        <meta name="作者" content="黄子涵"/>
        <meta name="描述" content="黄子涵是帅哥!"/>
        <link rel="shortcut icon" href="C:\Users\Administrator\Desktop\front end\favicon.ico" type="image/x-icon"/>
        <style>
            thead th , tfoot th { text-align: left; background: grey; color: white; }
            tbody th { text-align: right; background: lightgrey; color: grey; }
        </style>
    </head>
    <body>
        <table>
            <thead>
                <tr>
                    <th>周杰伦</th><th>梁博</th>
                    <th>薛之谦</th><th>林俊杰</th>
                </tr>
            </thead>
            <tfoot>
                <tr>
                    <th>周杰伦</th><th>梁博</th>
                    <th>薛之谦</th><th>林俊杰</th>
                </tr>
            </tfoot>
            <tbody>
                <tr>
                    <th>歌曲一:</th>
                    <td>你会成为你想的那个人</td>
                    <td>你被写在我的歌里</td>
                    <td>意外</td>
                </tr>
                <tr>
                    <th>歌曲二:</th>
                    <td>明明就</td>
                    <td>往事只能回味</td>
                    <td>晴天</td>
                </tr>
                <tr>
                    <th>歌曲三:</th>
                    <td>学不会</td>
                    <td>你曾是少年</td>
                    <td>曾经是情侣</td>
                </tr>
            </tbody>
        </table>
    </body>
</html>
此例把表头中的行复制到了表脚中。文档中有个样式还添加了另一个选择器,以便thead和tfoot元素中的th元素使用同样的样式。图(为表格添加表脚)显示了新添加的表脚。

制作不规则表格
大多数表格都是简单的网格形式,每个单元格占据网格中的一个位置。但是为了表示更复杂的数据,有时需要制作不规则的表格,其中的单元格会跨越几行或几列。这种表格的制作要用到td和th元素的colspan和rowspan属性。代码清单7示范了如何用这些属性制作不规则表格。
代码清单7 制作不规则表格
<!DOCTYPE HTML>
<html>
<head>
<title>黄子涵</title>
<meta name="作者" content="黄子涵"/>
<meta name="描述" content="黄子涵是帅哥!"/>
<link rel="shortcut icon" href="C:\Users\Administrator\Desktop\front end\favicon.ico" type="image/x-icon"/>
<style>
thead th , tfoot th { text-align:left; background:grey; color:white }
tbody th { text-align:right; background:lightgrey; color:grey }
[colspan], [rowspan] { font-weight: bold; border: medium solid black }
thead [colspan], tfoot [colspan] { text-align: center }
</style>
</head>
<body>
<table>
<thead>
<tr>
<th>名字</th><th>歌曲</th><th>籍贯</th>
<th colspan="2">年龄和粉丝数</th>
</tr>
</thead>
<tbody>
<tr>
<th>林志美</th><td>初恋</td>
<td>广东揭阳</td><td>58</td>
<td>2.2W</td>
</tr>
<tr>
<th>梁博</th><td>你会成为你想的那个人</td>
<td>吉林长春</td><td>31</td>
<td>44.3W</td>
</tr>
<tr>
<th>张国荣</th><td>无心睡眠</td>
<td colspan="2" rowspan="2">
黄子涵真棒!
</td>
<td>117W</td>
</tr>
<tr>
<th rowspan="2">周杰伦</th>
<td>明明就</td>
<td rowspan="2">1262.9W</td>
</tr>
<tr>
<td>七里香</td>
<td>晴天</td>
<td>夜曲</td>
</tr>
</tbody>
<tfoot>
<tr>
<th colspan="5"> © 版权归黄子涵所有</th>
</tr>
</tfoot>
</table>
</body>
</html>
想让一个单元格纵跨多行要用rowspan属性,为该属性设置的值就是所跨行数。同样,想让一个单元格横跨多列要用colspan属性。
提示
为rowspan和colspan设置的值必须是整数。有些浏览器会把100%这个值理解为表格中所有的行或列,但是这不是HTML5标准中的内容,没有得到一致实现。
例中还添加了一些样式,用来突出显示跨越多行或多列的单元格。如图所示。相关单元格都具有粗线边框。
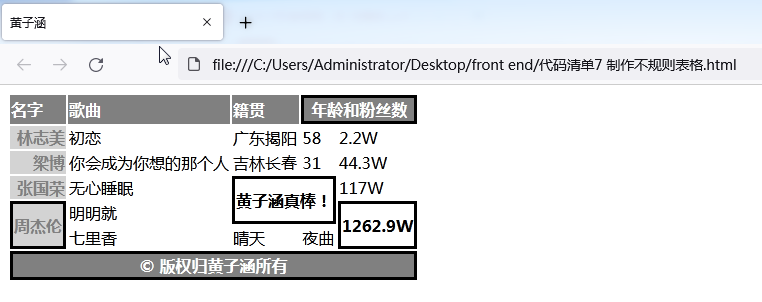
colspan和rowspan属性应该用在要占据的网格左上角那个单元格上。正常情况下位于它所跨越的位置上的td和th元素此时则被省略。下面来看一个例子,先看看代码清单8所示的表格。
代码清单8 一个简单的表格
<!DOCTYPE HTML>
<html>
    <head>
        <title>黄子涵</title>
        <meta name="作者" content="黄子涵"/>
        <meta name="描述" content="黄子涵是帅哥!"/>
        <link rel="shortcut icon" href="C:\Users\Administrator\Desktop\front end\favicon.ico" type="image/x-icon"/>
        <style>
            td {border: thin solid black; padding: 5px; font-size: x-large};
        </style>
    </head>
    <body>
        <table>
            <tr>
                <td>告白</td>
                <td>让一切随风</td>
                <td>西游记</td>
            </tr>
            <tr>
                <td>你究竟有几个好妹妹</td>
                <td>后来的我们</td>
                <td>残酷月光</td>
            </tr>
            <tr>
                <td>淘汰</td>
                <td>你曾是少年</td>
                <td>小小</td>
            </tr>
        </table>
    </body>
</html>
这是一个三行三列的常规表格,如图所示。

如果想让中间一列的一个单元格纵跨所有三行,则应设置2号单元格的rowspan属性,这是因为它是要覆盖的网格区域中最靠上的单元格(也是最靠左的,不过这在本例中无所谓)。此外, 扩展后的单元格将覆盖的那些单元格元素应该删除。代码清单9中实施了这些改变。
代码清单9 将一个单元格扩展到多行
<!DOCTYPE HTML>
<html>
    <head>
        <title>黄子涵</title>
        <meta name="作者" content="黄子涵"/>
        <meta name="描述" content="黄子涵是帅哥!"/>
        <link rel="shortcut icon" href="C:\Users\Administrator\Desktop\front end\favicon.ico" type="image/x-icon"/>
        <style>
            td {border: thin solid black; padding: 5px; font-size: x-large};
        </style>
    </head>
    <body>
        <table>
            <tr>
                <td>告白</td>
                <td rowspan="3">让一切随风</td>
                <td>西游记</td>
            </tr>
            <tr>
                <td>后来的我们</td>
                <td>残酷月光</td>
            </tr>
            <tr>
                <td>淘汰</td>
                <td>小小</td>
            </tr>
        </table>
    </body>
</html>
这些改动的结果如图所示。

浏览器会负责将所定义的其他单元格妥善安置在扩展后的单元格周围。
注意
不要让两个单元格扩展到同一个区域从而形成重叠单元格。表格元素的用途是表示表格式数据。使用重叠单元格唯一的原因只能是用表格元素布置其他元素,而这个事情应该用CSS的表格特性来做。
把表头与单元格关联起来
td和th元素都定义了headers属性,它可以供屏幕阅读器和其他残障辅助技术用来简化对表格的处理。headers属性的值可被设置为一个或多个th单元格的id属性值。代码清单10示范了这个属性的用法。
代码清单10 使用headers属性
<!DOCTYPE HTML>
<html>
<head>
<title>黄子涵</title>
<meta name="作者" content="黄子涵"/>
<meta name="描述" content="黄子涵是帅哥!"/>
<link rel="shortcut icon" href="C:\Users\Administrator\Desktop\front end\favicon.ico" type="image/x-icon"/>
<style>
thead th , tfoot th { text-align:left; background:grey; color:white }
tbody th { text-align:right; background:lightgrey; color:grey }
thead [colspan], tfoot [colspan] { text-align: center }
</style>
</head>
<body>
<table>
<thead>
<tr>
<th id="名字">名字</th>
<th id="歌曲">歌曲</th>
<th id="籍贯">籍贯</th>
<th id="年龄和粉丝数" colspan="2">年龄和粉丝数</th>
</tr>
</thead>
<tbody>
<tr>
<th id="第一" headers="名字">林志美</th>
<td headers="歌曲 第一">初恋</td>
<td headers="籍贯 第一">广东揭阳</td>
<td headers="年龄 第一">58</td>
<td headers="粉丝数 第一">2.2W</td>
</tr>
<tr>
<th id="第二" headers="名字">梁博</th>
<td headers="歌曲 第二">你会成为你想的那个人</td>
<td headers="籍贯 第二">吉林长春</td>
<td headers="年龄 第二">31</td>
<td headers="粉丝数 第二">44.3W</td>
</tr>
</tbody>
<tfoot>
<tr>
<th colspan="5"> © 版权归黄子涵所有</th>
</tr>
</tfoot>
</table>
</body>
</html>
此例为thead和tbody中的每一个th元素都设置了全局的id属性值。tbody中的每一个td和th元素都通过设置headers属性将相应单元格与列表头关联起来。其中td元素还指定了所关联的行表头(出现在第一列中的表头)。
为表格添加标题
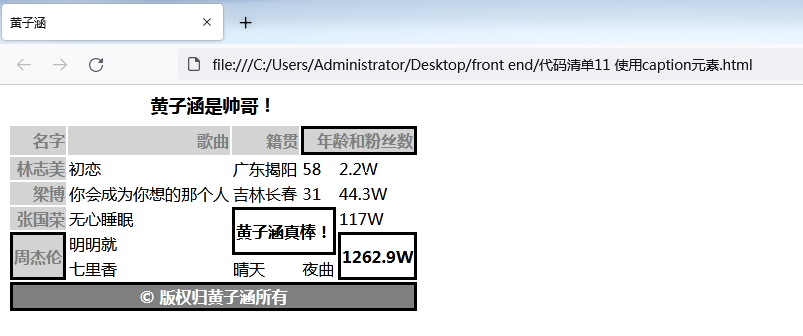
caption元素可以用来为表格定义一个标题并将其与表格关联起来。表(caption元素)概括了caption元素。
caption元素

代码清单11示范了caption元素的用法。
代码清单11 使用caption元素
<!DOCTYPE HTML>
<html>
<head>
<title>黄子涵</title>
<meta name="作者" content="黄子涵"/>
<meta name="描述" content="黄子涵是帅哥!"/>
<link rel="shortcut icon" href="C:\Users\Administrator\Desktop\front end\favicon.ico" type="image/x-icon"/>
<style>
thead th , tfoot th { text-align:left; background:grey; color:white }
tbody th { text-align:right; background:lightgrey; color:grey }
[colspan], [rowspan] { font-weight: bold; border: medium solid black }
thead [colspan], tfoot [colspan] { text-align: center }
caption {font-weight: bold; font-size: large; margin-bottom: 5px}
</style>
</head>
<body>
<table>
<thead>
<caption>黄子涵是帅哥!</caption>
<tr>
<th>名字</th><th>歌曲</th><th>籍贯</th>
<th colspan="2">年龄和粉丝数</th>
</tr>
</thead>
<tbody>
<tr>
<th>林志美</th><td>初恋</td><td>广东揭阳</td>
<td>58</td><td>2.2W</td>
</tr>
<tr>
<th>梁博</th><td>你会成为你想的那个人</td><td>吉林长春</td>
<td>31</td><td>44.3W</td>
</tr>
<tr>
<th>张国荣</th><td>无心睡眠</td>
<td colspan="2" rowspan="2">
黄子涵真棒!
</td>
<td>117W</td>
</tr>
<tr>
<th rowspan="2">周杰伦</th>
<td>明明就</td>
<td rowspan="2">1262.9W</td>
</tr>
<tr>
<td>七里香</td>
<td>晴天</td>
<td>夜曲</td>
</tr>
</tbody>
<tfoot>
<tr>
<th colspan="5"> © 版权归黄子涵所有</th>
</tr>
</tfoot>
</table>
</body>
</html>
一个表格只能包含一个caption元素。它不必是表格的第一个子元素,但是无论定义在什么位置,它总会显示在表格上方。图显示了表格标题(及所应用的样式)的效果。
处理列
HTML中的表格是基于行的。单元格的定义都要放在tr元素中,而表格则是一行一行地组建岀来的。因此对列应用样式有点不方便,对于包含不规则单元格的表格更是如此。这个问题的解决办法是使用colgroup和col元素。colgroup代表一组列。表(colgroup元素)概括了colgroup元素。
colgroup元素

代码清单12示范了colgroup元素的用法。
代码清单12 使用colgroup元素
<!DOCTYPE HTML>
<html>
<head>
<title>黄子涵</title>
<meta name="作者" content="黄子涵"/>
<meta name="描述" content="黄子涵是帅哥!"/>
<link rel="shortcut icon" href="C:\Users\Administrator\Desktop\front end\favicon.ico" type="image/x-icon"/>
<style>
thead th , tfoot th { text-align:left; background:grey; color:white }
tbody th { text-align:right; background:lightgrey; color:grey }
[colspan], [rowspan] { font-weight: bold; border: medium solid black }
thead [colspan], tfoot [colspan] { text-align: center }
caption {font-weight: bold; font-size: large; margin-bottom: 5px}
#colgroup_huangzihan1 {background-color: red}
#colgroup_huangzihan2 {background-image: green; font-size: small}
</style>
</head>
<body>
<table>
<thead>
<caption>黄子涵是帅哥!</caption>
<colgroup id="colgroup_huangzihan1" span="3"/>
<colgroup id="colgroup_huangzihan2" span="2"/>
<tr>
<th>名字</th><th>歌曲</th><th>籍贯</th>
<th colspan="2">年龄和粉丝数</th>
</tr>
</thead>
<tbody>
<tr>
<th>林志美</th><td>初恋</td><td>广东揭阳</td>
<td>58</td><td>2.2W</td>
</tr>
<tr>
<th>梁博</th><td>你会成为你想的那个人</td><td>吉林长春</td>
<td>31</td><td>44.3W</td>
</tr>
<tr>
<th>张国荣</th><td>无心睡眠</td>
<td colspan="2" rowspan="2">
黄子涵真棒!
</td>
<td>117W</td>
</tr>
<tr>
<th rowspan="2">周杰伦</th>
<td>明明就</td>
<td rowspan="2">1262.9W</td>
</tr>
<tr>
<td>七里香</td>
<td>晴天</td>
<td>夜曲</td>
</tr>
</tbody>
<tfoot>
<tr>
<th colspan="5"> © 版权归黄子涵所有</th>
</tr>
</tfoot>
</table>
</body>
</html>
此例定义了两个colgroup元素。span属性指定了colgroup元素负责的列数。代码清单中的第一个colgroup元素负责表格中的前三列,另一个colgroup负责剩余两列。两个colgroup元素都设置了id属性值,并以其id值为选择器定义了相应的CSS样式。其效果如图所示。
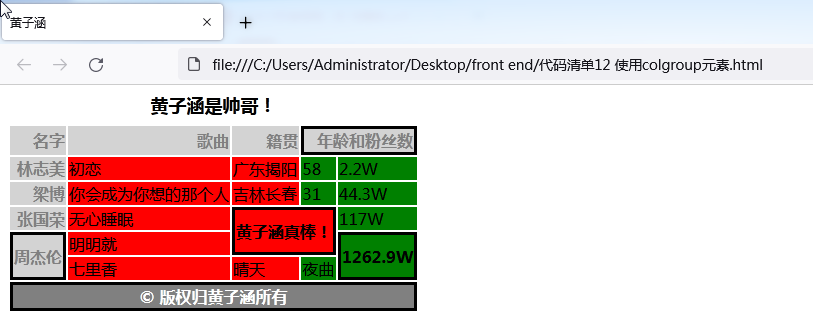
该图揭示了colgroup元素使用中的一些重要特点。首先,应用到colgroup上的CSS样式在具体程度上低于直接应用到tr、td和th元素上的样式。从应用到thead、tfoot和第一列th元素上的样式未受应用到colgroup元素上的样式的影响就能看出这一点。要是把针对colgroup元素的样式之外的样式都删除掉,那么所有单元格都会受到colgroup样式的影响,如图所示。
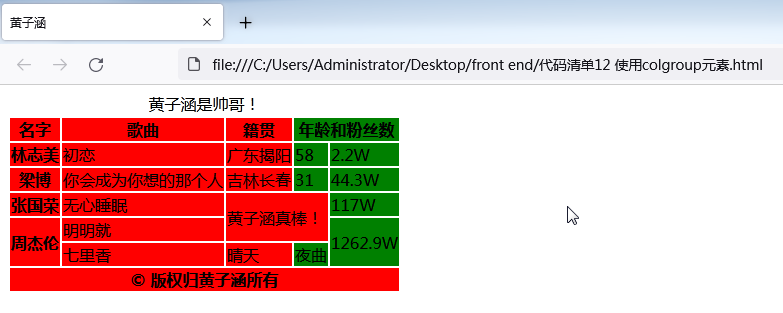
上图删除了针对colgroup元素的样式之外的所有样式之后
第二,不规则单元格被计入其起始列。从表格的第三行可以看出这一点。在此行中有一个应用了第一种样式的单元格扩展到了由另一个colgroup元素负责的区域。
最后要说的是,colgroup元素的影响范围覆盖了列中所有的单元格,包括那些位于thead和tfoot元素中的单元格,不管它们是用th还是td元素定义的。colgroup元素的特别之处就在于它影响到的元素并未包含在其内部。因此该元素无法用做更具体的选择器的基础(如#colgroupl > td这个选择器不会有任何匹配元素)
表示个别的列
也可以不用colgroup元素的span属性,改用col元素指定组中的各列。下表概括了col元素。
col元素

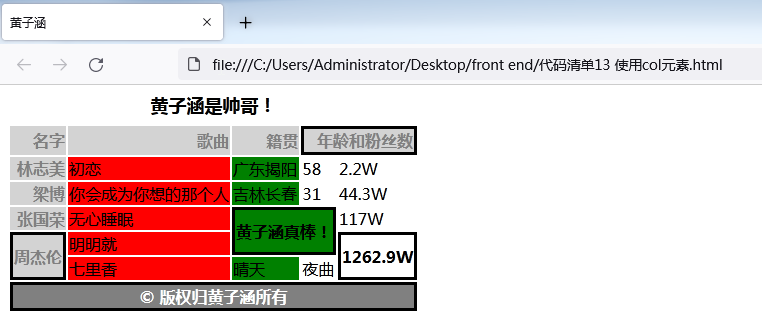
使用col元素的好处在于能够获得更多控制权。有了它,既能对一组列应用样式,也能对该组中个别的列应用样式。col元素位于colgroup元素之中,每个col元素代表列组中的一列(未使用span属性的情况),如代码清单13所示。
代码清单13 使用col元素
<!DOCTYPE HTML>
<html>
<head>
<title>黄子涵</title>
<meta name="作者" content="黄子涵"/>
<meta name="描述" content="黄子涵是帅哥!"/>
<link rel="shortcut icon" href="C:\Users\Administrator\Desktop\front end\favicon.ico" type="image/x-icon"/>
<style>
thead th , tfoot th { text-align:left; background:grey; color:white }
tbody th { text-align:right; background:lightgrey; color:grey }
[colspan], [rowspan] { font-weight: bold; border: medium solid black }
thead [colspan], tfoot [colspan] { text-align: center }
caption {font-weight: bold; font-size: large; margin-bottom: 5px}
#colgroup_huangzihan1 {background-color: red}
#col_huangzihan3 {background-color: green; font-size: small}
</style>
</head>
<body>
<table>
<thead>
<caption>黄子涵是帅哥!</caption>
<colgroup id="colgroup_huangzihan1" span="3"/>
<col id="col_huangzihan1And2" span="2"/>
<col id="col_huangzihan3"
</colgroup>
<tr>
<th>名字</th><th>歌曲</th><th>籍贯</th>
<th colspan="2">年龄和粉丝数</th>
</tr>
</thead>
<tbody>
<tr>
<th>林志美</th><td>初恋</td><td>广东揭阳</td>
<td>58</td><td>2.2W</td>
</tr>
<tr>
<th>梁博</th><td>你会成为你想的那个人</td><td>吉林长春</td>
<td>31</td><td>44.3W</td>
</tr>
<tr>
<th>张国荣</th><td>无心睡眠</td>
<td colspan="2" rowspan="2">
黄子涵真棒!
</td>
<td>117W</td>
</tr>
<tr>
<th rowspan="2">周杰伦</th>
<td>明明就</td>
<td rowspan="2">1262.9W</td>
</tr>
<tr>
<td>七里香</td>
<td>晴天</td>
<td>夜曲</td>
</tr>
</tbody>
<tfoot>
<tr>
<th colspan="5"> © 版权归黄子涵所有</th>
</tr>
</tfoot>
</table>
</body>
</html>
可以用col元素的span属性让一个col元素代表几列。不用span属性的col元素只代表一列。此例分另为一个colgroup元素和其中的一个col元素设定了样式。其效果如图所示。
设置表格边框
table元素定义了border属性。使用这个属性就是告诉浏览器这个表格是用来表示表格式数据而不是用来布置其他元素的。大多数浏览器见到border属性后会在表格和每个单元格周围绘出边框。代码清单14示范了 border属性的用法。
代码清单14 使用border属性
<!DOCTYPE HTML>
<html>
<head>
<title>黄子涵</title>
<meta name="作者" content="黄子涵"/>
<meta name="描述" content="黄子涵是帅哥!"/>
<link rel="shortcut icon" href="C:\Users\Administrator\Desktop\front end\favicon.ico" type="image/x-icon"/>
</head>
<body>
<table border="1">
<thead>
<caption>黄子涵是帅哥!</caption>
<colgroup id="colgroup_huangzihan1" span="3"/>
<col id="col_huangzihan1And2" span="2"/>
<col id="col_huangzihan3"
</colgroup>
<tr>
<th>名字</th><th>歌曲</th><th>籍贯</th>
<th colspan="2">年龄和粉丝数</th>
</tr>
</thead>
<tbody>
<tr>
<th>林志美</th><td>初恋</td><td>广东揭阳</td>
<td>58</td><td>2.2W</td>
</tr>
<tr>
<th>梁博</th><td>你会成为你想的那个人</td><td>吉林长春</td>
<td>31</td><td>44.3W</td>
</tr>
<tr>
<th>张国荣</th><td>无心睡眠</td>
<td colspan="2" rowspan="2">
黄子涵真棒!
</td>
<td>117W</td>
</tr>
<tr>
<th rowspan="2">周杰伦</th>
<td>明明就</td>
<td rowspan="2">1262.9W</td>
</tr>
<tr>
<td>七里香</td>
<td>晴天</td>
<td>夜曲</td>
</tr>
</tbody>
<tfoot>
<tr>
<th colspan="5"> © 版权归黄子涵所有</th>
</tr>
</tfoot>
</table>
</body>
</html>
border属性的值必须设置为1或空字符串("")。该属性并不控制边框的样式,那是CSS的工作。下图显示了带border属性的表格在火狐浏览器中的显示结果(注意此例删除了style元素以便强调border属性的效果)。
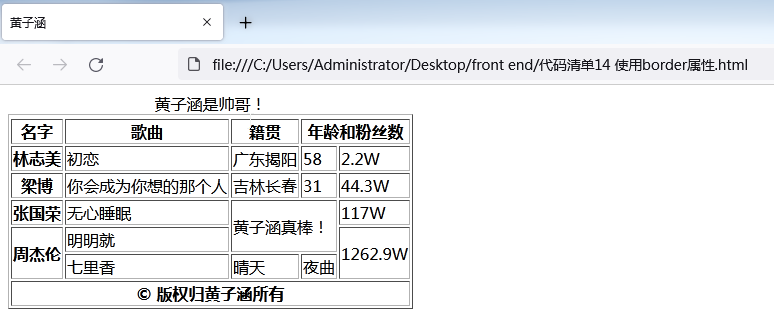
浏览器显示的默认边框并不美观,所以使用border属性之后通常还要用到CSS。
提示
不设置表格的border属性也能用CSS为其定义边框。不过,如果没有border属性,那么浏览器可能会认为表格是用于处理布局事宜的,因此其显示表格的方式可能会跟预想的不一样。
尽管border属性会让浏览器为表格和每个单元格添加边框,我们还是需要用CSS选择器分别针对各种元素重设边框样式。在设计CSS选择器时可用的办法很多:表格的外边框可以通过table元素控制;表头、表格主体和表脚可以分别通过thead、tbody和tfoot元素控制;列可以通过colgroup和col元素控制;各个单元格可以通过th和td元素控制。而且,就算别的办法都不管用, 至少还可以使用全局属性id和class确定目标。


