VMware 安装 Arch Linux
步骤基本参照 2021年vmware安装archlinux -ITKEY_ -CSDN 同时对照 Arch Linux 官方安装指导
实验环境:
Windows10
Vmware 版本 :16.2.3
Arch Linux : archlinux-2022.05.01-x86_64
windows10 上的 SSH 终端: MobaXterm
注意事项:
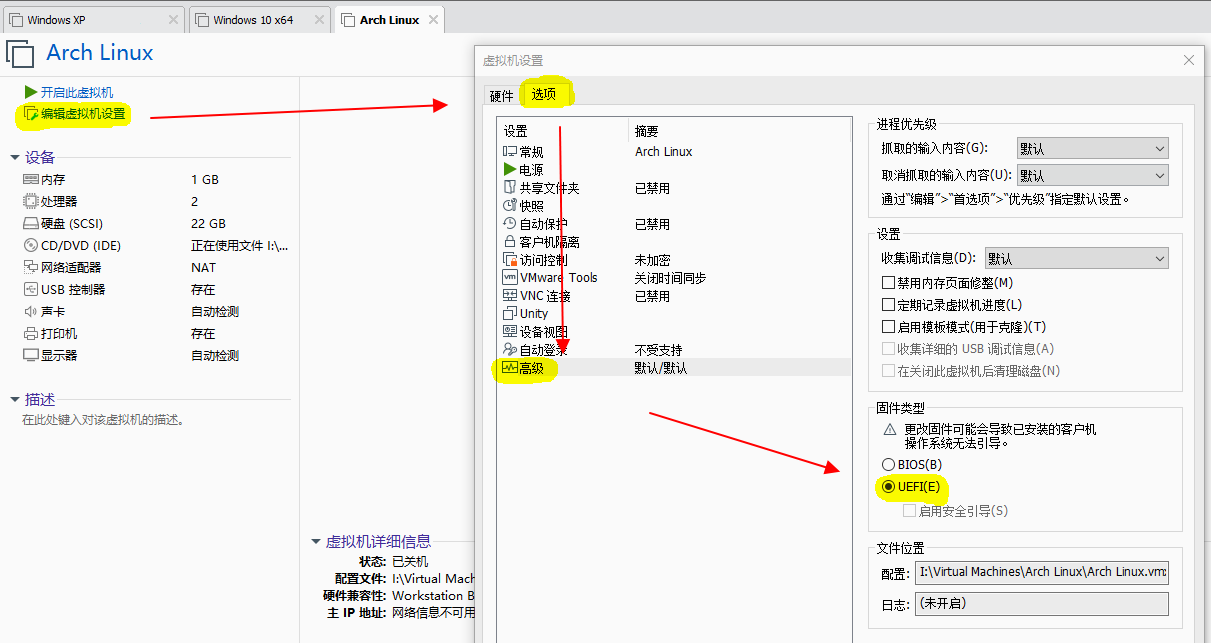
1. UEFI 引导
2. 磁盘分区
| Mount point | Partition | Partition type | Suggested size |
|---|---|---|---|
/mnt/boot |
/dev/efi_system_partition |
EFI system partition | At least 300 MiB |
[SWAP] |
/dev/swap_partition |
Linux swap | More than 512 MiB |
/mnt |
/dev/root_partition |
Linux x86-64 root (/) | Remainder of the device |
(parted) mkpart part-type-or-part-label fs-type start end
part-type-or-part-labelis interpreted differently based on the partition table:- MBR: the parameter is interpreted as
part-type, which can be one ofprimary,extendedorlogical. - GPT: the parameter is interpreted as
part-label, which sets the PARTLABEL attribute of the partition. The partition label always has to be set, since mkpart does not allow to create partitions with empty label.
- MBR: the parameter is interpreted as
】
我的分区操作:(可直接看代码区)
mkpart 命令中的 “fs-type” 选项( 如 fat32 、linux-swap 、 ext4 ) 可以不写,分区结束后用下列命令格式化分区。
# mkfs.fat -F 32 /dev/efi_system_partition ——实际写的是 mkfs.fat -F 32 /dev/sda1
# mkswap /dev/swap_partition ——实际写的是 mkswap /dev/sda2
# mkfs.ext4 /dev/root_partition ——实际写的是 mkfs.ext4 /dev/sda3
# parted /dev/sda             #根据 lsblk 具体硬盘写
(parted) mklabel
New disk label type? gpt

(parted) mkpart "EFI system partition" fat32 1MiB 301MiB
(parted) set 1 esp on
(parted) set partition boot on       #报错、但系统能用
(parted) mkpart "swap partition" linux-swap  301MiB 2349MiB
(parted) mkpart "root partition" ext4 2349MiB -1MiB       # "root partition" 用 blkid 查看成了/dev/sd3 的  PARTLABEL

(parted) print
(parted) align-check optimal 1   # 1 是分区号parted对话模式下 print 可列出分区号码
(parted) align-check optimal 2
(parted) align-check optimal 3
3. 解决 archlinuxcn 疑难
3.1 pacman.conf 文件的修改:
# vim /etc/pacman.conf
修改后的文件末尾:
[multilib]
Include = /etc/pacman.d/mirrorlist
[archlinuxcn]
Server = https://mirrors.ustc.edu.cn/archlinuxcn/$arch
[multilib]
Include = /etc/pacman.d/mirrorlist
[archlinuxcn]
SigLevel = Optional TrustAll      写上这句会报错, 所以不要了
Server = https://mirrors.ustc.edu.cn/archlinuxcn/$arch
3.2 archlinuxcn 相关命令:
博客中执行的命令是:
pacman -Syu haveged
systemctl start haveged
systemctl enable haveged

rm -fr /etc/pacman.d/gnupg
pacman-key --init

pacman-key --populate archlinux
pacman-key --populate archlinuxcn
sudo pacman -S archlinuxcn-keyring

sudo pacman -S yay
涉及到archlinuxcn 的命令会报错,参考 https://bbs.archlinux.org/viewtopic.php?id=187746 的 回答后改用:
pacman -Syu haveged
systemctl start haveged
systemctl enable haveged

rm -fr /etc/pacman.d/gnupg
pacman-key --init

pacman-key --populate
pacman-key --refresh-keys
sudo pacman -Sy archlinux-keyring
sudo pacman -Sy archlinuxcn-keyring

sudo pacman -S yay
其他就是照着博客 和 官方指导直至安装结束。
安装完成后
安装完成后使用 yay 安装软件前 还要 执行命令:
pacman -S base-devel
实际使用 yay 安装 codelite 过程中,出现报错。又用 pacman -S 安装了 cmake 、 gcc 、 make, 最后用 yay 安装 codelite 才成功。
好文收藏:
关于 archlinuxcn keyring —— pacman (简体中文)/Package signing (简体中文)
关于 yay 的报错 —— 错误: Cannot find the fakeroot binary. ==> 错误: Cannot find the strip binary required for object fil... --Way_Kwok_Chu --简书
在Vmware虚拟机中安装的Arch Linux里安装Vmware-tools

 浙公网安备 33010602011771号