一、RabbitMQ之延时消息(1)
1.原理 存活时间TTL(Time-To-Live) + 死信交换DLX(Dead Letter Exchanges)
- 存活时间:
- x-message-ttl:在创建队列时指定,表示该队列中的所有消息的存活时间
- x-expires:在创建队列时指定,表示该队列在指定时间间隔内未被使用(未被消费),则删除此队列
- expiration:在发送消息时,指定单条消息的过期时间
注:同时存在两种以上时,存活时间为最小的时间的值
- 死信交换:
- 消息被拒绝,消费者没有成功确认消费
- 消息TTL过期
- 超出队列长度限制
当出现上述情况时,消息即为无效,此时rabbitmq可以通过创建队列时指定的死信交换机,将消息交换到死信队列中去。
延时队列的实现则是通过在业务队列上(或者消息体)指定消息的过期时间,并不配置业务队列的消费者,等待业务队列中的消息到达过期时间,被交换到死信队列中去,再通过消费死信队列中的消息,达到延时的效果。
2.实例
-
配置交换机和队列,设置绑定关系
@Configuration
public class DelayMQConfig {

    // 业务队列交换机
    public static final String BUSINESS_EXCHANGE_NAME = "business.exchange";
    // 业务队列
    public static final String BUSINESS_QUEUE_NAME = "business.queue";
    //业务路由key
    public static final String BUSINESS_ROUTING_KEY = "business.routingKey";
    // 死信队列交换机
    public static final String DEADLETTER_EXCHANGE_NAME = "deadLetter.exchange";
    // 死信队列
    public static final String DEADLETTER_QUEUE_NAME = "deadLetter.queue";
    // 死信路由key
    public static final String DEADLETTER_ROUTING_KEY = "deadLetter.routingKey";

    /**
     * decription: 业务队列使用交换机
     */

    @Bean
    DirectExchange businessExchange() {
        return new DirectExchange(BUSINESS_EXCHANGE_NAME);
    }

    /**
     * decription: 业务队列
     */
    @Bean
    Queue businessQueue() {
        //业务队列绑定死信交换机,设置路由键,设置TTL
        Map<String, Object> map = new HashMap<>();
        map.put("x-dead-letter-exchange", DEADLETTER_EXCHANGE_NAME);
        map.put("x-dead-letter-routing-key", DEADLETTER_ROUTING_KEY);
        map.put("x-message-ttl", 6000);
//        map.put("x-expires", 10000);
        return QueueBuilder.durable(BUSINESS_QUEUE_NAME).withArguments(map).build();
    }

    /**
     * decription:死信队列使用交换机
     */

    @Bean
    DirectExchange deadLetterExchange() {
        return new DirectExchange(DEADLETTER_EXCHANGE_NAME);
    }

    /**
     * decription: 死信队列
     */
    @Bean
    Queue deadLetterQueue() {
        return new Queue(DEADLETTER_QUEUE_NAME);
    }

    /**
     * decription: 业务队列绑定业务交换机
     */
    @Bean
    Binding businessBinding(DirectExchange businessExchange, Queue businessQueue) {
        return BindingBuilder.bind(businessQueue).to(businessExchange).with(BUSINESS_ROUTING_KEY);
    }

    /**
     * decription: 死信队列绑定死信交换机
     */
    @Bean
    Binding deadLetterBinding(DirectExchange deadLetterExchange, Queue deadLetterQueue) {
        return BindingBuilder.bind(deadLetterQueue).to(deadLetterExchange).with(DEADLETTER_ROUTING_KEY);
    }
}
-
配置死信队列的消费者
1 2 3 4 5 6 7 8 9 10 11 12 13 | @Component@Slf4jpublic class DelayConsumer { @RabbitHandler @RabbitListener(queues = DEADLETTER_QUEUE_NAME) public void receiveA(Message message, Channel channel) throws IOException { String msg = new String(message.getBody()); log.info("当前时间:{},死信队列收到消息:{}", new Date().toString(), msg); // channel.basicAck(message.getMessageProperties().getDeliveryTag(), false); }} |
-
测试发送消息
1 2 3 4 5 6 7 8 9 10 11 12 13 14 15 16 17 18 19 20 21 | @RestController@Slf4jpublic class DelaySender { @Autowired private RabbitTemplate rabbitTemplate; @GetMapping("sendMessage") public void sendMsg(String msg, Integer time) { log.info("send msg:{},time:{}", msg, time); if (time == null) { rabbitTemplate.convertAndSend(BUSINESS_EXCHANGE_NAME, BUSINESS_ROUTING_KEY, msg); } else { //测试过期时间,真正的过期时间会取较小值 rabbitTemplate.convertAndSend(BUSINESS_EXCHANGE_NAME, BUSINESS_ROUTING_KEY, msg, a -> { a.getMessageProperties().setExpiration(time + ""); return a; }); } }} |
- 验证
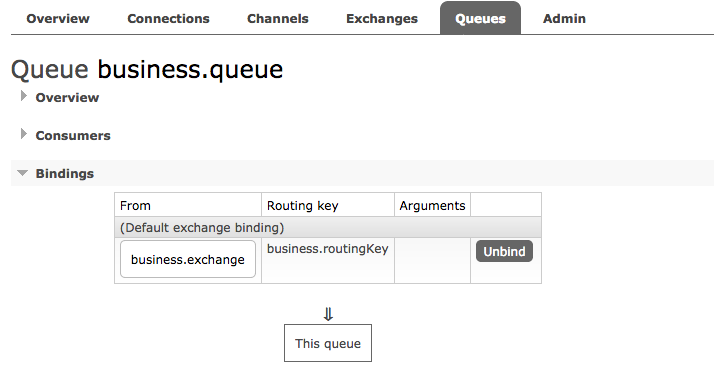
启动程序,打开web界面,查看队列信息,可以看到业务队列已经成功绑定到业务交换机上,并且给此业务队列设置了死信交换机,队列中消息的过期时间统一为6s


现在尝试向业务交换机发送一条消息,routingKey设置为业务路由key,可以看到消息被成功路由到业务队列中,我们给这条消息设置的过期时间为30s,而队列的消息过期时间设置的6s,可以看到在6s的时候,消息已经被转移到死信队列中,继而被消费掉了


【推荐】编程新体验,更懂你的AI,立即体验豆包MarsCode编程助手
【推荐】凌霞软件回馈社区,博客园 & 1Panel & Halo 联合会员上线
【推荐】抖音旗下AI助手豆包,你的智能百科全书,全免费不限次数
【推荐】博客园社区专享云产品让利特惠,阿里云新客6.5折上折
【推荐】轻量又高性能的 SSH 工具 IShell:AI 加持,快人一步