JointJS - 通过 Port 与图形进行连接
什么事 Ports
一个元素的一端和另一个元素的一端相连可以在 Graph(逻辑层)中通过 Link 的 target 和 source 两个函数实现相连。
从用户的角度出发,在 Paper(视图层)中,用户通过鼠标移动从一个元素的一端拉一条线和另一个元素的一端相连,而这就需要借助端口(Ports)来实现。
创建单个 Port
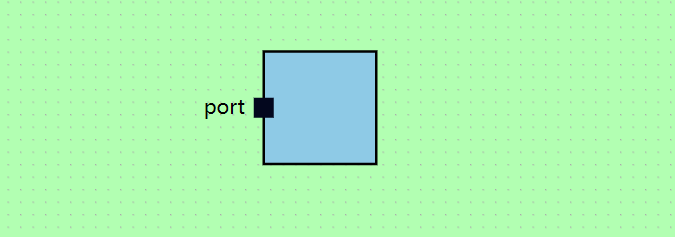
配置 Port
const port = {
  // 端口样式,与 Element 的 attrs 一致
  attrs: {
    // 端口的配置项
    portBody: {
      magnet: true,
      width: 16,
      height: 16,
      x: -8,
      y: -8,
      fill: "#03071E"
    },
    // 端口附带一个文本
    label: {
      text: "port"
    }
  },
  // 文本的相关配置
  label: {
    position: {
      name: "left"
    },
    markup: [
      {
        tagName: "text",
        selector: "label"
      }
    ]
  },
  // 端口的子图形,是一个矩形
  markup: [
    {
      tagName: "rect",
      selector: "portBody"
    }
  ]
};
| 属性名 | 描述 |
|---|---|
| attrs | JointJS 的样式定义。与 Element 的属性是一致的。 |
| label | 端口的文本描述,下面的 markup 与第三点的 markup 是一样的。 |
| markup | 定义端口图形下的子图形的 SVG 类型,并给子图形设置一个名称,以便于 attrs 的样式可以正确对应到子图形上。 |
构造函数
第一种方式是通过构造函数传递一个 ports 属性,从而给这个图形设置一个端口。
const rect = new joint.shapes.standard.Rectangle({
  position: { x: 275, y: 50 },
  size: { width: 90, height: 90 },
  ports: {
    items: [port] // add a port in constructor
  }
});
addPort 函数
通过图形的函数 addPort 添加一个端口。
const rect = new joint.shapes.standard.Rectangle({
  // ...
  del:[ports: {
    items: [port] // add a port in constructor
  }]:del
});

add:[rect.addPort(port);]:add
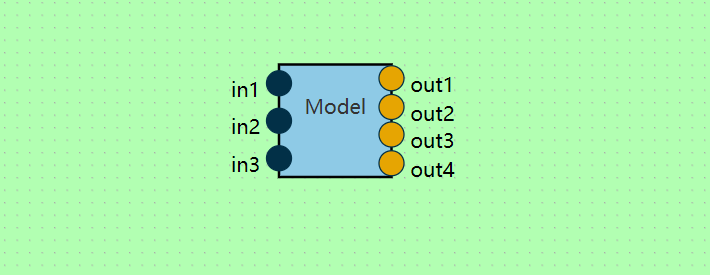
Port Groups
一个图形上的端口可以有很多个,为了方便统一管理,我们可以利用端口组(Port Groups)。比如,有两组样式不一样的端口,一个是 in,另一个是 out。那么,我们就需要配置两个端口组。
in port
file:[in 端口组的配置]
const portsIn = {
  position: {
    name: "left"
  },
  attrs: {
    portBody: {
      magnet: true,
      r: 10,
      fill: "#023047",
      stroke: "#023047"
    }
  },
  label: {
    position: {
      name: "left",
      args: { y: 6 }
    },
    markup: [
      {
        tagName: "text",
        selector: "label",
        className: "label-text"
      }
    ]
  },
  markup: [
    {
      tagName: "circle",
      selector: "portBody"
    }
  ]
};
out port
file:[out 端口组的配置]
const portsOut = {
  position: {
    name: "right"
  },
  attrs: {
    portBody: {
      magnet: true,
      r: 10,
      fill: "#E6A502",
      stroke: "#023047"
    }
  },
  label: {
    position: {
      name: "right",
      args: { y: 6 }
    },
    markup: [
      {
        tagName: "text",
        selector: "label",
        className: "label-text"
      }
    ]
  },
  markup: [
    {
      tagName: "circle",
      selector: "portBody"
    }
  ]
};
添加端口组
file:[在图形中的构造函数中添加端口组]
const rect = new joint.shapes.standard.Rectangle({
  // ...
  ports: {
    // 所有端口的配置格式
    del:[items: [ports]]:del
    // 端口组的配置格式
    add:[groups: {
      'in': portsIn,
      'out': portsOut
      }]:add
  }
});
in 的端口组下的所有端口样式都是一样的,可以统一设置其样式,out 端口组也是如此。
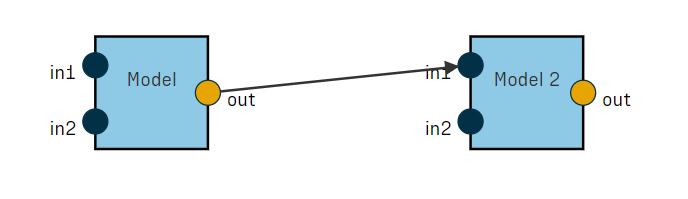
禁止从 in 端口拉线
这里需要用到 validateConnection 函数对全局的连线行为做出限制。就如标题所说,禁止从 in 端口拉线出去与别的端口相连。
const paper = new joint.dia.Paper({
  // ...
  validateConnection: function (cellViewS, magnetS, cellViewT, magnetT, end, linkView) {
    // 禁止从 in 端口处拉线
    if (magnetS && magnetS.getAttribute("port-group") === "in") return false;
    // 禁止从相同的图形中拉线
    if (cellViewS === cellViewT) return false;
    // 禁止与一个图形的 out 端口相连
    return magnetT && magnetT.getAttribute("port-group") === "in";
  }
});
| 参数名 | 描述 |
|---|---|
| cellViewS | 源图形 |
| magnetS | 源图形上的端口。比如,从 A 拉一条线,magnetS 就是 A 图形上的某端口 |
| cellViewT | 目标图形 |
| magnetT | 目标图形上的端口。比如,从 A 拉一条线,将鼠标移动到 B 图形的 BPort1 端口上,magnetT 就是 BPort1 端口 |
| end | 连接的结束端,可以是 'source'(源端)或 'target'(目标端) |
| linkView | 连接的图形 |
显示可连接的端口
添加 markAvailable 属性,以及 CSS 样式,以此来提示用户拉线时连接到另一个图形的可连接的端口。
const paper = new joint.dia.Paper({
  // ...
  markAvailable: true
});
<style>
  /* port styling */
  .available-magnet {
    fill: #5da271;
  }

  /* element styling */
  .available-cell rect {
    stroke-dasharray: 5, 2;
  }
</style>
自定义 CSS
通过 highlighting 可以自定义 CSS。通过这种方式可以通过 js 代码来改变 SVG 的样式,和 CSS 是一样的,就如下面的 elementAvailability,magnetAvailability 用的是 CSS 样式。
const paper = new joint.dia.Paper({
  // ...
  markAvailable: true,
  add:[highlighting: {
    magnetAvailability: {
      name: "addClass",
      options: {
        className: "custom-available-magnet"
      }
    },
    elementAvailability: {
      name: "stroke",
      options: {
        padding: 20,
        attrs: {
          "stroke-width": 3,
          stroke: "#ED6A5A"
       }
     }
    }
  }]:add
});
<style>
  .custom-available-magnet {
    fill: #6c6c6c;
  }
</style>
Port Layout
矩形的端口位置
可以改变的位置有上(top)、下(bottom)、左(left)、右(right)。配置方式如下:
const portsOut = {
  position: {
    lit:[name: "right"]:lit
  },
  // ...
};
就是通过 position.name 指定这个端口出现的位置,注意这是这个配置对象(js 对象)的第二层对象,注意层级关系,因为还有文字的 posotion,容易混淆:
const portsOut = {
  position: {
    // top、left、bottom 等
    name: "right"
  },
  label: {
    position: {
      name: "right",
      lit:[args: { y: 6 }]:lit
    }
  }
};
这里还需要说一个,label.position.args.y 指的是文本以端口为基准,偏移的 y 是多少,0 就是正中央。
椭圆的端口位置
const ellipsePortsIn = {
  position: {
    name: "ellipseSpread",
    args: {
      dx: 1,
      dy: 1,
      dr: 1,
      startAngle: 220,
      step: 50,
      compensateRotation: false
    }
  }
  // Other attributes
};

