SpringBoot 整合 RabbitMQ
总结自:BV15k4y1k7Ep
简介
一般在开发过程中,通过如下步骤在 SpringBoot 项目中集成 RabbitMQ:
生产者工程:
-
application.yml 文件配置 RabbitMQ 相关信息;
-
在生产者工程中编写配置类,用于创建交换机和队列,并进行绑定;
-
注入 RabbitTemplate 对象,通过 RabbitTemplate 对象发送消息到交换机。
消费者工程:
-
application.yml 文件配置 RabbitMQ 相关信息;
-
创建消息处理类,用于接收队列中的消息并进行处理。
搭建生产者工程
创建工程
创建 SpringBoot 工程 springboot-producer:
 |
添加依赖
pom.xml 文件中添加 spring-boot-starter-amqp:
<dependency> <groupId>org.springframework.boot</groupId> <artifactId>spring-boot-starter-amqp</artifactId> </dependency>
配置 RabbitMQ
1)配置文件
创建 application.yml,内容如下:
spring: rabbitmq: host: localhost port: 5672 virtual-host: /vhost username: admin password: 123456
2)绑定交换机和队列
创建 RabbitMQ 队列与交换机绑定的配置类 RabbitMQConfig:
package com.zhangmingge.producer.config; import org.springframework.amqp.core.*; import org.springframework.beans.factory.annotation.Qualifier; import org.springframework.context.annotation.Bean; import org.springframework.context.annotation.Configuration; @Configuration public class RabbitMQConfig { // 交换机名称 public static final String ITEM_TOPIC_EXCHANGE = "item_topic_exchange"; // 队列名称 public static final String ITEM_QUEUE = "item_queue"; // 声明交换机 @Bean("itemTopicExchange") public Exchange topicExchange() { // 路由模式 // return ExchangeBuilder.directExchange("EXCHANGE_NAME").durable(true).build(); // 生产消费模式 // return ExchangeBuilder.fanoutExchange("EXCHANGE_NAME").durable(true).build(); // 主题模式 return ExchangeBuilder.topicExchange(ITEM_TOPIC_EXCHANGE).durable(true).build(); } // 声明队列 @Bean("itemQueue") public Queue itemQueue() { return QueueBuilder.durable(ITEM_QUEUE).build(); } // 绑定队列和交换机 @Bean public Binding itemQueueExchange(@Qualifier("itemQueue") Queue queue, @Qualifier("itemTopicExchange") Exchange exchange) { // 路由模式、生产消费模式 // return BindingBuilder.bind(queue).to(exchange).with("ROUTING_KEY").noargs(); // 主题模式 return BindingBuilder.bind(queue).to(exchange).with("item.#").noargs(); } }
搭建消费者工程
创建工程
创建 SpringBoot 工程 springboot-consumer:
 |
添加依赖
pom.xml 文件中添加 spring-boot-starter-amqp:
<dependency> <groupId>org.springframework.boot</groupId> <artifactId>spring-boot-starter-amqp</artifactId> </dependency>
配置 RabbitMQ
创建 application.yml,内容如下:
spring: rabbitmq: host: localhost port: 5672 virtual-host: /vhost username: admin password: 123456
消息监听处理类
编写消息监听器 MyListener:
package com.zhangmingge.consumer.listener; import org.springframework.amqp.rabbit.annotation.RabbitListener; import org.springframework.stereotype.Component; @Component public class MyListener { /** * 监听某个队列的消息 * * @param message 接收到的消息 */ @RabbitListener(queues = "item_queue") public void myListener1(String message) { System.out.println("消费者接收到的消息为:" + message); } }
测试
在生产者工程 springboot-producer 中创建测试类,发送消息:
package com.zhangmingge.producer; import com.zhangmingge.producer.config.RabbitMQConfig; import org.junit.jupiter.api.Test; import org.springframework.amqp.rabbit.core.RabbitTemplate; import org.springframework.beans.factory.annotation.Autowired; import org.springframework.boot.test.context.SpringBootTest; @SpringBootTest public class RabbitMQTest { @Autowired private RabbitTemplate rabbitTemplate; @Test public void test() { rabbitTemplate.convertAndSend(RabbitMQConfig.ITEM_TOPIC_EXCHANGE, "item.insert", "商品新增,routing key 为 item.insert"); rabbitTemplate.convertAndSend(RabbitMQConfig.ITEM_TOPIC_EXCHANGE, "item.update", "商品修改,routing key 为 item.update"); rabbitTemplate.convertAndSend(RabbitMQConfig.ITEM_TOPIC_EXCHANGE, "item.delete", "商品删除,routing key 为 item.delete"); } }
先运行上述测试程序(交换机和队列才能先被声明和绑定),然后启动消费者,在消费者工程 springboot-consumer 中控制台查看是否接收到对应消息。
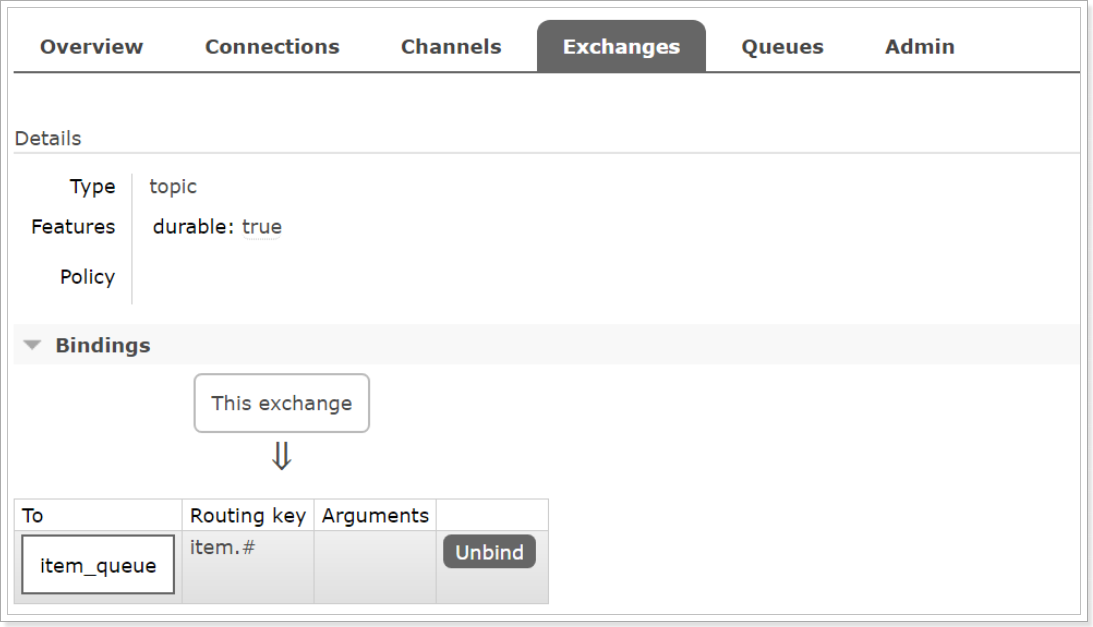
另外,也可以在 RabbitMQ 的管理控制台中查看到交换机与队列的绑定:
 |
分类:
计算机


【推荐】国内首个AI IDE,深度理解中文开发场景,立即下载体验Trae
【推荐】编程新体验,更懂你的AI,立即体验豆包MarsCode编程助手
【推荐】抖音旗下AI助手豆包,你的智能百科全书,全免费不限次数
【推荐】轻量又高性能的 SSH 工具 IShell:AI 加持,快人一步
· 开源Multi-agent AI智能体框架aevatar.ai,欢迎大家贡献代码
· Manus重磅发布:全球首款通用AI代理技术深度解析与实战指南
· 被坑几百块钱后,我竟然真的恢复了删除的微信聊天记录!
· 没有Manus邀请码?试试免邀请码的MGX或者开源的OpenManus吧
· 园子的第一款AI主题卫衣上架——"HELLO! HOW CAN I ASSIST YOU TODAY