03_入门程序(注解方式,掌握)
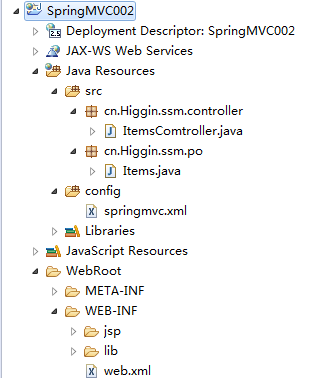
【工程截图】

【springmvc.xml】(注解方式,未优化)
<beans xmlns="http://www.springframework.org/schema/beans"
    xmlns:xsi="http://www.w3.org/2001/XMLSchema-instance" xmlns:mvc="http://www.springframework.org/schema/mvc"
    xmlns:context="http://www.springframework.org/schema/context"
    xmlns:aop="http://www.springframework.org/schema/aop" xmlns:tx="http://www.springframework.org/schema/tx"
    xsi:schemaLocation="http://www.springframework.org/schema/beans
        http://www.springframework.org/schema/beans/spring-beans-3.2.xsd
        http://www.springframework.org/schema/mvc
        http://www.springframework.org/schema/mvc/spring-mvc-3.2.xsd
        http://www.springframework.org/schema/context
        http://www.springframework.org/schema/context/spring-context-3.2.xsd
        http://www.springframework.org/schema/aop
        http://www.springframework.org/schema/aop/spring-aop-3.2.xsd
        http://www.springframework.org/schema/tx
        http://www.springframework.org/schema/tx/spring-tx-3.2.xsd ">

    <!-- 配置Handler -->
<!--     <bean name="/queryItems.action" class="cn.Higgin.ssm.controller.ItemsController"/> -->


    <!-- 处理器映射器
        将bean的name作为url进行查找,需要在配置Handler时指定beanname(即url)-->
<!--     <bean class="org.springframework.web.servlet.handler.BeanNameUrlHandlerMapping"/> -->

    <!-- 处理适配器
        注意:所有的处理适配器都实现了HandlerAdapter接口-->
<!--     <bean  class="org.springframework.web.servlet.mvc.SimpleControllerHandlerAdapter" /> -->

    <!-- 注解映射器 -->
    <bean class="org.springframework.web.servlet.mvc.method.annotation.RequestMappingHandlerMapping" />
    <!-- 注解适配器 -->
    <bean class="org.springframework.web.servlet.mvc.method.annotation.RequestMappingHandlerAdapter"/>
    <!-- 配置handler,实际开发中一般使用组件扫描-->
    <bean class="cn.Higgin.ssm.controller.ItemsController" />

    <!-- 视图解析器
        解析jsp页面,默认使用jstl标签,classpath下面必须有jstl的jar包-->
    <bean class="org.springframework.web.servlet.view.InternalResourceViewResolver"/>

</beans>
【ItemsController.java】
package cn.Higgin.ssm.controller;
import java.util.ArrayList;
import java.util.List;
import org.springframework.web.bind.annotation.RequestMapping;
import org.springframework.web.servlet.ModelAndView;
import cn.Higgin.ssm.po.Items;

import org.springframework.stereotype.Controller;;
/**
 * 注解方式开发
 * 无需 实现Controller接口
 * 使用@Controller标识ItemsComtroller是一个控制器
 */
@Controller
public class ItemsController{

    /*
     * 商品查询列表
     * @RequestMapping实现对queryItems方法和url进行映射,一个方法对应一个url
     * 一般建议将url和方法写成一样
     */
    @RequestMapping("/queryItems")
    public ModelAndView queryItems(){
        //调用Service查找数据库,查询商品列表,这里使用静态数据模拟
        List<Items> itemsList=new ArrayList<Items>();
        //向list中填充数据
        Items item1=new Items();
        item1.setName("华硕笔记本");
        item1.setPrice(600f);
        item1.setDetail("华硕啦啦啦啦啦啦啦啦啦");

        Items item2=new Items();
        item2.setName("联想笔记本");
        item2.setPrice(300f);
        item2.setDetail("联想啦啦啦啦啦啦啦啦啦");

        itemsList.add(item1);
        itemsList.add(item2);

        //返回ModelAndView
        ModelAndView modelAndView=new ModelAndView();
        //相当于request的setAttribute,在jsp页面中通过itemList来获取
        modelAndView.addObject("itemsList",itemsList);
        //指定视图
        modelAndView.setViewName("/WEB-INF/jsp/items/itemsList.jsp");
        System.out.println("注解方式:ItemsComtroller......");
        return modelAndView;
    }
}
【其余部分代码不变,与上一篇Blog相同】
【运行结果】

控制台

【优化!!!!!】
【springmvc.xml】
<beans xmlns="http://www.springframework.org/schema/beans"
    xmlns:xsi="http://www.w3.org/2001/XMLSchema-instance" xmlns:mvc="http://www.springframework.org/schema/mvc"
    xmlns:context="http://www.springframework.org/schema/context"
    xmlns:aop="http://www.springframework.org/schema/aop" xmlns:tx="http://www.springframework.org/schema/tx"
    xsi:schemaLocation="http://www.springframework.org/schema/beans
        http://www.springframework.org/schema/beans/spring-beans-3.2.xsd
        http://www.springframework.org/schema/mvc
        http://www.springframework.org/schema/mvc/spring-mvc-3.2.xsd
        http://www.springframework.org/schema/context
        http://www.springframework.org/schema/context/spring-context-3.2.xsd
        http://www.springframework.org/schema/aop
        http://www.springframework.org/schema/aop/spring-aop-3.2.xsd
        http://www.springframework.org/schema/tx
        http://www.springframework.org/schema/tx/spring-tx-3.2.xsd ">

      <!-- 注解映射器 -->
<!--     <bean class="org.springframework.web.servlet.mvc.method.annotation.RequestMappingHandlerMapping" /> -->
    <!--     注解适配器 -->
<!--     <bean class="org.springframework.web.servlet.mvc.method.annotation.RequestMappingHandlerAdapter"/> -->

    <!-- 这可代替注解映射器和注解适配器 -->
    <mvc:annotation-driven />
    <!-- 配置handler,实际开发中一般使用组件扫描-->
  <!-- <bean class="cn.Higgin.ssm.controller.ItemsController" /> -->
   <context:component-scan base-package="cn.Higgin.ssm.controller"/>
  <!-- 也可以用<context:component-scan base-package="cn.Higgin.*"> -->

    <!-- 视图解析器
    解析jsp解析,默认使用jstl标签,classpath下的得有jstl的包
     -->
    <bean
        class="org.springframework.web.servlet.view.InternalResourceViewResolver">
        <!-- 配置jsp路径的前缀 -->
        <property name="prefix" value="/WEB-INF/jsp/"/>
        <!-- 配置jsp路径的后缀 -->
        <property name="suffix" value=".jsp"/>
    </bean>

</beans>
【ItemsController.java】
package cn.Higgin.ssm.controller;
import java.util.ArrayList;
import java.util.List;
import org.springframework.web.bind.annotation.RequestMapping;
import org.springframework.web.servlet.ModelAndView;
import cn.Higgin.ssm.po.Items;

import org.springframework.stereotype.Controller;;
/**
 * 注解方式开发
 * 无需 实现Controller接口
 * 使用@Controller标识ItemsComtroller是一个控制器
 */
@Controller
public class ItemsController{

    /*
     * 商品查询列表
     * @RequestMapping实现对queryItems方法和url进行映射,一个方法对应一个url
     * 一般建议将url和方法写成一样
     */
    @RequestMapping("/queryItems")
    public ModelAndView queryItems(){
        //调用Service查找数据库,查询商品列表,这里使用静态数据模拟
        List<Items> itemsList=new ArrayList<Items>();
        //向list中填充数据
        Items item1=new Items();
        item1.setName("华硕笔记本");
        item1.setPrice(600f);
        item1.setDetail("华硕啦啦啦啦啦啦啦啦啦");

        Items item2=new Items();
        item2.setName("联想笔记本");
        item2.setPrice(300f);
        item2.setDetail("联想啦啦啦啦啦啦啦啦啦");

        itemsList.add(item1);
        itemsList.add(item2);

        //返回ModelAndView
        ModelAndView modelAndView=new ModelAndView();
        //相当于request的setAttribute,在jsp页面中通过itemList来获取
        modelAndView.addObject("itemsList",itemsList);
        //指定视图  //相对于上面就做了这一处修改,对应配置文件中的视图解析器
        modelAndView.setViewName("items/itemsList");
        System.out.println("注解方式:ItemsComtroller......");
        return modelAndView;
    }
}


 浙公网安备 33010602011771号