09_注解01
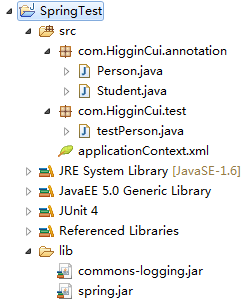
【工程截图】

【Student.java】
package com.HigginCui.annotation;

public class Student {

    public void sayHello(){
        System.out.println("Student say: hello!!");
    }
}
【Person.java】
package com.HigginCui.annotation;

import javax.annotation.Resource;

public class Person {
    @Resource(name="student")
    private Student student;

    public void sayHello(){
        this.student.sayHello();
    }
}
【applicationContext.xml】
<?xml version= "1.0" encoding ="UTF-8"?>
<beans xmlns="http://www.springframework.org/schema/beans"
        xmlns:context="http://www.springframework.org/schema/context"
       xmlns:xsi="http://www.w3.org/2001/XMLSchema-instance"
       xsi:schemaLocation="http://www.springframework.org/schema/beans
           http://www.springframework.org/schema/beans/spring-beans-2.5.xsd
           http://www.springframework.org/schema/context
           http://www.springframework.org/schema/context/spring-context-2.5.xsd">

    <!-- 把person和student都放入spring容器 -->
    <bean id="person" class="com.HigginCui.annotation.Person"></bean>
    <bean id="student" class="com.HigginCui.annotation.Student"></bean>

    <!-- 启动依赖注入的注解解析器 -->
    <context:annotation-config></context:annotation-config>
</beans>
【testPerson.java】
package com.HigginCui.test;

import org.junit.Test;
import org.springframework.context.ApplicationContext;
import org.springframework.context.support.ClassPathXmlApplicationContext;

import com.HigginCui.annotation.Person;

public class testPerson {
    @Test
    public void test(){
        ApplicationContext context=new ClassPathXmlApplicationContext("applicationContext.xml");
        Person person=(Person) context.getBean("person");
        person.sayHello();
    }
}
【运行结果】
Student say: hello!!
【小结】
执行顺序:
1.启动Spring容器
2.Spring容器内部创建了两个对象:porson和student
3.当Spring容器中解析到<context:annotation-config></context:annotation-config>时,启动依赖注入的注解解析器。
4.Spring容器在容器中查找所有的bean(此时有person,student)
5.如果属性上面有该注解(例如:@Resource(name="studnet")),再次检查是否有name属性
6.如果没有name属性,则会把该注解标注的属性的名称获取到并且和Spring容器中的id做匹配,如果匹配成功,则赋值。如果匹配不成功,再按照类型进行再次匹配,匹配成功,再赋值。若还是匹配不成功,则报错。
7.如果有name属性(例如@Resource(name="studnet")),则把name属性的值解析出来和Spring容器中的id做匹配,如果匹配成功,则赋值,不成功则报错。
8.上述的步骤看出注解的效率较低,Xml的效率较高。注解编写较简单,而Xml的书写较复杂。
关于Spring容器中的DI注解
1.按照类型进行匹配
@Autowired
2.按照id进行匹配
@Qualifier("student")


 浙公网安备 33010602011771号