SSH 公钥登录
一般使用SSH进行远程登录时需要提供密码,这也是我们所熟知的一种方式。
另外,就是通过公钥登录的方式,本文将简要介绍公钥登录的两种方法,建议使用方法二。本文也将简单演示公钥登录过程,以及强制使用公钥和密码的双因子认证。
公钥登录:法一
Step 1:创建公钥/私钥对ssh-keygen
$ ssh-keygen
Generating public/private rsa key pair.
...
$ ls
id_rsa  id_rsa.pub  known_hosts
Step 2:将id_rsa.pub上传到要远程登录到的机器上
$ scp id_rsa.pub root@142.93.198.56:/tmp
root@142.93.198.56's password:
id_rsa.pub                                                         100%  405     1.5KB/s   00:00
Step 3:将公钥添加到authorized_keys中
首先,远程登录到目标机器,在远程进行操作。
$ ssh root@142.93.198.56
...
# cd /tmp/# cat id_rsa.pub >> ~/.ssh/authorized_keys
Step 4:更改文件权限
# chmod 600 ~/.ssh/authorized_keys
Step 5:查看配置
查看和更改配置文件:/etc/ssh/sshd_config
# vim /etc/ssh/sshd_config
PasswordAuthentication yes      # 口令登录
RSAAuthentication yes         # RSA认证
PubkeyAuthentication yes       # 公钥登录
然后重启sshd服务。如果不想使用口令登录,可以修改PasswordAuthentication 为no。不过还是建议保留这项配置,如果一不下心执行了一下ssh-keygen命令,那这台远程服务器就真的离你有点远了。
Step 6:ssh公钥登录
现在便能使用私钥登录到远程机器了。
$ ssh -i id_rsa root@142.93.198.56
Welcome to Ubuntu 16.04.5 LTS (GNU/Linux 4.4.0-131-generic x86_64)

 * Documentation:  https://help.ubuntu.com
 * Management:     https://landscape.canonical.com
 * Support:        https://ubuntu.com/advantage

  Get cloud support with Ubuntu Advantage Cloud Guest:
    http://www.ubuntu.com/business/services/cloud

0 packages can be updated.
0 updates are security updates.

New release '18.04.1 LTS' available.
Run 'do-release-upgrade' to upgrade to it.
vps :142.93.198.56仅供测试,已销毁。
公钥登录:法二
在接触Hadoop环境搭建的过程中,由于Hadoop集群之间是使用公钥直接进行数据传输。接触和使用了ssh-copy-id命令,该命令可轻松完成上述方法一的所有步骤。
# ssh-keygen                      # 生成公钥
Generating public/private rsa key pair.
Enter file in which to save the key (/root/.ssh/id_rsa):
Enter passphrase (empty for no passphrase):
Enter same passphrase again:
Your identification has been saved in /root/.ssh/id_rsa.
Your public key has been saved in /root/.ssh/id_rsa.pub.
The key fingerprint is:
SHA256:+E2PL7KFGu9pdzg9gEkg5OhMToGQxvMipMkXgBNub/k root@kali
The key's randomart image is:
+---[RSA 2048]----+
|*=o..            |
|*= =. .          |
|==* o. .         |
|=O.o.  ..        |
|. *+  ..So.      |
|  . .  .o+.o     |
|     E. o ++.    |
|       +oo=.+    |
|      .o=+ +..   |
+----[SHA256]-----+# ssh-copy-id root@172.16.82.136          # ssh-copy-id 命令
/usr/bin/ssh-copy-id: INFO: Source of key(s) to be installed: "/root/.ssh/id_rsa.pub"
The authenticity of host '172.16.82.136 (172.16.82.136)' can't be established.
ECDSA key fingerprint is SHA256:buanLhYcZbfmeZ2rRECFo5K1v2EcfUAutraLAIQH/yU.
Are you sure you want to continue connecting (yes/no)? yes
/usr/bin/ssh-copy-id: INFO: attempting to log in with the new key(s), to filter out any that are already installed
/usr/bin/ssh-copy-id: INFO: 1 key(s) remain to be installed -- if you are prompted now it is to install the new keys
root@172.16.82.136's password:

Number of key(s) added: 1

Now try logging into the machine, with:   "ssh 'root@172.16.82.136'"
and check to make sure that only the key(s) you wanted were added.

root@kali:~# ssh root@172.16.82.136          # 可直接公钥登录,无需输入密码
Last failed login: Mon Mar  4 08:50:43 CST 2019 from 172.16.83.136 on ssh:notty
There was 1 failed login attempt since the last successful login.
Last login: Mon Mar  4 08:50:28 2019
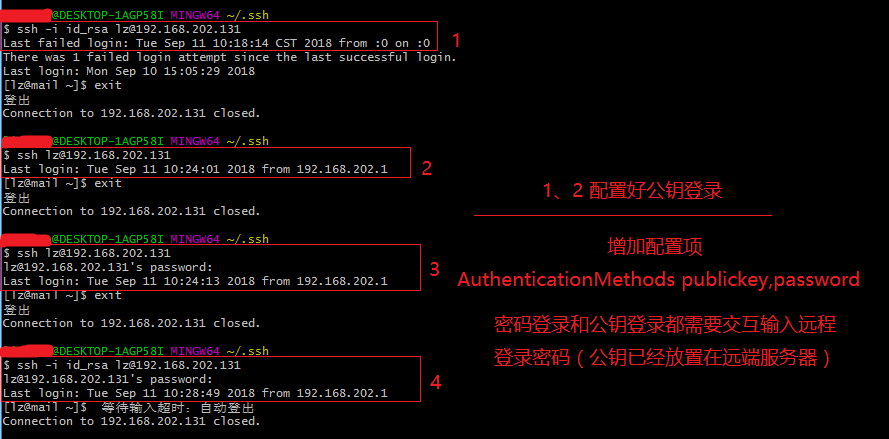
强制需要同时使用公钥和密码登录
在公钥登录的基础之上,需要增加如下配置:
$ sudo vim /etc/ssh/sshd_config
...
AuthenticationMethods publickey,password
重启SSHD服务:
$ sudo service sshd restart
具体展示如下如所示:

需要公钥和输入密码才能登录。
以上!
Reference:
-------------------------------------------
个性签名:如果世上的事都按你说的道理走 世界就不是现在这样了!
如果觉得这篇文章对你有小小的帮助的话,记得在右下角点个“推荐”哦,博主在此感谢!


