swagger
一.Swagger简介
我们在项目开发中,经常会写接口文档。但是随着代码的不断更新,我们需要花费大量的精力去修改接口文档。即使是修改了接口文档,还是会存在更新不及时,更新不匹配等问题存在。为了统一接口规范,Swagger就顺势而生啦。它能提供一个统一的接口文档规范。但是虽然有了这个统一的接口规范(Swager)了,开发来编写这些json或者yml的描述文件还是比较麻烦,甚至还会忘记去更新描述文件件,只是更新自己开发的代码。因此,Spring就迅速的将Swagger规范纳入自身的标准,建立了Srping-swagger项目,后面改成了现在的Springfox。通过在项目引入Springfox相关依赖,就可以通过扫描代码生成描述文件,从而根据这个描述文件生成我们的接口文档了。这样就既方便有匹配的拥有接口文档了。
一般在pom.xml中引入如下两个依赖就好了。如果出现报错,找不到加载类,还需要引入swagger-models(因为可能会版本不兼容,导致类加载失败)。

 1 <dependency>
 2     <groupId>io.springfox</groupId>
 3     <artifactId>springfox-swagger2</artifactId>
 4     <version>2.9.2</version>
 5 </dependency>
 6
 7 <dependency>
 8     <groupId>io.springfox</groupId>
 9     <artifactId>springfox-swagger-ui</artifactId>
10     <version>2.9.2</version>
11 </dependency>
二.Swagger常用注解介绍
这里总结一下我在项目常用到的注解及其常用参数:
2.1 @API 用在Controller类上
| value | 在swagger-ui上不显示。配置了tags后这个value不需要再配置了 |
| description或者tags |
在swagger-ui上显示,可以当做备注使用,描述这个Controller的信息 在新版本的swagger2中description已被淘汰,可以用tags代替,但是不更改也不会影响使用。 但是tags如果有多个值,会生成多个list |
2.2 @ApiOperation 用在方法上,表示一个http请求
| value | 接口说明,是接口文档没有展开时的描述信息,比较简短 |
| httpMethod | 接口请求方式,指定http模式,参数有"POST"、"DELETE"、"GET"、"HEAD"等 |
| notes | 接口发布说明,是接口文档展开时的描述信息,可以写较value更加详细 |
2.3 @ApiParam 用于方法参数
| value | 参数的具体描述 |
| name | 参数名称 |
| required | 是否是必选参数,如果是true,就代表必选参数 |
2.4 @ApiModel 用于返回对象类,描述返回对象的意义
| value | 对象名 |
| description | 用于对对象的描述 |
2.5 @ApiModelProperty 用于属性的描述
| value | 字段说明 |
| name | 运行覆盖属性的名称。重写属性名称 |
| required | 是否为必传参数 |
2.6 @ApiImplicitParam()和@ApiImplicitParams()
@ApiImplicitParam() 用于方法,表示单独的请求参数
@ApiImplicitParams() 用于方法,包含多个 @ApiImplicitParam
| name | 参数名 |
| value | 参数说明 |
| paramType | 参数类型 |
| example | 举例说明 |
三. 具体实例
本例子将会用到上面介绍的所有注解,项目采用springboot+maven搭建而成,具体做法不介绍了。
3.1 准备一个springboot项目,引入相关swagger依赖,项目结构如下,主要关注红色部分:

依赖配置:

 1 <?xml version="1.0" encoding="UTF-8"?>
 2 <project xmlns="http://maven.apache.org/POM/4.0.0" xmlns:xsi="http://www.w3.org/2001/XMLSchema-instance"
 3     xsi:schemaLocation="http://maven.apache.org/POM/4.0.0 https://maven.apache.org/xsd/maven-4.0.0.xsd">
 4     <modelVersion>4.0.0</modelVersion>
 5     <parent>
 6         <groupId>org.springframework.boot</groupId>
 7         <artifactId>spring-boot-starter-parent</artifactId>
 8         <version>2.2.5.RELEASE</version>
 9         <relativePath/> <!-- lookup parent from repository -->
10     </parent>
11     <groupId>com.example</groupId>
12     <artifactId>LunTan</artifactId>
13     <version>0.0.1-SNAPSHOT</version>
14     <name>LunTan</name>
15     <description>Demo project for Spring Boot</description>
16
17     <properties>
18         <java.version>1.8</java.version>
19         <maven-jar-plugin.version>3.1.1</maven-jar-plugin.version>
20     </properties>
21
22     <dependencies>
23         <dependency>
24             <groupId>org.springframework.boot</groupId>
25             <artifactId>spring-boot-starter-web</artifactId>
26         </dependency>
27
28         <dependency>
29             <groupId>io.swagger</groupId>
30             <artifactId>swagger-core</artifactId>
31             <version>1.5.21</version>
32         </dependency>
33
34         <!-- https://mvnrepository.com/artifact/io.swagger/swagger-models -->
35         <dependency>
36             <groupId>io.swagger</groupId>
37             <artifactId>swagger-models</artifactId>
38             <version>1.5.21</version>
39         </dependency>
40
41
42         <dependency>
43             <groupId>org.springframework.boot</groupId>
44             <artifactId>spring-boot-starter-websocket</artifactId>
45         </dependency>
46         <!-- https://mvnrepository.com/artifact/javax.servlet/javax.servlet-api -->
47 <dependency>
48     <groupId>javax.servlet</groupId>
49     <artifactId>javax.servlet-api</artifactId>
50     <scope>provided</scope>
51 </dependency>
52         <!-- https://mvnrepository.com/artifact/io.springfox/springfox-swagger2 -->
53 <dependency>
54     <groupId>io.springfox</groupId>
55     <artifactId>springfox-swagger2</artifactId>
56     <version>2.9.2</version>
57 </dependency>
58
59
60         <dependency>
61             <groupId>org.springframework.boot</groupId>
62             <artifactId>spring-boot-starter-test</artifactId>
63             <scope>test</scope>
64             <exclusions>
65                 <exclusion>
66                     <groupId>org.junit.vintage</groupId>
67                     <artifactId>junit-vintage-engine</artifactId>
68                 </exclusion>
69             </exclusions>
70         </dependency>
71         <!-- https://mvnrepository.com/artifact/io.springfox/springfox-swagger-ui -->
72 <dependency>
73     <groupId>io.springfox</groupId>
74     <artifactId>springfox-swagger-ui</artifactId>
75     <version>2.9.2</version>
76 </dependency>
77
78     </dependencies>
79
80     <build>
81         <plugins>
82             <plugin>
83                 <groupId>org.springframework.boot</groupId>
84                 <artifactId>spring-boot-maven-plugin</artifactId>
85             </plugin>
86         </plugins>
87     </build>
88
89 </project>
3.2 各个类的具体实现:
(1)swagger配置类:用来启动swagger

 1 package com.example.demo.swagger;
 2
 3 import org.springframework.context.annotation.Bean;
 4 import org.springframework.context.annotation.Configuration;
 5
 6 import springfox.documentation.builders.ApiInfoBuilder;
 7 import springfox.documentation.builders.PathSelectors;
 8 import springfox.documentation.builders.RequestHandlerSelectors;
 9 import springfox.documentation.service.ApiInfo;
10 import springfox.documentation.service.Contact;
11 import springfox.documentation.spi.DocumentationType;
12 import springfox.documentation.spring.web.plugins.Docket;
13 import springfox.documentation.swagger2.annotations.EnableSwagger2;
14 /**
15  * Swagger的配置类
16  * 1.EnableSwagger是开启Swagger的意思,Configuration是声明当前类是一个配置类
17  * 2.createRestApi方法不需要更改,主要用于swagger的初始化设置
18  *
19  *
20  */
21 @Configuration
22 @EnableSwagger2
23 public class SwaggerConfig {
24
25     @Bean
26     public Docket createRestApi() {
27         return new Docket(DocumentationType.SWAGGER_2)
28                 .apiInfo(apiInfo())
29                 .select()
30                 .apis(RequestHandlerSelectors.basePackage("com.example.demo.controller"))
31                 .paths(PathSelectors.any())
32                 .build();
33     }
34
35     private ApiInfo apiInfo() {
36         return new ApiInfoBuilder()
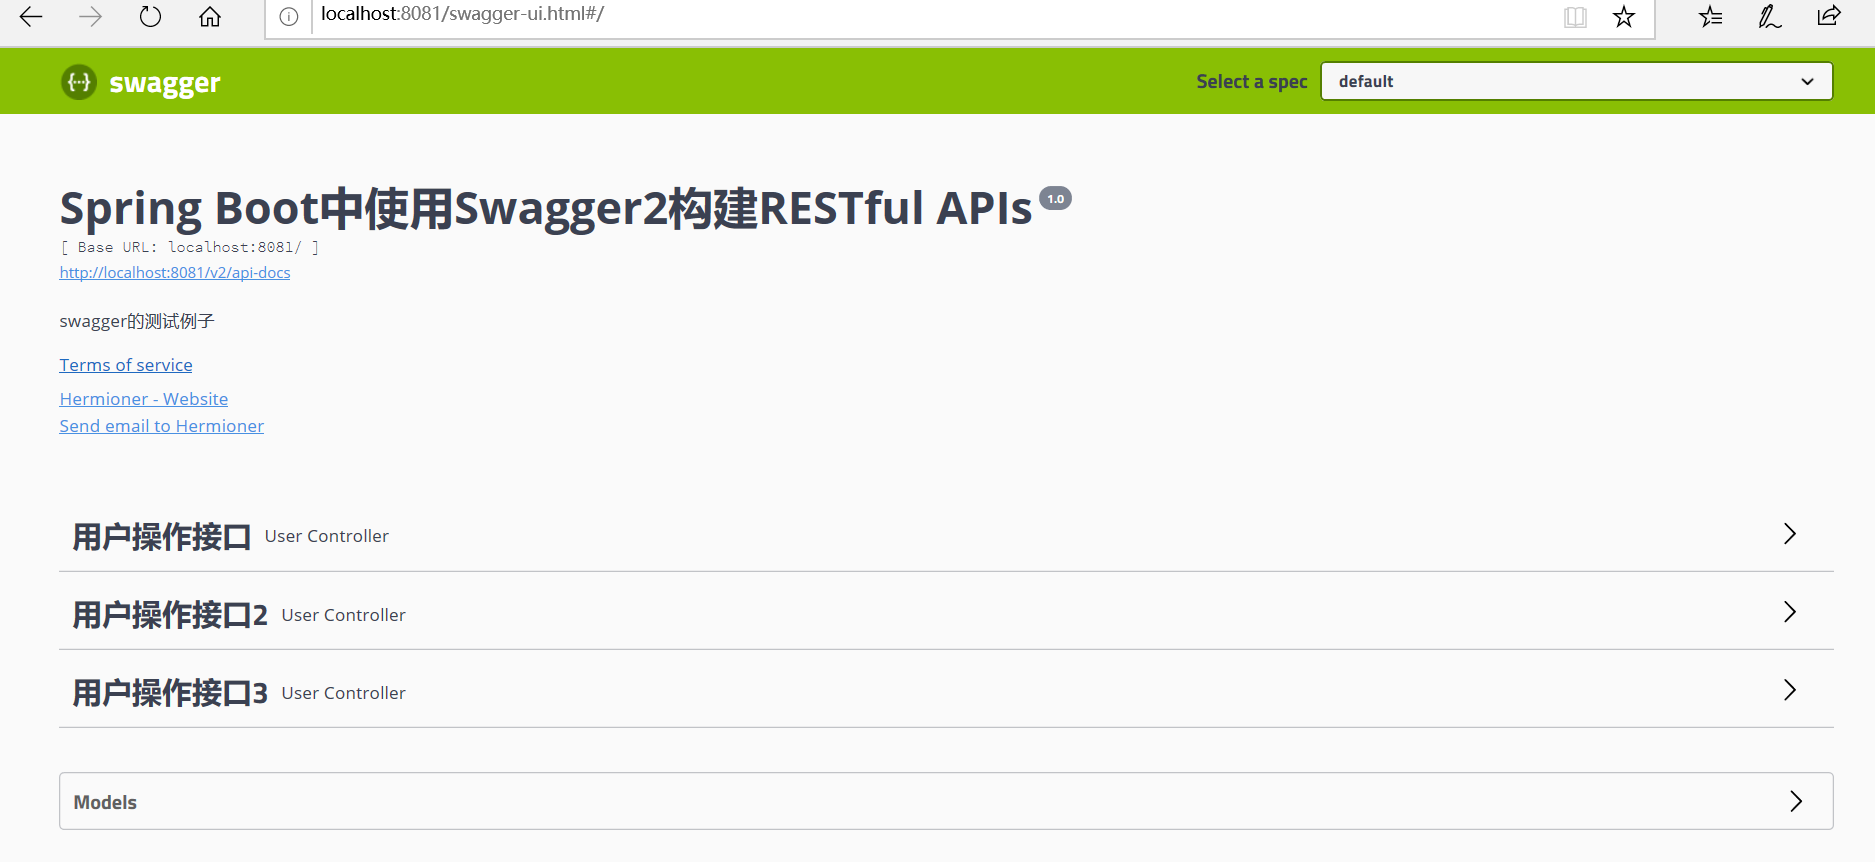
37                 .title("Spring Boot中使用Swagger2构建RESTful APIs")
38                 .description("swagger的测试例子")
39                 .termsOfServiceUrl("https://www.cnblogs.com/Hermioner/")//(不可见,条款地址,公司内部使用的话不需要配置)
40                 .contact(new Contact("Hermioner", "https://www.cnblogs.com/Hermioner/", "没有邮箱@admin.com"))//作者信息
41                 .version("1.0")
42                 .build();
43             }
44
45 }
就当成固定的写法就行,可以选择性的要一些设置。
     * 创建API应用
     * apiInfo() 增加API相关信息
     * 通过select()函数返回一个ApiSelectorBuilder实例,用来控制哪些接口暴露给Swagger来展现,
     * basePackage:扫描该包下面的API注解
(2)controller类:UserController

 1 package com.example.demo.controller;
 2
 3 import org.springframework.web.bind.annotation.RequestMapping;
 4 import org.springframework.web.bind.annotation.ResponseBody;
 5 import org.springframework.web.bind.annotation.RestController;
 6
 7 import com.example.demo.bean.User;
 8
 9 import io.swagger.annotations.Api;
10 import io.swagger.annotations.ApiImplicitParam;
11 import io.swagger.annotations.ApiImplicitParams;
12 import io.swagger.annotations.ApiOperation;
13 import io.swagger.annotations.ApiParam;
14
15
16 @RestController
17 @Api(value="用户controller,我不得显示出来哟",tags= {"用户操作接口","用户操作接口2","用户操作接口3"})
18 public class UserController {
19
20     @RequestMapping("/getA")
21     @ResponseBody
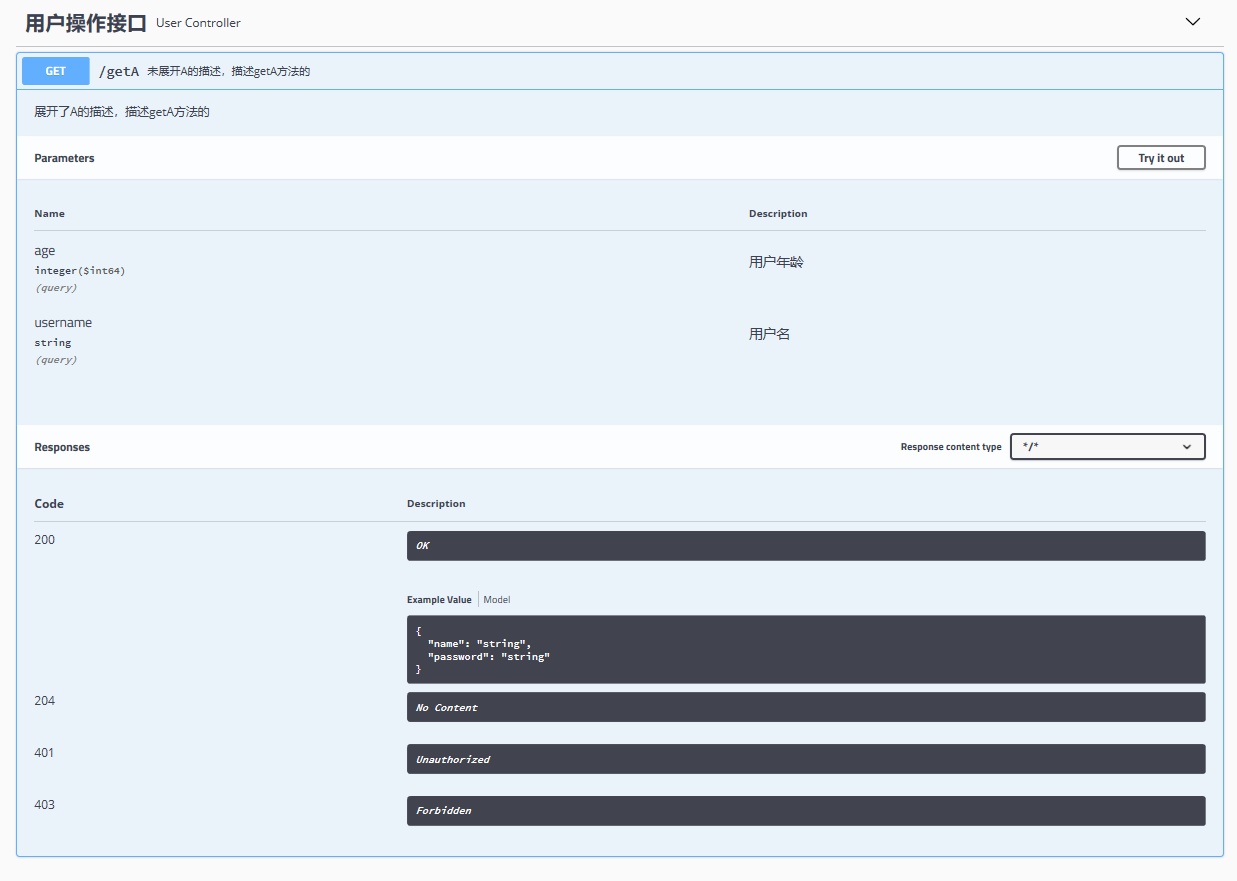
22     @ApiOperation(value="未展开A的描述,描述getA方法的",notes="展开了A的描述,描述getA方法的", httpMethod = "GET")
23     @ApiImplicitParams({
24         @ApiImplicitParam(name="username",value="用户名",dataType="string",paramType="query",example="张三"),
25         @ApiImplicitParam(name="age",value="用户年龄",dataType="long",paramType="query")
26     })
27     public User getA(@ApiParam(value = "用户名", name="username",required = true)String name){
28         return new User();
29     }
30 }
(3)实体类:User

 1 package com.example.demo.bean;
 2
 3 import io.swagger.annotations.ApiModel;
 4 import io.swagger.annotations.ApiModelProperty;
 5
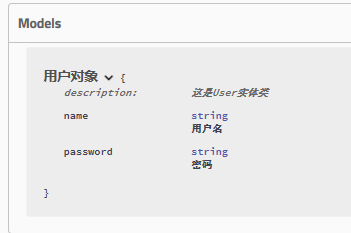
 6 @ApiModel(value="用户对象",description="这是User实体类")
 7 public class User {
 8     @ApiModelProperty(value="用户名")
 9     private String name;
10     @ApiModelProperty(value="密码")
11     private String password;
12     public String getName() {
13         return name;
14     }
15
16     public String getPassword() {
17         return password;
18     }
19
20     public void setPassword(String password) {
21         this.password = password;
22     }
23
24     public void setName(String name) {
25         this.name = name;
26     }
27 }
3.3 运行结果:
(1)直接点开链接就可以查看在线API文档(默认地址: 项目实际地址/swagger-ui/html)

(2)点击“用户操作接口”:

(3)点击Get这一行:

点击右上角的try it out还可以模拟测试:

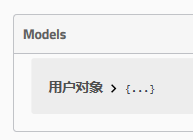
(4)点击models

展开它:


