从零开始,搭建一个简单的购物平台(十一)
从零开始,搭建一个简单的购物平台(十):
https://blog.csdn.net/time_____/article/details/108442619
项目源码(持续更新):https://gitee.com/DieHunter/myCode/tree/master/shopping
这篇文章接着上篇的订单管理后端接口,对前端功能进行实现,主要功能有:新增订单,订单列表,订单删除,订单状态修改。
前端:


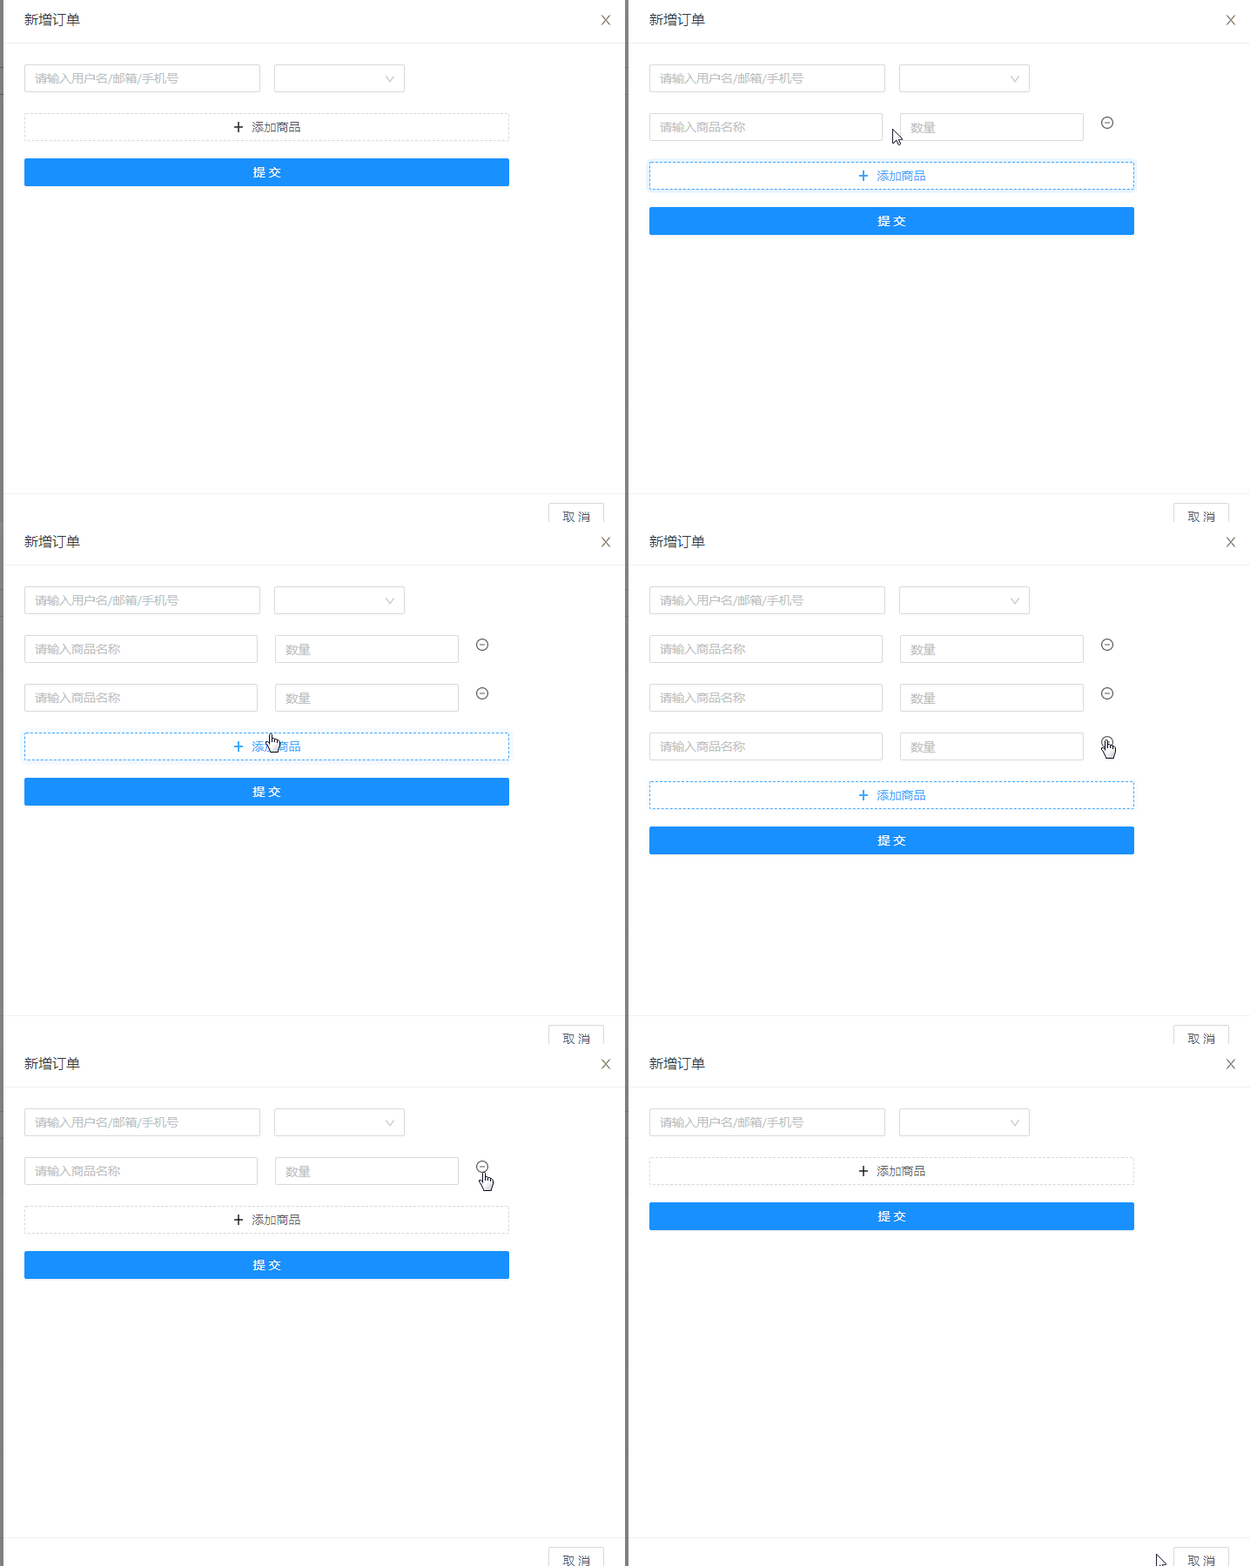
- 首先先实现新增订单功能,照着之前的新增用户和商品的方法修改一些代码,提交的form表单也要修改一下,AntD表单中有一个动态增减嵌套字段的功能,可以用于订单商品的增减


使用Form.List提供一个渲染函数,其中有两个参数,分别是需要操作的数组和操作方式对象(add:新增,remove:删除,move:移动)
实现效果<Form.List name="shopList"> {(shopList, { add, remove }) => ( <div> {shopList.map((field) => ( <Row gutter={20} key={field.key}> <Col span={10}> <Form.Item {...field} name={[field.name, "shopName"]} fieldKey={[field.fieldKey, "shopName"]} rules={[{ required: true, message: "请输入商品名称" }]} > <Input placeholder="请输入商品名称" allowClear /> </Form.Item> </Col> <Col span={8}> <Form.Item {...field} name={[field.name, "shopCount"]} fieldKey={[field.fieldKey, "shopCount"]} rules={[{ required: true, message: "请输入购买数量" }]} > <InputNumber style={{ width: "100%" }} min={1} max={99} placeholder="数量" allowClear /> </Form.Item> </Col> <Col span={2}> <MinusCircleOutlined onClick={() => { remove(field.name); }} /> </Col> </Row> ))} <Row gutter={20}> <Col span={20}> <Button type="dashed" onClick={() => { add(); }} style={{ width: "100%" }} > <PlusOutlined /> 添加商品 </Button> </Col> </Row> </div> )} </Form.List>
- 实现提交功能并对接接口,提交函数与之前的新增用户和新增商品一致,只是参数不同,所以可以直接复用,提交的函数和shopList结构以及data结构如下
sendData(val) {
    console.log(val.shopList)
    if (!val.shopList || !val.shopList.length) {
      message.warning("请选择至少一件商品");
      return;
    }
    val.token = this.$utils.getStorage(StorageName.token);
    console.log(val)
    Bussiness.sendInfo.bind(this, ServerApi.order.addOrder, val)();
  }


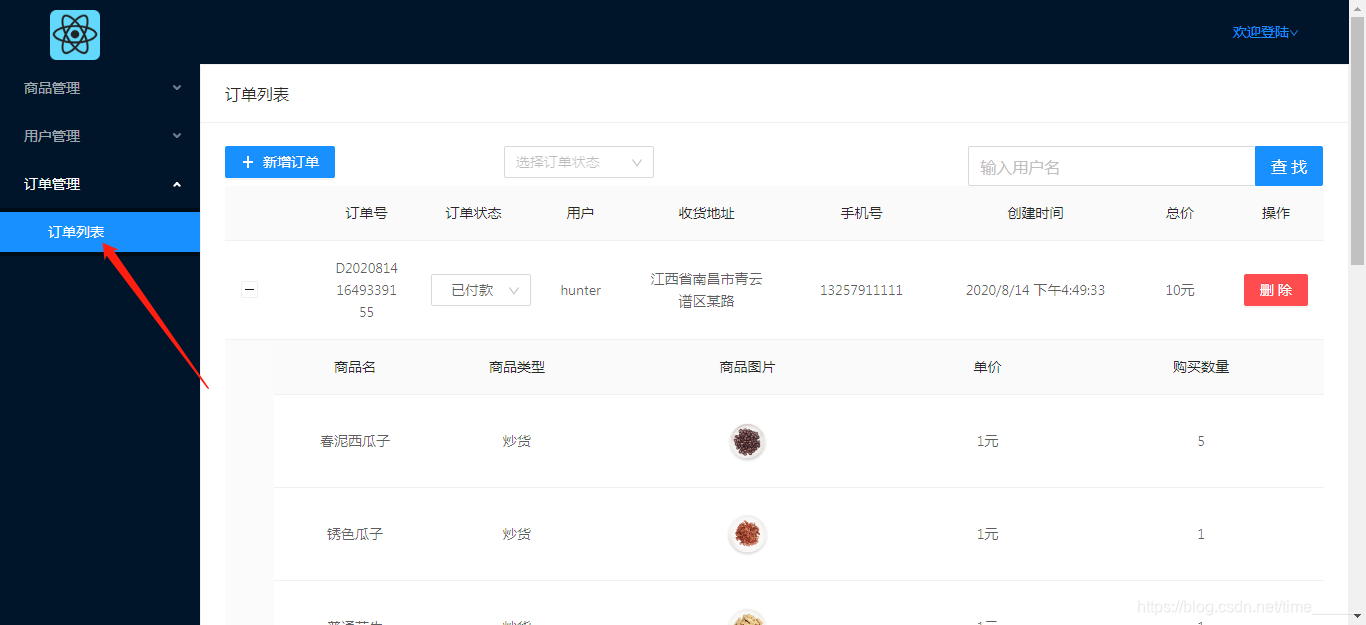
- 新增功能完成后,下面实现订单列表的展示功能,与之前的表格展示相同,在table组件中传入不同的参数(即表单字段及配置)以实现不同表格显示的效果,这里有一个表格嵌套的问题,每一个订单对应着不同的多个商品,所以前端的效果应该是这样的


这里涉及到的子表格可以用一个新的表格子组件来显示,在table组件下新建一个新的组件,命名expandTab.js,用于显示订单中购买的商品列表
在Table组件中做一个适配,其中expandable属性是新增的属性,根据是否是order来判断订单列表显示状态,showOrderItem函数的作用是生成子表格import React from "react"; import config from "../../config/config"; import ShopType from "../../config/shopType"; const { shopType } = ShopType; const { FilePath } = config; export default class expandTab { constructor(_this) { return [ { align: "center", title: "商品名", key: "shopName", dataIndex: "shopName", width: 50, }, { align: "center", title: "商品类型", key: "shopType", dataIndex: "shopType", width: 50, render: (text) => { return <div>{shopType[text].name}</div>; }, }, { align: "center", title: "商品图片", key: "shopPic", dataIndex: "shopPic", width: 60, render: (imgPath) => { return ( <img src={FilePath + imgPath} alt="" style={{ width: 60, margin: "0 auto" }} /> ); }, }, { align: "center", title: "单价", key: "shopPrice", dataIndex: "shopPrice", width: 30, render: (price) => { return <div>{price + "元"}</div>; }, },{ align: "center", title: "购买数量", key: "shopCount", dataIndex: "shopCount", width: 30, }, ]; } }<Table scroll={{ x: 1000 }} rowKey={(record) => record._id} columns={this.state.columns} dataSource={this.state.list} expandable={ this.state.tableType === "order" ? { indentSize: 0, expandedRowRender: this.showOrderItem, } : null } pagination={false} ></Table>showOrderItem函数(生成新的Table子组件)
其余函数与功能和商品及用户管理相同showOrderItem = (record) => { return ( <Table rowKey={(record) => record._id} scroll={{ x: 1000 }} columns={new expandTab(this)} dataSource={record.shopList} pagination={false} ></Table> ); }; - 修改订单状态和删除订单,删除订单可以直接在上述生成的表格中添加按钮,执行到主界面的删除事件,在table.js中之前写过一个clickHandler函数
clickHandler函数(用于所有对表格数据操作的汇总,再分配到主页面中,触发对应事件):{ align: "center", title: "操作", width: 50, fixed: "right", render: (record) => { return ( <div> <Popconfirm title="是否删除?" onConfirm={_this.clickHandler.bind(_this, record, "delete")} okText="是" cancelText="否" disabled={record.userType === "admin" ? true : false} > <Button type="danger" disabled={record.userType === "admin" ? true : false} > 删除 </Button> </Popconfirm> </div> ); }, },
以下是订单管理主页面中的方法:clickHandler(record, type) { switch (type) { case "add": //添加 this.props.addInfo(); break; case "change": //修改 this.props.changeInfo(record); break; case "delete": //删除 this.props.deleteInfo(record); break; case "allow": //冻结 this.props.freezeInfo(record); break; case "state": //订单状态 this.props.orderState(...arguments); break; default: break; } }
将这些方法绑定到父组件属性中作为子组件局部方法,以供子组件调用,修改订单与删除相同,达到以下效果,要在修改时添加下拉列表修改事件,同样执行clickHandler函数,并且将数据通过接口传到后端addOrder = () => {//新增订单,触发bussiness中的新增接口 Events.emit(EventName.ADD_ORDER, FormDefaultVal.shop); this.drawerChild.showDrawer("addOrder"); }; changePage = (pageConfig) => {//分页 this.setState({ pageConfig }); this.getList(); }; orderState = (data, type, state) => {//修改订单状态,触发bussiness中的修改接口 data.token = this.$utils.getStorage(StorageName.token); data.orderState = state; Bussiness.orderState.bind(this, ServerApi.order.updateOrder, data)(); }; getList = () => {//获取订单列表,触发bussiness中的获取列表函数 Bussiness.getInfo.bind(this, ServerApi.order.orderList)(); }; deleteOrder = (record) => {//删除订单,触发bussiness中的删除接口 Bussiness.delInfo.bind(this, ServerApi.order.delOrder, record)(); };
- 以上就是新增的订单管理前端部分所有内容
下一期将开始商城的前端板块介绍,后期将结合App和uniapp打包及使用


 浙公网安备 33010602011771号