
CocoaPods源码剖析(一)
更新记录
- 2020年3月28日,初稿
源码地址
- CocoaPods/CocoaPods
- Pod是由Ruby实现的,所以想要读懂源码,还需要先了解一下Ruby的源码
源码运行过程(含注释),即输入Pod install(或update)的执行过程
前置环节-生成对应的Command子类对象(例如Install类和Update类)
- Pod::Command的run类方法
def self.run(argv)
   help! 'You cannot run CocoaPods as root.' if Process.uid == 0 && !Gem.win_platform?

   verify_minimum_git_version!
   verify_xcode_license_approved!

   super(argv)
   ensure
   UI.print_warnings
end
- CLAide::Command类的run方法
def self.run(argv = [])
   plugin_prefixes.each do |plugin_prefix|
      PluginManager.load_plugins(plugin_prefix)
   end

   argv = ARGV.coerce(argv)
   #通过参数生成一个Command类的子类对象
   command = parse(argv)
   ANSI.disabled = !command.ansi_output?
   unless command.handle_root_options(argv)
      command.validate!
      # 调用comman类子类对象的run方法
      command.run
   end
   rescue Object => exception
   handle_exception(command, exception)
end
- CLAide::Command类的parse方法
# @param  [Array, ARGV] argv
#         A list of (remaining) parameters.
#
# @return [Command] An instance of the command class that was matched by
#         going through the arguments in the parameters and drilling down
#         command classes.
#
def self.parse(argv)self.run
   argv = ARGV.coerce(argv)
   # 得到第一个参数
   cmd = argv.arguments.first
   if cmd && subcommand = find_subcommand(cmd)
      argv.shift_argument
      subcommand.parse(argv)
   elsif abstract_command? && default_subcommand
      load_default_subcommand(argv)
   else
      new(argv)
   end
end
3.1 CLAide::Command类的argument方法
# @return [Array<Argument>]
#         A list of arguments the command handles. This is shown
#         in the usage section of the command’s help banner.
#         Each Argument in the array represents an argument by its name
#         (or list of alternatives) and whether it's required or optional
#
def arguments
   # 如果@arguments不为空,则返回@arguments,否则返回空数组
   @arguments ||= []
end
3.2 CLAide::Command类的find_subcommand方法
# Searches the list of subcommands that should not be ignored for command
# lookup for a subcommand with the given `name`.
#
# @param  [String] name
#         The name of the subcommand to be found.
#
# @return [CLAide::Command, nil] The subcommand, if found.
#
def self.find_subcommand(name)
   subcommands_for_command_lookup.find { |sc| sc.command == name }
end
3.3 通过 find_subcommand 找到对应的子类对象,然后调用子类对象的parse方法(subcommand.parse(argv))
def self.parse(argv)
    entries = []
    #对argv数组的每个值进行to_s的表达式操作,生成一个新的数组,存储到copy变量中
    copy = argv.map(&:to_s)
    double_dash = false
    #shift返回数组的第一个元素,并且移除该元素。类比stack的pop函数
    while argument = copy.shift
       # if为真,直接进入下次循环
       next if !double_dash && double_dash = (argument == '--')
       type = double_dash ? :arg : argument_type(argument)
       parsed_argument = parse_argument(type, argument)
       entries << [type, parsed_argument]
    end
    entries
end
实际pod主流程的核心环节(调用Installer类的install函数)
- 看到 CocoaPods/lib/cocoapods/command/install.rb中Install类的run方法
def run
    verify_podfile_exists!
    installer = installer_for_config
    installer.repo_update = repo_update?(:default => false)
    installer.update = false
    installer.deployment = @deployment
    installer.clean_install = @clean_install
    installer.install!
end
- 我们对比一下 CocoaPods/lib/cocoapods/command/update.rb中Update类的run方法
def run
    verify_podfile_exists!

    installer = installer_for_config
    installer.repo_update = repo_update?(:default => true)
    installer.clean_install = @clean_install
    if @pods.any? || @excluded_pods.any? || @source_pods.any?
       verify_lockfile_exists!
       verify_pods_are_installed!
       verify_excluded_pods_are_installed!

       @pods += @source_pods.select { |pod| config.lockfile.pod_names.include?(pod) }
       @pods = config.lockfile.pod_names.dup if @pods.empty?
       @pods -= @excluded_pods

       installer.update = { :pods => @pods }
    else
       UI.puts 'Update all pods'.yellow
       installer.update = true
    end
    installer.install!
end
- 对比Install类和Update类的run方法,我们发现
- 相同点
- 最后都会调用Installer类的
install!函数
- 最后都会调用Installer类的
- 明显的不同点
- Install命令类的
repo_update属性为false,Update命令类的repo_update函数为true - Install命令类的
update属性为false,Update命令类的update函数为true
- Install命令类的
- 相同点
- 参考Podfile.lock背后的那点事,我们可以提前知道
update变量的值,区分了Installer调用install函数下,使用pod install和pod update的场景。
本篇结论
- 本篇分析执行Pod install或者update的前几个步骤,主要是通过命令行参数(install或者update)的解析,实例化不同的
Command子类对象。 - install和update参数的命令执行,最后都会进入Installer类的install函数,执行核心的依赖库安装过程。
- Installer类的install函数,是通过update的值,来判断两种不同的场景(即update和install)来进行不同的操作
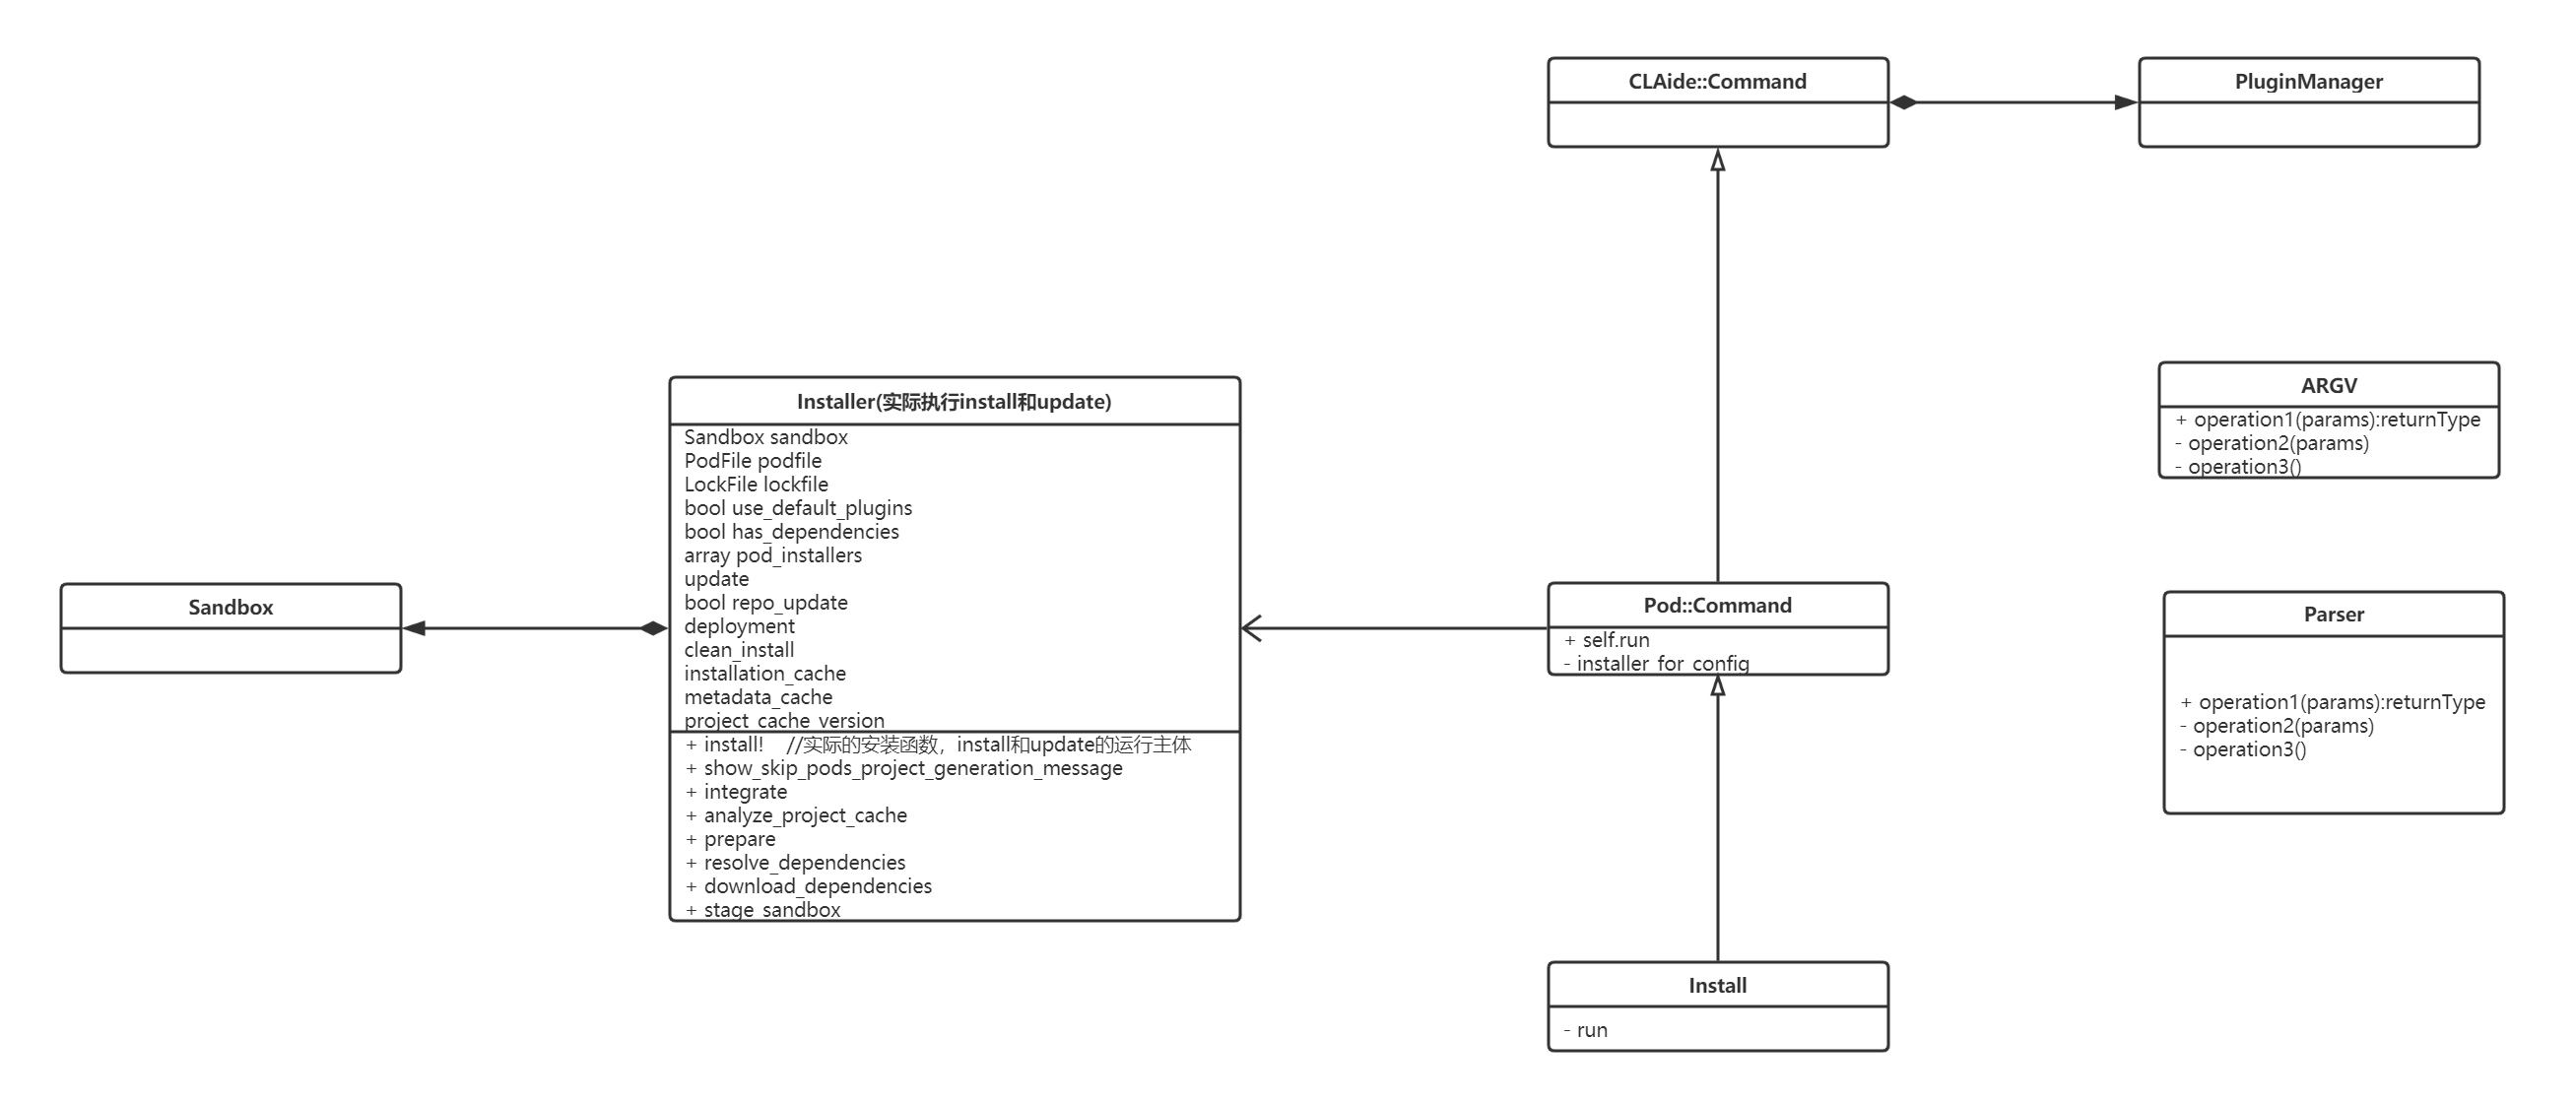
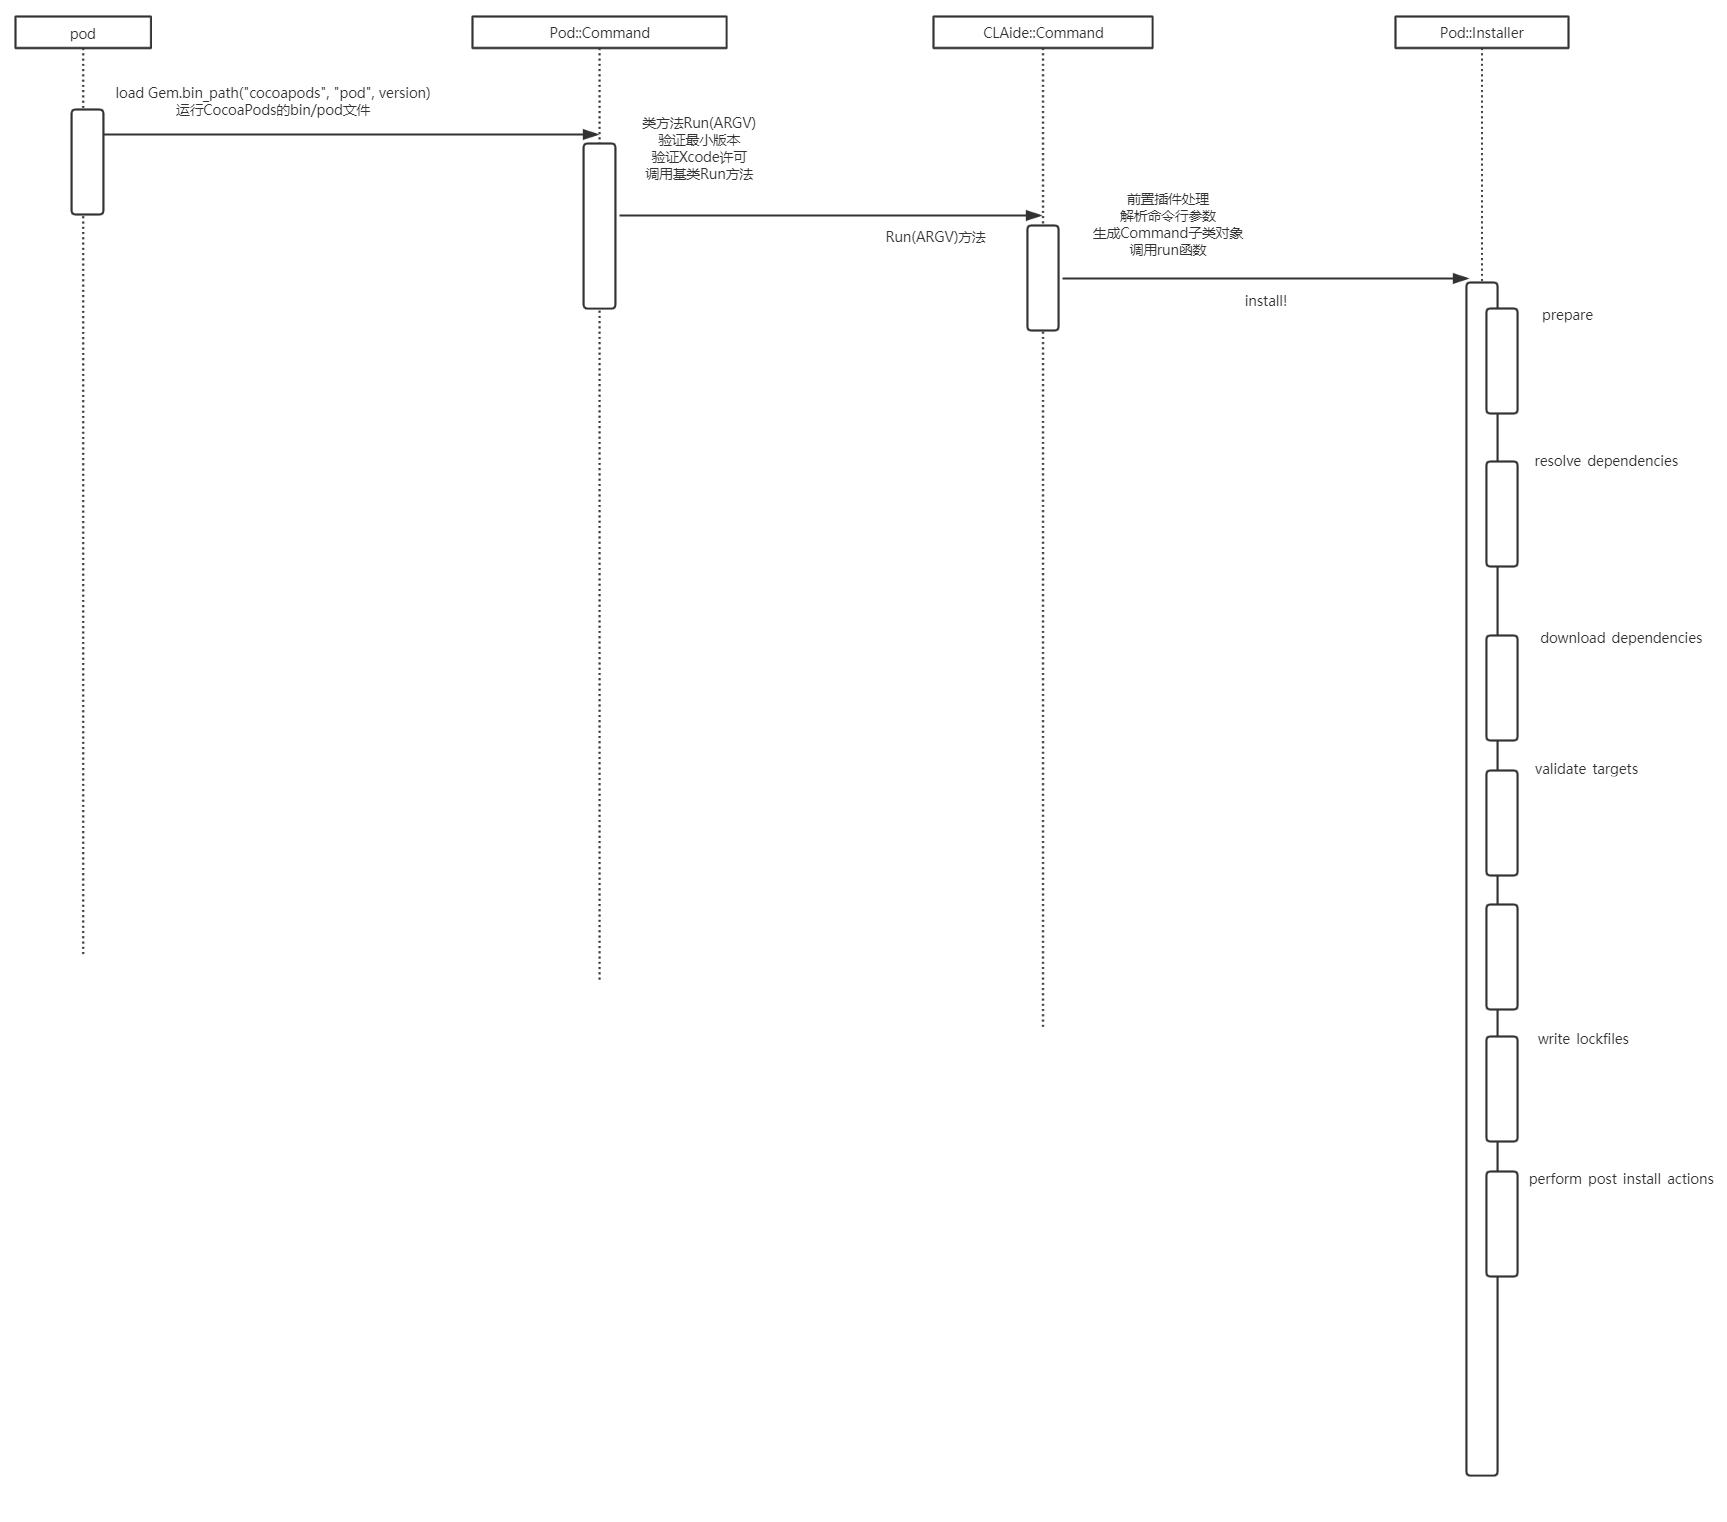
- 另附上简单版(真的是简单版,别见怪)类图,流程图
![]()
写在后面的话
- 鉴于篇幅已较长,为了有较好的阅读体验(避免文章分析过长,很多读者其实都没有耐心看下去),而且自己也不能一下子完全捋清楚,所以第一篇到此为止。
- 后续会从该篇的节点继续往下分析
- 后续还需要分析的点
- Installer类中的update属性如何使用?如何具体地区别install和update两种场景?
- PodFile.lock文件有何作用?
- Pod如何解析PodFile文件的?
- Pod.spec文件有何作用?
- Pod是如何集成Xcode工程的?

 浙公网安备 33010602011771号