【mail邮件系统】linux上安装部署sendmail邮件系统
sendmail是linux系统中一个邮箱系统,在系统中配置好sendmail就可以直接使用它来发送邮箱。
sendmail的配置文件
/etc/mail/sendmail.cf :Sendmail的主配置文件;
/etc/mail/access :中继访问控制;
/etc/mail/domaintable ;域名映射;
/etc/mail/local-host-names ;本地主机别名;
/etc/mail/mailertable :为特定的域指定特殊的路由规则;
/etc/mail/virtusertable :虚拟域配置。
中继的配置:是指一台服务器接受并传递源地址和目的地址都不是本服务器的邮件。
在两个文件中进行设置:
/etc/mail/relay-domains
/etc/mail/access。
一、安装软件
[root@VM_0_10_centos ~]# yum -y install sendmail sendmail-cf
启动saslauthd服务进行SMTP验证(默认是安装的,如果没有,就手动安装)
[root@VM_0_10_centos ~]# systemctl restart saslauthd
二、邮件服务配置
1)需关闭防火墙
[root@VM_0_10_centos ~]# systemctl stopfirewalld
[root@VM_0_10_centos ~]# systemctl status firewalld
2)配置Senmail的SMTP认证
将下面两行内容前面的dnl去掉。在sendmail文件中,dnl表示该行为注释行,是无效的,因此通过去除行首的dnl字符串可以开启相应的设置行。
[root@VM_0_10_centos ~]# vim /etc/mail/sendmail.mc
TRUST_AUTH_MECH(`EXTERNAL DIGEST-MD5 CRAM-MD5 LOGIN PLAIN')dnl
define(`confAUTH_MECHANISMS', `EXTERNAL GSSAPI DIGEST-MD5 CRAM-MD5 LOGIN PLAIN')dnl

3) 设置Sendmail服务的网络访问权限(如果是直接本机调用,可以不用操作,采用默认的127.0.0.1。不过最后还是改成0.0.0.0)
将127.0.0.1改为0.0.0.0,意思是任何主机都可以访问Sendmail服务。
如果仅让某一个网段能够访问到Sendmail服务,将127.0.0.1改为形如192.168.1.0/24的一个特定网段地址。
[root@VM_0_10_centos ~]# vim /etc/mail/sendmail.mc
DAEMON_OPTIONS(`Port=smtp,Addr=0.0.0.0, Name=MTA')dnl

4)生成配置文件
Sendmail的配置文件由m4来生成,m4工具在sendmail-cf包中。如果系统无法识别m4命令,说明sendmail-cf软件包没有安装
# 修改之前先备份
[root@VM_0_10_centos ~]# cp -r /etc/mail/sendmail.cf /etc/mail/sendmail.cf.bak
[root@VM_0_10_centos ~]#  m4 /etc/mail/sendmail.mc > /etc/mail/sendmail.cf
5)启动服务(如果发现sendmail dead but subsys locked,那就执行"service postfix status"查看postfix是否默认开启了,如果开启的话,就关闭postfix,然后再启动或重启sendmail服务即可。)
[root@VM_0_10_centos ~]# systemctl restart sendmail
[root@VM_0_10_centos ~]# systemctl restart saslauthd
[root@VM_0_10_centos ~]# systemctl status postfix(如果是开启的,将status改为stop即可)
将服务加入到开机自启
[root@VM_0_10_centos ~]# systemctl enable sendmail.service
[root@VM_0_10_centos ~]# systemctl enable saslauthd.service
Created symlink from /etc/systemd/system/multi-user.target.wants/saslauthd.service to /usr/lib/systemd/system/saslauthd.se
rvice.
[root@VM_0_10_centos ~]# systemctl list-unit-files | grep sendmail
sendmail.service                              enabled
[root@VM_0_10_centos ~]# systemctl list-unit-files | grep saslauthd
saslauthd.service                             enabled
三、测试发送邮箱
1)第一种方式:安装sendmail即可使用。
# 默认好像已经安装
[root@VM_0_10_centos ~]# yum -y install mailx
PS:创建一个邮件内容文件,然后发邮件(注意-s参数后的邮件标题要用单引号,不能使用双引号,否则发邮件会失败!)
[root@VM_0_10_centos ~]# echo 'This is test mail' > /root/testmail.txt
[root@VM_0_10_centos ~]# cat /root/testmail.txt
This is test mail
[root@VM_0_10_centos ~]# mail -s 'Test Mail' qqMail@qq.com < /root/testmail.txt
PS:我这边使用的是qq.com,发送邮件并未接收到,可能是需要在qq邮箱开启授权码。然后在服务器上进行配置才行,操作如下
先开启授权码:

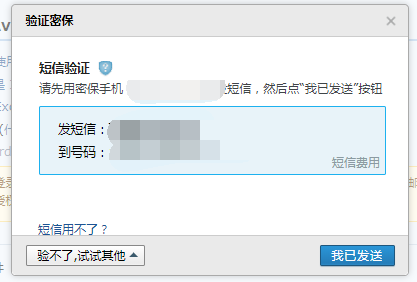
往下滑动,开启签名两个服务表示已经开启了smtp功能。点击生 成授权码 按照提示继续操作就可以获取授权码了
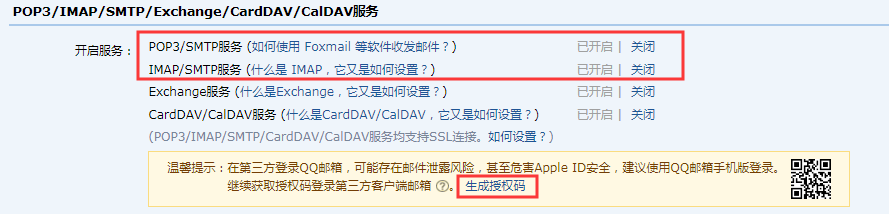
发送之后点击我已发送,生成授权码即可。
编辑配置文件:
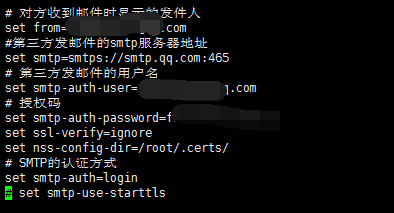
[root@VM_0_10_centos ~]# vi /etc/mail.rc
set from=qqMail@qq.com      # 对方收到邮件时显示的发件人
set smtp=smtps://smtp.qq.com:465        # 第三方发邮件的smtp服务器地址
set smtp-auth-user=qqMail@qq.com   # 第三方发邮件的用户名
set smtp-auth-password=*********** # 授权码
set ssl-verify=ignore
set nss-config-dir=/root/.certs/
set smtp-auth=login     # SMTP的认证方式
# set smtp-use-starttls # 如果配置这个会报错SSL/TLS handshake failed: SSL received a malformed Alert record
加入上面配置保存以后,重启邮件服务:
# systemctl restart sendmail
# systemctl restart saslauthd
运行以下命令测试发送邮件,如果没有意外,我们的邮箱很快就能收到从服务器发过来的测试邮件了。
在这里报错:

# 创建/root/.certs目录
# mkdir -p /root/.certs
[root@VM_0_10_centos .certs]# echo -n | openssl s_client -connect smtp.qq.com:465 | sed -ne '/-BEGIN CERTIFICATE-/,
/-END CERTIFICATE-/p' >qq.crt
depth=2 C = US, O = DigiCert Inc, OU = www.digicert.com, CN = DigiCert Global Root CA
verify return:1
depth=1 C = US, O = DigiCert Inc, OU = www.digicert.com, CN = Secure Site CA G2
verify return:1
depth=0 C = CN, ST = Guangdong, L = Shenzhen, O = Tencent Technology (Shenzhen) Company Limited, OU = \E4\BC\81\E4\B8\9A\E
5\BE\AE\E4\BF\A1\E4\BA\A7\E5\93\81\E9\83\A8, CN = *.exmail.qq.comverify return:1
DONE
[root@VM_0_10_centos .certs]# certutil -A -n "GeoTrust SSL CA" -t "C,," -d /root/.certs/ -i qq.crt
[root@VM_0_10_centos .certs]#  certutil -A -n "GeoTrust Global CA" -t "C,," -d /root/.certs/ -i qq.crt
[root@VM_0_10_centos .certs]# certutil -L -d /root/.certs/

Certificate Nickname                                         Trust Attributes
                                                             SSL,S/MIME,JAR/XPI

GeoTrust SSL CA                                              C,,
[root@VM_0_10_centos .certs]# certutil -A -n "GeoTrust SSL CA - G3" -t "Pu,Pu,Pu" -d ./ -i qq.crt
Notice: Trust flag u is set automatically if the private key is present.
这样配置还是没有解决,查看日志/var/log/mailog(可能是主机没有解析到的原因)
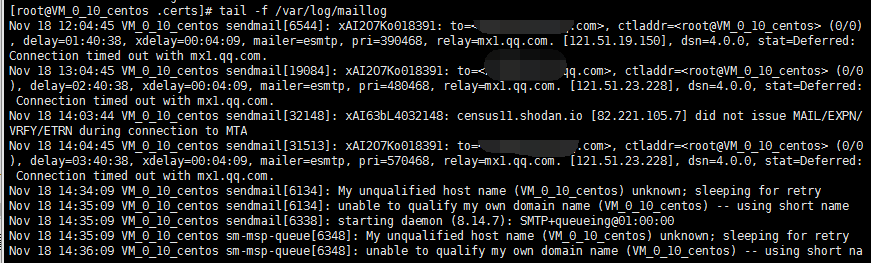
解决:设置/etc/hosts添加如下内容,然后保存退出,重启服务
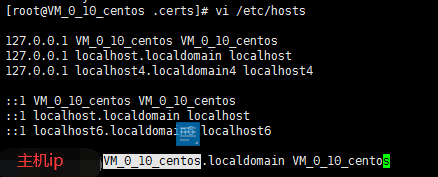
好吧,还是没解决
后面按照这个博客的试了下,也出现了问题https://blog.csdn.net/qq_43277505/article/details/85337072

意思是:来自地址的501邮件必须与授权用户相同,查看mail.rc配配置文件发现是from后面的qq.com写成了163.com
绕了这么大圈终于解决了,开森
这里是直接输入,然后结合管道符发送,还可以从文件读取(-s表示主题)
# mail -s 'Test Mail' **@qq.com < /root/testmail.txt
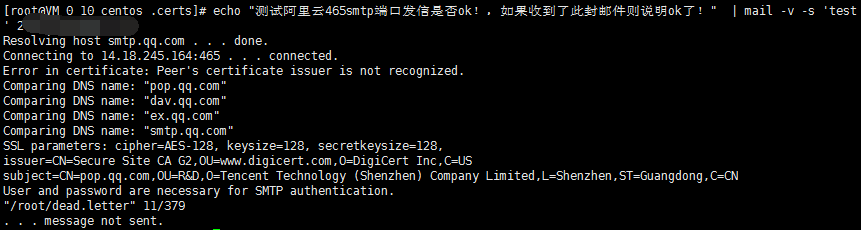
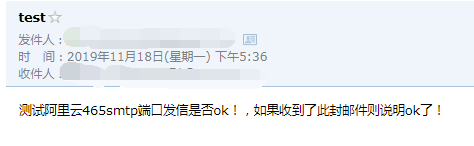
[root@VM_0_10_centos .certs]# echo "测试阿里云465smtp端口发信是否ok!,如果收到了此封邮件则说明ok了!"  | mail -v -s 'test
' **@qq.comResolving host smtp.qq.com . . . done.
Connecting to 14.18.245.164:465 . . . connected.
Comparing DNS name: "pop.qq.com"
Comparing DNS name: "dav.qq.com"
Comparing DNS name: "ex.qq.com"
Comparing DNS name: "smtp.qq.com"
SSL parameters: cipher=AES-128, keysize=128, secretkeysize=128,
issuer=CN=Secure Site CA G2,OU=www.digicert.com,O=DigiCert Inc,C=US
subject=CN=pop.qq.com,OU=R&D,O=Tencent Technology (Shenzhen) Company Limited,L=Shenzhen,ST=Guangdong,C=CN
220 smtp.qq.com Esmtp QQ Mail Server
>>> EHLO VM_0_10_centos
250-smtp.qq.com
250-PIPELINING
250-SIZE 73400320
250-AUTH LOGIN PLAIN
250-AUTH=LOGIN
250-MAILCOMPRESS
250 8BITMIME
>>> AUTH LOGIN
334 VXNlcm5hbWU6
>>> MjM2MDQxNTg3MUBxcS5jb20=
334 UGFzc3dvcmQ6
>>> ZndkY29va2JvdWV5ZWJhaQ==
235 Authentication successful
>>> MAIL FROM:<**@qq.com>
250 Ok
>>> RCPT TO:<**@qq.com>
250 Ok
>>> DATA
354 End data with <CR><LF>.<CR><LF>
>>> .
250 Ok: queued as
>>> QUIT
221 Bye
如果是发送给多个邮件,就使用-c参数,如下:
# echo "This is test mail" | mail -s 'test' -c **@qq.com **@163.com

参考博客:
https://www.cnblogs.com/kevingrace/p/6143977.html
https://blog.csdn.net/qq_43277505/article/details/85337072(推荐)
