5_API网关服务
前言
1、新建工程api-gateway
1.1、添加zuly依赖
   <dependency>
         <groupId>org.springframework.cloud</groupId>
         <artifactId>spring-cloud-starter-zuul</artifactId>
      </dependency>
<?xml version="1.0" encoding="UTF-8"?>
<project xmlns="http://maven.apache.org/POM/4.0.0" xmlns:xsi="http://www.w3.org/2001/XMLSchema-instance"
   xsi:schemaLocation="http://maven.apache.org/POM/4.0.0 http://maven.apache.org/xsd/maven-4.0.0.xsd">
   <modelVersion>4.0.0</modelVersion>

   <groupId>com.didispace</groupId>
   <artifactId>api-gateway</artifactId>
   <version>1.0.0</version>
   <packaging>jar</packaging>

   <name>api-gateway</name>
   <description>Spring Cloud project</description>

   <parent>
      <groupId>org.springframework.boot</groupId>
      <artifactId>spring-boot-starter-parent</artifactId>
      <version>1.3.7.RELEASE</version>
      <relativePath/> <!-- lookup parent from repository -->
   </parent>

   <properties>
      <project.build.sourceEncoding>UTF-8</project.build.sourceEncoding>
      <java.version>1.8</java.version>
   </properties>

   <dependencies>

      <dependency>
         <groupId>org.springframework.cloud</groupId>
         <artifactId>spring-cloud-starter-zuul</artifactId>
      </dependency>

   </dependencies>

   <dependencyManagement>
      <dependencies>
         <dependency>
            <groupId>org.springframework.cloud</groupId>
            <artifactId>spring-cloud-dependencies</artifactId>
            <version>Brixton.SR5</version>
            <type>pom</type>
            <scope>import</scope>
         </dependency>
      </dependencies>
   </dependencyManagement>

   <build>
      <plugins>
         <plugin>
            <groupId>org.springframework.boot</groupId>
            <artifactId>spring-boot-maven-plugin</artifactId>
         </plugin>
      </plugins>
   </build>

</project>
1.2、2、开启zuul网关服务功能,注意啦,这里是springCloudApplication
@EnableZuulProxy //开启zuul 的API网关服务功能
@SpringCloudApplication
public class Application {

   public static void main(String[] args) {
      new SpringApplicationBuilder(Application.class).web(true).run(args);
   }


}
1.3、配置路由转发(传统的路由转发)
spring.application.name=api-gateway
server.port=5555

解释:# 下面这个配置定义了发往API网关服务的请求中,所有符合/api-a-url/** 的规则
# 访问都被路由转发到 http://localhost:8001/ 地址上;
# 也就是说当我们访问 http://localhost:5555/api-a-url/hello
# 会转发到 http://localhost:8001/api-a-url/hello 提供的微服务接口上,


# routes to url 传统的路由转发
# 下面这个配置定义了发往API网关服务的请求中,所有符合/api-a-url/** 的规则
# 访问都被路由转发到 http://localhost:8001/ 地址上;
# 也就是说当我们访问 http://localhost:5555/api-a-url/hello
# 会转发到 http://localhost:8001/api-a-url/hello 提供的微服务接口上,
zuul.routes.api-a-url.path=/api-a-url/**
zuul.routes.api-a-url.url=http://localhost:8001/
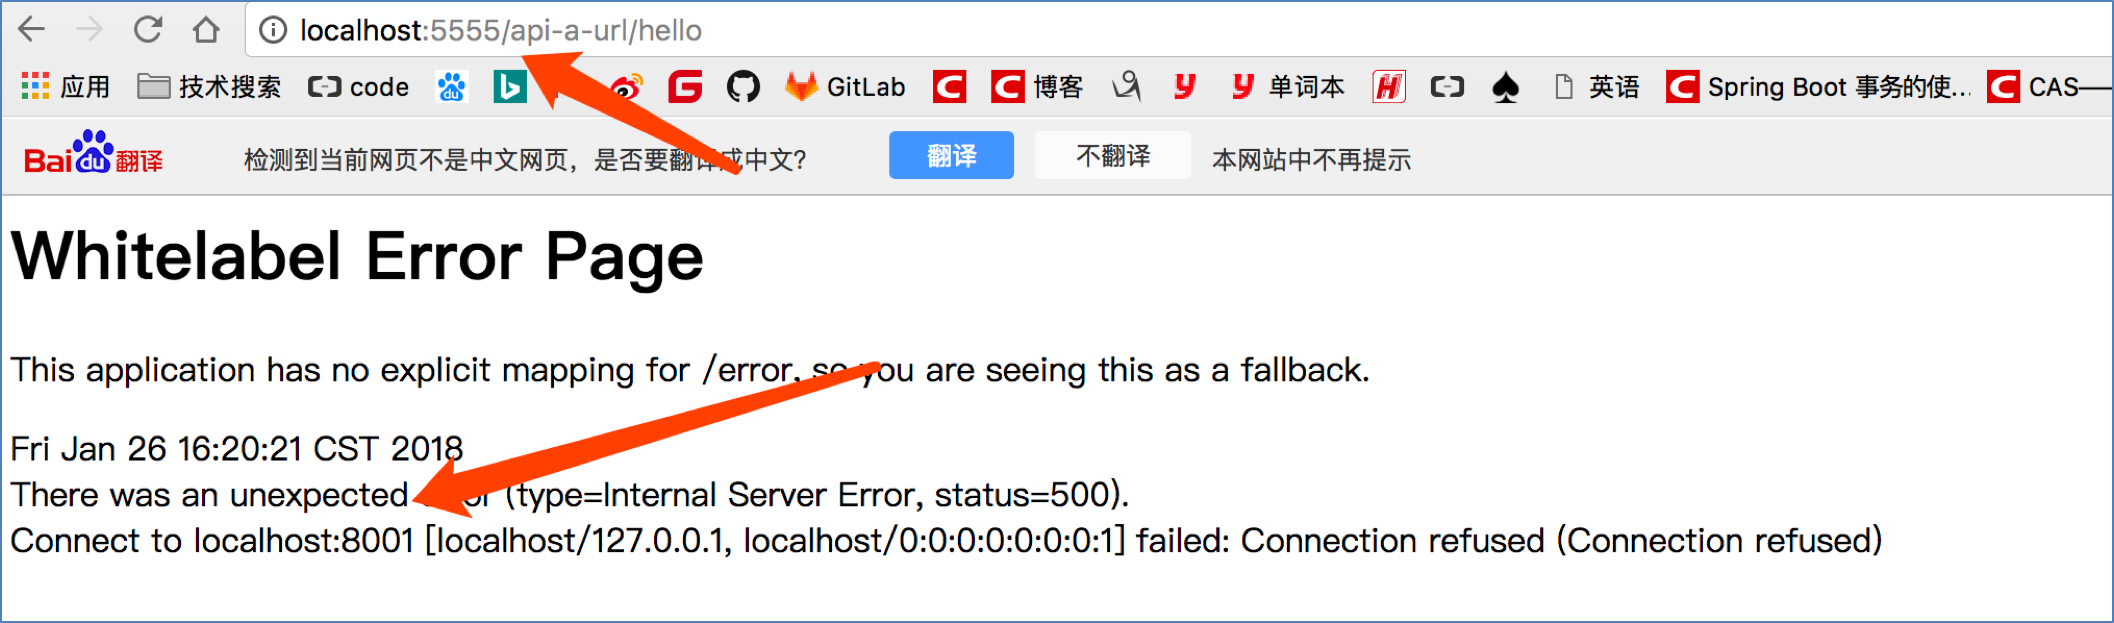
1.4、启动这个服务
开始访问 http://localhost:5555/api-a-url/hello
2、面向服务的路由(开始和eurake集合)
2.1、添加pom.xml依赖
<dependency>
   <groupId>org.springframework.cloud</groupId>
   <artifactId>spring-cloud-starter-eureka</artifactId>
</dependency>
2.2、指定注册中心,别难过配置服务路由
配置服务提供者路由和声明式服务调用的转发
# eureka
eureka.client.serviceUrl.defaultZone=http://localhost:1111/eureka/

# routes to serviceId
zuul.routes.api-a.path=/api-a/**
zuul.routes.api-a.serviceId=hello-service


zuul.routes.api-b.path=/api-b/**
zuul.routes.api-b.serviceId=feign-consumer
2.3、在Hello-Sevice 服务提供者中添加REST api-a/hello的url请求
@RequestMapping(value = "/api-a/hello", method = RequestMethod.GET)
public String api_a() {
   ServiceInstance instance = client.getLocalServiceInstance();
   logger.info("/hello, host:" + instance.getHost() + ", service_id:" + instance.getServiceId());
   return "Hello World";
}
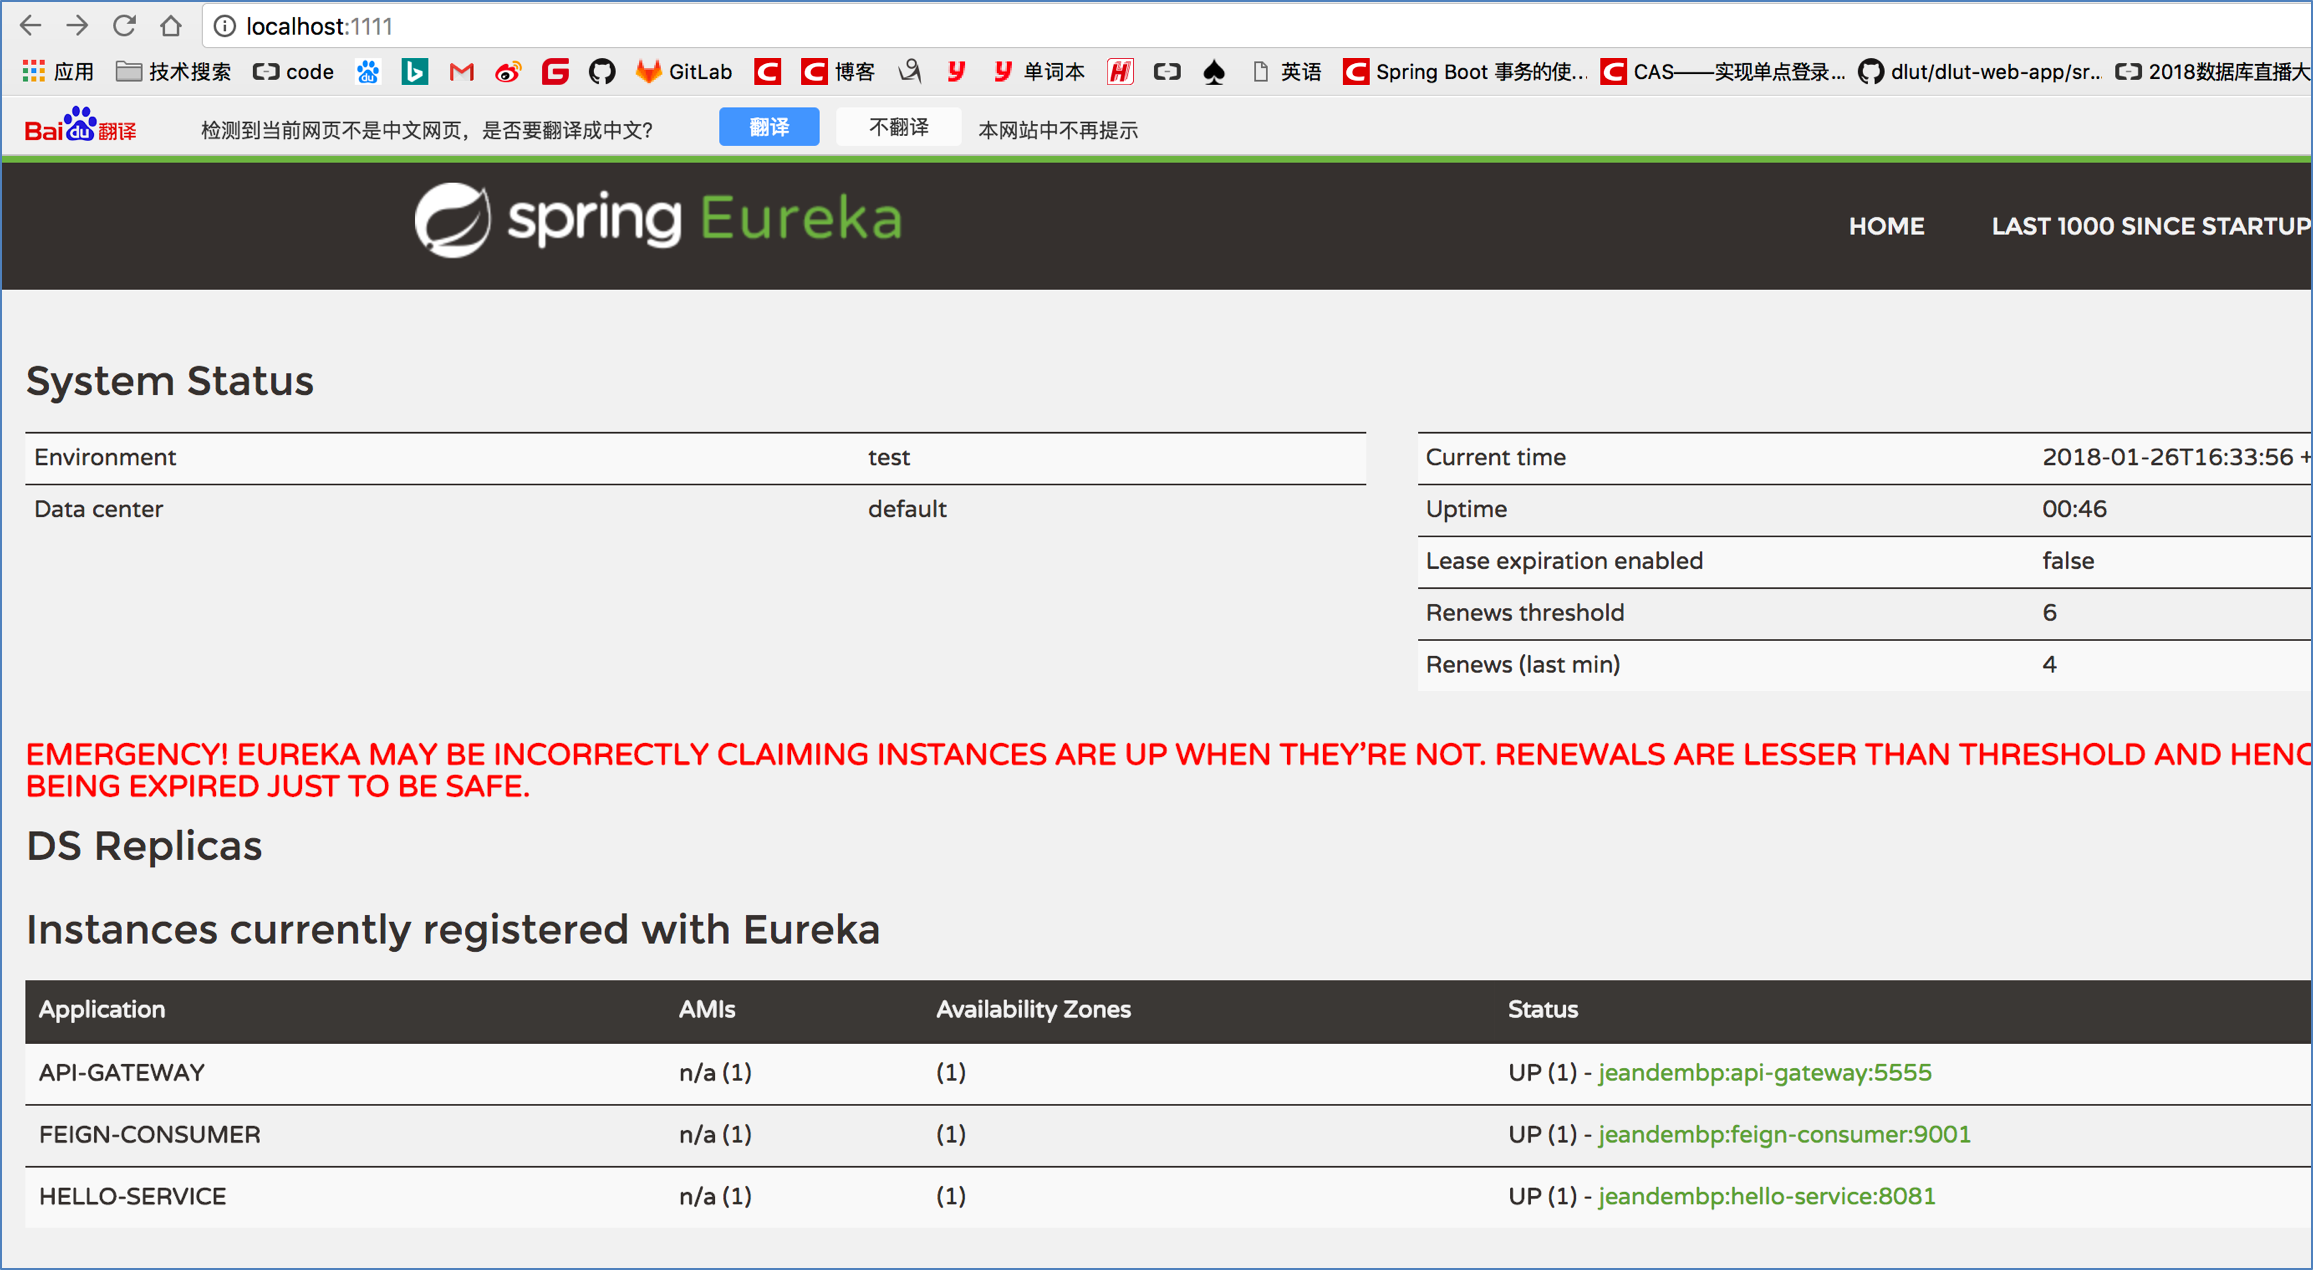
2.4、启动所有的服务
注册中心1111,
服务提供者8081
申明式服务9001
还有本实例,API网关服务5555
2.5、浏览器测试
http://localhost:5555/api-a/hello 地址不变哦,端口地址没有变化哦,测试成功
2.6、总结
实现了请求路由功能以后,我们的微服务应用提供的接口就可以通过统一的API网关入口被客户访问到了。但是每个客户请求微服务时,他们的访问权限一般与一定的限制,系统不会对所有的功能都开放。所以这里需要一个zuul过滤器3、zuul过滤器
3.1、配置过滤器
package com.didispace.filter;

import com.netflix.zuul.ZuulFilter;
import com.netflix.zuul.context.RequestContext;
import org.slf4j.Logger;
import org.slf4j.LoggerFactory;

import javax.servlet.http.HttpServletRequest;

public class AccessFilter extends ZuulFilter  {

    private static Logger log = LoggerFactory.getLogger(AccessFilter.class);

    /**
     * 1、过滤器类型 这里定义为pre 意味着在请求路由之前执行
     * @return
     */
    @Override
    public String filterType() {
        return "pre";
    }

    /**
     * 2、过滤器执行顺序,当请求中存在多个过滤器时,需要根据这个返回值来依次执行
     * @return
     */
    @Override
    public int filterOrder() {
        return 0;
    }

    /**
     * 3、判断过滤器是否需要被执行,这里返回,true 因此这个过滤器对所有的请求都会生效,
     *  实际操作中可以利用这里指定过滤器的有效范围
     * @return
     */
    @Override
    public boolean shouldFilter() {
        return true;
    }

    /**
     * 4、过滤器的具体逻辑
     * @return
     */
    @Override
    public Object run() {
        RequestContext ctx = RequestContext.getCurrentContext();
        HttpServletRequest request = ctx.getRequest();

        log.info("send {} request to {}", request.getMethod(), request.getRequestURL().toString());

        Object accessToken = request.getParameter("accessToken");
##         if(accessToken == null) {
            log.warn("access token is empty");
            ctx.setSendZuulResponse(false);
            ctx.setResponseStatusCode(401);
            return null;
        }
        log.info("access token ok");
        return null;
    }

}
3.2、添加过滤器
@EnableZuulProxy //开启zuul 的API网关服务功能
@SpringCloudApplication
public class Application {

   public static void main(String[] args) {
      new SpringApplicationBuilder(Application.class).web(true).run(args);
   }


   @Bean
   public AccessFilter accessFilter() {
      return new AccessFilter();
   }


}
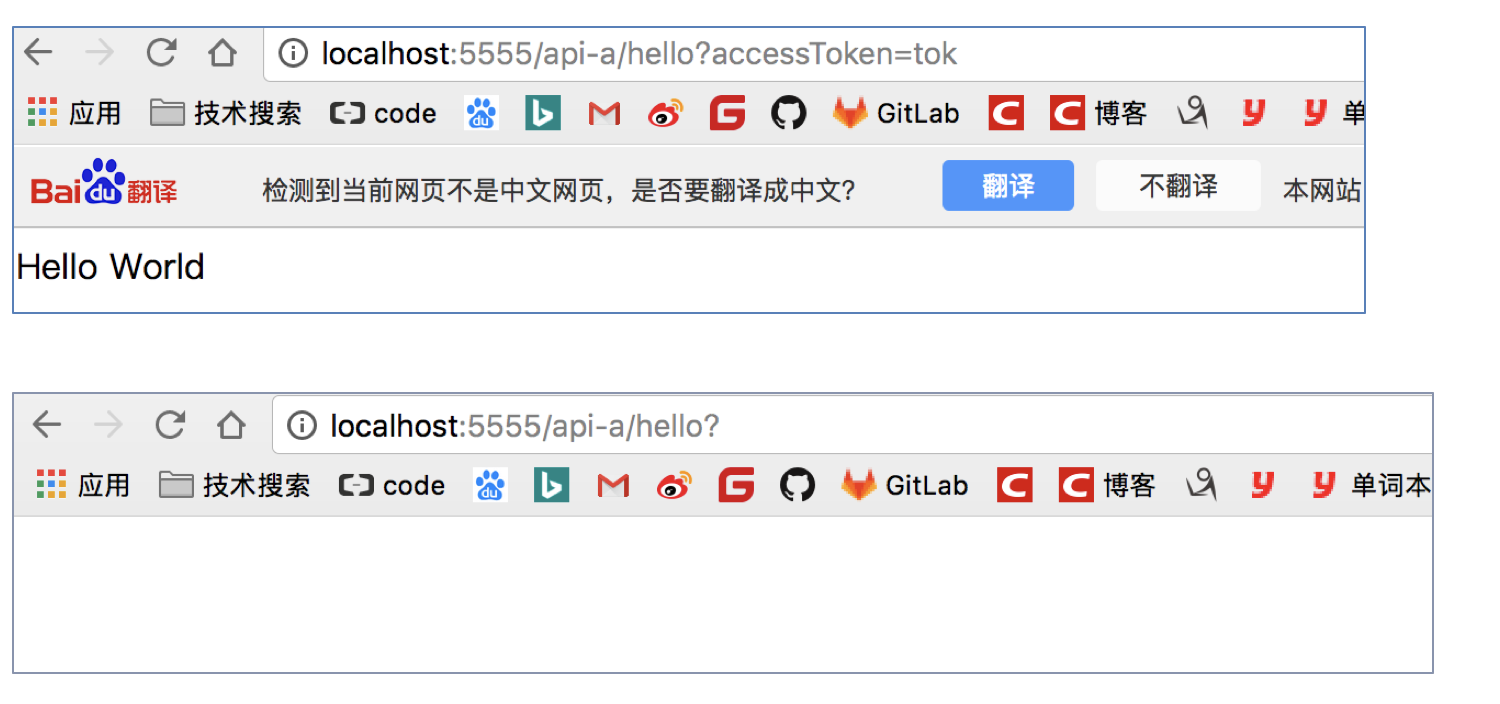
3.3、开始测试
成功,http://localhost:5555/api-a/hello?accessToken=token
HealerJean-代码下载
感兴趣的,欢迎添加博主微信,
哈,博主很乐意和各路好友交流,如果满意,请打赏博主任意金额,感兴趣的在微信转账的时候,备注您的微信或者其他联系方式。添加博主微信哦。
请下方留言吧。可与博主自由讨论哦
| 微信 | 微信公众号 | 支付宝 |
|---|---|---|
 |
 |
 |

 浙公网安备 33010602011771号