HarmonyOS三方件开发指南(18)-Flexbox流式布局组件

目录:

1、引言

2、VideoCache使用指南

3、VideoCache开发指南

4、《HarmonyOS三方件开发指南》系列文章合集

引言

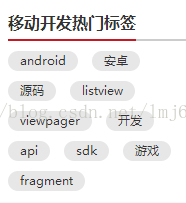
       上一篇给大家介绍底部导航栏的组件使用及开发指南,本篇将给大家带来另一个鸿蒙三方件的是实现:Flexbox,何为Flexbox,如果对Java的Swing比较熟悉的话一定不会陌生,就是控件根据ViewGroup的宽,自动的往右添加,如果当前行剩余空间不足,则自动添加到下一行。有点所有的控件都往左飘的感觉,第一行满了,往第二行飘~所以也叫流式布局。鸿蒙并没有提供流式布局,但是某些场合中,流式布局还是非常适合使用的,比如关键字标签,搜索热词列表等,比如下图:
【软通动力】HarmonyOS三方件开发指南(18)-Flexbox流式布局组件【软通动力】HarmonyOS三方件开发指南(18)-Flexbox流式布局组件

这些都特别适合使用Flexbox,本篇会带领大家自己实现Flexbox,然后使用我们自己定义的Flexbox实现上面的标签效果。学会使用一个控件和学会写一个控件,我相信大家都明白,授人以鱼不如授人以渔。

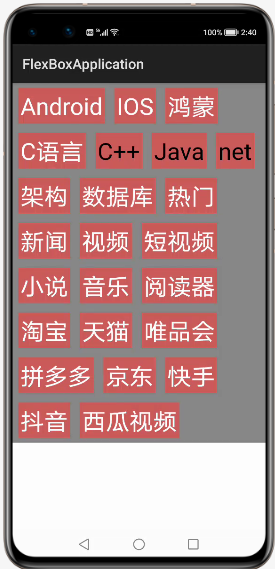
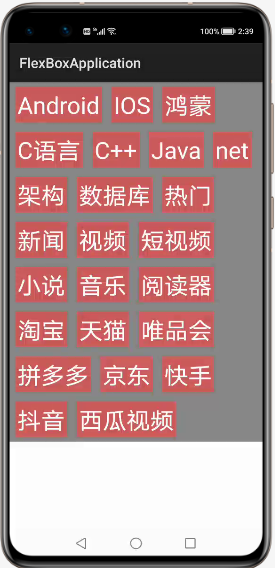
接下来看下鸿蒙模拟器的实现效果,效果图如下:

图(1)默认标签状态 
【软通动力】HarmonyOS三方件开发指南(18)-Flexbox流式布局组件

图(2)标签选中状态

【软通动力】HarmonyOS三方件开发指南(18)-Flexbox流式布局组件

VideoCache使用指南

Ø 新建工程, 添加组件Har包依赖

在应用模块中添加HAR,只需要将flexboxlibrary-debug.har复制到entry\libs目录下即可

Ø 修改配置文件

1. 在布局中添加如下代码:

<com.istone.flexboxlibrary.HWFlowViewGroup
    ohos:id="$+id:viewgroup"
    ohos:height="match_content"
    ohos:width="match_parent"
    ohos:background_element="gray"
    ohos:orientation="vertical"
    />

2.在代码中通过以下方式使用:

   //mNames 是item的数据源,可以是任意需要显示的数据类型,根据实际情况去定义
parentLayout = (HWFlowViewGroup) findComponentById(ResourceTable.Id_viewgroup);
parentLayout.HWFlowViewGroup(getContext(), mNames, parentLayout);
parentLayout.setOnItemClickListener((Component view) -> {
//item点击之后的回调
    Text text = (Text)view;
    if(text.isSelected()){
        text.setTextColor(Color.BLACK);

    }else{
        text.setTextColor(Color.WHITE);
    }
});

VideoCache开发指南

在上述中,已经说明Flexbox 如何在开发过程中使用,接下来简单的分析下Flexbox 实现思路

1、对于Flexbox ,需要指定的LayoutConfig,我们目前只需要能够识别margin、padding即可

2、measureChild中计算所有childView的宽度,然后根据childView的宽度,计算当前每一行的宽度

3、最后根据计算之后的宽度,对中所有的childView进行布局。

以text为例,计算每个childView 的代码如下:

private float measureChild(Text text) {
    Paint paint = new Paint();
    paint.setTextSize(text.getTextSize());
    float childWidth = paint.measureText(text.getText());
    childWidth = childWidth + text.getPaddingLeft() + text.getPaddingRight() + text.getMarginLeft() + text.getMarginRight();
    return childWidth;
}

初始化每行的布局,代码如下:

private DirectionalLayout initDirtLayout() {
    DirectionalLayout childLayout = new DirectionalLayout(mContext);
    childLayout.setOrientation(Component.HORIZONTAL);
    DirectionalLayout.LayoutConfig layoutConfig = new DirectionalLayout.LayoutConfig(ComponentContainer.LayoutConfig.MATCH_PARENT, ComponentContainer.LayoutConfig.MATCH_CONTENT);
    layoutConfig.setMargins(10, 10, 10, 10);
    childLayout.setLayoutConfig(layoutConfig);
    return childLayout;
}

获取屏幕的宽度,代码如下:

private void getParentWidthAndHeight() {
    Optional<Display> display = DisplayManager.getInstance().getDefaultDisplay(mContext);
    Point pt = new Point();
    display.get().getSize(pt);
    mParentWidth = (int) pt.getPointX();
}

动态布局:

private void initChildViews() {
    for (int i = 0; i < mNames.length; i++) {
        Text text = new Text(mContext);
        text.setId(i);
        text.setText(mNames[i]);
        text.setTextSize(100);
        text.setSelected(false);
        text.setTextColor(Color.WHITE);
        text.setPadding(10, 10, 10, 10);
        ShapeElement background = new ShapeElement();
        background.setRgbColor(new RgbColor(205, 92, 92));
        text.setBackground(background);
        DirectionalLayout.LayoutConfig layoutConfig = new DirectionalLayout.LayoutConfig(ComponentContainer.LayoutConfig.MATCH_CONTENT, ComponentContainer.LayoutConfig.MATCH_CONTENT);
        layoutConfig.setMargins(20, 10, 20, 10);
        text.setLayoutConfig(layoutConfig);

        if (i == 0) {
            childLayout = initDirtLayout();
            mLineWidth = measureChild(text);
            childLayout.addComponent(text);
        } else {
            mLineWidth = mLineWidth + measureChild(text);
            if (mLineWidth > (mParentWidth - childLayout.getMarginLeft() - childLayout.getMarginRight())) {
                mParentLayout.addComponent(childLayout);
                childLayout = initDirtLayout();
                mLineWidth = measureChild(text);
            }
            childLayout.addComponent(text);
            if (i == mNames.length - 1) {
                mParentLayout.addComponent(childLayout);
            }
        }

        ComponentBean bean = new ComponentBean(text, false);
        list.add(bean);

        text.setClickedListener(component -> {
            text.setSelected(!text.isSelected());
            mOnItemClickListener.onItemClick(text);
        });
    }
}

定义接口,实现item的点击事件

public interface OnItemClickListener {
    void onItemClick(Component view);
}

public void setOnItemClickListener(OnItemClickListener onItemClickListener) {
    mOnItemClickListener = onItemClickListener;
}

按照思路看下来,是不是很简单呢?我们只需要把握住如何计算childview 的宽度,以及什么情况下添加新的一行即可。

更多原创,请关注:https://harmonyos.51cto.com/column/30

作者:软通田可辉

想了解更多内容,请访问51CTO和华为合作共建的鸿蒙社区:https://harmonyos.51cto.com

posted @ 2021-04-20 16:15  HarmonyOS技术社区  阅读(170)  评论(0编辑  收藏  举报