HarmonyOS基础-第一个应用总结
目录:
HarmonyOS第一个应用项目
一、HarmonyOS应用项目结构
1.项目结构图

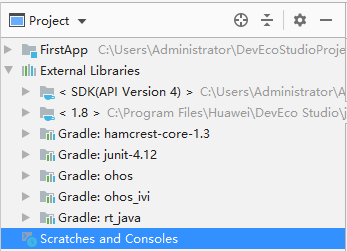
如上图:
FirstApp为项目名称
External Libraries为一些扩展库或者第三方库,默认就有不需要进行加载
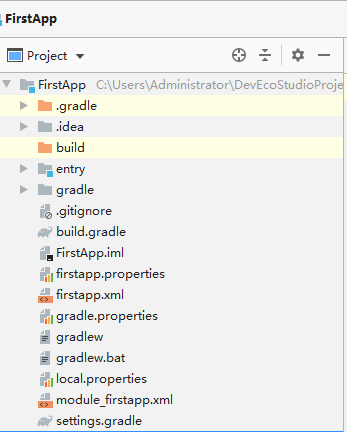
2.项目结构图

gradle:**Gradle**配置文件,由系统自动生成,一般情况下不需要进行修改。
build: 为编译后生成文件,如最后生成的hap文件(entry-debug-unsigned.hap)
entry:非常重要,一个项目有且只有一个entry,默认启动模块(主模块),开发者用于编写源码文件以及开发资源文件的目录
gradle:gradle jar包以及版本信息,可以修改gradle版本,最好使用默认配置
build.gradle 项目编译配置文件以及第三方库引用等
gradle.properties gradle属性值,默认是空
gradlew 是linux gradle命令脚本
gradlew.bat是windows gradle命令脚本
local.properties 应用本地属性配置文件,目前只有两个,主要是SDK和nodejs的安装
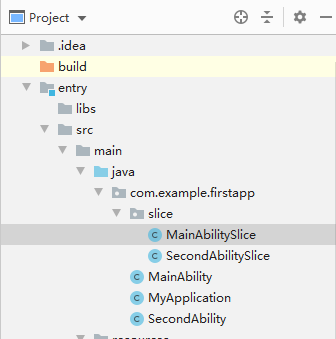
3.Entry目录结构

libs:用于存放entry模块的依赖文件。
src :添加源码的地方
main 是主要重要的关注的地方,以后就在这个目录畅享你的未来了
java:用于存放Java源码。
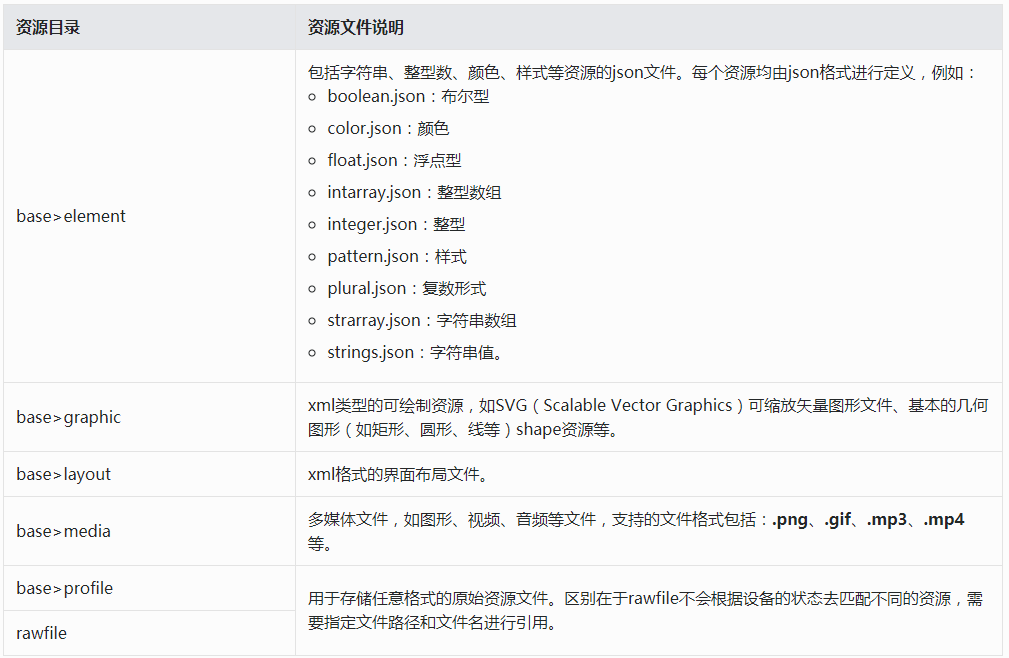
resources用于存放应用所用到的资源文件,如图形、多媒体、字符串、布局文件等

test 编写代码单元测试代码的目录
config.json:HAP清单文件,详细说明请参考config.json配置文件介绍。
.gitignore:标识git版本管理需要忽略的文件。
build.gradle:entry模块的编译配置文件。
二、第一个HarmonyOS应用
1.项目说明
1.实现一个XML文件布局(布局中包含一个Button和一个Text组件)
2.用代码实现一个页面布局(布局中包含一个Button和一个Text组件)
3.点击Button可以实现两个界面跳转
2.XML布局文件
1.页面布局文件
<?xml version="1.0" encoding="utf-8"?>
<DependentLayout
xmlns:ohos="http://schemas.huawei.com/res/ohos"
ohos:height="match_parent"
ohos:width="match_parent"
ohos:background_element="#5555FF55">
<Text
ohos:id="$+id:text_id"
ohos:height="match_content"
ohos:width="match_content"
ohos:text="HarmonyOS第一个XML布局实例"
ohos:text_size="22fp"
ohos:left_padding="5vp"
ohos:right_padding="5vp"
ohos:center_in_parent="true"
ohos:background_element="$graphic:background_text"
/>
<Button
ohos:id="$+id:button_id"
ohos:width="match_content"
ohos:height="match_content"
ohos:text="下个页面"
ohos:text_size="25fp"
ohos:top_padding="5vp"
ohos:bottom_padding="5vp"
ohos:left_padding="5vp"
ohos:right_padding="5vp"
ohos:below="$id:text_id"
ohos:center_in_parent="true"
ohos:background_element="$graphic:background_button"/>
</DependentLayout>
组件常用的属性
ohos:height="match_parent" // 组件的高度
ohos:width="match_parent" //组件的宽度
ohos:orientation="vertical" //布局组件的方向属性 适用于DirectionalLayout布局
ohos:id="$+id:text_helloworld" //组件ID,常用Button、Text等组件,用于标识唯一一个组件,便于查找
ohos:text="Hello World" //组件上显示的文本内容,如Button名字或者Text的标签或者文本
ohos:text_size="50fp"
fp:宽度或者高度,距离离,一般描述组件自己的大小(与屏幕密度有关系)
px:描述像素
vp: 宽度或者高度,距离离,一般描述间隔,如内间距,外间距等(与屏幕密度有关系)
ohos:text_color="#55FFFFFF" //文本颜色,55设置透明度, FFFFFF设置的RGB颜色值
ohos:top_padding="8vp" //设置上间距
ohos:bottom_padding="8vp"//设置下间距
ohos:left_padding="8vp"//设置左边距
ohos:right_padding="8vp"//设置右边距
ohos:below="$id:text_helloworld" //设置在文本组件的下方 用于在相对布局中
2.背景布局文件
background_text
<?xml version="1.0" encoding="UTF-8" ?>
<shape xmlns:ohos="http://schemas.huawei.com/res/ohos"
ohos:shape="rectangle">
<solid
ohos:color="#ff888888"/>
<corners
ohos:radius="20"/>
</shape>
background_button
<?xml version="1.0" encoding="UTF-8" ?>
<shape xmlns:ohos="http://schemas.huawei.com/res/ohos"
ohos:shape="rectangle">
<solid
ohos:color="#FF007DFF"/>
<corners
ohos:radius="20"/>
</shape>
ohos:shape="rectangle"//背景的图形为矩形
ohos:color="#FF007DFF"//背景的图形颜色
ohos:radius="20"//背景的图形角的弧度
3.Code布局实现
1.代码实现布局加载
/*创建一个布局,布局中包含一个Text和Button组件*/
/*申明布局并设置布局的大小和背景颜色*/
DependentLayout secondLayout = new DependentLayout(this);
secondLayout.setHeight(MATCH_PARENT);
secondLayout.setWidth(MATCH_PARENT);
ShapeElement element = new ShapeElement();
element.setRgbColor(new RgbColor(55,55,55));
secondLayout.setBackground(element);
/*创建一个Text文本*/
Text text = new Text(this);
text.setText("HarmonyOS第二个页面");
text.setTextSize(20, Text.TextSizeType.FP);
text.setTextColor(Color.CYAN);
text.setId(TEXT_ID);
/*创建一个Button 按钮*/
Button button = new Button(this);
button.setText("上个页面");
button.setTextSize(25, Text.TextSizeType.FP);
button.setTextColor(Color.RED);
button.setPadding(10,10,10,10);
button.setId(BUTTON_ID);
ShapeElement element1 = new ShapeElement();
element1.setRgbColor(new RgbColor(255,55,255));
button.setBackground(element1);
/*设置布局参数*/
DependentLayout.LayoutConfig secondLayoutConfig =
new DependentLayout.LayoutConfig(MATCH_CONTENT,MATCH_CONTENT);
secondLayoutConfig.addRule(DependentLayout.LayoutConfig.CENTER_IN_PARENT);
text.setLayoutConfig(secondLayoutConfig);
secondLayoutConfig.addRule(DependentLayout.LayoutConfig.BELOW, TEXT_ID);
button.setLayoutConfig(secondLayoutConfig);
secondLayout.addComponent(text);
secondLayout.addComponent(button);
/*将布局添加到Ability*/
super.setUIContent(secondLayout);
4.Button按键事件与界面跳转
1.XML页面Button
/*获取Button 组件*/
Button button = (Button) findComponentById(ResourceTable.Id_button_id);
button.setClickedListener(Componentt->{
/*添加Button 点击后的处理action*/
Intent intent1 = new Intent();
Operation operation = new Intent.OperationBuilder()
.withDeviceId("")/*设置目标设备的ID ,"" 为本机*/
.withBundleName("com.example.firstapp")/*指定跳转目标所在的应用包名*/
.withAbilityName("com.example.firstapp.SecondAbility")/*目标所在的类名*/
.build();
intent1.setOperation(operation);
/*调用一个方法,跳转到SecondAbility adbility*/
startAbility(intent1);
});
2.Code页面Button
button.setClickedListener(new Component.ClickedListener() {
@Override
public void onClick(Component component) {
Intent intent1 = new Intent();
Operation operation = new Intent.OperationBuilder()
.withDeviceId("")
.withBundleName("com.example.firstapp")
.withAbilityName("com.example.firstapp.MainAbility")
.build();
intent1.setOperation(operation);
startAbility(intent1);
}
});
5.java文件说明

MyApplication 为项目应用默认入口类
MainAbility 为应用默认加载的Ability类MyApplicationMainAbility为 应用默认加载的Ability类MyApplication中调用
SecondAbility 为添加第二页面增加的ability
MainAbilitySlice 为第一个XML布局加载和显示界面的类
SecondAbilitySlice 为第二页面实现类
作者:czdIT
想了解更多内容,请访问: 51CTO和华为官方战略合作共建的鸿蒙技术社区https://harmonyos.51cto.com


