9 nginx代理实践
1、服务器准备
| 主机 | ip | 身份 |
|---|---|---|
| lb01 | 192.168.15.5 | 负载均衡 |
| web01 | 192.168.15.7 | web服务器 |
| web02 | 192.168.15.8 | web服务器 |
| db01 | 192.168.15.51 | 数据库 |
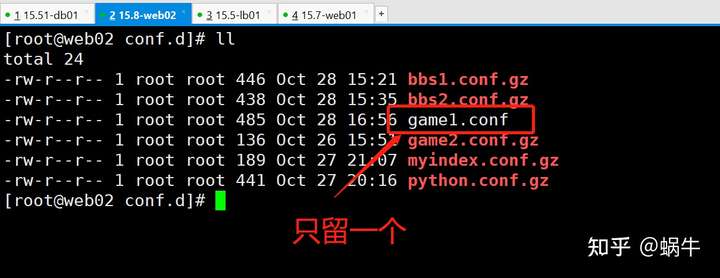
2、web02配置
3、lb01服务器配置(使用七层负载均衡)
1.安装nginx
yum install nginx -y2.简化nginx.conf文件
vi /etc/nginx/nginx.conf
user nginx;
worker_processes auto;
error_log /var/log/nginx/error.log;
pid /run/nginx.pid;
events {
    worker_connections 1024;
}

http {
    log_format  main  '$remote_addr - $remote_user [$time_local] "$request" '
                      '$status $body_bytes_sent "$http_referer" '
                      '"$http_user_agent" "$http_x_forwarded_for"';

    access_log  /var/log/nginx/access.log  main;

    sendfile            on;
    tcp_nopush          on;
    tcp_nodelay         on;
    keepalive_timeout   65;
    types_hash_max_size 4096;

    include             /etc/nginx/mime.types;
    default_type        application/octet-stream;

    # Load modular configuration files from the /etc/nginx/conf.d directory.
    # See http://nginx.org/en/docs/ngx_core_module.html#include
    # for more information.
    include /etc/nginx/conf.d/*.conf;

}
3.创建一个IP连接池
cd /etc/nginx/conf.dvim game.conf
upstream game {
    server 172.16.1.8:80;
}

server {
    server_name game1.test.com;
    listen 80;

    location / {
      proxy_pass http://game;
}
}
4.启动nginx
systemctl start nginx5.修改Windows的host文件
192.168.15.5 game1.test.com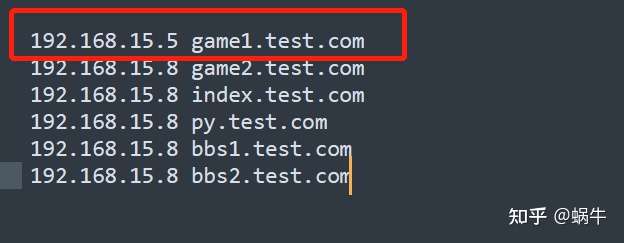
6.测试
http://game1.test.com
4、web01服务器配置
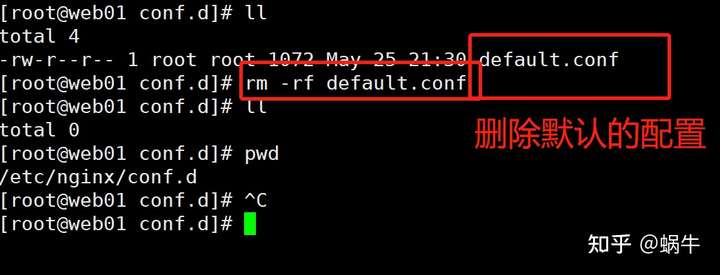
1.进入/etc/nginx/conf.d
2.把web02的配置和项目传到web01
cd /etc/nginx/conf.d
scp game1.conf 172.16.1.7:/etc/nginx/conf.d/
cd /usr/share/nginx
scp -r html5-mario 172.16.1.7:/usr/share/nginx/
3.web01服务器开启nginx
systemctl start nginx4.测试
http://192.168.15.7/
5.修改lb01服务器
vim /etc/nginx/conf.d/game.conf
upstream game {
    server 172.16.1.8:80;
    server 172.16.1.7:80;
}

server {
    server_name game1.test.com;
    listen 80;

    location / {
      proxy_pass http://game;
}
}
然后重启lb01服务器的nginx
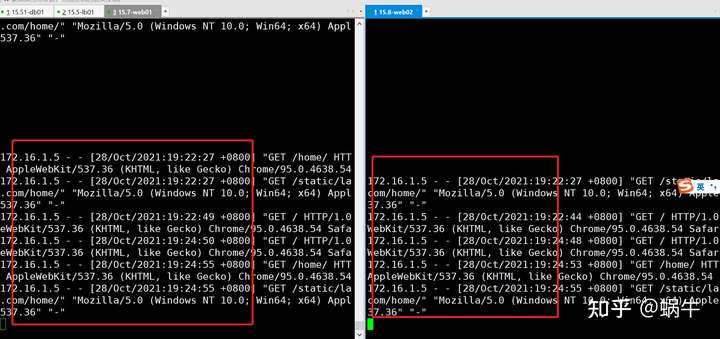
systemctl restart nginx6.查看负载到那个服务器了
tail -f /var/log/nginx/access.log 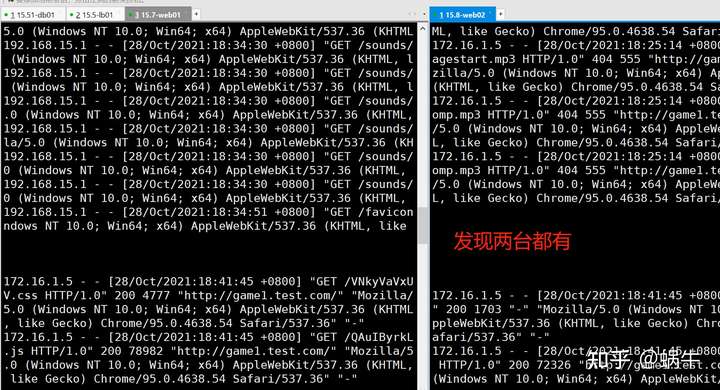
5、代理python项目
1.web02
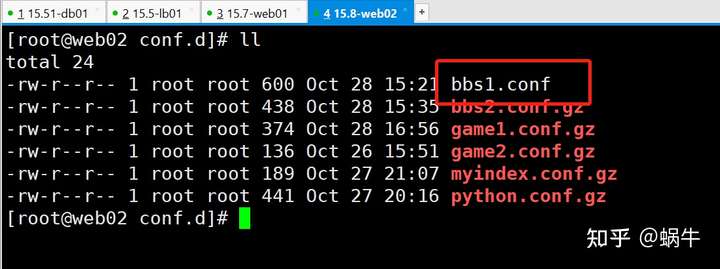
cd /etc/nginx/conf.d
scp bbs1.conf 172.16.1.7:/etc/nginx/conf.d/
cd /opt
scp -r BBS18_day01 172.16.1.7:/opt
重启web02的nginx
systemctl restart nginx2.web01配置参考如下:

3.lb01配置
upstream bbs {
server 172.16.1.8:80;
server 172.16.1.7:80;
}
server {
server_name bbs1.test.com;
listen 80;
location / {
proxy_pass http://bbs;
}
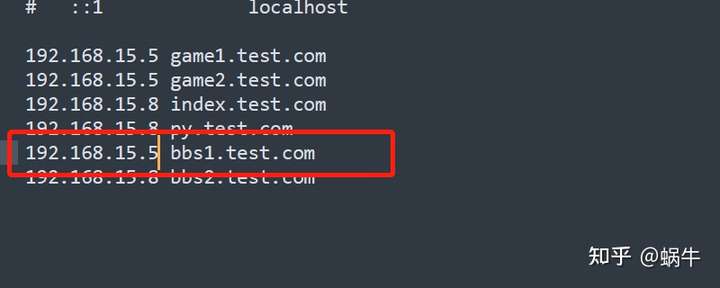
}4.配置windows的hosts
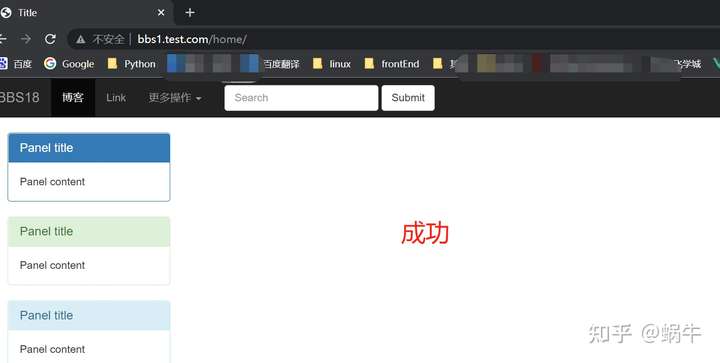
5.测试
知识储备:
1.创建一个IP连接池(存放web服务器的IP的)
upstream
只能配置在:http
格式:
upstream [连接池的名称] {
    [存放的IP]
    server [ip1];
    server [ip2];
}
2.往IP连接池中丢请求
proxy_pass http://[连接池的名称];
重点!!!
nginx 指向同一个网站时:
一定要在最前面加
server {
listen 80 ;
server_name _;
return 403;
}

 浙公网安备 33010602011771号