fabric1.4.0 first-network搭建
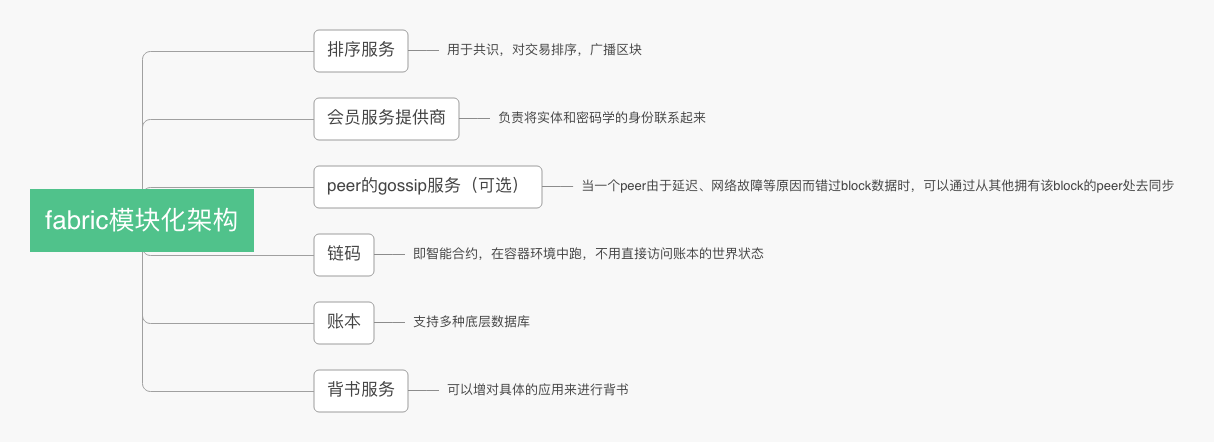
fabric模块化结构

安装fabric-samples
安装1.4版本,对于安装了docker for mac的机器,先切换到/Users, /Volumes, /private, or /tmp目录下(可以是下面的子目录,为什么?因为docker只允许挂载到这些制定的目录下)
git clone git@github.com:hyperledger/fabric-samples.git
cd fabric-samples
git checkout -b v1.4.0
下载对应版本的可执行文件和配置到fabric-samples目录下的bin和config目录中,并且下载fabric相关的镜像
# 使用scripts/bootstrap.sh脚本安装,会遇到Could not resolve host: nexus.hyperledger.org错误,该网站没有维护了
sh scripts/bootstrap.sh
# 使用fabric官网的命令安装(注意,需要在fabric-samples根目录执行)
curl -sSL https://raw.githubusercontent.com/hyperledger/fabric/master/scripts/bootstrap.sh | bash -s -- <fabric_version> <fabric-ca_version> <thirdparty_version>
curl -sSL https://raw.githubusercontent.com/hyperledger/fabric/master/scripts/bootstrap.sh | bash -s -- 1.4.0 1.4.0 0.4.14
使用上述命令可能会出现SSL_ERROR_SYSCALL in connection to github.com:443错误,可以修改hosts文件
sudo vi /etc/hosts
# 添加一行
199.232.28.133 raw.githubusercontent.com
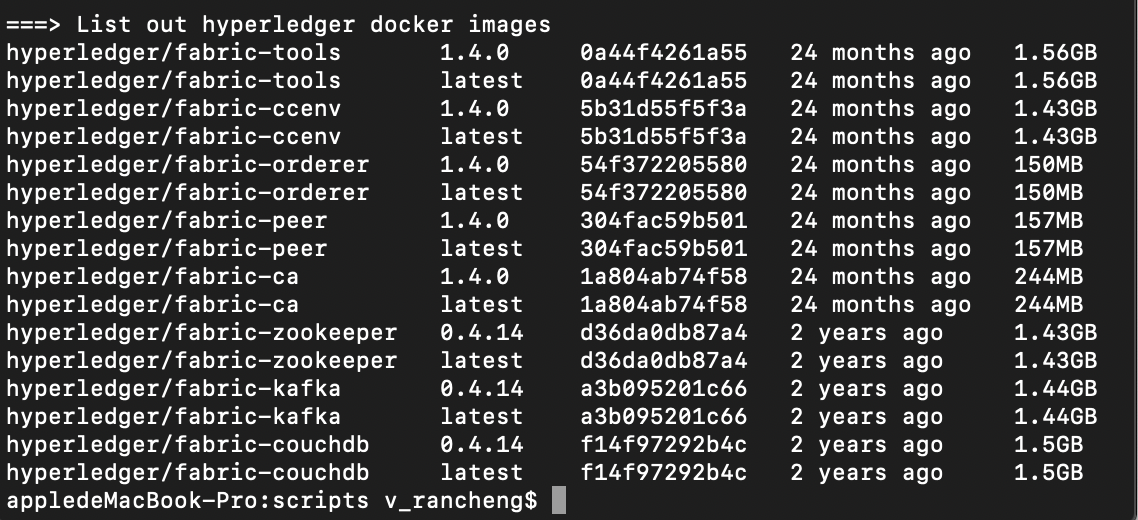
下载的镜像:

下载的bin:

下载的config:

byfn(build your first network)
构建你的第一个网络(Build Your First network,BYFN)提供了一个 fabric 的示例网络。该示例网络中由两个组织构成,每个组织维护两个 peer 节点,默认使用 solo 共识服务。
首先进入first-network目录cd first-network:

- 生成证书与创世区块
./byfn.sh generate
会生成各个网络实体需要的证书和私钥,genesis block用于初始化排序节点,以及生成一些配置交易用于初始化通道(配置交易会生成一个配置区块,配置区块是中除了配置交易不存在其他交易,第一个配置区块就是创世区块。更新配置流程是拉取配置、转换为人可读的格式、修改并提交审核)。
- 启动网络
该命令包含几个动作:1. 创建区块链网络(4个peer+1个order)2. 创建channel 把peer加入到channel中 3. 部署/ 执行chaincode 。
启动网络会创建6个docker,其中4个peer节点,一个cli来管理控制peer,以及一个orderer节点负责排序。
./byfn.sh up
遇到dial unix /host/var/run/docker.sock: connect: no such file or director错误,此问题是由适用于macOS的Docker Desktop的较新版本引起的。要解决此问题,请在Docker Desktop首选项中,取消选中该框Use gRPC FUSE for file sharing, 以使用旧版osxfs文件共享,然后单击Apply&Restart 。
再次启动网络时又会报错Failed to reach implicit threshold of 1 sub-policies, required 1 remaining: permission denied,下面是解决方法,不过我还不知道原理:
/byfn.sh -m down
/byfn.sh -m up
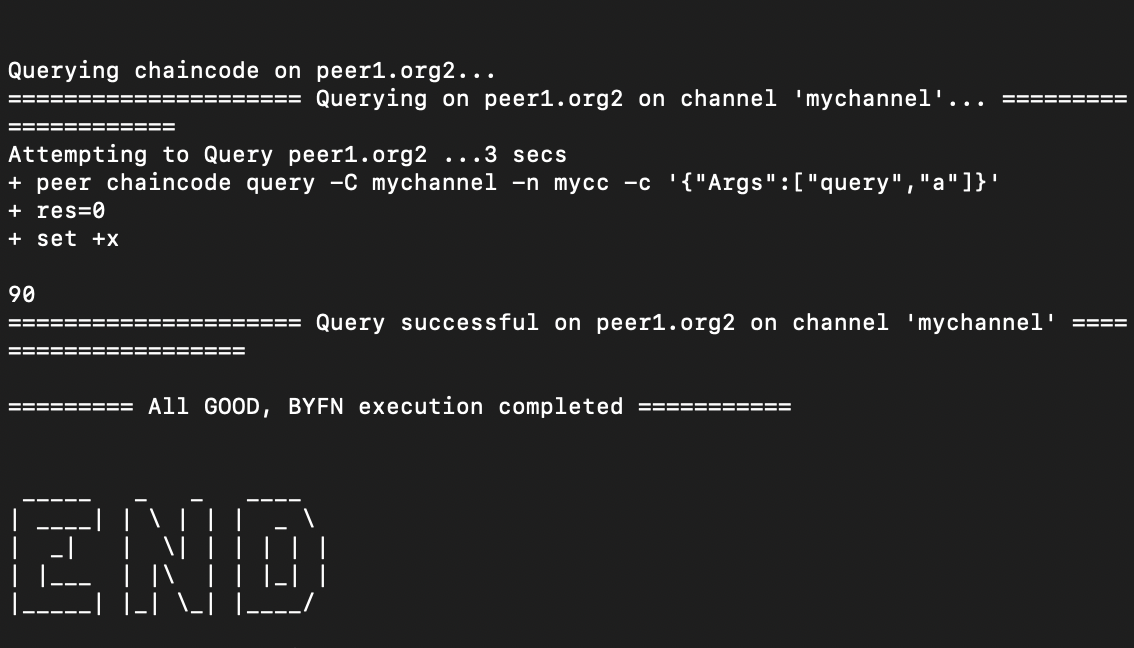
最终可以正确执行:

新建一个通道
orderer系统通道:abric网络创建的第一个通道是系统通道。系统通道定义了order节点和作为order service管理员的组织,系统通道被用来创建其它通道。
创建一个应用通道:
../bin/configtxgen -profile TwoOrgsChannel -outputCreateChannelTx ./channel-artifacts/channel1.tx -channelID channel1
进入cli docker之后可以控制整个区块链网络,执行创建channel的命令(以org1管理者的身份执行)
peer channel create -o orderer.example.com:7050 -c channel1 -f ./channel-artifacts/channel1.tx --tls true --cafile ${PWD}/crypto/ordererOrganizations/example.com/orderers/orderer.example.com/msp/tlscacerts/tlsca.example.com-cert.pem --outputBlock ./channel-artifacts/channel1.block

然后让各个peer加入channel1,首先控制每个docker,fabric提供了一个cli来控制peer节点,只需修改一些环境变量
CORE_PEER_LOCALMSPID=Org1MSP
ORE_PEER_ADDRESS=peer0.org1.example.com:7051
CORE_PEER_TLS_ROOTCERT_FILE=${PWD}/crypto/peerOrganizations/org1.example.com/peers/peer0.org1.example.com/tls/ca.crt
CORE_PEER_MSPCONFIGPATH=${PWD}/crypto/peerOrganizations/org1.example.com/users/Admin@org1.example.com/msp

# 加入channel1
peer channel join -b channel1.block

byfn细节解释
- cryptogen
cryptogen使用crypto-config.yaml配置文件,里面包括了网络拓扑的配置,每一个机构成员(member)都有自己的ca证书,实体之间互相通信和交易都需要数字签名。
其中count表示peer的数量:
    # ---------------------------------------------------------------------------
    # "Template"
    # ---------------------------------------------------------------------------
    # Allows for the definition of 1 or more hosts that are created sequentially
    # from a template. By default, this looks like "peer%d" from 0 to Count-1.
    # You may override the number of nodes (Count), the starting index (Start)
    # or the template used to construct the name (Hostname).
    #
    # Note: Template and Specs are not mutually exclusive.  You may define both
    # sections and the aggregate nodes will be created for you.  Take care with
    # name collisions
    # ---------------------------------------------------------------------------
    Template:
      Count: 2
      # Start: 5
      # Hostname: {{.Prefix}}{{.Index}} # default
当运行cryptogen命令之后生成的证书和私钥都会放入crypto-config文件夹中:

- configtxgen
configtxgen用来生成以下的配置:
orderer genesis block
channel configuration transaction
and two anchor peer transactions - one for each Peer Org.
configtxgen使用configtx.yaml配置文件


【推荐】国内首个AI IDE,深度理解中文开发场景,立即下载体验Trae
【推荐】编程新体验,更懂你的AI,立即体验豆包MarsCode编程助手
【推荐】抖音旗下AI助手豆包,你的智能百科全书,全免费不限次数
【推荐】轻量又高性能的 SSH 工具 IShell:AI 加持,快人一步
· 从 HTTP 原因短语缺失研究 HTTP/2 和 HTTP/3 的设计差异
· AI与.NET技术实操系列:向量存储与相似性搜索在 .NET 中的实现
· 基于Microsoft.Extensions.AI核心库实现RAG应用
· Linux系列:如何用heaptrack跟踪.NET程序的非托管内存泄露
· 开发者必知的日志记录最佳实践
· winform 绘制太阳,地球,月球 运作规律
· AI与.NET技术实操系列(五):向量存储与相似性搜索在 .NET 中的实现
· 超详细:普通电脑也行Windows部署deepseek R1训练数据并当服务器共享给他人
· 【硬核科普】Trae如何「偷看」你的代码?零基础破解AI编程运行原理
· 上周热点回顾(3.3-3.9)
2020-01-06 C++冷知识(1)