RabbitMQ
1.消息队列解决的问题:
1.异步处理
2.应用解耦
3.流量削锋
4.日志处理
2.安装RabbitMQ
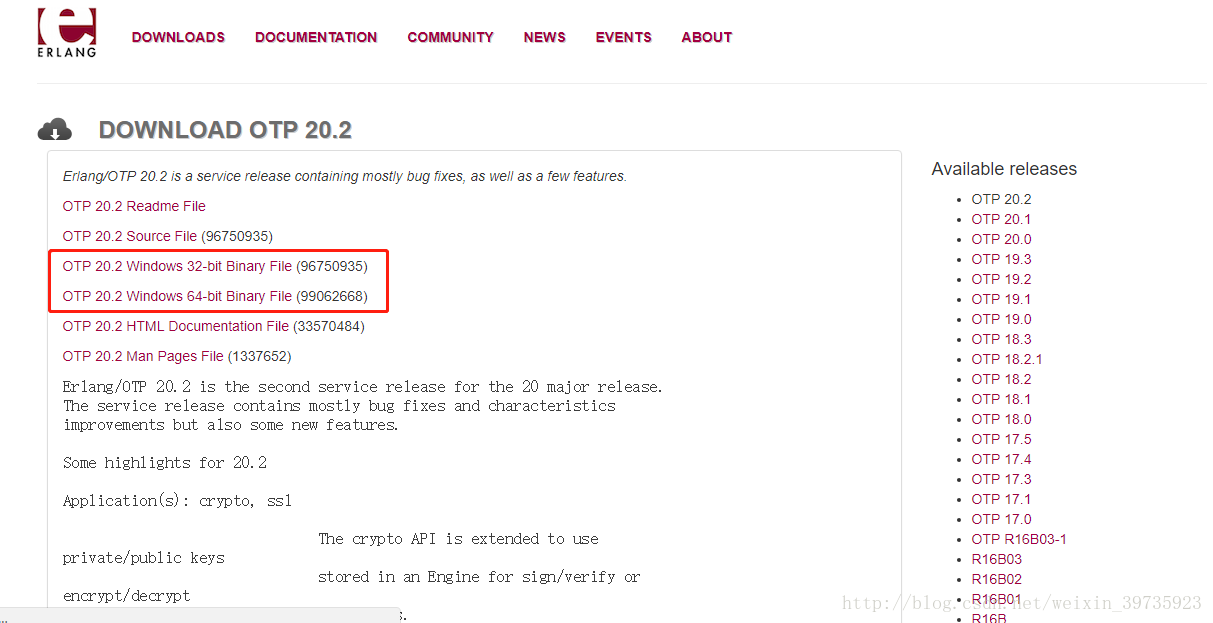
1.下载并安装erlang
下载地址:http://www.erlang.org/downloads
一路下一步
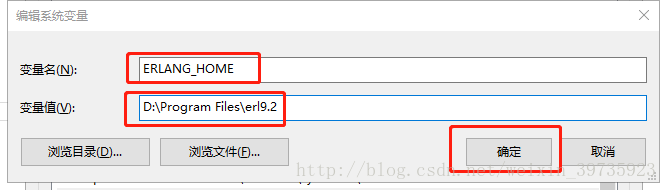
2.配置系统环境变量
1.添加系统变量
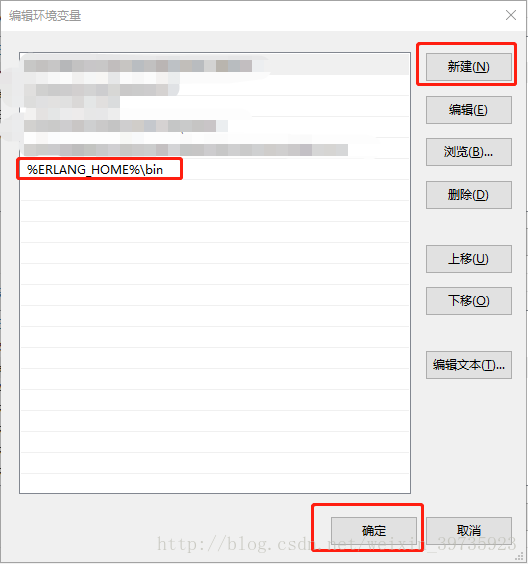
2.修改系统变量的path
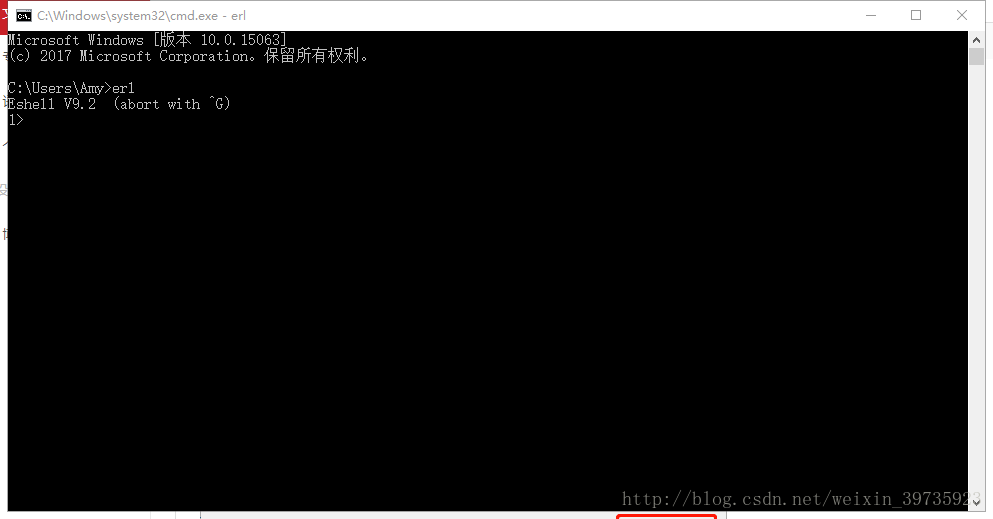
最后windows键+R键,输入cmd,再输入erl,看到版本号就说明erlang
下载地址: https://www.rabbitmq.com/install-windows.html
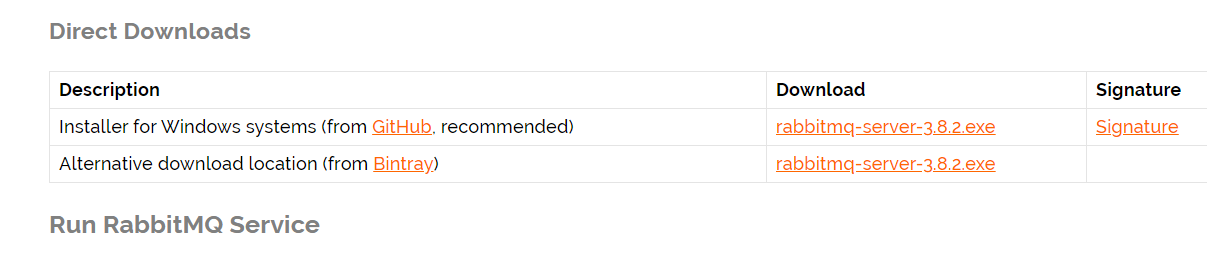
一路下一步安装
在RabbitMQ的sbin目录打开cmd运行代码进行安装
rabbitmq-plugins enable rabbitmq_management
然后输入
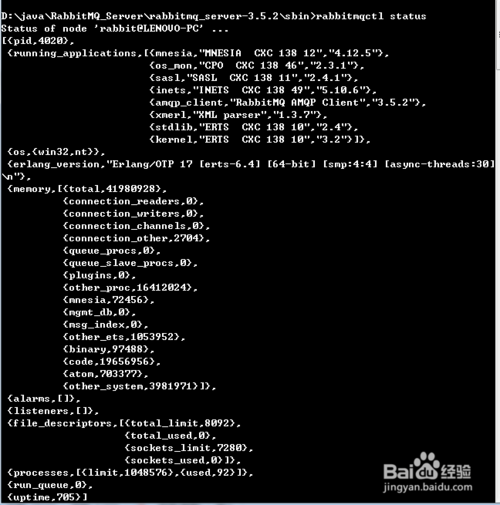
rabbitmqctl status
出现这个图表示安装成功,并且 RabbitMQ Server 已经启动
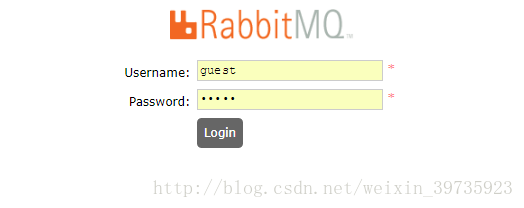
超级用户的账号密码都是:guest
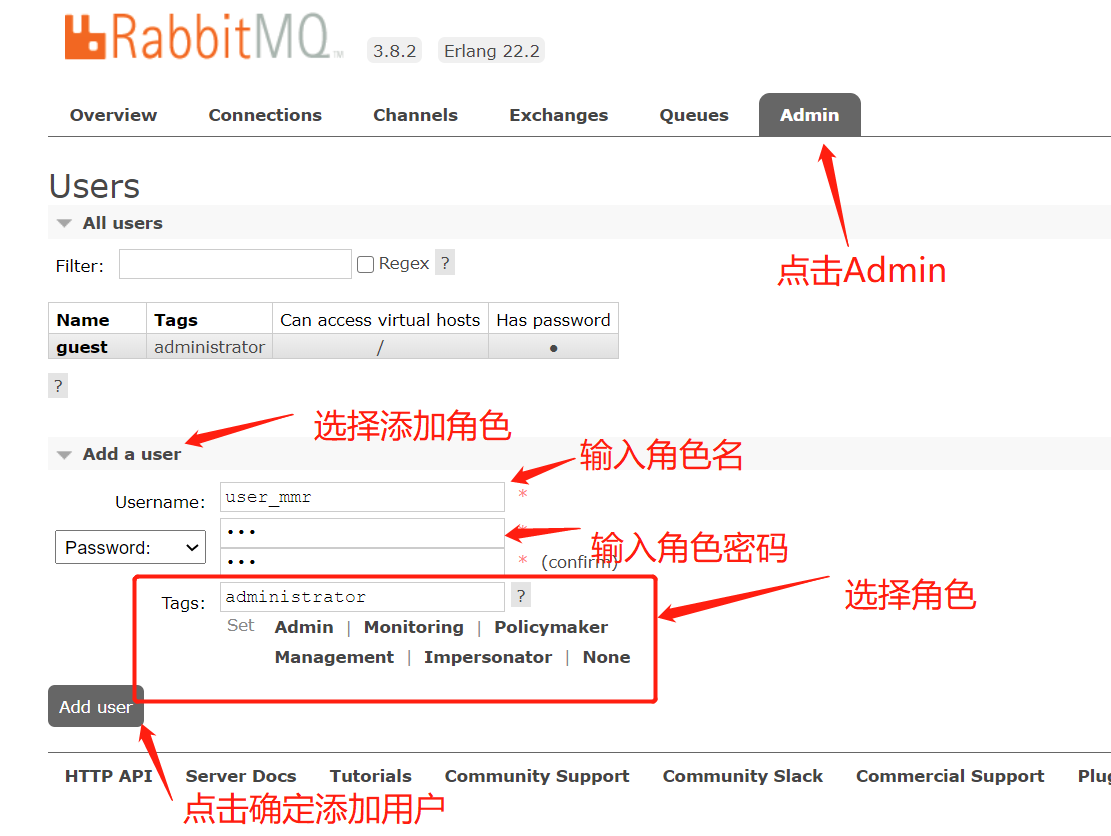
1.添加用户
添加完用户后需要指定数据库
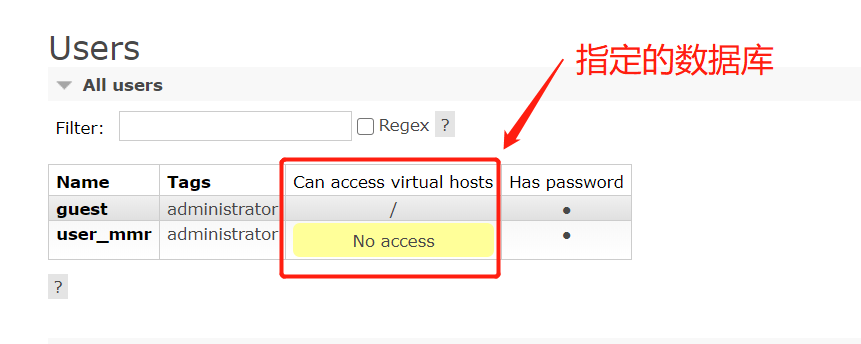
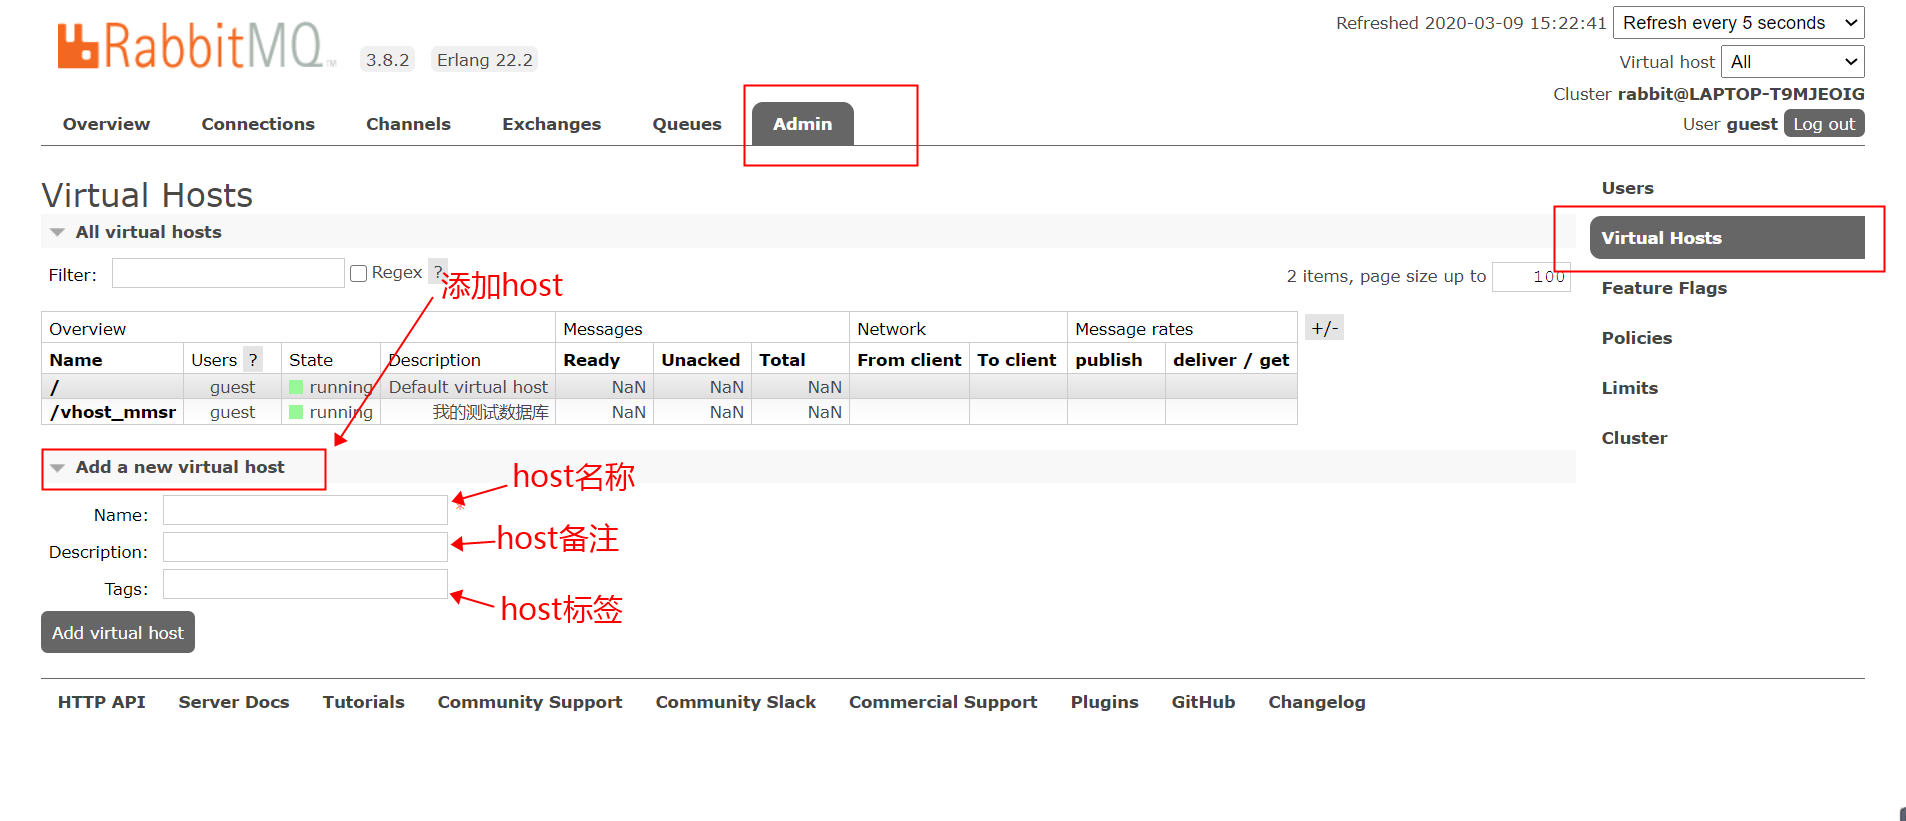
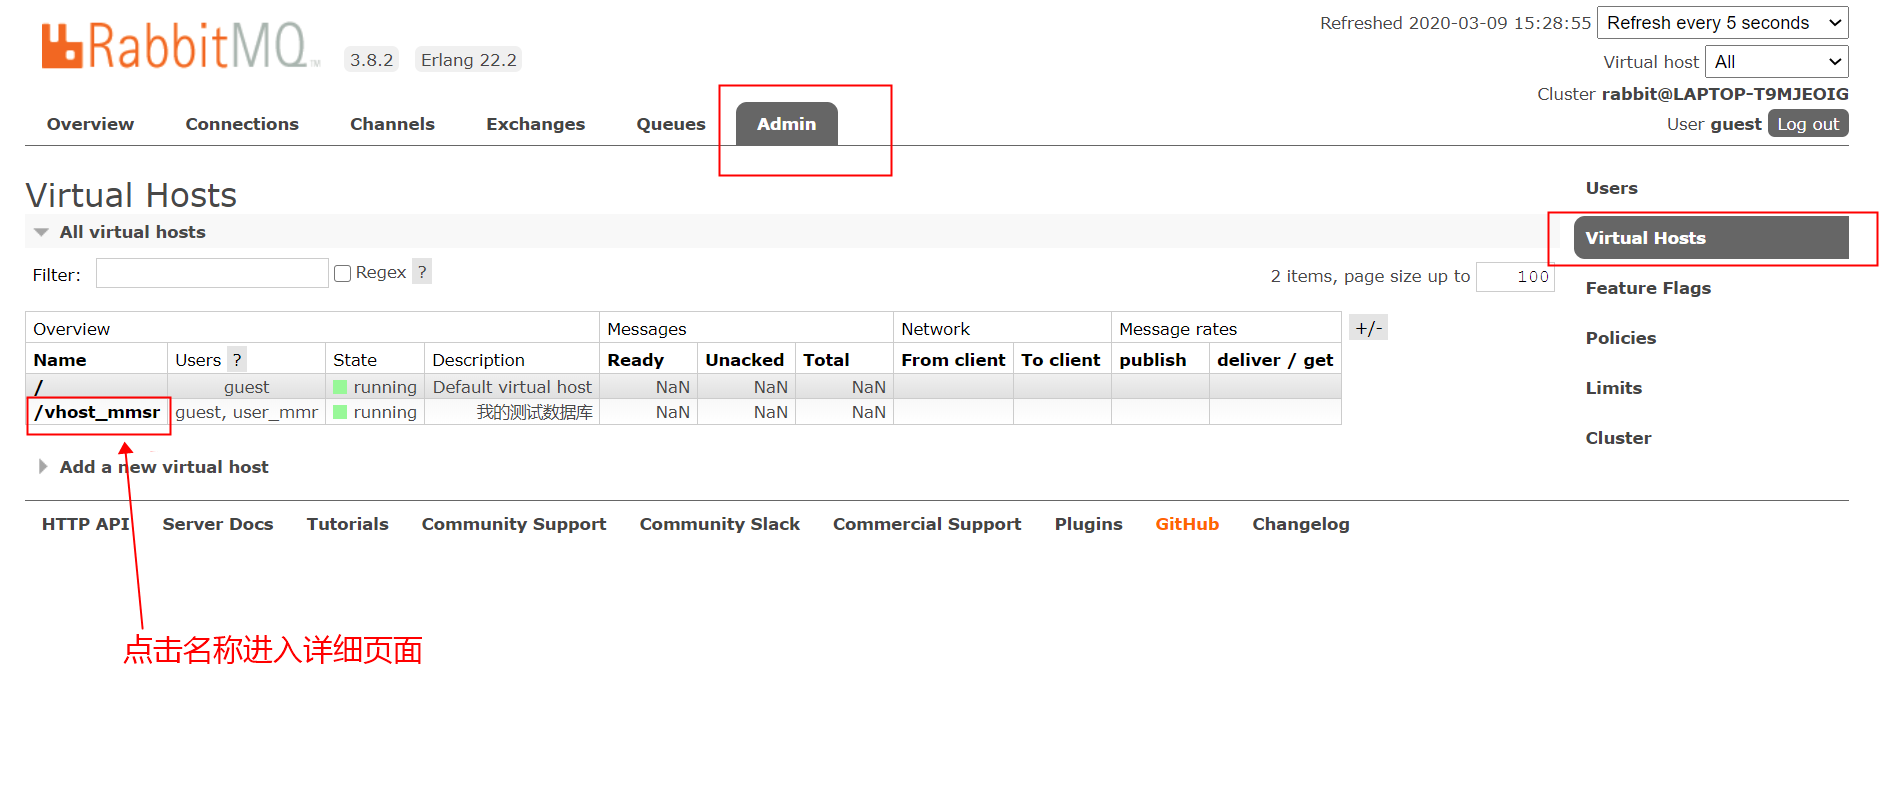
添加数据库:
host的名一般以/开头
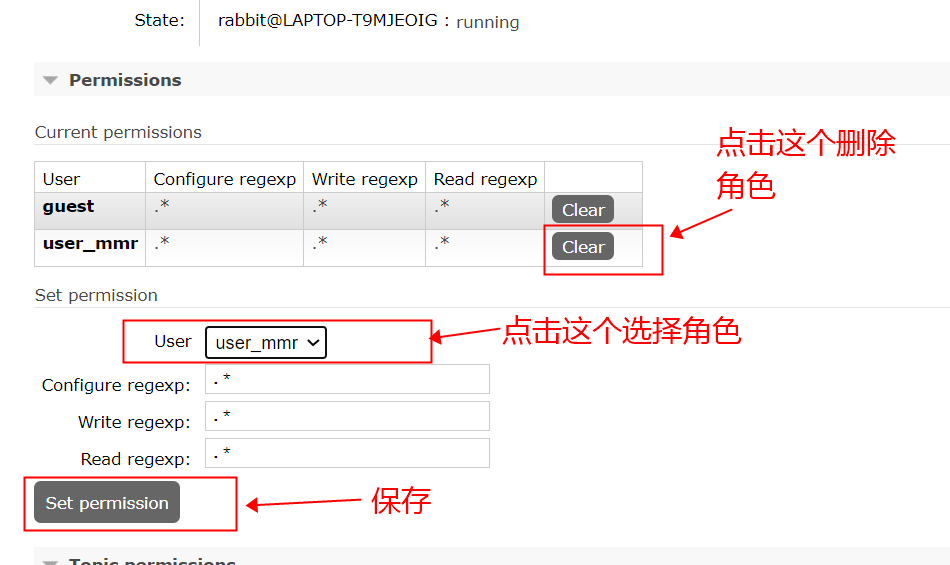
给host指定用户
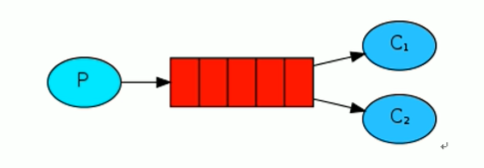
1.简单队列

p消息生产者 红色消息队列 c消费者

消费者

@Component
@RabbitListener(queues="监听的消息队列名称")
public class DirectReceiver{

    @RabbitHandler
    public void process(Map massage){
        System.out.println(massage.toString)
    }

}
耦合性高,生产者一 一对应,如果有多个消费者,消费消息队列中的消息时就不行了
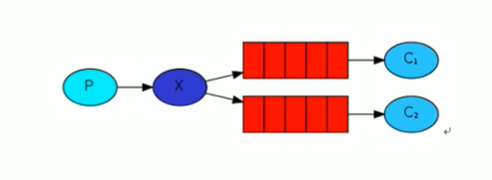
这种方式是产生的效果是:生产者产生50条数据两个消费者会每个消费25条,消费者1是偶数,消费者2是奇数,这种方式叫轮询分发
可以设置公平分发:公平分发的话,要将自动应答改成手动的,@RabbitListener注解设置优先等级priority
例子:@RabbitListener(queues = "ceshi",priority = "1")
1 2 3 4 | //创建消息队列 public Queue ceshi() { return new Queue("ceshi", true); //true 是否持久 } |
rabbitmq不支持重新定义已有的消息队列,如果在代码中改的话代码不会报错,但是运行时会报错
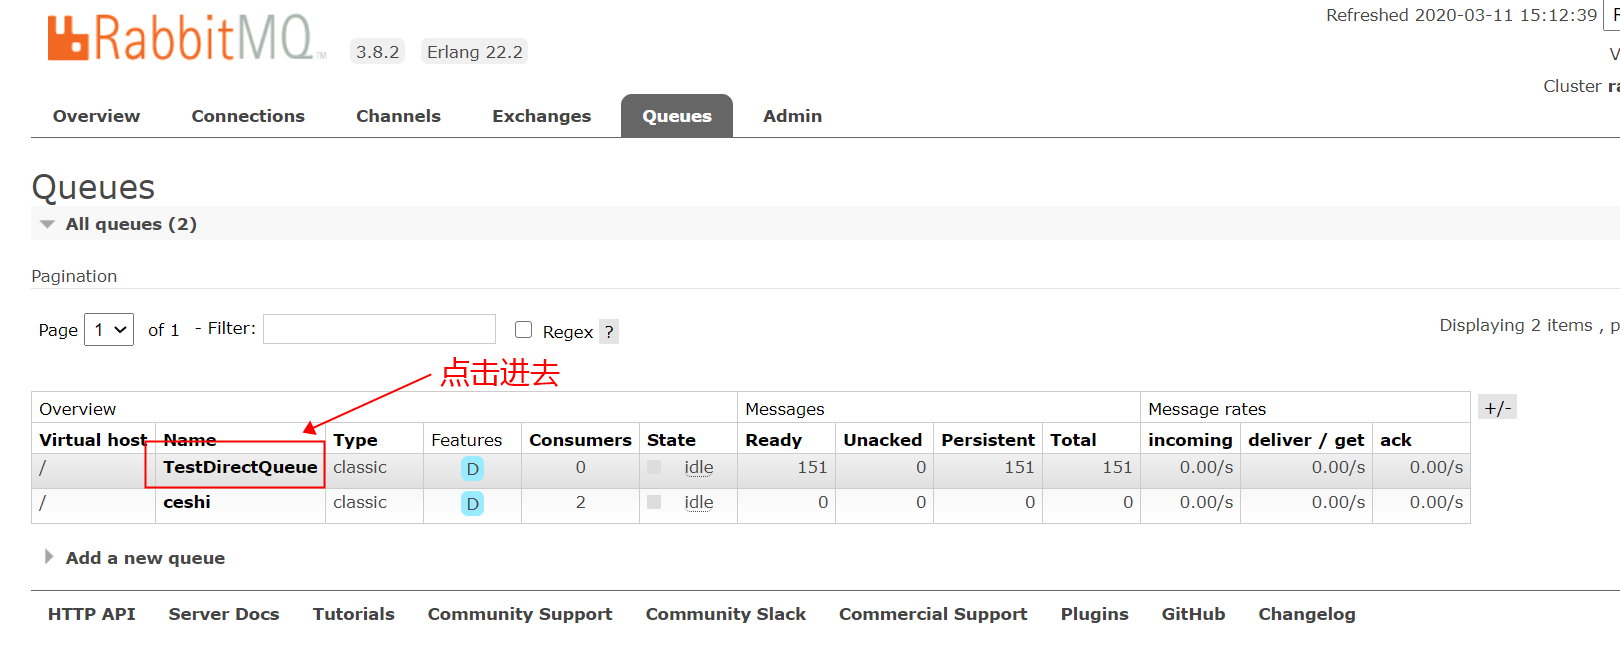
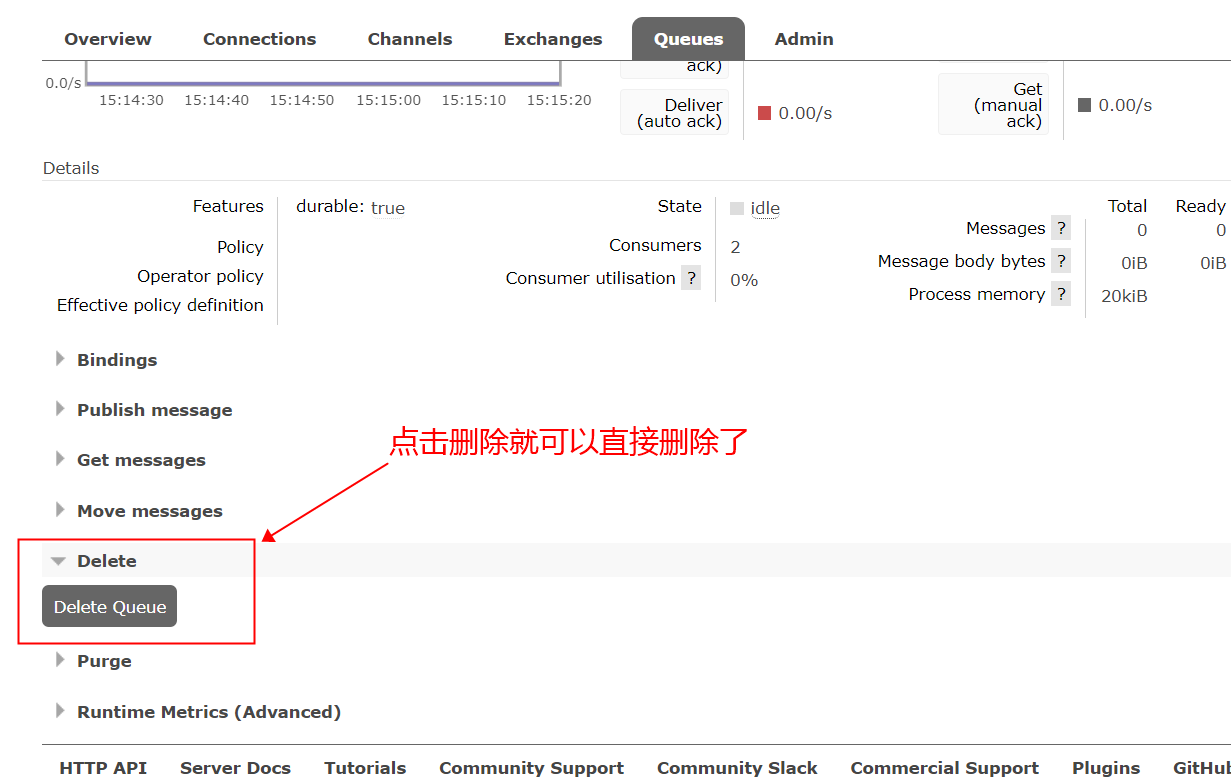
删除消息队列
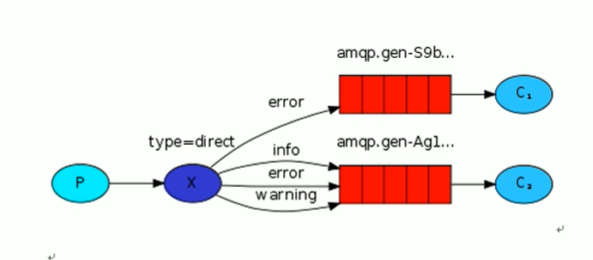
Exchange交换机
交换机一方面是接收生产者的消息,另一方面是向队列推送消息
Direct模式:处理路由键,发送的时候带一个路由key,队列只保存相对应模式的内容
例子:
1.导入jar包
<dependency>
   <groupId>org.springframework.boot</groupId>
   <artifactId>spring-boot-starter-amqp</artifactId>
</dependency>
2.配置application.properties文件
server:
 server.port: 8021
spring
 rabbitmq:
  host: 127.0.0.1
  port: 5672
  username: guest
  password: guest
  virtual-host: vhost_mmsr
3.交换机和消息队列配置类
import org.springframework.amqp.core.Binding;
import org.springframework.amqp.core.BindingBuilder;
import org.springframework.amqp.core.DirectExchange;
import org.springframework.amqp.core.Queue;
import org.springframework.context.annotation.Bean;
import org.springframework.context.annotation.Configuration;

@Configuration
public class DirectRabbitConfig {

    //创建消息队列 起名:TestDirectQueue
    @Bean
    public Queue TestDirectQueue() {
        return new Queue("TestDirectQueue", true);  //true 是否持久
    }

    //创建路由(Direct)交换机 起名:TestDirectExchange
    @Bean
    DirectExchange TestDirectExchange() {
        return new DirectExchange("TestDirectExchange");
    }

    //绑定  将队列和交换机绑定, 并设置用于匹配键:TestDirectRouting
    @Bean
    Binding bindingDirect() {
        return BindingBuilder.bind(TestDirectQueue()).to(TestDirectExchange()).with("TestDirectRouting");
    }

}
4.生产者
@Autowired
RabbitTemplate rabbitTemplate;

public void sendMessage(){
    Map<String,Object> map=new HashMap<>();
    map.put("测试key",“测试内容”);

    rabbitTemplate.convertAndSend("交换机的名",“匹配的键名”,值);
}
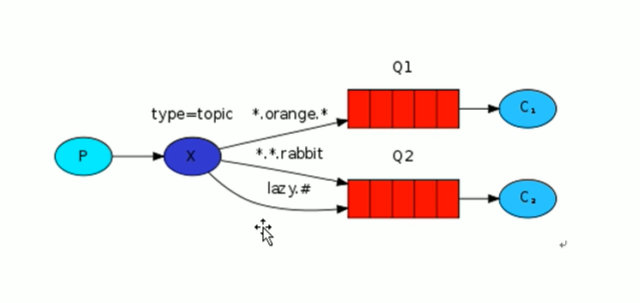
将路由和某模式匹配
通配符:# 匹配一个或多个,*匹配一个
3.生产者交换机和消息队列配置类
import org.springframework.amqp.core.Binding;
import org.springframework.amqp.core.BindingBuilder;
import org.springframework.amqp.core.Queue;
import org.springframework.amqp.core.TopicExchange;
import org.springframework.context.annotation.Bean;
import org.springframework.context.annotation.Configuration;

@Configuration
public class TopicRabbitConfig {
    //绑定键
    public final static String man="topic.man";
    public final static String woman="topic.woman";

    //创建消息队列
    @Bean
    public Queue firsQueue(){
      return   new Queue(TopicRabbitConfig.man);
    }
    //创建消息队列
    @Bean
    public Queue secondQueue(){
        return new Queue(TopicRabbitConfig.woman);
    }

    //创建交换机
    @Bean
    TopicExchange exchange(){
        return new TopicExchange("topicExchange");
    }

    //将交换机和消息队列绑定
    @Bean
    Binding bindingExchangeMessage(){
        return BindingBuilder.bind(firsQueue()).to(exchange()).with(man);
    }

    //将交换机和消息队列绑定
    @Bean
    Binding bindingExcangeMessage2(){
        return BindingBuilder.bind(secondQueue()).to(exchange()).with(woman);
    }

}
4.生产者发送信息
@GetMapping(value = "/sendTopicMessage1")
    public String sendTopicMessage1(){
                                        //交换机名称      //键      //值
        rabbitTemplate.convertAndSend("topicExchange","topic.man","1号");
        return "ok";
    }
5.创建消费者交换机和消息队列配置类
import org.springframework.amqp.core.Binding;
import org.springframework.amqp.core.BindingBuilder;
import org.springframework.amqp.core.Queue;
import org.springframework.amqp.core.TopicExchange;
import org.springframework.context.annotation.Bean;
import org.springframework.context.annotation.Configuration;

@Configuration
public class TopicRabbitConfig {
    //绑定键
    public final static String man="topic.#";

    //创建消息队列
    @Bean
    public Queue firsQueue(){
      return   new Queue(TopicRabbitConfig.man);
    }

    //创建交换机
    @Bean
    TopicExchange exchange(){
        return new TopicExchange("topicExchange");
    }

    //将消息队列和交换机绑定
    @Bean
    Binding bindingExchangeMessage(){
        return BindingBuilder.bind(firsQueue()).to(exchange()).with(man);
    }
}
6.创建消费者
@Component
@RabbitListener(queues = "topic.#")//设置监听topic.所有的
public class TopicManReceiver {

    @RabbitHandler
    public void sc(String s){
        System.out.println("2号:"+s);
    }
}
6.扇形交换机(FanoutExchange)
不带路由的就是扇形交换机
例子:
//交换机队列配置
import org.springframework.amqp.core.Binding;
import org.springframework.amqp.core.BindingBuilder;
import org.springframework.amqp.core.FanoutExchange;
import org.springframework.amqp.core.Queue;
import org.springframework.context.annotation.Bean;
import org.springframework.context.annotation.Configuration;

@Configuration
public class FanoutExchangeConfig {

    @Bean
    public Queue one(){
        return new Queue("a");
    }
    @Bean
    public Queue two(){
        return new Queue("b");
    }

       //创建扇形交换机
    @Bean
    public FanoutExchange getFanoutExchange(){
        return new FanoutExchange("shanxing");
    }

    @Bean
    Binding ba(){    //扇形交换机绑定的时候不用写出路由
        return BindingBuilder.bind(one()).to(getFanoutExchange());
    }
    @Bean
    Binding bb(){
        return BindingBuilder.bind(two()).to(getFanoutExchange());
    }

}
生产者
    @GetMapping(value = "/sendFanoutExchange")
    public String sendFanoutExchange(){ //输出的时候不用带路由
        rabbitTemplate.convertAndSend("shanxing",null,"扇形交换机内容");
        return "扇形交换机";
    }
消费者和以前一样监听
@Component
@RabbitListener(queues = "a")
public class FanoutExchangeReceiver {

    @RabbitHandler
    public void sc(String s){
        System.out.println("a:"+s);
    }
}
7.消息确认
在rabbitmq中我们可以通过持久化数据,解决rabbitmq服务器异常,的数据丢失问题
实现事物机制的两种方式:
AMQP实现了事物机制
Confirm模式
事物机制
txSelect : 用户将当前的channel设置为transation模式
txCommit : 用于提交事物
txRollback : 回滚事物


【推荐】国内首个AI IDE,深度理解中文开发场景,立即下载体验Trae
【推荐】编程新体验,更懂你的AI,立即体验豆包MarsCode编程助手
【推荐】抖音旗下AI助手豆包,你的智能百科全书,全免费不限次数
【推荐】轻量又高性能的 SSH 工具 IShell:AI 加持,快人一步
· 10年+ .NET Coder 心语,封装的思维:从隐藏、稳定开始理解其本质意义
· .NET Core 中如何实现缓存的预热?
· 从 HTTP 原因短语缺失研究 HTTP/2 和 HTTP/3 的设计差异
· AI与.NET技术实操系列:向量存储与相似性搜索在 .NET 中的实现
· 基于Microsoft.Extensions.AI核心库实现RAG应用
· TypeScript + Deepseek 打造卜卦网站:技术与玄学的结合
· 阿里巴巴 QwQ-32B真的超越了 DeepSeek R-1吗?
· 【译】Visual Studio 中新的强大生产力特性
· 10年+ .NET Coder 心语 ── 封装的思维:从隐藏、稳定开始理解其本质意义
· 【设计模式】告别冗长if-else语句:使用策略模式优化代码结构