ASP.NET全栈开发验证模块在MVC中使用服务端验证
上一章我们在控制台中基本的了解了FluentValidation是如何简洁,优雅的完成了对实体的验证工作,今天我们将在实战项目中去应用它。
首先我们创建一个ASP.NET MVC项目,本人环境是VS2017,
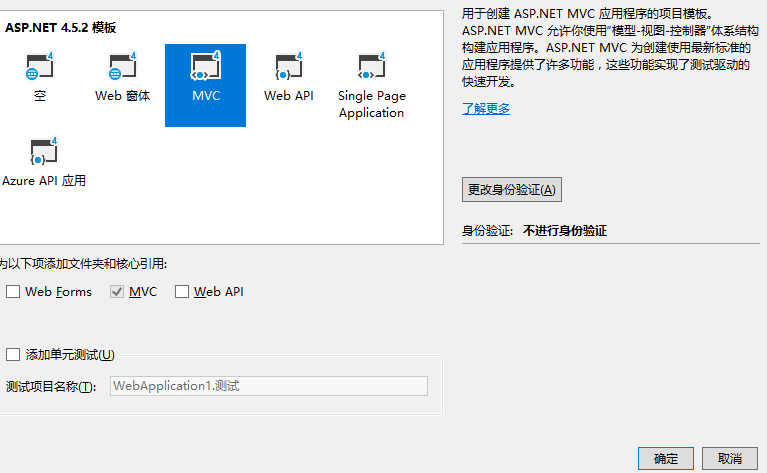
创建成功后通过在Nuget中使用 Install-Package FluentValidation -Version 7.6.104 安装FluentValidation
在Model文件夹中添加两个实体Address 和 Person
 public class Address
    {
        public string Home { get; set; }

        public string Phone { get; set; }
    }
  public class Person
    {
        /// <summary>
        /// 姓名
        /// </summary>
        public string Name { get; set; }
        /// <summary>
        /// 年龄
        /// </summary>
        public int Age { get; set; }
        /// <summary>
        /// 性别
        /// </summary>
        public bool Sex { get; set; }

        /// <summary>
        /// 地址
        /// </summary>
        public Address Address { get; set; }
    }
紧接着创建实体的验证器
  public class AddressValidator : AbstractValidator<Address>
    {
        public AddressValidator()
        {
            this.RuleFor(m => m.Home)
                .NotEmpty()
                .WithMessage("家庭住址不能为空");

            this.RuleFor(m => m.Phone)
                .NotEmpty()
                .WithMessage("手机号码不能为空");
        }
    }
  public class PersonValidator : AbstractValidator<Person>
    {
        public PersonValidator()
        {
            this.RuleFor(p => p.Name)
                .NotEmpty()
                .WithMessage("姓名不能为空");

            this.RuleFor(p => p.Age)
                .NotEmpty()
                .WithMessage("年龄不能为空");

            this.RuleFor(p => p.Address)
                .SetValidator(new AddressValidator());

        }
    }
为了更好的管理验证器,我建议将使用一个Manager者来管理所有验证器的实例。如ValidatorHub
 public class ValidatorHub
    {
        public AddressValidator AddressValidator { get; set; } = new AddressValidator();

        public PersonValidator PersonValidator { get; set; } = new PersonValidator();
    }
现在我们需要创建一个页面,在默认的HomeController 控制器下添加2个Action:ValidatorTest,他们一个用于展示页面,另一个则用于提交。
     [HttpGet]
        public ActionResult ValidatorTest()
        {
            return View();
        }

        [HttpPost]
        public ActionResult ValidatorTest(Person model)
        {
         return View();
        }
为 ValidatorTest 添加视图,选择Create模板,实体为Person
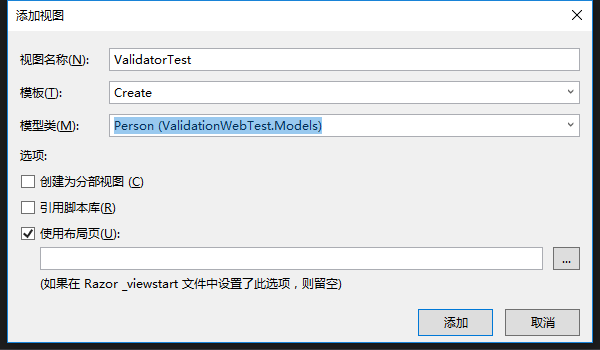
将默认的@Html全部删掉,因为在我们本次介绍中不需要,我们的目标是搭建一个前后端分离的项目,而不要过多的依赖于MVC。
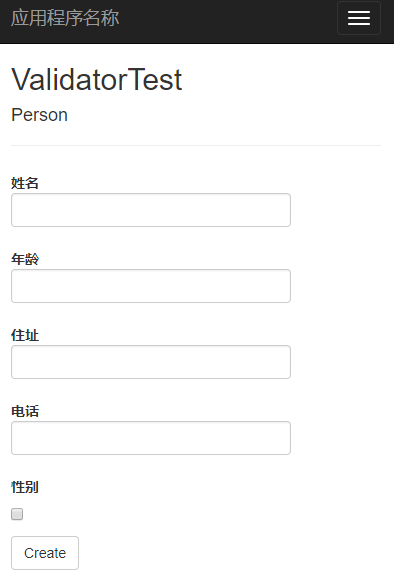
最终我们将表单改写成了
@using (Html.BeginForm())
{
    @Html.AntiForgeryToken()

    <div class="form-horizontal">
        <h4>Person</h4>
        <hr />
        @Html.ValidationSummary(true, "", new { @class = "text-danger" })
        <div class="form-group">
            <label for="Name" class="control-label col-md-2">姓名</label>
            <div class="col-md-10">
                <input type="text" name="Name" class="form-control" />
            </div>
        </div>

        <div class="form-group">
            <label for="Age" class="control-label col-md-2">年龄</label>
            <div class="col-md-10">
                <input type="text" name="Age" class="form-control" />
            </div>
        </div>

        <div class="form-group">
            <label for="Home" class="control-label col-md-2">住址</label>
            <div class="col-md-10">
                <input type="text" name="Address.Home" class="form-control" />
            </div>
        </div>

        <div class="form-group">
            <label for="Phone" class="control-label col-md-2">电话</label>
            <div class="col-md-10">
                <input type="text" name="Address.Phone" class="form-control" />
            </div>
        </div>

        <div class="form-group">
            <label for="Sex" class="control-label col-md-2">性别</label>
            <div class="col-md-10">
                <div class="checkbox">
                    <input type="checkbox" name="Sex" />
                </div>
            </div>
        </div>

        <div class="form-group">
            <div class="col-md-offset-2 col-md-10">
                <input type="submit" value="Create" class="btn btn-default" />
            </div>
        </div>
    </div>
}
注意,由于我们的实体Person中存在复杂类型Address,我们都知道,表单提交默认是Key:Value形式,而在传统表单的key:value中,我们无法实现让key为Address的情况下Value为一个复杂对象,因为input一次只能承载一个值,且必须是字符串。实际上MVC中存在模型绑定,此处不作过多介绍(因为我也忘记了-_-||)。
简单的说就是他能根据你所需要类型帮我们自动尽可能的转换,我们目前只要知道如何正确使用,在Address中存在Home属性和Phone属性,我们可以将表单的name设置为Address.Home,MVC的模型绑定会将Address.Home解析到对象Address上的Home属性去。
简单的校验方式我也不过多介绍了。再上一章我们已经了解到通过创建一个实体的验证器来对实体进行验证,然后通过IsValid属性判断是否验证成功。对,没错,对于大家来说这太简单了。但我们每次校验都创建一个验证器是否显得有点麻烦呢?不要忘了我们刚刚创建了一个ValidatorHub,我们知道控制器默认继承自Controller,如果我们想为控制器扩展一些能力呢?现在我要创建一个ControllerEx了,并继承自Controller。
 public class ControllerEx : Controller
    {
        protected Dictionary<string, string> DicError { get; set; } = new Dictionary<string, string>();

        protected ValidatorHub ValidatorHub { get; set; } = new ValidatorHub();

        protected override void OnActionExecuted(ActionExecutedContext filterContext)
        {
            base.OnActionExecuted(filterContext);
            ViewData["Error"] = DicError;
        }

        protected void ValidatorErrorHandler(ValidationResult result)
        {
            foreach (var failure in result.Errors)
            {
                if (!this.DicError.ContainsKey(failure.PropertyName))
                {
                    this.DicError.Add(failure.PropertyName, failure.ErrorMessage);
                }
            }
        }
    }
在ControllerEx里我创建了一个ValidatorHub属性,正如其名,他内部存放着各种验证器实体呢。有了它,我们可以在需要验证的Action中通过this.ValidatorHub.具体验证器就能完成具体验证工作了,而不需要再去每次new 一个验证器。
同样我定义了一个DicError的键值对集合,他的键和值类型都是string。key是验证失败的属性名,而value则是验证失败后的错误消息,它是用来存在验证的结果的。
在这里我还定义了一个ValidatorErrorHandler的方法,他有一个参数是验证结果,通过名称我们大致已经猜到功能了,验证错误的处理,对验证结果的错误信息进行遍历,并将错误信息添加至DicError集合。
最终我需要将这个DicError传递给View,简单的办法是ViewData["Error"] 但我不想在每个页面都去这么干,因为这使我要重复多次写这行代码,我会厌倦它的。很棒的是MVC框架为我们提供了Filter(有的地方也称函数钩子,切面编程,过滤器),能够方便我们在生命周期的不同阶段进行控制,很显然,我的需求是在每次执行完Action后要在末尾添加一句ViewData["Error"]=DicError。于是我重写了OnActionExecuted方法,仅添加了 ViewData["Error"] = DicError;
现在我只需要将HomeController继承自ControllerEx即可享受以上所有功能了。
现在基本工作基本都完成了,但我们还忽略了一个问题,我错误是存在了ViewData["Error"]里传递给View,只不过难道我们在验证错误的时候在页面显示一个错误列表?像li一样?这显然不是我们想要的。我们还需要一个帮助我们合理的显示错误信息的函数。在Razor里我们可以对HtmlHelper进行扩展。于是我为HtmlHelper扩展了一个方法ValidatorMessageFor
public static class ValidatorHelper
    {
        public static MvcHtmlString ValidatorMessageFor(this HtmlHelper htmlHelper, string property, object error)
        {
            var dicError = error as Dictionary<string, string>;

            if (dicError == null)  //没有错误
            {
                //  不会等于空
            }
            else
            {
                if (dicError.ContainsKey(property))
                {
                    return new MvcHtmlString(string.Format("<p>{0}</p>", dicError[property]));
                }
            }
            return new MvcHtmlString("");
        }
    }
在ValidatorMessaegFor里需要2个参数property 和 error
前者是需要显示的错误属性名,后者则是错误对象即ViewData["Error"],功能很简单,在发现错误对象里存在key为错误属性名的时候将value用一个p标签包裹起来返回,value即为错误属性所对应的错误提示消息。
现在我们还需要在View每一个input下添加一句如: @Html.ValidatorMessageFor("Name", ViewData["Error"])即可。
@using (Html.BeginForm())
{
    @Html.AntiForgeryToken()

    <div class="form-horizontal">
        <h4>Person</h4>
        <hr />
        @Html.ValidationSummary(true, "", new { @class = "text-danger" })
        <div class="form-group">
            <label for="Name" class="control-label col-md-2">姓名</label>
            <div class="col-md-10">
                <input type="text" name="Name" class="form-control" />
                @Html.ValidatorMessageFor("Name", ViewData["Error"])
            </div>
        </div>

        <div class="form-group">
            <label for="Age" class="control-label col-md-2">年龄</label>
            <div class="col-md-10">
                <input type="text" name="Age" class="form-control" />
                @Html.ValidatorMessageFor("Name", ViewData["Error"])
            </div>
        </div>

        <div class="form-group">
            <label for="Home" class="control-label col-md-2">住址</label>
            <div class="col-md-10">
                <input type="text" name="Address.Home" class="form-control" />
                @Html.ValidatorMessageFor("Address.Home", ViewData["Error"])
            </div>
        </div>

        <div class="form-group">
            <label for="Phone" class="control-label col-md-2">电话</label>
            <div class="col-md-10">
                <input type="text" name="Address.Phone" class="form-control" />
                @Html.ValidatorMessageFor("Address.Phone", ViewData["Error"])
            </div>
        </div>

        <div class="form-group">
            <label for="Sex" class="control-label col-md-2">性别</label>
            <div class="col-md-10">
                <div class="checkbox">
                    <input type="checkbox" name="Sex" />
                </div>
            </div>
        </div>

        <div class="form-group">
            <div class="col-md-offset-2 col-md-10">
                <input type="submit" value="Create" class="btn btn-default" />
            </div>
        </div>
    </div>
}
到此我们的所有基本工作都已完成
 [HttpPost]
        public ActionResult ValidatorTest(Person model)
        {
            var result = this.ValidatorHub.PersonValidator.Validate(model);
            if (result.IsValid)
            {
                return Redirect("https://www.baidu.com");
            }
            else
            {
                this.ValidatorErrorHandler(result);
            }
            return View();
        }
通过我们在ControllerEx种的ValidatorHub来对实体Person进行校验,如果校验成功了....这里没啥可干的就当跳转一下表示咯,否则的话调用Ex中的ValidatorErrorHandler 将错误消息绑定到ViewData["Error"]中去,这样就能在前端View渲染的时候将错误消息显示出来了。
接下来我们将程序跑起来。
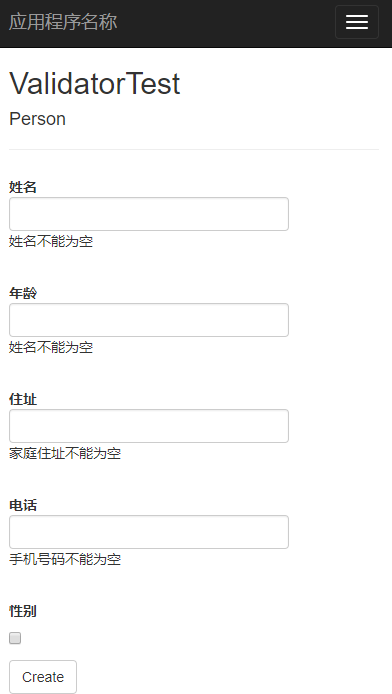
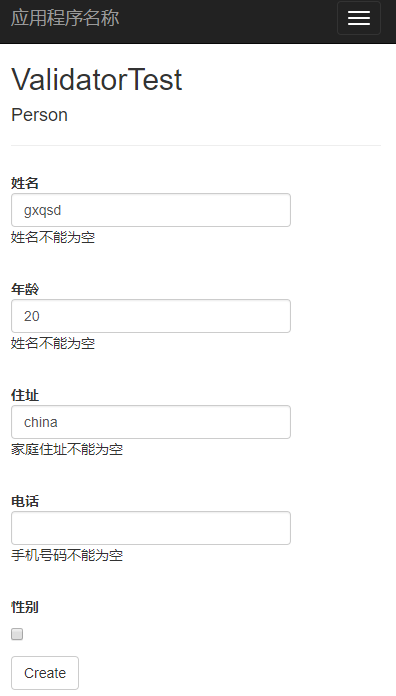
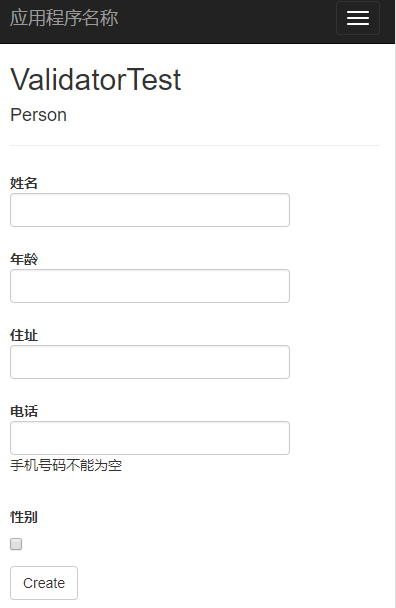
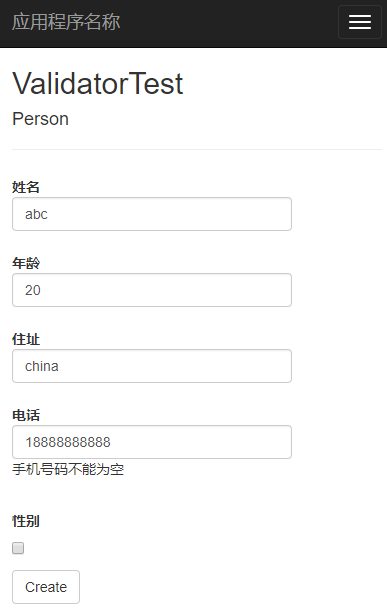
正如大家所看到的,当我点击提交的时候 虽然只有电话没输入但其他三个表单被清空了,也许我们会觉得不爽,当然如果你需要那相信你在看完上述的错误信息绑定后一定也能解决这个问题的,但事实上,我们并不需要它,\(^o^)/~
为什么呢?因为我们还要前端验证啊,当前端验证没通过的时候根本无法发送到后端来,所以不用担心用户在一部分验证失败时已填写的表单数据被清空掉。
这里提到在表单提交时需要前端校验,既然有前端校验了为何还要我们做后台校验呢?不是脱了裤子放屁吗?事实上,前端校验的作用在于优化用户体验,减轻服务器压力,也可以防住君子,但绝不能防止小人,由于Web客户端的不确定性,任何东西都可以模拟的。如果不做服务端验证,假如你的系统涉及金钱,也许那天你醒来就发现自己破产了。
来一个通过验证的。
