
在Unity3D中实现安卓平台的本地通知推送
【前言】
对于手游来说,什么时候需要推送呢?玩过一些带体力限制的游戏就会发现,我的体力在恢复满后,手机会收到一个通知告诉我体力已完全恢复了。这类通知通常是由本地的客户端发起的,没有经过服务端。
在安卓应用中,本地通知推送是通过调用系统级服务NotificationManager实现的。虽然U3D本身也有NotificationServices类可以进行通知推送,但仅限于iOS平台(这篇博文讲了怎么使用它在iOS平台发起本机推送)。
而现在我们的游戏是使用U3D开发的,并不能像安卓开发一样直接在代码中调用服务。为了实现本地定时推送效果,需要自己写一个插件来实现了。
由于推送通常发生在客户端关闭的状态,这个推送应该被放在一个延时服务中,否则玩游戏玩得好好的突然跳出来一条自己的推送,太诡异了。
于是我们需要完成一个提供三个功能的模块:1、设定X秒后显示一条推送通知;2、设定X秒后显示一条通知,之后每天再显示一次;3、清除本应用的所有推送。
【解决思路】
因为U3D引擎提供了调用jar包的方法,所以我们可以在jar包中调用安卓的类库,实现消息推送,然后在jar包中留出接口供U3D使用即可,没有必要走JNI层。
【所需工具】
● eclipse
● 安卓SDK(我使用的4.4)
● Unity编辑器(我使用的5.1.3)
【开工】
1、 创建jar包工程
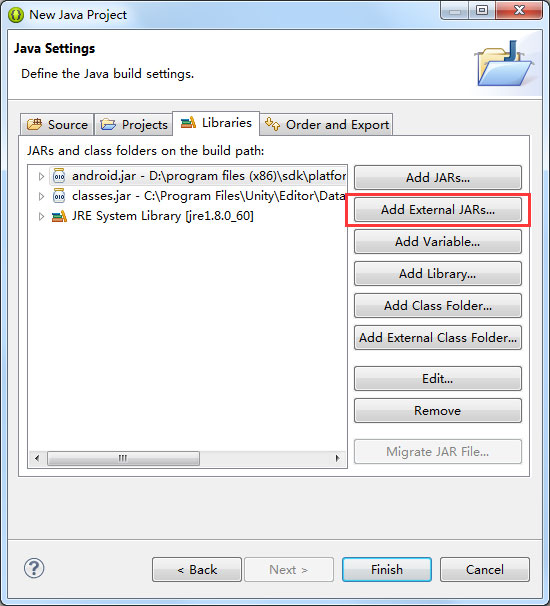
创建的时候要引入两个第三方jar包。
一个是Unity的包,地址: Unity安装目录\Editor\Data\PlaybackEngines\androidplayer\release\bin\classes.jar(貌似4.x的目录和5.x不太一样,但总之就是找到androidplayer里面的classes.jar)
还有一个是安卓SDK的包,地址: 安卓SDK安装目录\platforms\安卓版本\android.jar
2、 编码
思路就是使用AlarmManager服务,在一定时间后发起广播,然后通过接收器接受展示。如果你做过安卓开发,对这段代码肯定不会陌生。如果没做过也没关系,当成一个黑盒,在需要的时候调接口就行。
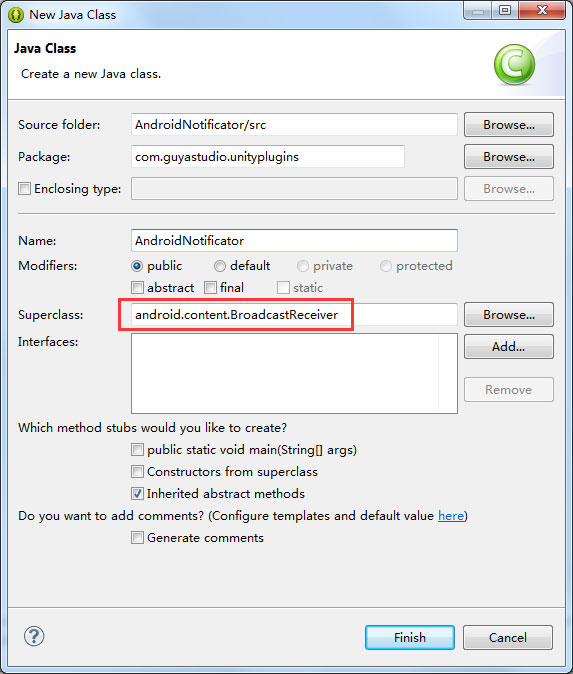
首先添加一个Java类,注意父类要设为BroadcastReceiver。
添加完成后,就可以开始写了:
1 2 3 4 5 6 7 8 9 10 11 12 13 14 15 16 17 18 19 20 21 22 23 24 25 26 27 28 29 30 31 32 33 34 35 36 37 38 39 40 41 42 43 44 45 46 47 48 49 50 51 52 53 54 55 56 57 58 59 60 61 62 63 64 65 66 67 68 69 70 71 72 73 74 75 76 77 78 79 80 81 82 83 84 85 86 87 88 89 90 91 92 93 94 95 96 97 98 99 100 101 102 103 104 105 106 107 108 109 110 111 112 113 114 115 116 117 118 119 120 121 122 123 124 125 126 127 128 129 130 131 132 133 134 135 136 137 | package com.guyastudio.unityplugins;import java.util.Calendar;import android.app.Activity;import android.app.AlarmManager;import android.app.Notification;import android.app.NotificationManager;import android.app.PendingIntent;import android.content.BroadcastReceiver;import android.content.Context;import android.content.Intent;import android.content.pm.ApplicationInfo;import android.content.pm.PackageManager;import android.os.Bundle;import com.unity3d.player.UnityPlayer;/** * 用于生成 / 清除本地通知推送的插件 * 仅在安卓平台有效 * * @author Weiren * */public class AndroidNotificator extends BroadcastReceiver { private static int m_nLastID = 0; /** * 显示数秒后的通知 * * @param pAppName 应用名 * @param pTitle 通知标题 * @param pContent 通知内容 * @param pDelaySecond 延迟时间 * @param pIsDailyLoop 是否每日自动推送 * @throws IllegalArgumentException */ public static void ShowNotification(String pAppName, String pTitle, String pContent, int pDelaySecond, boolean pIsDailyLoop) throws IllegalArgumentException { if(pDelaySecond < 0) { throw new IllegalArgumentException("The param: pDelaySecond < 0"); } Activity curActivity = UnityPlayer.currentActivity; Intent intent = new Intent("UNITY_NOTIFICATOR"); intent.putExtra("appname", pAppName); intent.putExtra("title", pTitle); intent.putExtra("content", pContent); PendingIntent pi = PendingIntent.getBroadcast(curActivity, 0, intent, 0); AlarmManager am = (AlarmManager)curActivity.getSystemService(Context.ALARM_SERVICE); Calendar calendar = Calendar.getInstance(); calendar.add(Calendar.SECOND, pDelaySecond); long alarmTime = calendar.getTimeInMillis(); if (pIsDailyLoop){ am.setRepeating( AlarmManager.RTC_WAKEUP, alarmTime, 86400, // 24 hours pi); } else { am.set( AlarmManager.RTC_WAKEUP, alarmTime, pi); } } /** * 清除所有通知,包括日常通知 */ public static void ClearNotification() { Activity act = UnityPlayer.currentActivity; NotificationManager nManager = (NotificationManager)act.getSystemService(Context.NOTIFICATION_SERVICE); for(int i = m_nLastID; i >= 0; i--) { nManager.cancel(i); } m_nLastID = 0; } @SuppressWarnings("deprecation") public void onReceive(Context pContext, Intent pIntent) { Class<?> unityActivity = null; try { unityActivity = pContext.getClassLoader().loadClass("com.unity3d.player.UnityPlayerProxyActivity"); } catch (Exception ex) { ex.printStackTrace(); return; } ApplicationInfo applicationInfo = null; PackageManager pm = pContext.getPackageManager(); try { applicationInfo = pm.getApplicationInfo(pContext.getPackageName(), PackageManager.GET_META_DATA); } catch (Exception ex) { ex.printStackTrace(); return; } Bundle bundle = pIntent.getExtras(); Notification notification = new Notification( applicationInfo.icon, (String)bundle.get("appname"), System.currentTimeMillis()); PendingIntent contentIntent = PendingIntent.getActivity( pContext, m_nLastID, new Intent(pContext, unityActivity), 0); notification.setLatestEventInfo( pContext, (String)bundle.get("title"), (String)bundle.get("content"), contentIntent); NotificationManager nm = (NotificationManager)pContext.getSystemService(Context.NOTIFICATION_SERVICE); nm.notify(m_nLastID, notification); m_nLastID++; }} |
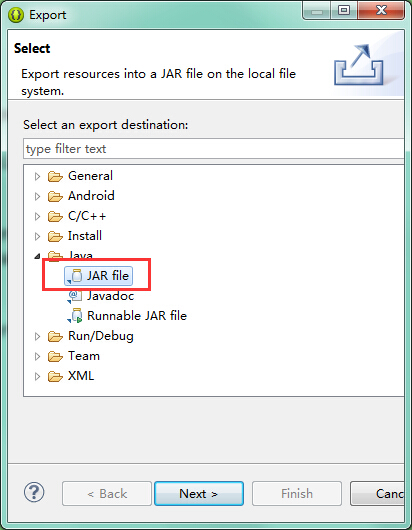
3、 导出jar包
在项目上右键——Export,导出为jar格式。
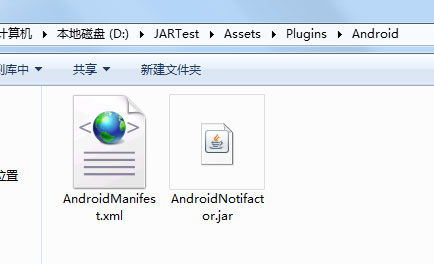
4、添加AndroidManifest.xml
安卓应用中如果要让应用收到广播,还需要在AndroidManifest.xml中加入receiver标签。我们创建的项目是一个Java项目,不会自动生成AndroidManifest,所以需要手动写一个:
1 2 3 4 5 6 7 8 9 10 11 12 13 14 15 16 17 18 19 20 21 22 23 24 | <?xml version="1.0" encoding="utf-8"?><manifest xmlns:android="http://schemas.android.com/apk/res/android" android:installLocation="preferExternal" android:theme="@android:style/Theme.NoTitleBar" android:versionName="1.0" android:versionCode="10"> <supports-screens android:smallScreens="true" android:normalScreens="true" android:largeScreens="true" android:xlargeScreens="true" android:anyDensity="true" /> <application android:icon="@drawable/app_icon" android:label="@string/app_name" android:debuggable="false"> <receiver android:process=":remote" android:name="com.macaronics.notification.AlarmReceiver"></receiver> <activity android:name="com.unity3d.player.UnityPlayerProxyActivity" android:label="@string/app_name" android:configChanges="fontScale|keyboard|keyboardHidden|locale|mnc|mcc|navigation|orientation|screenLayout|screenSize|smallestScreenSize|uiMode|touchscreen" > <intent-filter> <action android:name="android.intent.action.MAIN" /> <category android:name="android.intent.category.LAUNCHER" /> </intent-filter> </activity> <activity android:name="com.unity3d.player.UnityPlayerActivity" android:label="@string/app_name" android:configChanges="fontScale|keyboard|keyboardHidden|locale|mnc|mcc|navigation|orientation|screenLayout|screenSize|smallestScreenSize|uiMode|touchscreen" > </activity> <receiver android:name="com.guyastudio.unityplugins.AndroidNotificator" > <intent-filter> <action android:name="UNITY_NOTIFICATOR" /> </intent-filter> </receiver> </application> <uses-feature android:glEsVersion="0x00020000" /> <uses-sdk android:minSdkVersion="8" android:targetSdkVersion="17" /> </manifest> |
● 注意“<action android:name="UNITY_NOTIFICATOR" />”这里名字要和前面Java代码中的一致。
4、 在U3D项目中调用
创建一个新的U3D项目,在界面上放一个Text和两个Button(为节约时间我用的源生UI):

然后将导出的jar文件和AndroidManifest.xml文件移动到 U3D项目目录\Assets\Plugins\Android下:
在几个UI的父节点上加一个脚本,内容如下:
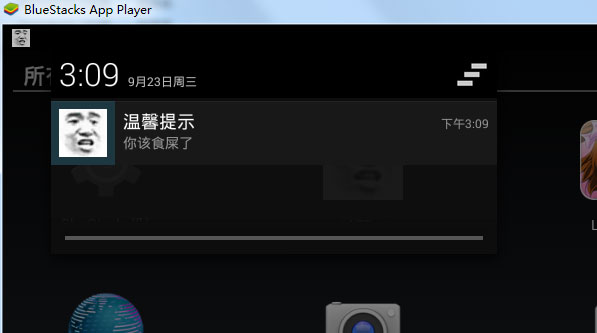
1 2 3 4 5 6 7 8 9 10 11 12 13 14 15 16 17 18 19 20 21 22 23 24 25 26 27 28 29 30 31 32 33 34 35 36 37 38 39 40 41 42 43 44 45 46 47 48 49 50 51 52 53 54 55 56 57 58 59 60 61 62 63 64 65 66 67 68 69 70 71 72 73 74 75 76 77 | using UnityEngine;using UnityEngine.UI;public class JARTest : MonoBehaviour { public Text Text_Message;#if UNITY_ANDROID private AndroidJavaObject m_ANObj = null;#endif // Use this for initialization void Start () { } // Update is called once per frame void Update () { } public void Button_1_Clicked() {#if UNITY_ANDROID if(InitNotificator()) { m_ANObj.CallStatic( "ShowNotification", Application.productName, "温馨提示", "你该食屎了", 10, false); this.Text_Message.text = "Notification will show in 10 sec."; }#endif } public void Button_2_Clicked() {#if UNITY_ANDROID if(InitNotificator()) { m_ANObj.CallStatic("ClearNotification"); this.Text_Message.text = "Notification has been cleaned"; }#endif }#if UNITY_ANDROID private bool InitNotificator() { if (m_ANObj == null) { try { m_ANObj = new AndroidJavaObject("com.guyastudio.unityplugins.AndroidNotificator"); } catch { this.Text_Message.text = "Init AndroidNotificator Fail"; return false; } } if (m_ANObj == null) { this.Text_Message.text = "AndroidNotificator Not Found."; return false; } return true; }#endif} |
● 注意实例化AndroidJavaObject的参数名字要和Java工程的包名类名一致。
然后绑定控件和事件方法。绑定好后先编译一下,如果通过了,就可以导出一个apk包了。将这个包安装到安卓设备上。我手头没有安卓设备,就用模拟器来测试:
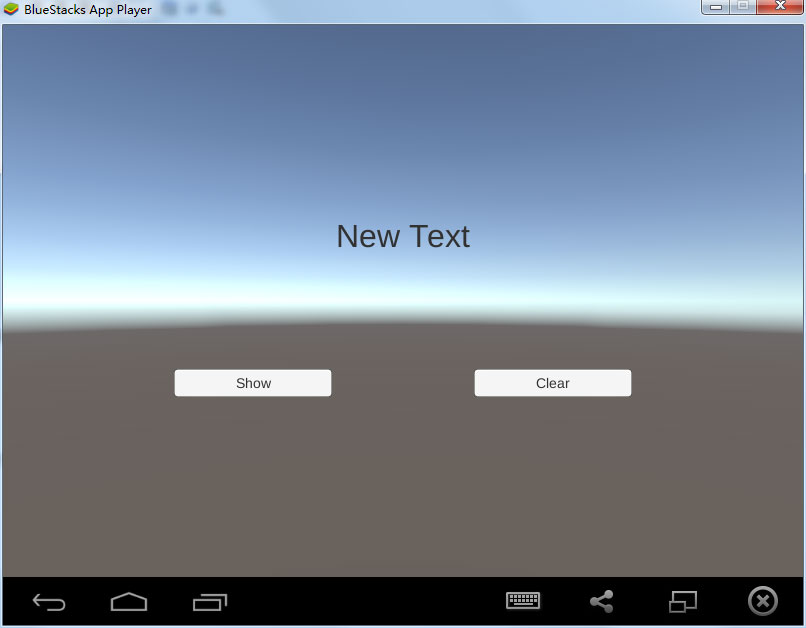
点击“Show”按钮,10秒后会收到通知(点击后可将应用至后台,或杀掉):
而点击“Clean”按钮,通知都会被清除。
至此,这个通知插件就完成了。
【后记】
最近两个月经历了辞职,以休息的名义玩(主要是肝夏活,你懂的),苦逼地找工作,意外地入职这一系列过程,心情比较复杂,博客这一块也一直没上。直到今天在项目中搞了个这个模块,才意识到可以稍微更新一下。
我知道你们想要谱面编辑器教程(
好吧,完整的制作过程我看来是没时间写出来了,这周末讲一下核心部分的逻辑,核心搞懂了其他都很简单了。不发直播拆大和,我是认真的!


【推荐】国内首个AI IDE,深度理解中文开发场景,立即下载体验Trae
【推荐】编程新体验,更懂你的AI,立即体验豆包MarsCode编程助手
【推荐】抖音旗下AI助手豆包,你的智能百科全书,全免费不限次数
【推荐】轻量又高性能的 SSH 工具 IShell:AI 加持,快人一步
· go语言实现终端里的倒计时
· 如何编写易于单元测试的代码
· 10年+ .NET Coder 心语,封装的思维:从隐藏、稳定开始理解其本质意义
· .NET Core 中如何实现缓存的预热?
· 从 HTTP 原因短语缺失研究 HTTP/2 和 HTTP/3 的设计差异
· 周边上新:园子的第一款马克杯温暖上架
· 分享 3 个 .NET 开源的文件压缩处理库,助力快速实现文件压缩解压功能!
· Ollama——大语言模型本地部署的极速利器
· DeepSeek如何颠覆传统软件测试?测试工程师会被淘汰吗?
· 使用C#创建一个MCP客户端