注解方式整合mybatis & SpringBoot整合分页助手 & SpringBoot整合JSP
1.注解方式整合mybatis
1.1 创建District的Mapper接口
public interface DistrictMapper {

    @Select("select * from district")
    List<District> findAll();

    @Select("select * from district where id= #{id}")
    District findOneById(@Param("id") Integer id);
}
 @Insert("insert into district(id, name)" + "values (#{id}, #{name})")
    @Options(useGeneratedKeys = true, keyColumn = "id")
    int insertOne(@Param("id") Integer id, @Param("name") String name);
@Update("update district set name=#{name} where id=#{id}")
    int updateOne(@Param("id") Integer id, @Param("name") String name);
1.2 添加mybatis注解
针对增删改查:@Insert,@Delete,@Update,@Select
1.2.1 常用注解说明
- @Mapper
可以给接口自动生成一个实现类,让spring对mapper接口的bean进行管理,并且可以省略去写复杂的xml文件。
- @Options
配置映射语句的属性。例如:@Options(useGeneratedKeys = true, keyColumn = "id"):指定表的自增主键并自动绑定到实体类对象。
- @Result
修饰返回的结果集,关联实体类属性和数据库字段一一对应,如果实体类属性和数据库属性名保持一致,就不需要这个属性来修饰。
- @Param
如果你的映射方法的形参有多个,这个注解使用在映射方法的参数上就能为它们取自定义名字。若不给出自定义名字,多参数(不包括 RowBounds 参数)则先以 "param" 作前缀,再加上它们的参数位置作为参数别名。例如 #{param1}, #{param2}。
- @Select、@Delete、@Insert、@Update
这四个注解分别代表将会被执行的 SQL 语句。它们用字符串数组(或单个字符串)作为参数。如果传递的是字符串数组,字符串之间先会被填充一个空格再连接成单个完整的字符串。
还是需要在启动类中添加@MapperScan注解
import org.mybatis.spring.annotation.MapperScan;
import org.springframework.boot.SpringApplication;
import org.springframework.boot.autoconfigure.SpringBootApplication;

@SpringBootApplication
@MapperScan(basePackages = "com.company.firstspringboot.mapper")
public class FirstSpringbootApplication {

    public static void main(String[] args) {
        SpringApplication.run(FirstSpringbootApplication.class, args);
    }

}
在往数据库中添加数据时:出现这样的问题:

这是因为:在application.yml中要把编码加上
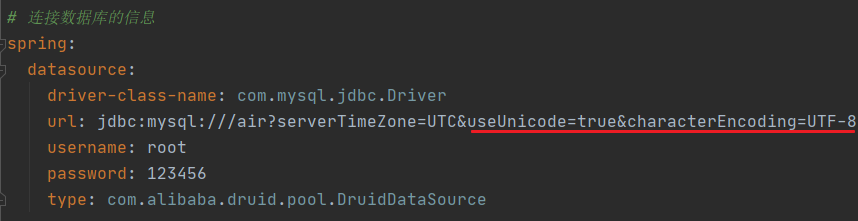
完整的application.yml
server:
  port: 8080
  servlet:
    context-path: /

# 连接数据库的信息
spring:
  datasource:
    driver-class-name: com.mysql.jdbc.Driver
    url: jdbc:mysql:///air?serverTimeZone=UTC&useUnicode=true&characterEncoding=UTF-8
    username: root
    password: 123456
    type: com.alibaba.druid.pool.DruidDataSource

# MyBatis配置
mybatis:
  # 扫描映射文件
  mapper-locations: classpath:mapper/*.xml
  # 配置别名扫描的包
  type-aliases-package: com.company.firstspringboot.entity
  configuration:
    # 开启驼峰映射配置
    map-underscore-to-camel-case: true

# 查看sql语句
logging:
  level:
    com.company.firstspringboot: DEBUG
1.3 测试,看到执行的sql语句
在application.yml文件中添加
# 查看sql语句
logging:
  level:
    com.company.firstspringboot: DEBUG
class DistrictMapperTest extends FirstSpringbootApplicationTests {

    @Autowired
    private DistrictMapper mapper;

    @Test
    void findAll() {
        List<District> list = mapper.findAll();
        for (District district : list) {
            System.out.println(district);
        }
    }

    @Test
    void findOneById() {
        District oneById = mapper.findOneById(5);
        System.out.println(oneById);
    }
}
可以看到执行的sql语句,其实就是debug模式

    @Test
    void insertOne() {
        int district = mapper.insertOne(10, "秦淮区");
        System.out.println(district);
    }
    @Test
    void updateOne() {
        int i = mapper.updateOne(9, "雨花台区");
    }
2. SpringBoot整合分页助手
导入依赖
https://mvnrepository.com/artifact/com.github.pagehelper/pagehelper-spring-boot-starter
<!--        分页助手pageHelper依赖-->
        <dependency>
            <groupId>com.github.pagehelper</groupId>
            <artifactId>pagehelper-spring-boot-starter</artifactId>
            <version>1.2.10</version>
        </dependency>
AirMapperTest.java
import com.company.firstspringboot.FirstSpringbootApplicationTests;
import com.company.firstspringboot.entity.Air;
import com.github.pagehelper.PageHelper;
import com.github.pagehelper.PageInfo;

import org.junit.jupiter.api.Test;
import org.springframework.beans.factory.annotation.Autowired;

import java.util.List;

class AirMapperTest extends FirstSpringbootApplicationTests {

    @Autowired
    private AirMapper airMapper;

    @Test
    void findAll() {
        List<Air> all = airMapper.findAll();
        for (Air air : all) {
            System.out.println(air);
        }
    }

    @Test
    public void findByPage() {
        // 1.执行分页
        PageHelper.startPage(1, 5);

        // 2.执行查询
        List<Air> list = airMapper.findAll();

        // 3.封装PageInfo对象
        PageInfo<Air> pageInfo = new PageInfo<>(list);

        // 4.输出
        for (Air air : pageInfo.getList()) {
            System.out.println(air);
        }
    }
}

3.SpringBoot整合JSP
1.需要导入依赖,在pom.xml中
springboot不推荐使用jsp,所以在spring-boot-starter-web启动器中并没有包括这两个,需要单独引入jstl和tomcat-embed-jasper的依赖支持
<!--        JSP核心引擎依赖-->
        <dependency>
            <groupId>org.apache.tomcat.embed</groupId>
            <artifactId>tomcat-embed-jasper</artifactId>
        </dependency>
<!--        JSTL-->
        <dependency>
            <groupId>javax.servlet</groupId>
            <artifactId>jstl</artifactId>
        </dependency>
2.创建webapp以及WEB_INF去存放JSP页面
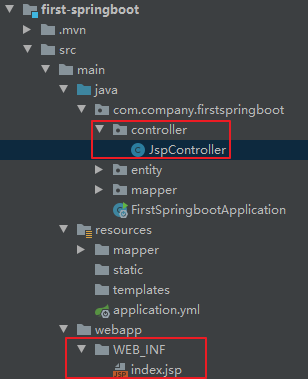
JspController.java
package com.company.firstspringboot.controller;

import org.springframework.stereotype.Controller;
import org.springframework.ui.Model;
import org.springframework.web.bind.annotation.RequestMapping;
import org.springframework.web.servlet.ModelAndView;

@Controller
public class JspController {
    @RequestMapping("/index")
    public ModelAndView index(Model model) {
        model.addAttribute("name", "张三");
        return new ModelAndView("index");
    }
}
index.jsp
<%@ page language="java" contentType="text/html; charset=utf-8"
         pageEncoding="utf-8"%>
<%@ taglib uri="http://java.sun.com/jsp/jstl/core" prefix="c"%>
<!DOCTYPE html PUBLIC "-//W3C//DTD HTML 4.01 Transitional//EN" "http://www.w3.org/TR/html4/loose.dtd">

<html>
<head>
    <meta charset="UTF-8">
    <title>Title</title>
</head>
<body>
    <h1>hello ${name}</h1>
</body>
</html>
3.指定view的前缀和后缀,在application.yml中
spring:
  mvc:
    # 视图的前缀和后缀
    view:
      prefix: /WEB_INF/
      suffix: .jsp

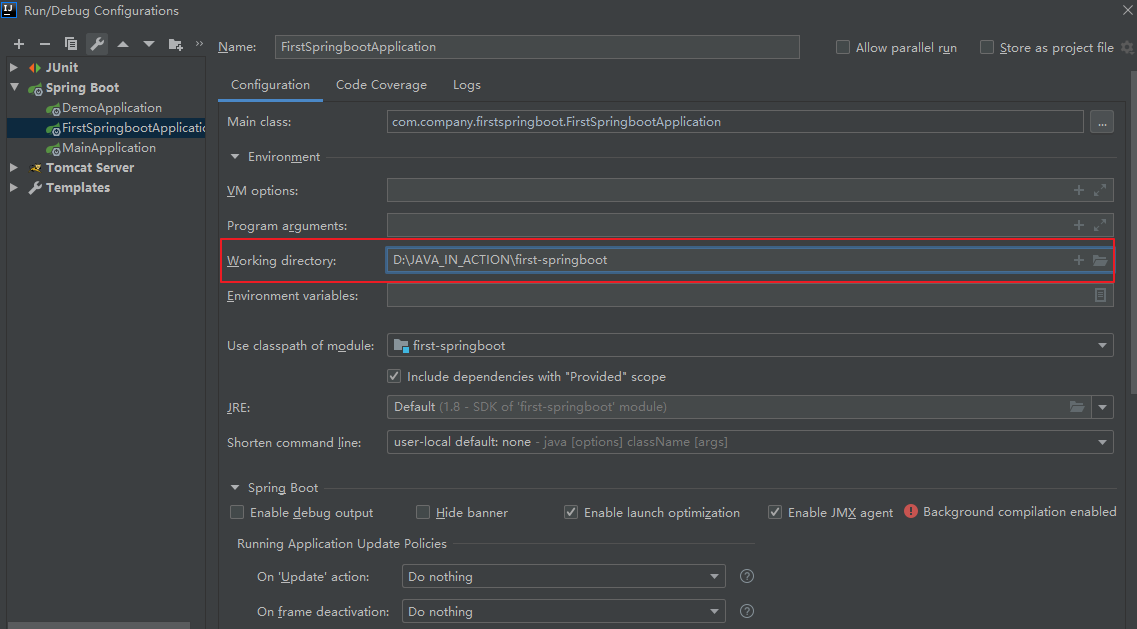
在整合jsp过程中出现了两个问题:
1.出现下面的问题
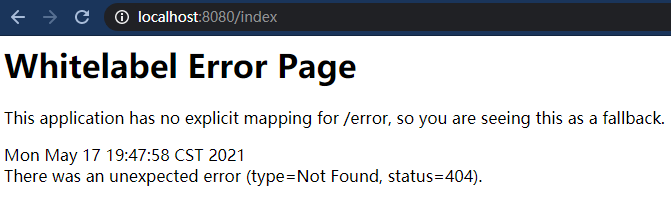
因为用的是IDEA,需要特别注意其中一个项目配置,否则可能找不到jsp页面。

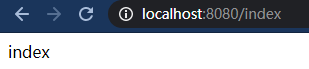
2.只返回了文字,并没有返回页面
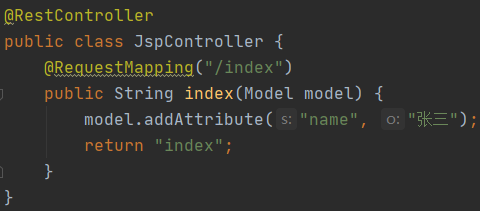
原因分析:@RestController注解相当于@ResponseBody和@Controller合在一起的作用。在使用@RestController注解Controller时,Controller中的方法无法返回jsp页面,或者html,配置的视图解析器 InternalResourceViewResolver不起作用,返回的内容就是Return 里的内容。
包括在Mapping注解使用的同时使用@ResponseBody时也会出现同样的问题。
解决办法:①去除@ResponseBody或将含有Rest的注解换成对应的原始注解;
②不通过String返回,通过ModelAndView对象返回,上述例子可将return语句换成下面:
@RestController
public class JspController {
    @RequestMapping("/index")
    public ModelAndView index(Model model) {
        model.addAttribute("name", "张三");
        return new ModelAndView("index");
    }
}
在使用ModelAndView对象返回的时候,不需要考虑有没有@ResponseBody类似的注解。
参考:
https://juejin.cn/post/6844903993391448072
https://www.cnblogs.com/myitnews/p/12347191.html
https://www.cnblogs.com/guo-xu/p/11203740.html

 浙公网安备 33010602011771号