SpringBoot底层注解-@ImportResource和配置绑定@ConfigurationProperties
1.@ImportResource
帮助我们导入spring的配置文件,比如以前的老项目,我有个beans.xml,里面有一些组件,我不想一个重新写,就可以用@ImportResource("classpath:beans.xml"),即导入第三方组件使用
beans.xml
<?xml version="1.0" encoding="UTF-8"?>
<beans xmlns="http://www.springframework.org/schema/beans"
       xmlns:xsi="http://www.w3.org/2001/XMLSchema-instance"
       xmlns:context="http://www.springframework.org/schema/context"
       xsi:schemaLocation="http://www.springframework.org/schema/beans http://www.springframework.org/schema/beans/spring-beans.xsd http://www.springframework.org/schema/context https://www.springframework.org/schema/context/spring-context.xsd">

    <bean id="haha" class="com.atguigu.boot.bean.User">
        <property name="name" value="zhangsan"></property>
        <property name="age" value="18"></property>
    </bean>

    <bean id="hehe" class="com.atguigu.boot.bean.Pet">
        <property name="name" value="tomcat"></property>
    </bean>
</beans>
在MyConfig类上加上@ImportResource("classpath:beans.xml")

在MainApplication.java里测试
 boolean haha = run.containsBean("haha");
 boolean hehe = run.containsBean("hehe");
 System.out.println("haha:"+haha);//true
 System.out.println("hehe:"+hehe);//true
2.配置绑定@ConfigurationProperties
我们习惯把经常变化的东西配到配置文件里面,比如之前的jdbc.properties,我们把连接地址,账户,密码等放到jdbc.properties中,然后,我们未来会创建数据库连接池,会把这个配置文件的内容会一一解析到数据库连接池(JavaBean),因此我们这个实现场景就是把properties里面的所有配置绑定到JavaBean中,这个绑定过程,如果用Java原生代码来做,还是很麻烦。
我们来看看,如何使用Java读取到properties文件中的内容,并且把它封装到JavaBean中,以供随时使用;
public class getProperties {
     public static void main(String[] args) throws FileNotFoundException, IOException {
         Properties pps = new Properties();
         pps.load(new FileInputStream("a.properties"));
         Enumeration enum1 = pps.propertyNames();//得到配置文件的名字
         while(enum1.hasMoreElements()) {
             String strKey = (String) enum1.nextElement();
             String strValue = pps.getProperty(strKey);
             System.out.println(strKey + "=" + strValue);
             //封装到JavaBean。
         }
     }
 }
但是在SpringBoot中,只需要使用@ConfigurationProperties就可以搞定了
2.1 第一种方式@Component+@ConfigurationProperties
为了让@ConfigurationProperties生效,要加上@Component让其生效,因为只有在容器中的组件,才会拥有SpringBoot提供的强大的功能
下面来测试一下:

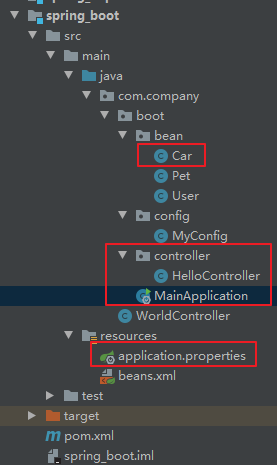
在Car.java中

注意:@ConfigurationProperties(prefix="mycar")这中配置绑定只和 application.properties进行绑定
prefiix="mycar"表示绑定以mycar开头的配置
application.properties
mycar.brand=BYD
mycar.price=100000
HelloController.java
package com.company.boot.controller;

import com.company.boot.bean.Car;

import org.springframework.beans.factory.annotation.Autowired;
import org.springframework.web.bind.annotation.RequestMapping;
import org.springframework.web.bind.annotation.RestController;


@RestController
public class HelloController {

    @Autowired
    Car car;

    @RequestMapping("/car")
    public Car car() {
        return car;
    }

    @RequestMapping("/hello")
    public String handle01() {
        return "Hello, Spring boot 2!";
    }
}
在浏览器上输入

完整的Car.java
package com.company.boot.bean;

import org.springframework.boot.context.properties.ConfigurationProperties;
import org.springframework.stereotype.Component;

@Component
@ConfigurationProperties(prefix = "mycar")
public class Car {
    private String brand;
    private Integer price;

    public String getBrand() {
        return brand;
    }

    public void setBrand(String brand) {
        this.brand = brand;
    }

    public Integer getPrice() {
        return price;
    }

    public void setPrice(Integer price) {
        this.price = price;
    }

    @Override
    public String toString() {
        return "Car{" + "brand='" + brand + '\'' + ", price=" + price + '}';
    }
}
2.2 第二种方式,@EnableConfigurationProperties + @ConfigurationProperties
这种方式适用于配置第三方类库的属性
@EnableConfigurationProperties(Car.class)
//1、开启Car配置绑定功能
//2、把这个Car这个组件自动注册到容器中
public class MyConfig {
}


