Winform Vs Installer之添加自定义安装流程
1、简介
在Winform 安装工具之Vs Installer介绍了Vs Installer的基本使用,可以满足基本需求,但是开发中遇到一些需要自定义安装流程的需求,如何通过Vs Installer来完成,本文以在安装过程中添加一个注册表的流程来介绍.
2、实战
在Winform 安装工具之Vs Installer的基础上,如果需要在安装过程中添加自定义流程,则需要在官方可视化的操作界面之上添加安装程序类,并将安装程序类单独建立一个类库,类库结构如下:

安装类的添加方式如下

下面开始编写注册表相关的代码,代码如下:
注册表操作类如下:
    public class RegistryVisitor
    {
        /// <summary>
        /// 写入可以与网页交互的注册表信息
        /// </summary>
        /// <param name="rootName">自定义更路径名称</param>
        /// <param name="appPath">应用的安装路径</param>
        /// <param name="protocolName">自定义Url协议的名称</param>
        public static void Register(string rootName, string appPath, string protocolName = null)
        {
            if (!string.IsNullOrEmpty(appPath) && File.Exists(appPath))
            {
                try
                {
                    //判断root是否存在,存在的话先删除
                    if (Registry.ClassesRoot.OpenSubKey(rootName) != null)
                        Registry.ClassesRoot.DeleteSubKeyTree(rootName);
                }
                catch (Exception ex)
                {
                    MessageBox.Show($"操作注册表异常,确保{rootName}创建前为空失败,信息:{ex.Message},堆栈:{ex.StackTrace}");
                }

                try
                {
                    //创建root节点
                    using (var root = Registry.ClassesRoot.CreateSubKey(rootName))
                    {
                        //打开root节点,并写入相关信息
                        root.SetValue("", protocolName ?? "Custome Protocol");
                        root.SetValue("URL Protocol", appPath);
                    }

                    //创建root->shell子节点
                    using (Registry.ClassesRoot.CreateSubKey($@"{rootName}\shell")) { };

                    //创建root->shell->open子节点
                    using (Registry.ClassesRoot.CreateSubKey($@"{rootName}\shell\open")) { };

                    //打开open子节点
                    using (var open = Registry.ClassesRoot.OpenSubKey($@"{rootName}\shell\open", true))
                    {
                        //创建root->shell->open->command子节点
                        using (var command = open.CreateSubKey("command"))
                        {
                            //写入command子节点值相关的值 %1代表appPath对应的winform程序中的Main(string[] args)可以接收到%1传递的值
                            //%1的值是通过网页上给定 格式是  root节点的名称:网页需要传递的参数
                            //这样args就能接收到网页传递的参数
                            command.SetValue(@"", "\"" + appPath + "\" \" %1\"");
                        }
                    }
                    MessageBox.Show("注册表写入成功");
                }
                catch (Exception ex)
                {
                    MessageBox.Show($"注册表写入失败,信息:{ex.Message},堆栈:{ex.StackTrace}");
                }
            }
            else
            {
                MessageBox.Show($"注册表写入失败,未找到应用路径:{appPath}");
            }
        }
    }
为啥么要这么写注册表,参考网页唤起Winform窗体通过非IE浏览器
接着编辑上面新增的安装程序类,代码如下
    [RunInstaller(true)]
    public partial class Installer : System.Configuration.Install.Installer
    {
        public Installer()
        {
            InitializeComponent();
            AfterInstall += new InstallEventHandler((object sender, InstallEventArgs e) => {
                var path = Context.Parameters["targetdir"]; //从vs Installer中获取用户选择的安装路径
                RegistryVisitor.Register("WinformsCustomInstall", $"{path}\\WinformsCustomInstall.exe", "WinformsCustomInstallProtocol");
            });
        }
    }
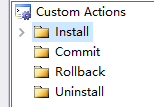
这段代码控制安装完毕之后,执行写入注册表操作(当然如果有别的需求也可以通过这种方式,自行扩展).但是这里需要注意的是如何获取Vs Installer中用户自行选择的安装路径.这里需要回到Winform 安装工具之Vs Installer 首先给Application Folder添加安装程序类所在的类库为主输出.接着 右键Set Up项目添加自定义操作,如下图

接着右键Install,添加自定义操作

然后选择刚刚添加到Application Folder的安装程序类所在的类库的主输出

添加成功之后的界面如图所示

最后右键主输出,打开属性窗口输入以下代码
/targetdir="[TARGETDIR]/"

这样安装程序类就可以访问到用户选择的自定义安装路径,并完成注册表的写入,整个流程到这里完成.
分类:
.Net / Winforms


【推荐】国内首个AI IDE,深度理解中文开发场景,立即下载体验Trae
【推荐】编程新体验,更懂你的AI,立即体验豆包MarsCode编程助手
【推荐】抖音旗下AI助手豆包,你的智能百科全书,全免费不限次数
【推荐】轻量又高性能的 SSH 工具 IShell:AI 加持,快人一步
· winform 绘制太阳,地球,月球 运作规律
· 超详细:普通电脑也行Windows部署deepseek R1训练数据并当服务器共享给他人
· 上周热点回顾(3.3-3.9)
· TypeScript + Deepseek 打造卜卦网站:技术与玄学的结合
· AI 智能体引爆开源社区「GitHub 热点速览」
2018-12-13 Identity Server4学习系列二之令牌(Token)的概念
2018-12-13 Identity Server4学习系列一