Es 集群搭建及相关配置和相关参数解读
参考文档:
https://www.elastic.co/guide/en/elasticsearch/reference/8.3/index.html
https://www.elastic.co/guide/en/elasticsearch/reference/8.3/important-settings.html
https://www.elastic.co/guide/en/elasticsearch/reference/8.3/advanced-configuration.html#set-jvm-options
本文主要介绍elasticsearch-8.3.2 集群安装 -简易版教程
1、JVM相关配置
参考:https://www.elastic.co/guide/en/elasticsearch/reference/8.3/advanced-configuration.html#set-jvm-options
(1)、配置JVM内存
官方建议:Set Xms and Xmx to no more than 50% of your total memory. Elasticsearch requires memory for purposes other than the JVM heap. For example, Elasticsearch uses off-heap buffers for efficient network communication and relies on the operating system’s filesystem cache for efficient access to files. The JVM itself also requires some memory. It’s normal for Elasticsearch to use more memory than the limit configured with the Xmx setting.
修改jvm.options文件在config目录下,调整以下参数:
-Xms2g
-Xmx2g
这里设为2g得原因是,本地内存不太够.
2、集群配置
(1)、集群名称
官方介绍:A node can only join a cluster when it shares its cluster.name with all the other nodes in the cluster. The default name is elasticsearch, but you should change it to an appropriate name that describes the purpose of the cluster.
修改elasticsearch.yml文件在config目录下,调整以下参数:
cluster.name: test_cluster
3、集群节点配置
(1)、节点名称
官方介绍:
Elasticsearch uses node.name as a human-readable identifier for a particular instance of Elasticsearch. This name is included in the response of many APIs. The node name defaults to the hostname of the machine when Elasticsearch starts, but can be configured explicitly in elasticsearch.yml:
修改elasticsearch.yml文件在config目录下,调整以下参数:
node.name: node-1
4、集群网络配置
(1)、network.host 设置
官方介绍:
(Static) Sets the address of this node for both HTTP and transport traffic. The node will bind to this address and will also use it as its publish address. Accepts an IP address, a hostname, or a special value.
注意以下官方说明:
By default, Elasticsearch only binds to loopback addresses such as 127.0.0.1 and [::1]. This is sufficient to run a cluster of one or more nodes on a single server for development and testing, but a resilient production cluster must involve nodes on other servers. There are many network settings but usually all you need to configure is network.host:
When you provide a value for network.host, Elasticsearch assumes that you are moving from development mode to production mode, and upgrades a number of system startup checks from warnings to exceptions. See the differences between development and production modes.
修改elasticsearch.yml文件在config目录下,调整以下参数:
network.host: 0.0.0.0
(4)、http.port设置
官方介绍:
(Static) The port to bind for HTTP client communication. Accepts a single value or a range. If a range is specified, the node will bind to the first available port in the range.
Defaults to 9200-9300.
修改elasticsearch.yml文件在config目录下,增加以下参数:
http.port: 9200
注:不设置,默认是9200
(5)、transport.port设置
官方介绍:
(Static) The port to bind for communication between nodes. Accepts a single value or a range. If a range is specified, the node will bind to the first available port in the range. Set this setting to a single port, not a range, on every master-eligible node.
Defaults to 9300-9400.
修改elasticsearch.yml文件在config目录下,调整以下参数:
transport.port: 9300
5、集群发现相关配置
官方介绍:Configure two important discovery and cluster formation settings before going to production so that nodes in the cluster can discover each other and elect a master node.
(1)、discovery.seed_hosts
官方介绍:
Out of the box, without any network configuration, Elasticsearch will bind to the available loopback addresses and scan local ports 9300 to 9305 to connect with other nodes running on the same server. This behavior provides an auto-clustering experience without having to do any configuration.
When you want to form a cluster with nodes on other hosts, use the static discovery.seed_hosts setting. This setting provides a list of other nodes in the cluster that are master-eligible and likely to be live and contactable to seed the discovery process. This setting accepts a YAML sequence or array of the addresses of all the master-eligible nodes in the cluster. Each address can be either an IP address or a hostname that resolves to one or more IP addresses via DNS.
修改elasticsearch.yml文件在config目录下,调整以下参数:
discovery.seed_hosts: ["127.0.0.1:9300", "172.18.100.231:9300"]
(2)、cluster.initial_master_nodes
官方介绍:
When you start an Elasticsearch cluster for the first time, a cluster bootstrapping step determines the set of master-eligible nodes whose votes are counted in the first election. In development mode, with no discovery settings configured, this step is performed automatically by the nodes themselves.
Because auto-bootstrapping is inherently unsafe, when starting a new cluster in production mode, you must explicitly list the master-eligible nodes whose votes should be counted in the very first election. You set this list using the cluster.initial_master_nodes setting.
注意:After the cluster forms successfully for the first time, remove the cluster.initial_master_nodes setting from each node’s configuration. Do not use this setting when restarting a cluster or adding a new node to an existing cluster
修改elasticsearch.yml文件在config目录下,调整以下参数:
cluster.initial_master_nodes: ["node-1", "node-2"]
6、安全相关
(1)、xpack.security.enabled 是否关闭安全模式(开发环境),8.x及之后得版本默认都是开启.
修改elasticsearch.yml文件在config目录下,增加以下参数:
xpack.security.enabled: false
(2)、跨域相关如果用了Head插件
http.cors.enabled: true
http.cors.allow-origin: "*"
这里如果启用跨域相关配置,必须配置下(1),否则会报错,具体原因不清楚.自行百度
7、注意
集群配置时如果遇到失败的情况,每次运行完elasticsearch.bat,必须清楚根目录下得data文件,反之,集群可能会构建失败
8、源码
这里如果需要使用到ik分词器,因为其目前尚未只知道最新版本,所以相关es集群的构建参考ES 中文分词器ik
(1)、JVM相关配置上面有介绍,根据机器配置酌情选择
(2)、node1节点 elasticsearch.yml文件如下
cluster.name: test_cluster
node.name: node-2
network.host: 0.0.0.0
http.port: 9200
transport.port: 9300
http.cors.enabled: true
http.cors.allow-origin: "*"
discovery.seed_hosts: ["127.0.0.1:9300", "172.18.100.231:9300"]
cluster.initial_master_nodes: ["node-1", "node-2"]
xpack.security.enabled: false
(3)、node2节点 elasticsearch.yml文件如下
cluster.name: test_cluster
node.name: node-1
network.host: 172.18.100.231
http.cors.enabled: true
http.cors.allow-origin: "*"
discovery.seed_hosts: ["172.18.100.231:9300","172.18.10.214:9300"]
xpack.security.enabled: false

8、集群健康值
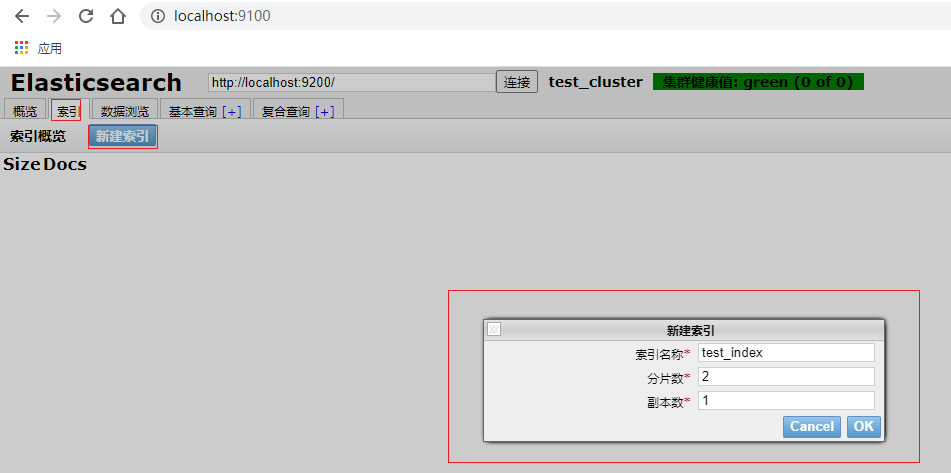
(1)、新建一个索引
打开head页面

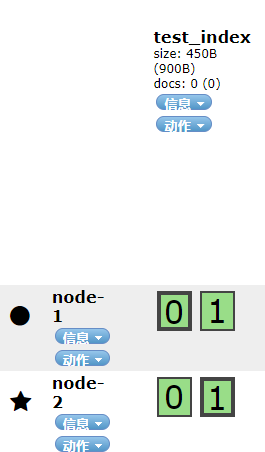
注:这里应为是2节点部署,所以创建2两个分片.一般es最小三节点部署,防止脑裂

创建成功,且集群状态健康.
(2)、如何通过head页面判断集群的健康状态

绿色:代表主分片和副本分片均为健康状态
黄色:代表有至少有一个副本分片不能用,但是所有的主分片可用,ES中的索引数据可以保证完整性.
红色:代表至少有一个主分片不可用,数据不完整,集群不可用.
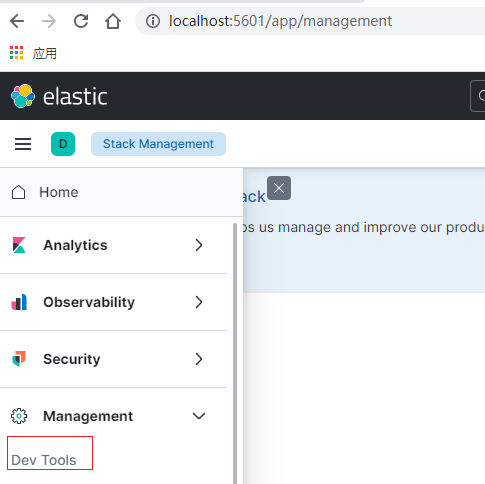
(3)、通过kibana查看集群健康状态
i、进入如下kibana界面

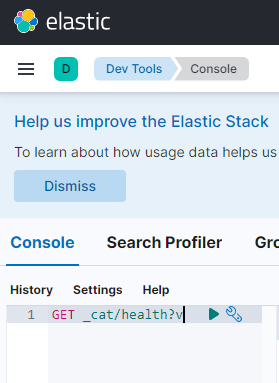
ii、通过Console界面接入iii中的指令

iii、集群健康检查指令如下
GET _cat/health?v
结果如下:

epoch-当前查询的时间戳
timestamp-当前查询的时分秒
注:都是格林尼治时间需要转换成本地时间 一般加8小时
cluster-集群名称
status-集群状态 上面有介绍
node.total-当前集群的所有节点数
node.data-当前集群的数据节点数
注:数据节点只存放数据的节点,

红框中代表是集群的主节点,ES还有如主节点的候选节点、数据节点、转换节点、投票节点等等.
shards-当前集群的分片
pri-当前集群的主分片
relo-当前集群正在迁移中的分片数
注:ES内置分片均衡功能,如果向集群中新增节点,此时为了性能考虑,ES会进行分片迁移功能
init-当前集群正在初始化的分片
注:当前集群中新增索引分配索引分片时,需要一定的时间,这个时候当前新增的分片会处于初始化状态中.
unassign-当前集群未分配的分片数
pending_tasks-主节点等节点挤压得执行任务(如创建索引等任务)
max_task_wait_time-主节点等节点最大任务得等待时间
active_shards_percent-当前集群得活动分片占总分片得百分比


【推荐】国内首个AI IDE,深度理解中文开发场景,立即下载体验Trae
【推荐】编程新体验,更懂你的AI,立即体验豆包MarsCode编程助手
【推荐】抖音旗下AI助手豆包,你的智能百科全书,全免费不限次数
【推荐】轻量又高性能的 SSH 工具 IShell:AI 加持,快人一步
· TypeScript + Deepseek 打造卜卦网站:技术与玄学的结合
· Manus的开源复刻OpenManus初探
· 三行代码完成国际化适配,妙~啊~
· .NET Core 中如何实现缓存的预热?
· 如何调用 DeepSeek 的自然语言处理 API 接口并集成到在线客服系统
2016-07-19 JavaScript之对象学习
2016-07-19 JavaScript之数组学习