基于face_recognition实现的人脸识别功能
环境
- Python 3.11.8
- dlib == 19.24.4
- opencv-python == 4.9.0.80
- numpy == 1.26.4
- face_recognition == 1.3.0
通过本地图片采集人脸编码
import os
import cv2
import face_recognition
encode_list = []
image_field_path = os.path.join('.', 'images')
images_file_list = os.listdir(image_field_path)

for img_file in images_file_list:  # 获取每张人像的名称
    img_path = os.path.join(image_field_path, img_file)
    cv2_img = cv2.imread(img_path)
    # 判断图片中是否存在人脸
    img_location = face_recognition.face_locations(cv2_img)
    if not img_location:
        continue
    # 计算图片编码,多次编码可通过num_jitters设置重复计算次数,所用时间也会相应增加
    face_encode_list = face_recognition.face_encodings(cv2_img)
    # 取人脸列表中的第一张人脸
    encode = face_encode_list[0]
    encode_list.append(encode)
通过摄像头采集人脸图像
import cv2

# 获取摄像头对象,笔记本内置摄像头0, 外置摄像头为1(多个摄像头未尝试)
cap = cv2.VideoCapture(0)
while True:
    # 循环采集摄像头的每一帧图像
    ret, frame = cap.read()
    # 创建窗口并绘制图像
    cv2.imshow('frame', frame)
    # 设置等待绘制,避免黑框无响应;以及按下按键退出(esc键将ord()改为27)
    if cv2.waitKey(1) & 0xFF == ord('q'):
        break

# 释放摄像头与关闭窗口
cap.release()
cv2.destroyAllWindows()
给人脸绘制绿框
# 获取摄像头对象,笔记本内置摄像头0, 外置摄像头为1(多个摄像头未尝试)
cap = cv2.VideoCapture(0)
while True:
    # 循环采集摄像头的每一帧图像
    ret, frame = cap.read()
    # 按原比例缩放图片,减小计算人脸位置时的时间
    img = cv2.resize(frame, (0, 0), None, 0.25, 0.25)
    # 查找人脸位置
    img_face_locations = face_recognition.face_locations(img)
    for face_location in img_face_locations:
        top, right, bottom, left = face_location
        top, right, bottom, left = top * 3, right * 4, bottom * 4, left * 4
        # 绘制人脸框,调整参数设置框的大小边际
        cv2.rectangle(frame, (left, top + 20), (right, bottom + 10), (0, 255, 0), 1)

    # 创建窗口并绘制图像
    cv2.imshow('frame', frame)
    # 设置等待绘制,避免黑框无响应;以及按下按键退出(esc键将ord()改为27)
    if cv2.waitKey(1) & 0xFF == ord('q'):
        break

# 释放摄像头与关闭窗口
cap.release()
cv2.destroyAllWindows()
计算摄像头捕获的图片与已知图片的欧式距离
# 获取摄像头对象,笔记本内置摄像头0, 外置摄像头为1(多个摄像头未尝试)
cap = cv2.VideoCapture(0)
while True:
    # 循环采集摄像头的每一帧图像
    ret, frame = cap.read()
    # 按原比例缩放图片,减小计算人脸位置时的时间
    img = cv2.resize(frame, (0, 0), None, 0.25, 0.25)
    # 查找人脸位置
    img_face_locations = [face_recognition.face_locations(img)[0]]
    cur_face_encoding = face_recognition.face_encodings(img, img_face_locations)
    for face_location, face_encoding in zip(img_face_locations, cur_face_encoding):
        top, right, bottom, left = face_location
        top, right, bottom, left = top * 3, right * 4, bottom * 4, left * 4
        # 绘制人脸框,调整参数设置框的大小边际
        cv2.rectangle(frame, (left, top + 20), (right, bottom + 10), (0, 255, 0), 1)
        face_dis = face_recognition.face_distance(encode_list, face_encoding)  # 计算欧式距离
        match_index = np.argmin(face_dis)  # face_distance返回face_distance数组中小元素的索引
        print('计算欧式距离:', face_dis[match_index])
        # 一般欧式距离0.3~0.38可以满足业务需求
        if face_dis[match_index] <= 0.3:
            print(f'人脸识别成功')

    # 创建窗口并绘制图像
    cv2.imshow('frame', frame)
    # 设置等待绘制,避免黑框无响应;以及按下按键退出(esc键将ord()改为27)
    if cv2.waitKey(1) & 0xFF == ord('q'):
        break

# 释放摄像头与关闭窗口
cap.release()
cv2.destroyAllWindows()
这样写有一个问题就是每次计算一个人脸的时间需要用掉0.2秒左右,导致显示的时候回很卡,而且延迟也会很高

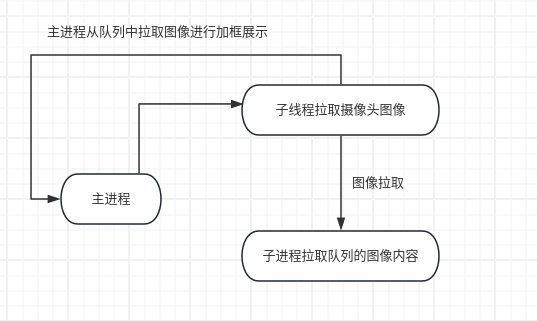
解决延迟掉帧的刀片超车
cv_read_cam.py
import cv2
import queue
import threading


class VideoCapture:
    """Customized VideoCapture, always read latest frame """

    def __init__(self, camera_id, cam_data):
        # "camera_id" is a int type id or string name
        self.cap = cv2.VideoCapture(camera_id)
        print(self.cap.get(cv2.CAP_PROP_FPS))
        self.q = cam_data   # 用于识别人脸
        self.full_q = queue.Queue(maxsize=30)   # 用于前台展示画面
        self.stop_threads = False  # to gracefully close sub-thread
        th = threading.Thread(target=self._reader)
        th.daemon = True  # 设置工作线程为后台运行
        th.start()

    # 实时读帧,只保存最后一帧
    def _reader(self):
        while not self.stop_threads:
            ret, frame = self.cap.read()
            if not ret:
                break
            self.full_q.put((ret, frame))
            frame = cv2.resize(frame, (0, 0), None, 0.25, 0.25)
            if not self.q.empty():
                try:
                    self.q.get_nowait()
                except queue.Empty:
                    pass
            self.q.put((ret, frame))

    def read(self):
        return self.q.get()

    def full_read(self):
        return self.full_q.get()

    def terminate(self):
        self.stop_threads = True
        self.cap.release()
cv_cam.py
import math
import multiprocessing
import os
import time

import cv2
import face_recognition
import numpy as np

from cv_read_cam import VideoCapture

path = 'images'  # 人像存储位置
className = []
myList = os.listdir(path)  # 返回指定文件目录下的列表,这里返回的是人像图片
encodeList = []   # 储存读取的人脸信息


for cl in myList:  # 获取每张人像的名称
    img_path = os.path.join(path, cl)
    curImg = cv2.imread(os.path.join(path, cl))
    curFaceEncodeList = face_recognition.face_encodings(curImg)
    if len(curFaceEncodeList) == 0:
        continue
    encode = curFaceEncodeList[0]
    encodeList.append(encode)
    className.append(os.path.splitext(cl)[0])

encodeListKnown = encodeList
print('encoding complete')

cam_data = multiprocessing.Queue(maxsize=1)
cap = VideoCapture(0, cam_data)

def cvtFaceModel(cam_data, encodeListKnown, className):
    while True:
        ret, img = cam_data.get()

        t1 = time.time()
        faceCurFrame = face_recognition.face_locations(img)  # 获取人脸位置信息
        if not faceCurFrame:
            continue

        t2 = time.time()
        print('计算人脸信息', t2 - t1, end='\t')
        encodesCurFrame = face_recognition.face_encodings(img, faceCurFrame)  # 获取人脸编码
        print('计算人脸编码', time.time() - t2)

        for encodeFace, faceLoc in zip(encodesCurFrame, faceCurFrame):  # zip函数,连接成字典
            # matches = face_recognition.compare_faces(encodeListKnown, encodeFace)  # 人脸匹配
            faceDis = face_recognition.face_distance(encodeListKnown, encodeFace)  # 欧式距离
            matchIndex = np.argmin(faceDis)  # face_distance返回face_distance数组中小元素的索引
            print('计算欧式距离:', faceDis[matchIndex])
            if faceDis[matchIndex] <= 0.38:
                name = className[matchIndex]
                print(f'人脸识别成功:{name}')

                time.sleep(2)


process = multiprocessing.Process(target=cvtFaceModel, args=(cam_data, encodeListKnown, className))
process.start()

while True:
    fps_t1 = time.time()
    ret, img = cap.full_read()
    if not ret:
        break
    imgs = cv2.resize(img, (0, 0), None, 0.25, 0.25)
    imgs = cv2.cvtColor(imgs, cv2.COLOR_BGR2RGB)
    faceCurFrame = face_recognition.face_locations(imgs)  # 获取人脸位置信息
    for faceLoc in faceCurFrame:
        top, right, bottom, left = faceLoc
        top, right, bottom, left = top * 3, right * 4, bottom * 4, left * 4
        cv2.rectangle(img, (left, top + 20), (right, bottom + 10), (0, 255, 0), 1)
    fps_t2 = time.time()
    # print(fps_t2 - fps_t1)
    cv2.putText(img, '%.2f' % math.ceil(1 / round(fps_t2 - fps_t1, 2)), (10, 30), cv2.FONT_HERSHEY_SIMPLEX, 1, (0, 0, 255), 2)
    cv2.imshow('Video', img)

    if cv2.waitKey(1) & 0xFF == ord('q'):
        break


process.terminate()
cv2.destroyAllWindows()
到这里就彻底完工了,可以通过子进程识别图像并且不影响图片展示的流畅度

 浙公网安备 33010602011771号