SpringCloud Eureka Client和Server侧配置及Eureka高可用配置
一、Eureka注册中心和客户端配置Demo。
1.Server端
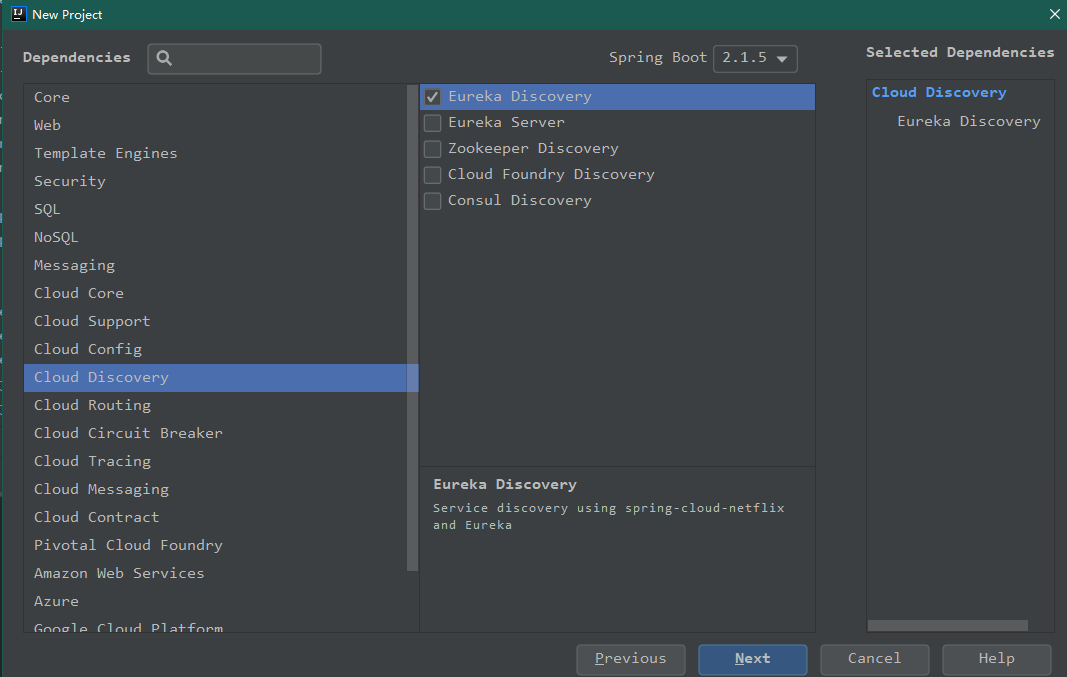
a.使用Idea创建Spring项目,如下所示:


b.相关配置
application.yaml配置文件如下:
# eureka本身也是一个服务,需要eureka当做一个client配置到自身中(如果是单Eureka服务)
eureka:
  client:
    service-url:
      defaultZone: http://localhost:8761/eureka
    # 不在eureka管理页显示
    register-with-eureka: false
  # 配置eureka 主页自主维护告警显示
  server:
    enable-self-preservation: false
spring:
  application:
    name: eureka
server:
  port: 8761
在启动类上增加@EnableEurekaServer注解
2.client
a.使用Idea创建Spring项目,如下:

b.相关配置
application.yaml配置文件如下:
# 将client注册到eureka中
eureka:
  client:
    service-url:
      defaultZone: http://localhost:8761/eureka
  # 在Eureka管理页面上显示的跳转后的hostname
  instance:
    hostname: eurekaClient

spring:
  application:
    name: cilent
在启动类上增加@EnableDiscoveryClient注解
tips:直接创建的Eureka-client启动后自动停止,原因是pom中缺少web模块,需要增加:
<dependency>
            <groupId>org.springframework.boot</groupId>
            <artifactId>spring-boot-starter-web</artifactId>
</dependency>
启动成功后效果如下:

二、Eureka的高可用性
Eureka单服务在使用过程中会出现宕机等异常情况,迫使业务受损,需要配置多个Eureka保证高可用性。
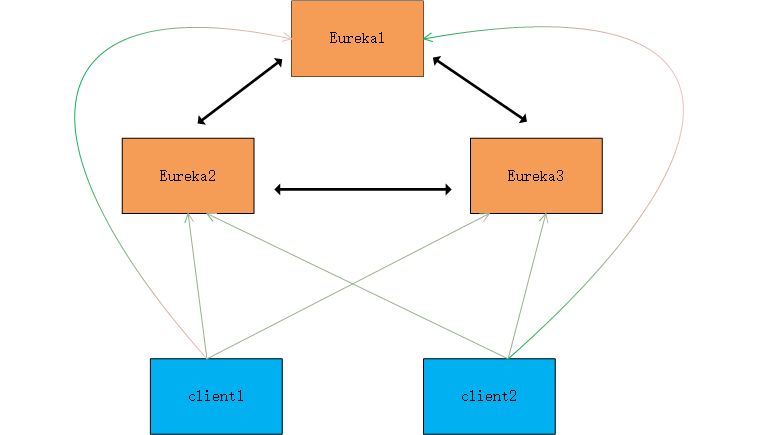
原理图如下,需要多个Eureka之间相互注册,且每个客户端需要在每个Eureka上注册。

配置过程:
1. Eureka之间相互注册。
如:端口为8761的Eureka,注册到:8762,8763上。
defaultZone: http://localhost:8762/eureka,http://localhost:8763/eureka
端口为8762的Eureka,注册到:8761,8763上。
defaultZone: http://localhost:8761/eureka,http://localhost:8763/eureka
端口为8763的Eureka,注册到:8761,8762上。
defaultZone: http://localhost:8761/eureka,http://localhost:8762/eureka
2.client注册到每个Eureka上
client中的配置:
defaultZone: http://localhost:8761/eureka,http://localhost:8762/eureka,http://localhost:8763/eureka


