ROS学习笔记(7)——多点导航——sendmark.py详解
一、原代码:
  1 #!/usr/bin/env python
  2 # encoding: utf-8
  3
  4 from visualization_msgs.msg import Marker
  5 from visualization_msgs.msg import MarkerArray
  6 import rospy
  7 import math
  8 from geometry_msgs.msg import PointStamped, PoseStamped
  9 import actionlib
 10 from move_base_msgs.msg import *
 11
 12 #到达目标点成功或失败的回调函数,输入参数:[3:成功, 其它:失败](4:ABORTED)
 13 def pose_callback(msg):
 14     global try_again, index, try_again, index
 15     if msg.status.status == 3 and count>0 :  #成功到达任意目标点,前往下一目标点
 16         try_again = 1 #允许再次尝试前往尚未抵达的该目标点
 17
 18         #count表示当前目标点计数,index表示已完成的目标点计数
 19         if index == count:                   #当index等于count时,表示所有目标点完成,重新开始巡航
 20             print ('Reach the target point '+str(index-1)+'.')
 21             if count>1: print 'Complete instructions!' #只有一个目标点不算巡航
 22             index = 0;
 23             pose = PoseStamped()
 24             pose.header.frame_id = 'map'
 25             pose.header.stamp = rospy.Time.now()
 26             pose.pose.position.x = markerArray.markers[index].pose.position.x
 27             pose.pose.position.y = markerArray.markers[index].pose.position.y
 28             pose.pose.orientation.z = 0
 29             pose.pose.orientation.w = 1
 30             goal_pub.publish(pose)
 31             index += 1 #下一次要发布的目标点序号
 32         elif index < count:                   #当index小于count时,表示还未完成所有目标点,目标巡航未完成
 33             print ('Reach the target point '+str(index-1)+'.')
 34             pose = PoseStamped()
 35             pose.header.frame_id = 'map'
 36             pose.header.stamp = rospy.Time.now()
 37             pose.pose.position.x = markerArray.markers[index].pose.position.x
 38             pose.pose.position.y = markerArray.markers[index].pose.position.y
 39             pose.pose.orientation.z = 0
 40             pose.pose.orientation.w = 1
 41             goal_pub.publish(pose)
 42             index += 1 #下一次要发布的目标点序号
 43
 44     elif count>0: #未抵达设定的目标点
 45         rospy.logwarn('Can not reach the target point '+str(index-1)+'.')
 46
 47         #如果未尝试过前往尚未抵达的目标点,则尝试前往尚未抵达的目标点
 48         if try_again == 1:
 49             rospy.logwarn('trying reach the target point '+str(index-1)+' again!')
 50             pose = PoseStamped()
 51             pose.header.frame_id = 'map'
 52             pose.header.stamp = rospy.Time.now()
 53             pose.pose.position.x = markerArray.markers[index - 1].pose.position.x
 54             pose.pose.position.y = markerArray.markers[index - 1].pose.position.y
 55             pose.pose.orientation.z = 0
 56             pose.pose.orientation.w = 1
 57             goal_pub.publish(pose)
 58             try_again = 0 #不允许再次尝试前往尚未抵达的该目标点
 59
 60         #如果已经尝试过前往尚未抵达的目标点,则前往下一个目标点
 61         elif index < len(markerArray.markers):      #若还未完成目标点
 62             rospy.logwarn('try reach the target point '+str(index-1)+' failed! reach next point.')
 63             if index==count: index=0 #如果下一个目标点序号为count,说明当前目标点为最后一个目标点,下一个目标点序号应该设置为0
 64             pose = PoseStamped()
 65             pose.header.frame_id = 'map'
 66             pose.header.stamp = rospy.Time.now()
 67             pose.pose.position.x = markerArray.markers[index].pose.position.x
 68             pose.pose.position.y = markerArray.markers[index].pose.position.y
 69             pose.pose.orientation.z = 0
 70             pose.pose.orientation.w = 1
 71             goal_pub.publish(pose)
 72             index += 1 #下一次要发布的目标点序号
 73             try_again = 1 #允许再次尝试前往尚未抵达的该目标点
 74
 75 #rviz内标记按下的回调函数,输入参数:按下的位置[x, y, z=0]
 76 def press_callback(msg):
 77     global index, count
 78
 79     print('Add a new target point '+str(count)+'.')
 80     marker = Marker()      #创建marker对象
 81     marker.header.frame_id = 'map' #以哪一个TF坐标为原点
 82     marker.type = marker.TEXT_VIEW_FACING #一直面向屏幕的字符格式
 83     marker.action = marker.ADD #添加marker
 84     marker.scale.x = 1 #marker大小
 85     marker.scale.y = 1 #marker大小
 86     marker.scale.z = 1 #marker大小,对于字符只有z起作用
 87     marker.color.a = 1 #字符透明度
 88     marker.color.r = 1 #字符颜色R(红色)通道
 89     marker.color.g = 0 #字符颜色G(绿色)通道
 90     marker.color.b = 0 #字符颜色B(蓝色)通道
 91     marker.pose.position.x = msg.point.x #字符位置
 92     marker.pose.position.y = msg.point.y #字符位置
 93     marker.pose.position.z = msg.point.z #字符位置
 94     marker.text = str(count) #字符内容
 95     markerArray.markers.append(marker) #添加元素进数组
 96
 97     #markers的id不能一样,否则rviz只会识别最后一个元素
 98     id = 0
 99     for m in markerArray.markers:    #遍历marker分别给id赋值
100         m.id = id
101         id += 1
102
103     mark_pub.publish(markerArray) #发布markerArray,rviz订阅并进行可视化
104
105     #第一次添加marker时直接发布目标点
106     if count == 0:
107         pose = PoseStamped() #创建目标点对象
108         pose.header.frame_id = 'map' #以哪一个TF坐标为原点
109         pose.header.stamp = rospy.Time.now()
110         pose.pose.position.x = msg.point.x #目标点位置
111         pose.pose.position.y = msg.point.y #目标点位置
112         pose.pose.orientation.z = 0 #四元数,到达目标点后小车的方向,z=sin(angle/2)
113         pose.pose.orientation.w = 1 #四元数,到达目标点后小车的方向,w=cos(angle/2)
114         goal_pub.publish(pose)
115         index += 1 #下一次要发布的目标点序号
116
117     count += 1 #有几个目标点
118
119 def send_mark():
120     global markerArray, count, index, try_again, mark_pub, goal_pub
121     markerArray = MarkerArray() #目标点标记数组
122     count = 0
123     index = 0
124     try_again = 1
125     rospy.init_node('path_point_demo') #初始化节点
126     mark_pub = rospy.Publisher('/path_point', MarkerArray, queue_size = 100) #用于发布目标点标记
127     click_sub = rospy.Subscriber('/clicked_point', PointStamped, press_callback) #订阅rviz内标记按下的位置
128     goal_pub = rospy.Publisher('/move_base_simple/goal', PoseStamped, queue_size = 1) #用于发布目标点
129     goal_status_sub = rospy.Subscriber('/move_base/result', MoveBaseActionResult, pose_callback) #用于订阅是否到达目标点状态
130     rospy.spin()
131
132 if __name__ == '__main__':
133     send_mark()
二、引用相关功能包
from visualization_msgs.msg import Marker  #引入RVIZ可视化功能包的Marker标记消息
from visualization_msgs.msg import MarkerArray  #标记数组
import rospy  #Python的ROS库
import math  #浮点数数学运算函数模块
from geometry_msgs.msg import PointStamped, PoseStamped  #几何基元功能包(点、矢量、姿势)的点坐标定义、姿态消息定义
import actionlib  #service/client功能包
from move_base_msgs.msg import *  #路径规划功能包
from…import * 语句与 import 区别
import 导入模块,相当于导入文件夹,相对路径。
from import 导入模块中的函数,相当于导入文件夹中的文件,绝对路径
import A import* 直接使用A里面的所有function,class
三、主函数
if __name__ == '__main__':
    send_mark()#执行函数
if __name__ == '__main__' :的作用
if __name__=="__main__": 语句之前和之后的代码都被执行。
import 执行.py文件则只执行语句之后的代码。
四、send_mark函数
def send_mark():
    global markerArray, count, index, try_again, mark_pub, goal_pub  #全局变量声明
    markerArray = MarkerArray() #创建目标点标记数组
    count = 0  #当前目标点
    index = 0  #正在前往目标点
    try_again = 1  #前往目标点失败标志位
    rospy.init_node('path_point_demo') #初始化节点 在navigation.launch里面重命名为了:send_mark
    mark_pub = rospy.Publisher('/path_point', MarkerArray, queue_size = 100) #用于发布目标点标记
    click_sub = rospy.Subscriber('/clicked_point', PointStamped, press_callback) #订阅rviz内标记按下的位置
    goal_pub = rospy.Publisher('/move_base_simple/goal', PoseStamped, queue_size = 1) #用于发布目标点
    goal_status_sub = rospy.Subscriber('/move_base/result', MoveBaseActionResult, pose_callback) #用于订阅是否到达目标点状态
    rospy.spin()
ROS Publishers 发布者
pub1 = rospy.Publisher(“/topic_name”, message_type, queue_size=size)
/topic_name表示发布者向这个topic发布消息。
message_type表示发布到话题中消息的类型。
同步:
意味着发布者试图向一个话题发布消息,但是会发生阻塞,如果该话题被另一个发布者发布消息。在这种情况下,第二个发布者被阻塞直到第一个发布者连续发布所有消息到缓存并且写到各个话题的订阅者。默认情况下,queue_size参数没有使用或者设置为None,rospy.Publisher默认以同步发送消息。
异步:
意味着发布者可以存储消息直到消息可以发送。如果发布的消息超过队列大小,最早的消息将被丢弃。队列大小通过queue_size参数设置.
ROS Subscriber 订阅者
sub1 = rospy.Subscriber(“/topic_name”, message_type, callback_function)
“/ topic_name”表示订阅者应该订阅哪个主题。
message_type 是在 “/ topic_name”上发布的消息的类型。
callback_function回调函数是为每个传入消息调用的函数的名称。每次收到消息时,它都会作为参数传递给callback_function。
通常,此功能在您的节点中定义,以对传入数据执行有用的操作。请注意,与服务处理函数不同,callback_function不需要返回任何内容。
rospy.spin()
ROS消息回调处理函数,循环,等待订阅,接收订阅消息后,执行该函数,调用消息,当订阅话题之后执行相应的回调函数。
五、press_callback(msg):RVIZ内标记按下的回调函数
def press_callback(msg):
    global index, count

    print('Add a new target point '+str(count)+'.')
    marker = Marker()      #创建marker对象,RVIZ显示的数字
    marker.header.frame_id = 'map' #以哪一个TF坐标为原点 已知click_point已map为原点
    marker.type = marker.TEXT_VIEW_FACING #一直面向屏幕的字符格式
    marker.action = marker.ADD #添加marker
    marker.scale.x = 1 #marker大小
    marker.scale.y = 1 #marker大小
    marker.scale.z = 1 #marker大小,对于字符只有z起作用 字符的倍数
    marker.color.a = 1 #字符透明度 0-1之间设置
    marker.color.r = 1 #字符颜色R(红色)通道
    marker.color.g = 0 #字符颜色G(绿色)通道
    marker.color.b = 0 #字符颜色B(蓝色)通道
    marker.pose.position.x = msg.point.x #字符位置
    marker.pose.position.y = msg.point.y #字符位置
    marker.pose.position.z = msg.point.z #字符位置
    marker.text = str(count) #字符内容
    markerArray.markers.append(marker) #添加元素进数组

    #markers的id不能一样,否则rviz只会识别最后一个元素
    id = 0
    for m in markerArray.markers:    #遍历marker分别给id赋值
        m.id = id
        id += 1

    mark_pub.publish(markerArray) #发布markerArray,rviz订阅并进行可视化

    #第一次添加marker时直接发布目标点
    if count == 0:
        pose = PoseStamped() #创建目标点对象
        pose.header.frame_id = 'map' #以哪一个TF坐标为原点
        pose.header.stamp = rospy.Time.now()#时间戳设置为当前时间
        pose.pose.position.x = msg.point.x #目标点位置
        pose.pose.position.y = msg.point.y #目标点位置
        pose.pose.orientation.z = 0 #四元数,到达目标点后小车的方向,z=sin(angle/2)
        pose.pose.orientation.w = 1 #四元数,到达目标点后小车的方向,w=cos(angle/2)
        goal_pub.publish(pose) #目标点发布
        index += 1 #下一次要发布的目标点序号

    count += 1 #有几个目标点
输入参数:按下的位置[x, y, z=0]
设置四元数的Z\W可改变其到达目标点的方向,确定angle(原点方向逆时针旋转)计算既可。
六、pose_callback(msg):到达目标点成功/失败的回调函数
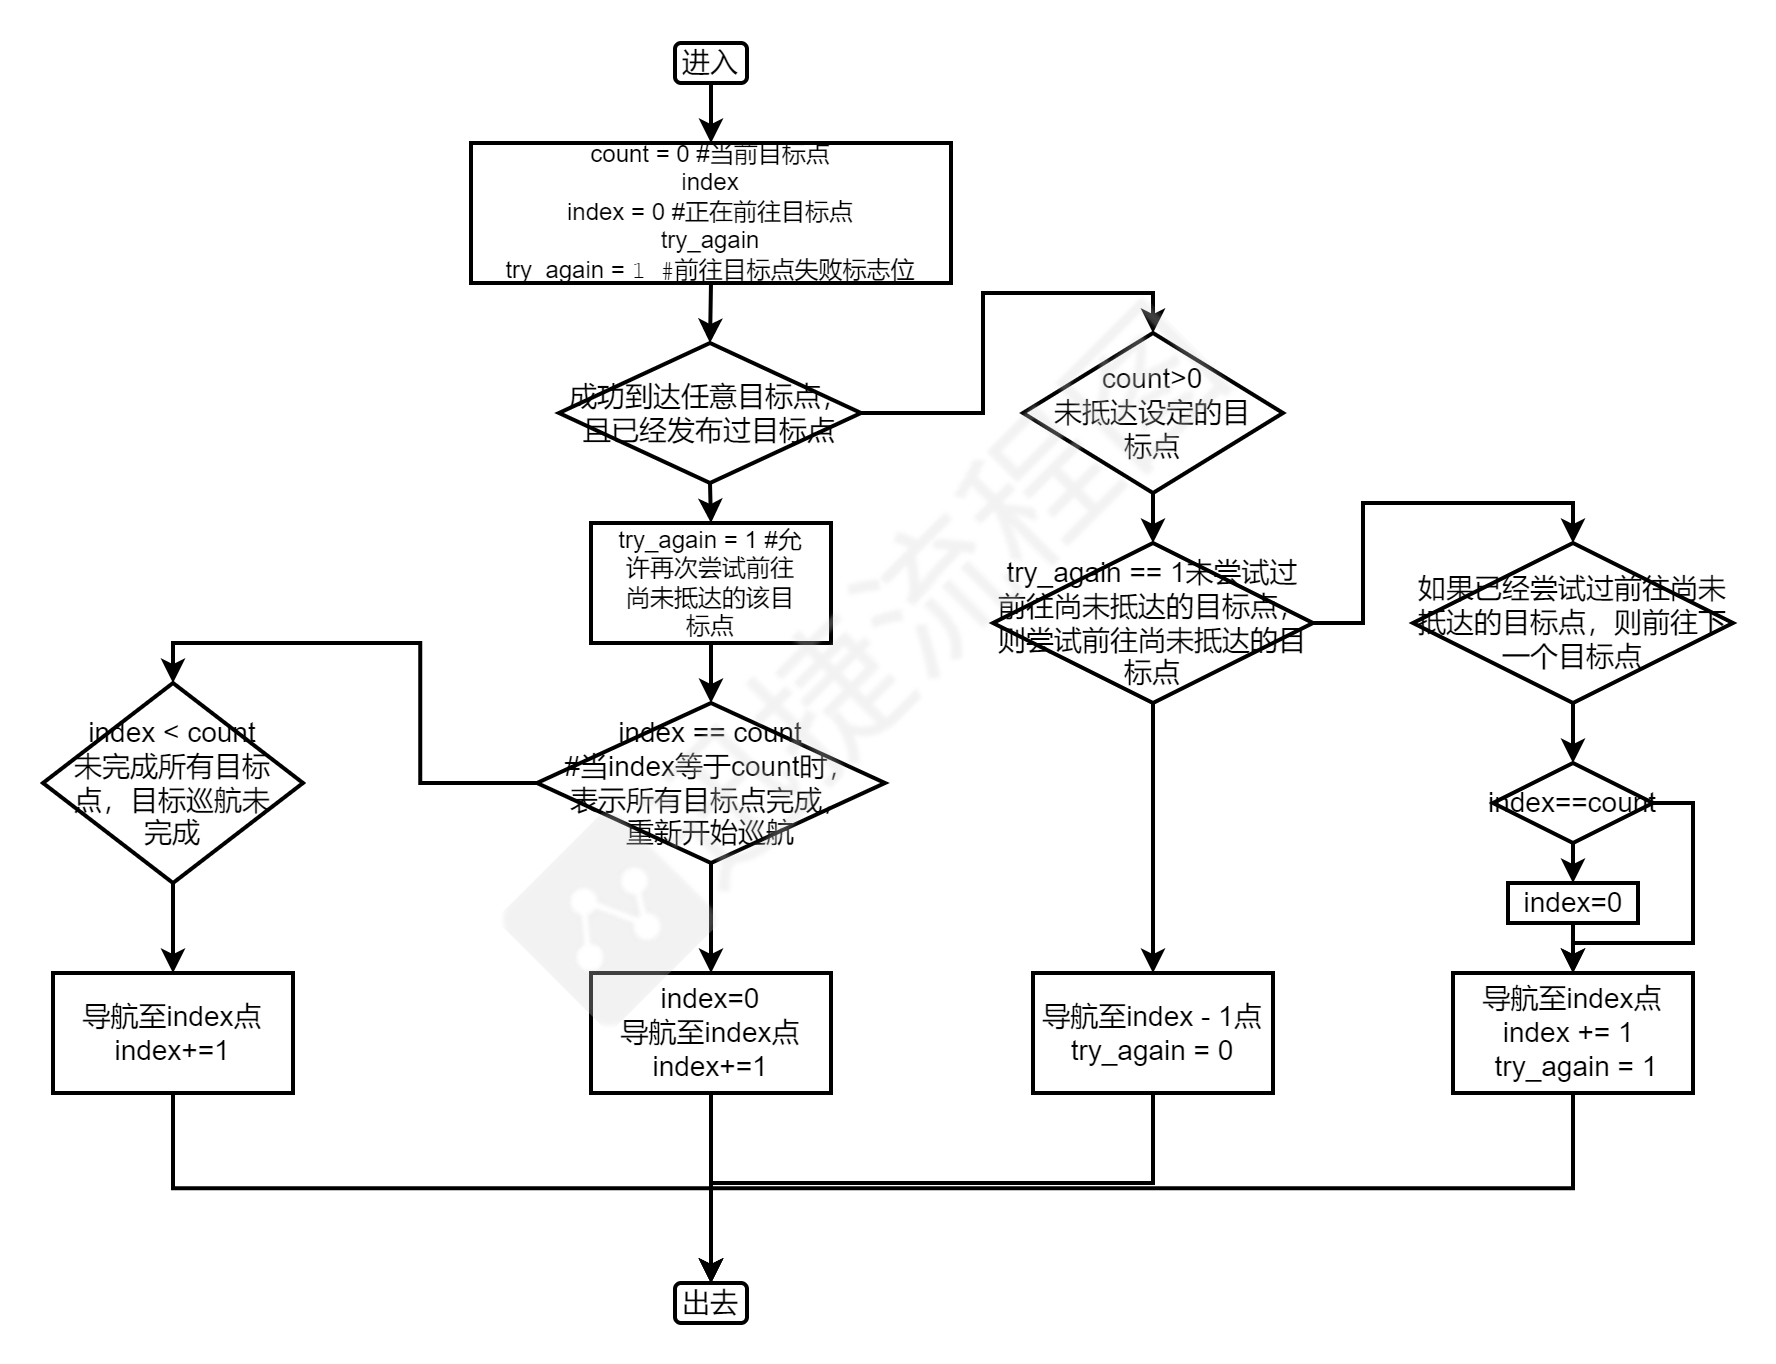
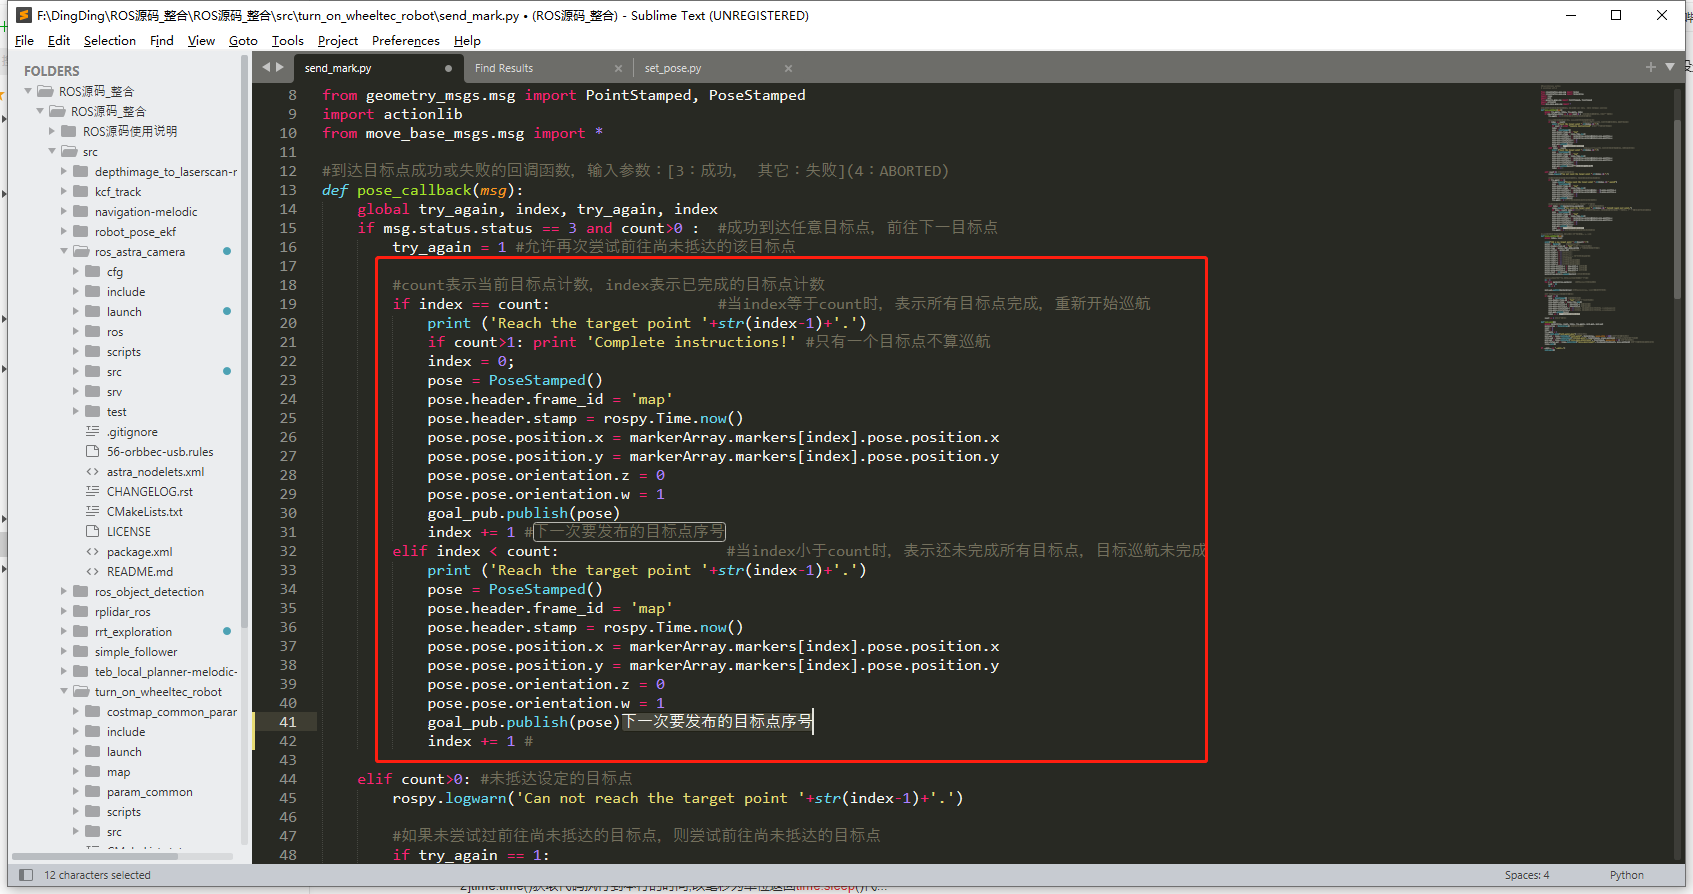
def pose_callback(msg):
    global try_again, index, try_again, index
    if msg.status.status == 3 and count>0 :  #成功到达任意目标点,且已经发布过目标点,前往下一目标点
        try_again = 1 #允许再次尝试前往尚未抵达的该目标点

        #count表示当前目标点计数,index表示已完成的目标点计数
        if index == count:                   #当index等于count时,表示所有目标点完成,重新开始巡航
            print ('Reach the target point '+str(index-1)+'.')
            if count>1: print 'Complete instructions!' #只有一个目标点不算巡航
            index = 0;
            pose = PoseStamped()
            pose.header.frame_id = 'map'
            pose.header.stamp = rospy.Time.now()
            pose.pose.position.x = markerArray.markers[index].pose.position.x
            pose.pose.position.y = markerArray.markers[index].pose.position.y
            pose.pose.orientation.z = 0
            pose.pose.orientation.w = 1
            goal_pub.publish(pose)
            index += 1 #下一次要发布的目标点序号
        elif index < count:                   #当index小于count时,表示还未完成所有目标点,目标巡航未完成
            print ('Reach the target point '+str(index-1)+'.')
            pose = PoseStamped()
            pose.header.frame_id = 'map'
            pose.header.stamp = rospy.Time.now()
            pose.pose.position.x = markerArray.markers[index].pose.position.x
            pose.pose.position.y = markerArray.markers[index].pose.position.y
            pose.pose.orientation.z = 0
            pose.pose.orientation.w = 1
            goal_pub.publish(pose)
            index += 1 #下一次要发布的目标点序号

    elif count>0: #未抵达设定的目标点
        rospy.logwarn('Can not reach the target point '+str(index-1)+'.')

        #如果未尝试过前往尚未抵达的目标点,则尝试前往尚未抵达的目标点
        if try_again == 1:
            rospy.logwarn('trying reach the target point '+str(index-1)+' again!')
            pose = PoseStamped()
            pose.header.frame_id = 'map'
            pose.header.stamp = rospy.Time.now()
            pose.pose.position.x = markerArray.markers[index - 1].pose.position.x
            pose.pose.position.y = markerArray.markers[index - 1].pose.position.y
            pose.pose.orientation.z = 0
            pose.pose.orientation.w = 1
            goal_pub.publish(pose)
            try_again = 0 #不允许再次尝试前往尚未抵达的该目标点

        #如果已经尝试过前往尚未抵达的目标点,则前往下一个目标点
        elif index < len(markerArray.markers):      #若还未完成目标点
            rospy.logwarn('try reach the target point '+str(index-1)+' failed! reach next point.')
            if index==count: index=0 #如果下一个目标点序号为count,说明当前目标点为最后一个目标点,下一个目标点序号应该设置为0
            pose = PoseStamped()
            pose.header.frame_id = 'map'
            pose.header.stamp = rospy.Time.now()
            pose.pose.position.x = markerArray.markers[index].pose.position.x
            pose.pose.position.y = markerArray.markers[index].pose.position.y
            pose.pose.orientation.z = 0
            pose.pose.orientation.w = 1
            goal_pub.publish(pose)
            index += 1 #下一次要发布的目标点序号
            try_again = 1 #允许再次尝试前往尚未抵达的该目标点
输入参数:3 成功 其他 失败
七、流程图:
八、程序设计改进
如果想要实现不使用rviz,让小车到一个点停留二十秒,然后再前往另一点停留二十秒,应该如何操作?
想要做到延迟20秒的话在多点导航的文件中修改,当抵达一个目标点时,加上延迟time.sleep()函数进行延迟就可以做到了
多点导航可设置目标点方向的方法
替换掉原来的多点导航文件【src/turn_on_wheeltec_robot/send_mark.py】
启动导航后,打开rviz,编辑【2D NavolGoal】发布的话题名称为【/send_mark_goal】,然后使用【2D NavolGoal】进行多点导航即可。


#!/usr/bin/env python
# encoding: utf-8

from visualization_msgs.msg import Marker
from visualization_msgs.msg import MarkerArray
import rospy
import math
from geometry_msgs.msg import PointStamped, PoseStamped
import actionlib
from move_base_msgs.msg import *
import sys, select, termios, tty

#到达目标点成功或失败的回调函数,输入参数:[3:成功, 其它:失败](4:ABORTED)
def pose_callback(msg):
    global try_again, index, try_again, index
    if msg.status.status == 3 and count>0 :  #成功到达任意目标点,前往下一目标点
        try_again = 1 #允许再次尝试前往尚未抵达的该目标点

        #count表示当前目标点计数,index表示已完成的目标点计数
        if index == count:                   #当index等于count时,表示所有目标点完成,重新开始巡航
            print ('Reach the target point '+str(index-1)+':')
            print('x:'+str(markerArray.markers[index-1].pose.position.x)+
                ', y:'+str(markerArray.markers[index-1].pose.position.y)+
                ', z:'+str(markerArray.markers[index-1].pose.orientation.z)+
                ', w:'+str(markerArray.markers[index-1].pose.orientation.w))

            if count>1: print 'Complete instructions!' #只有一个目标点不算巡航
            index = 0;
            pose = PoseStamped()
            pose.header.frame_id = 'map'
            pose.header.stamp = rospy.Time.now()
            pose.pose.position.x = markerArray.markers[index].pose.position.x
            pose.pose.position.y = markerArray.markers[index].pose.position.y
            pose.pose.orientation.z = markerArray.markers[index].pose.orientation.z
            pose.pose.orientation.w = markerArray.markers[index].pose.orientation.w
            goal_pub.publish(pose)
            index += 1 #下一次要发布的目标点序号

        elif index < count:                   #当index小于count时,表示还未完成所有目标点,目标巡航未完成
            print ('Reach the target point '+str(index-1)+':')
            print('x:'+str(markerArray.markers[index-1].pose.position.x)+
                ', y:'+str(markerArray.markers[index-1].pose.position.y)+
                ', z:'+str(markerArray.markers[index-1].pose.orientation.z)+
                ', w:'+str(markerArray.markers[index-1].pose.orientation.w))

            pose = PoseStamped()
            pose.header.frame_id = 'map'
            pose.header.stamp = rospy.Time.now()
            pose.pose.position.x = markerArray.markers[index].pose.position.x
            pose.pose.position.y = markerArray.markers[index].pose.position.y
            pose.pose.orientation.z = markerArray.markers[index].pose.orientation.z
            pose.pose.orientation.w = markerArray.markers[index].pose.orientation.w
            goal_pub.publish(pose)
            index += 1 #下一次要发布的目标点序号

    elif count>0: #未抵达设定的目标点
        rospy.logwarn('Can not reach the target point '+str(index-1)+':'+'\r\n'+
                      'x:'+str(markerArray.markers[index-1].pose.position.x)+
                    ', y:'+str(markerArray.markers[index-1].pose.position.y)+
                    ', z:'+str(markerArray.markers[index-1].pose.orientation.z)+
                    ', w:'+str(markerArray.markers[index-1].pose.orientation.w))

        #如果未尝试过前往尚未抵达的目标点,则尝试前往尚未抵达的目标点
        if try_again == 1:
            rospy.logwarn('trying reach the target point '+str(index-1)+' again!'+'\r\n'+
                          'x:'+str(markerArray.markers[index-1].pose.position.x)+
                        ', y:'+str(markerArray.markers[index-1].pose.position.y)+
                        ', z:'+str(markerArray.markers[index-1].pose.orientation.z)+
                        ', w:'+str(markerArray.markers[index-1].pose.orientation.w))

            pose = PoseStamped()
            pose.header.frame_id = 'map'
            pose.header.stamp = rospy.Time.now()
            pose.pose.position.x = markerArray.markers[index - 1].pose.position.x
            pose.pose.position.y = markerArray.markers[index - 1].pose.position.y
            pose.pose.orientation.z = markerArray.markers[index-1].pose.orientation.z
            pose.pose.orientation.w = markerArray.markers[index-1].pose.orientation.w
            goal_pub.publish(pose)
            try_again = 0 #不允许再次尝试前往尚未抵达的该目标点

        #如果已经尝试过前往尚未抵达的目标点,则前往下一个目标点
        elif index < len(markerArray.markers):      #若还未完成目标点
            rospy.logwarn('try reach the target point '+str(index-1)+' failed! reach next point:'+'\r\n'+
                          'x:'+str(markerArray.markers[index-1].pose.position.x)+
                        ', y:'+str(markerArray.markers[index-1].pose.position.y)+
                        ', z:'+str(markerArray.markers[index-1].pose.orientation.z)+
                        ', w:'+str(markerArray.markers[index-1].pose.orientation.w))

            if index==count: index=0 #如果下一个目标点序号为count,说明当前目标点为最后一个目标点,下一个目标点序号应该设置为0
            pose = PoseStamped()
            pose.header.frame_id = 'map'
            pose.header.stamp = rospy.Time.now()
            pose.pose.position.x = markerArray.markers[index].pose.position.x
            pose.pose.position.y = markerArray.markers[index].pose.position.y
            pose.pose.orientation.z = markerArray.markers[index].pose.orientation.z
            pose.pose.orientation.w = markerArray.markers[index].pose.orientation.w
            goal_pub.publish(pose)
            index += 1 #下一次要发布的目标点序号
            try_again = 1 #允许再次尝试前往尚未抵达的该目标点

#rviz内NavGoal标记按下的回调函数,输入参数:按下的位置[x, y, z=0]
def navGoal_callback(msg):
    global index, count

    print('Add a new target point '+str(count)+':')
    print('x:'+str(msg.pose.position.x)+
        ', y:'+str(msg.pose.position.y)+
        ', z:'+str(msg.pose.orientation.z)+
        ', w:'+str(msg.pose.orientation.w))

    marker = Marker()      #创建marker对象
    marker.header.frame_id = 'map' #以哪一个TF坐标为原点
    marker.type = marker.ARROW#TEXT_VIEW_FACING #一直面向屏幕的字符格式
    marker.action = marker.ADD #添加marker
    marker.scale.x = 0.5 #marker大小
    marker.scale.y = 0.05 #marker大小
    marker.scale.z = 0.05 #marker大小,对于字符只有z起作用
    marker.color.a = 1 #字符透明度
    marker.color.r = 1 #字符颜色R(红色)通道
    marker.color.g = 0 #字符颜色G(绿色)通道
    marker.color.b = 0 #字符颜色B(蓝色)通道
    marker.pose.position.x = msg.pose.position.x #字符位置
    marker.pose.position.y = msg.pose.position.y #字符位置
    marker.pose.position.z = 0.1#msg.position.z #字符位置
    marker.pose.orientation.z = msg.pose.orientation.z #字符位置
    marker.pose.orientation.w = msg.pose.orientation.w #字符位置
    markerArray.markers.append(marker) #添加元素进数组

    marker_number = Marker()      #创建marker对象
    marker_number.header.frame_id = 'map' #以哪一个TF坐标为原点
    marker_number.type = marker_number.TEXT_VIEW_FACING #一直面向屏幕的字符格式
    marker_number.action = marker_number.ADD #添加marker
    marker_number.scale.x = 0.5 #marker大小
    marker_number.scale.y = 0.5 #marker大小
    marker_number.scale.z = 0.5 #marker大小,对于字符只有z起作用
    marker_number.color.a = 1 #字符透明度
    marker_number.color.r = 1 #字符颜色R(红色)通道
    marker_number.color.g = 0 #字符颜色G(绿色)通道
    marker_number.color.b = 0 #字符颜色B(蓝色)通道
    marker_number.pose.position.x = msg.pose.position.x #字符位置
    marker_number.pose.position.y = msg.pose.position.y #字符位置
    marker_number.pose.position.z = 0.1#msg.position.z #字符位置
    marker_number.pose.orientation.z = msg.pose.orientation.z #字符位置
    marker_number.pose.orientation.w = msg.pose.orientation.w #字符位置
    marker_number.text = str(count) #字符内容
    markerArray_number.markers.append(marker_number) #添加元素进数组

    #markers的id不能一样,否则rviz只会识别最后一个元素
    id = 0
    for m in markerArray.markers:    #遍历marker分别给id赋值
        m.id = id
        id += 1

    for m in markerArray_number.markers:    #遍历marker分别给id赋值
        m.id = id
        id += 1

    mark_pub.publish(markerArray) #发布markerArray,rviz订阅并进行可视化
    mark_pub.publish(markerArray_number) #发布markerArray,rviz订阅并进行可视化

    #第一次添加marker时直接发布目标点
    if count == 0:
        pose = PoseStamped() #创建目标点对象
        pose.header.frame_id = 'map' #以哪一个TF坐标为原点
        pose.header.stamp = rospy.Time.now()
        pose.pose.position.x = msg.pose.position.x #目标点位置
        pose.pose.position.y = msg.pose.position.y #目标点位置
        pose.pose.orientation.z = marker.pose.orientation.z
        pose.pose.orientation.w = marker.pose.orientation.w
        goal_pub.publish(pose)
        index += 1 #下一次要发布的目标点序号

    count += 1 #有几个目标点

#rviz内标记按下的回调函数,输入参数:按下的位置[x, y, z=0]
def click_callback(msg):
    global index, count

    print('Add a new target point '+str(count)+':')
    print('x:'+str(msg.point.x)+
        ', y:'+str(msg.point.y)+
        ', z:0'+', w:1')

    marker = Marker()      #创建marker对象
    marker.header.frame_id = 'map' #以哪一个TF坐标为原点
    marker.type = marker.ARROW #一直面向屏幕的字符格式
    marker.action = marker.ADD #添加marker
    marker.scale.x = 0.2 #marker大小
    marker.scale.y = 0.05 #marker大小
    marker.scale.z = 0.05 #marker大小,对于字符只有z起作用
    marker.color.a = 1 #字符透明度
    marker.color.r = 1 #字符颜色R(红色)通道
    marker.color.g = 0 #字符颜色G(绿色)通道
    marker.color.b = 0 #字符颜色B(蓝色)通道
    marker.pose.position.x = msg.point.x #字符位置
    marker.pose.position.y = msg.point.y #字符位置
    marker.pose.orientation.z = 0 #字符位置
    marker.pose.orientation.w = 1 #字符位置
    markerArray.markers.append(marker) #添加元素进数组

    marker_number = Marker()      #创建marker对象
    marker_number.header.frame_id = 'map' #以哪一个TF坐标为原点
    marker_number.type = marker_number.TEXT_VIEW_FACING #一直面向屏幕的字符格式
    marker_number.action = marker_number.ADD #添加marker
    marker_number.scale.x = 0.5 #marker大小
    marker_number.scale.y = 0.5 #marker大小
    marker_number.scale.z = 0.5 #marker大小,对于字符只有z起作用
    marker_number.color.a = 1 #字符透明度
    marker_number.color.r = 1 #字符颜色R(红色)通道
    marker_number.color.g = 0 #字符颜色G(绿色)通道
    marker_number.color.b = 0 #字符颜色B(蓝色)通道
    marker_number.pose.position.x = msg.point.x #字符位置
    marker_number.pose.position.y = msg.point.y #字符位置
    marker_number.pose.position.z = 0.1 #字符位置
    marker_number.pose.orientation.z = 0 #字符位置
    marker_number.pose.orientation.w = 1 #字符位置
    marker_number.text = str(count) #字符内容
    markerArray_number.markers.append(marker_number) #添加元素进数组

    #markers的id不能一样,否则rviz只会识别最后一个元素
    id = 0
    for m in markerArray.markers:    #遍历marker分别给id赋值
        m.id = id
        id += 1

    for m in markerArray_number.markers:    #遍历marker分别给id赋值
        m.id = id
        id += 1

    mark_pub.publish(markerArray) #发布markerArray,rviz订阅并进行可视化
    mark_pub.publish(markerArray_number) #发布markerArray,rviz订阅并进行可视化

    #第一次添加marker时直接发布目标点
    if count == 0:
        pose = PoseStamped() #创建目标点对象
        pose.header.frame_id = 'map' #以哪一个TF坐标为原点
        pose.header.stamp = rospy.Time.now()
        pose.pose.position.x = msg.point.x #目标点位置
        pose.pose.position.y = msg.point.y #目标点位置
        pose.pose.orientation.z = 0 #四元数,到达目标点后小车的方向,z=sin(angle/2)
        pose.pose.orientation.w = 1 #四元数,到达目标点后小车的方向,w=cos(angle/2)
        goal_pub.publish(pose)
        index += 1 #下一次要发布的目标点序号

    count += 1 #有几个目标点


#获取键值函数
def getKey():
    tty.setraw(sys.stdin.fileno())
    rlist, _, _ = select.select([sys.stdin], [], [], 0.1)
    if rlist:
        key = sys.stdin.read(1)
    else:
        key = ''

    termios.tcsetattr(sys.stdin, termios.TCSADRAIN, settings)
    return key

def send_mark():
    global markerArray, markerArray_number, count, index, try_again, mark_pub, goal_pub
    markerArray = MarkerArray() #目标点标记数组
    markerArray_number = MarkerArray() #目标点标记数组
    count = 0
    index = 0
    try_again = 1
    rospy.init_node('path_point_demo') #初始化节点
    mark_pub    = rospy.Publisher('/path_point', MarkerArray, queue_size = 100) #用于发布目标点标记
    navGoal_sub = rospy.Subscriber('/send_mark_goal', PoseStamped, navGoal_callback) #订阅rviz内标记按下的位置
    click_sub   = rospy.Subscriber('/clicked_point', PointStamped, click_callback) #订阅rviz内标记按下的位置
    goal_pub    = rospy.Publisher('/move_base_simple/goal', PoseStamped, queue_size = 1) #用于发布目标点
    goal_status_sub = rospy.Subscriber('/move_base/result', MoveBaseActionResult, pose_callback) #用于订阅是否到达目标点状态

    while 1:
        key = getKey() #获取键值
        if(key=='c'): #键值为c是清空目标点
            count = 0
            index = 0
            try_again = 1

            markerArray = MarkerArray()
            marker = Marker()
            marker.header.frame_id = 'map'
            marker.type = marker.TEXT_VIEW_FACING
            marker.action = marker.DELETEALL
            marker.text = ''
            markerArray.markers.append(marker)

            for m in markerArray_number.markers:
                m.action = marker.DELETEALL

            mark_pub.publish(markerArray)
            mark_pub.publish(markerArray_number)
            markerArray = MarkerArray()
            markerArray_number = MarkerArray()

        elif (key == '\x03'): #ctrl+c退出
                    break
    rospy.spin()

if __name__ == '__main__':
    settings = termios.tcgetattr(sys.stdin) #获取键值初始化
    send_mark()
多点导航:实现它导航一个循环后就不再一直导航下去了
在send_mark.py文件里面改,可以在回调函数里定义一个变量,进一次回调函数自加一次,等这个变量值大于在rviz中放置的点数的时候,给个标志位,表示不执行巡逻了
多点导航每次都要在rviz配置 如何把目标点保存起来
在send_maker.py中添加所要做导航的目标点进行多点导航,将订阅rviz内标记按下的位置这里改成你发布的目标点即可。把sub改成pub 往话题里面发数据即可
提高导航时小车速度,应该改变哪的参数,加速度也要改吗?
加速度和速度相关参数都要改,改大导航速度修改这些参数,把最大值改大,然后改速度权重
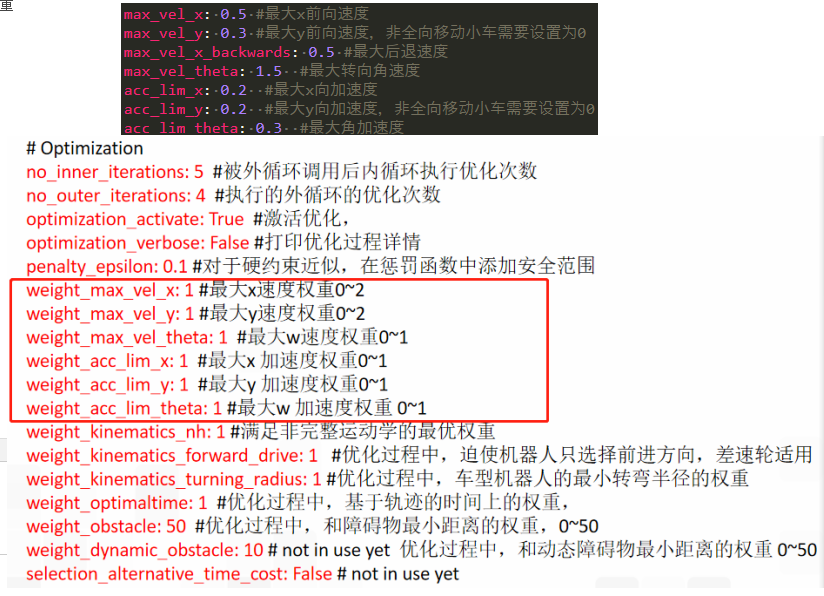
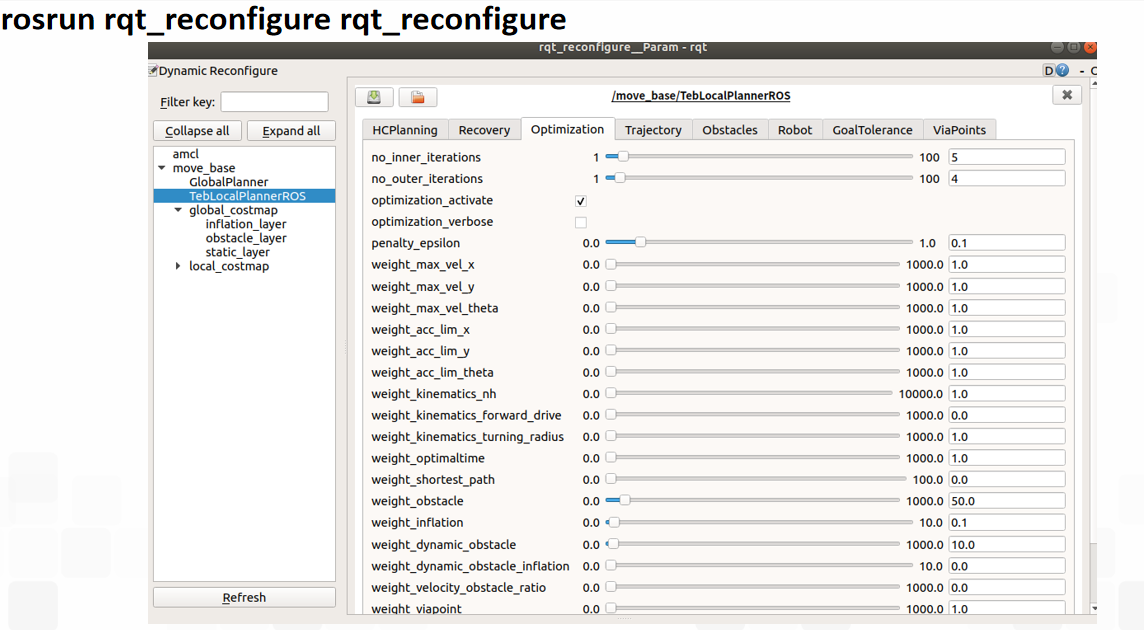
也可以动态调参,边调整边看效果是否满足你需求

 浙公网安备 33010602011771号