hadoop集群搭建(docker)
背景
目前在一家快递公司工作,因项目需要,对大数据平台做个深入的了解。工欲利其器必先利其器,在网上找了许多教程,然后自己搭建一个本地的环境并记录下来,增加一些印象。
环境搭建
1)Ubuntu
docker pull ubuntu:16.04
docker images
docker run -ti ubuntu:16.04
系统运行后,安装一些小工具
# apt update
//weget
# apt-get install wget
//ifconfig
# apt-get install net-tools
//ping
# apt-get install iputils-ping
//vim
# apt-get install vim
# exit
# docker commit -m “wget net-tools iputils-ping vim install” 864c90fe3ebb ubutun:tools
2)Java
apt-get install software-properties-common python-software-properties
add-apt-repository ppa:webupd8team/java
apt-get install oracle-java8-installer
vim ~/.bashrc
export JAVA_HOME=/usr/lib/jvm/java-8-oracle
# source ~/.bashrc
# java -version
使用docker commit保存一个副本
3)Hadoop
# cd ~
# mkdir soft
# cd soft
# mkdir apache
# cd apache
# wget https://mirrors.tuna.tsinghua.edu.cn/apache/hadoop/common/hadoop-2.7.6/hadoop-2.7.6.tar.gz
# tar -zxvf hadoop-2.7.6.tar.gz
配置hadoop环境变量
# vim ~/.bashrc
1 export HADOOP_HOME=/root/soft/apache/hadoop/hadoop-2.7.6
2
3 export HADOOP_CONFIG_HOME=$HADOOP_HOME/etc/hadoop
4
5 export PATH=$PATH:$HADOOP_HOME/bin
6
7 export PATH=$PATH:$HADOOP_HOME/bin
创建tmp、NameNode、DataNode目录
tmp是hadoop的临时存储目录
NameNode是文件系统的管理节点
DataNode是提供真实文件数据的存储服务
# cd $HADOOP_HOME/
# mkdir tmp
# mkdir namenode
# mkdir datanode
# cd $HADOOP_CONFIG_HOME/
# cp mapred-site.xml.template mapred-site.xml
# vim mapred-site.xml
<configuration>

 <property>

        <name>mapred.job.tracker</name>

        <value>master:9001</value>

        <description>The host and port that the MapReduce job tracker runs

        at.  If "local", then jobs are run in-process as a single map

        and reduce task.

        </description>

    </property>

</configuration>
# vim core-site.xml
<configuration>

  <property>

            <name>hadoop.tmp.dir</name>

            <value>/root/soft/apache/hadoop/hadoop-2.7.6/tmp</value>

            <description>A base for other temporary directories.</description>

    </property>


    <property>

            <name>fs.default.name</name>

            <value>hdfs://master:9000</value>

            <final>true</final>

            <description>The name of the default file system.  A URI whose

            scheme and authority determine the FileSystem implementation.  The

            uri's scheme determines the config property (fs.SCHEME.impl) naming

            the FileSystem implementation class.  The uri's authority is used to

            determine the host, port, etc. for a filesystem.</description>

    </property>

</configuration>
# vim hdfs-site.xml
<configuration>

 <property>

        <name>dfs.replication</name>

        <value>2</value>

        <final>true</final>

        <description>Default block replication.

        The actual number of replications can be specified when the file is created.

        The default is used if replication is not specified in create time.

        </description>

    </property>


    <property>

        <name>dfs.namenode.name.dir</name>

        <value>/root/soft/apache/hadoop/hadoop-2.7.6/namenode</value>

        <final>true</final>

    </property>


    <property>

        <name>dfs.datanode.data.dir</name>

        <value>/root/soft/apache/hadoop/hadoop-2.7.6/datanode</value>

        <final>true</final>

    </property>

</configuration>
#vim hadoop-en.sh
export JAVA_HOME=/usr/lib/jvm/java-8-oracle
#exit
docker commit -m “hadoop install” xxxxx ubuntu:hadoop
4)ssh配置
# apt-get install ssh
# cd ~/
# ssh-keygen -t rsa -P ‘’ -f ‘~/.ssh/id-rsa’
# cd .ssh
# cat is-rsa.pub >> authorized_keys
# service ssh start
#ssh localhost
#exit
docker commit -m “hadoop install” xxxxx ubuntu:hadoop
5)启动配置
配置好环境,接下来开始启动
master
#docker run -ti -h master -p 50070:50070 -p 8088:8088 ubuntu:hadoop
配置slaves
# cd $HADOOP_CONFIG_HOME/
# vim slaves
slave1
slave2
slave
#docker run -ti -h slave1
#docker run -ti -h slave2
三个节点都启动好了,利用ifconfig查看master、slave1、slave2的ip
#vim/etc/hosts
ip(master) master
ip(slave1) slave1
ip(slave2) slave2
一切都准备好了的时候,就可以切换到hadoop/sbin,开启hadoop集群啦
#cd $HADOOP_HOME/sbin/
#./start-all.sh
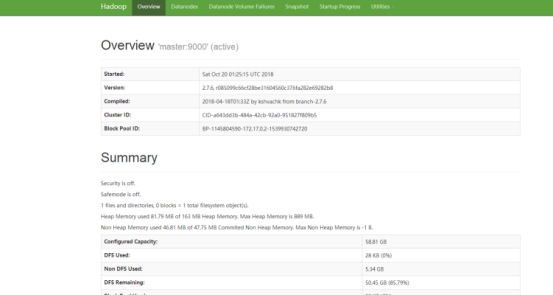
稍等片刻之后,可以通过http://localhost:50070/,查看hadoop集群

下面是导出的docker系统文件,ubuntu:hadoop,https://pan.baidu.com/s/1GSfZbwJxlTk18YGPqNFwew uhmh


 浙公网安备 33010602011771号