springboot(七).springboot整合jedis实现redis缓存
我们在使用springboot搭建微服务的时候,在很多时候还是需要redis的高速缓存来缓存一些数据,存储一些高频率访问的数据,如果直接使用redis的话又比较麻烦,在这里,我们使用jedis来实现redis缓存来达到高效缓存的目的,接下来,让我们一起来使用jedis来实现redis缓存
1.在pom.xml文件中添加依赖
<!-- jedis -->
    <dependency>
	<groupId>redis.clients</groupId>
	<artifactId>jedis</artifactId>
	<version>2.8.2</version>
    </dependency>
2. 在springboot的配置文件中加入redis的配置信息
#redis jedis配置
# Redis数据库索引(默认为0)
spring.redis.database=0
# Redis服务器地址
spring.redis.host=10.100.140.84
# Redis服务器连接端口
spring.redis.port=6379
# Redis服务器连接密码(默认为空)
#spring.redis.password=
# 连接池最大连接数(使用负值表示没有限制)
spring.redis.pool.max-active=200
# 连接池最大阻塞等待时间(使用负值表示没有限制)
spring.redis.pool.max-wait=-1
# 连接池中的最大空闲连接
spring.redis.pool.max-idle=8
# 连接池中的最小空闲连接
spring.redis.pool.min-idle=0
# 连接超时时间(毫秒)
spring.redis.timeout=0
#spring-session 使用
spring.session.store-type=none
3.创建jedis配置文件,配置文件的作用是在项目启动的时候将jedis注入,接着我们就可以在其他类中获取到JedisPool类的信息
@Configuration
public class JedisConfig extends CachingConfigurerSupport{
    private Logger logger = LoggerFactory.getLogger(JedisConfig.class);

    /**
     * SpringSession  需要注意的就是redis需要2.8以上版本,然后开启事件通知,在redis配置文件里面加上
     * notify-keyspace-events Ex
     * Keyspace notifications功能默认是关闭的(默认地,Keyspace 时间通知功能是禁用的,因为它或多或少会使用一些CPU的资源)。
     * 或是使用如下命令:
     * redis-cli config set notify-keyspace-events Egx
     * 如果你的Redis不是你自己维护的,比如你是使用阿里云的Redis数据库,你不能够更改它的配置,那么可以使用如下方法:在applicationContext.xml中配置
     * <util:constant static-field="org.springframework.session.data.redis.config.ConfigureRedisAction.NO_OP"/>
     * @return
     */

    @Value("${spring.redis.host}")
    private String host;

    @Value("${spring.redis.port}")
    private int port;

    @Value("${spring.redis.timeout}")
    private int timeout;

    @Value("${spring.redis.pool.max-active}")
    private int maxActive;

    @Value("${spring.redis.pool.max-idle}")
    private int maxIdle;

    @Value("${spring.redis.pool.min-idle}")
    private int minIdle;

    @Value("${spring.redis.pool.max-wait}")
    private long maxWaitMillis;


    @Bean
    public JedisPool redisPoolFactory(){
        JedisPoolConfig jedisPoolConfig = new JedisPoolConfig();
        jedisPoolConfig.setMaxIdle(maxIdle);
        jedisPoolConfig.setMaxWaitMillis(maxWaitMillis);
        jedisPoolConfig.setMaxTotal(maxActive);
        jedisPoolConfig.setMinIdle(minIdle);
        JedisPool jedisPool = new JedisPool(jedisPoolConfig,host,port,timeout,null);

        logger.info("JedisPool注入成功!");
        logger.info("redis地址:" + host + ":" + port);
        return  jedisPool;
    }

}
接下来,我们启动项目,gogogo

Jedis注入成功了!!!
然后我们可以定义一个工具类,用于对redis进行各种操作
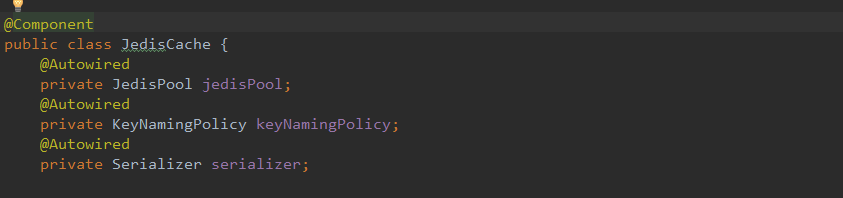
这里我们通过@Autowired将JedisPool注入到工具类中,其他两个是命名、序列化的类
这里,我们列举一下平常最常用的几个方法
//给某个key设值
public void set(String key, Object value) {
        Jedis client = getJedis();
        try {
            byte[] keyBytes = serializer.serializeKey(keyNamingPolicy.getKeyName(key));
            byte[] valueBytes = serializer.serializeValue(value);
            client.set(keyBytes, valueBytes);
        } finally {
            returnJedis(client);
        }

    }

//根据key获取value
 public Object get(String key) {
        Jedis client = getJedis();
        try {
            byte[] keyBytes = serializer.serializeKey(keyNamingPolicy.getKeyName(key));
            byte[] valueBytes = client.get(keyBytes);
            return serializer.deserializeValue(valueBytes);
        } finally {
            returnJedis(client);
        }
    }

//根据键值获取value
    public Object hashGet(String key, String field) {
        Jedis client = getJedis();
        try {
            byte[] keyBytes = serializer.serializeKey(keyNamingPolicy.getKeyName(key));
            byte[] fieldBytes = serializer.serializeKey(field);
            byte[] valueBytes = client.hget(keyBytes, fieldBytes);
            return serializer.deserializeValue(valueBytes);
        } finally {
            returnJedis(client);
        }

    }

    public void hashSet(String key, String field, Object value) {
        Jedis client = getJedis();
        try {
            byte[] keyBytes = serializer.serializeKey(keyNamingPolicy.getKeyName(key));
            byte[] fieldBytes = serializer.serializeKey(field);
            byte[] valueBytes = serializer.serializeValue(value);
            client.hset(keyBytes, fieldBytes, valueBytes);
        } finally {
            returnJedis(client);
        }

    }


public Map<String, Object> hashAllGet(String key) {
        Jedis client = getJedis();
        try {
            byte[] keyBytes = serializer.serializeKey(keyNamingPolicy.getKeyName(key));
            Map<byte[], byte[]> map = client.hgetAll(keyBytes);
            Map<String, Object> valueMap = Maps.newHashMap();
            Set<Map.Entry<byte[], byte[]>> valueSet = map.entrySet();
            for (Map.Entry<byte[], byte[]> entry : valueSet) {
                valueMap.put(serializer.deserializeKey(entry.getKey()), serializer.deserializeValue(entry.getValue()));
            }
            return valueMap;
        } finally {
            returnJedis(client);
        }

    }

//判断key是否存在
    public boolean existKey(String key) {
        Jedis client = getJedis();
        try {
            byte[] keyBytes = serializer.serializeKey(keyNamingPolicy.getKeyName(key));
            return client.exists(keyBytes);
        } finally {
            returnJedis(client);
        }
    }
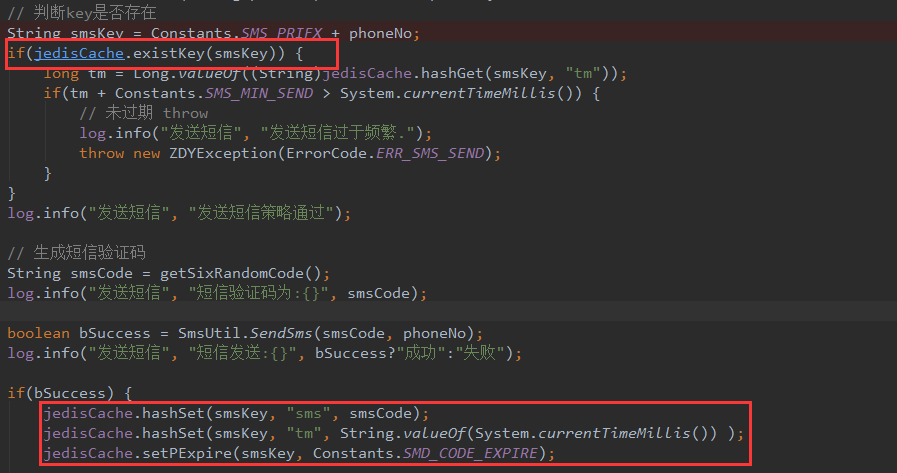
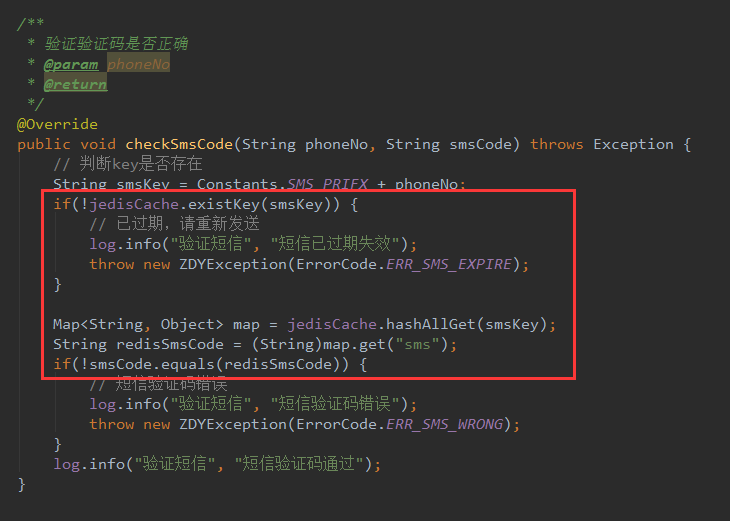
在该项目中,我们发送短信验证码后会将验证码存在redis中去,然后校验的时候会判断用户输入的验证码和缓存中的验证码是否一致,达到目的。

 浙公网安备 33010602011771号