
LInuxDay6——用户组和权限管理
一、Linux的安全模型
1.安全3A
资源分派
Authentication:认证
Authorization:授权
Accounts|Audition:审计
2.安全上下文
Linux安全上下文
运行中的程序:进程(process)
以进程发起者的身份运行:
root:/bin/cat
mage:/bin/cat
进程所能够访问资源的权限取决于进程的运行者的身份
3.密码加密
加密机制:
加密:铭文→密文
解密:密文→明文
单向加密:哈希算法,原文不同,密文必不同
相同算法定长输出,获得密文不可逆推出原始数据
雪崩效应:初始条件的微小改变,引起结果的巨大改变
mad5:message digest,128bits
sha224:224bits
sha256:256bits
sha384:384bits
sha512:512bits
更改加密算法 authconfig —— passalgo=sha256 ——updata
4.密码的复杂性策略
使用数字、大写字母、小写字母及特殊字符中至少3种
足够长
使用随机密码
定期更换,不要使用最近曾经使用过的密码
二、用户管理
1.用户user
令牌token,identity
Linux用户:Username/UID
管理员:root,0
普通用户·:1-65535
系统用户:1-499(CentOS6);1-999(CentOS7)
对守护进程获取资源进行权限分配
登入用户:500+;1000+
交互式登入
2.用户配置文件
Linux用户的主要配置文件:
/etc/passwd:用户及其属性信息(名称、UID、主组ID等)
/etc/shadow:用户密码及其相关属性
3.passwd文件格式
login name:登入用户名
passwd:密码(x)
UID:用户身份编号
GID:登录默认所在组编号
GECOS:用户全名或注释
home directory:用户主目录
shell:用户默认使用shell(bin/bash)
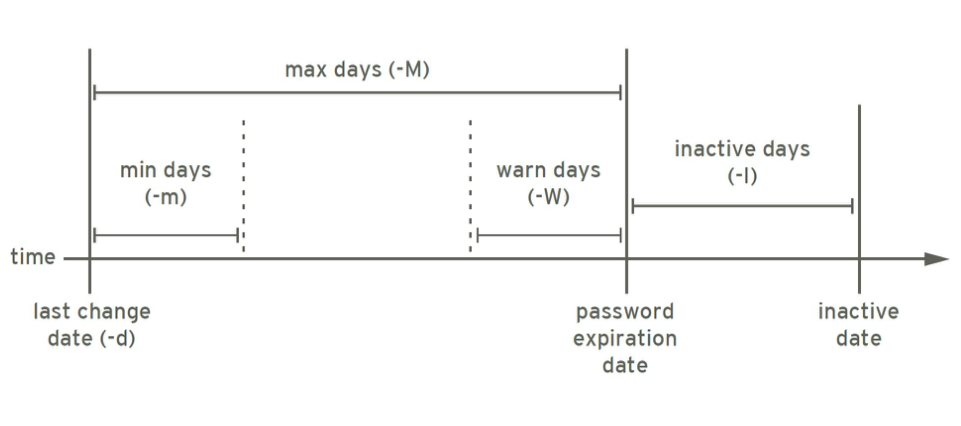
4.shadow文件格式
登入用户名
用户密码:一般用sha512加密
从1970年1月1日起到密码最近一次被更改的时间
密码再过几天可以被变更(0表示随时可被变更)
密码再过几天必须被变更(99999表示永不过期)
密码过期前几天系统提醒用户(默认为一周)
密码过期后几天后账号会被锁定
从1970年1月1日算起,多少天后账号失效
5.用户管理命令
useradd:创建用户
-u UID
-o 配合-u选项,不检查UID的唯一性
-g GID:知名用户所属基本组,可为组名,
-c “COMMENT”:用户的注释信息
-d HOME_DIR:指定的路径(不存在)为家目录
-s SHELL:指明用户的默认shell程序
可用列表在/etc/shells文件中
-G GROUP1 [GROUP2...]:为用户指明附加组,组必须事先存着
-N 不创建私用系统用户
-r 创建系统用户
-m 创建家目录,用于系统用户
-M 不创建家目录,用于非系统用户
默认值设定:/etc/default/useradd文件中
显示或更改默认设置
useradd -D
useradd -D -s SHELL
useradd -D -b BASE_DIR
useradd -D -g GROUP
usermod:修改用户
-u:修改uid
-g:修改gid
-G:修改附加组,结合-a可以追加附加组
-s:修改默认shell
-c:修改描述信息
-d:修改家目录,结合-m可以搬家
-l:修改用户名
-L:锁定账户
-U:解锁账户,在新系统上不支持对空密码用户解锁
-e YYYY-MM-DD:设置账户过期时间
-f INACTIVE:设定非活动期限
userdel :删除用户
-r:删除用户时连家目录一并删除
id :查看用户信息
-u:查看uid
-g:查看gid
-G:查看用户所属的组的ID
-n:显示名称,配合-ugG使用
su :切换用户
su Username:非登录式切换,即不会读取目标用户的配置文件,不改变当前工作目录
su - Username:登录式切换,会读取目标用户的配置文件,切换至家目录,完全切换
root su至其他用户无需密码;非root用户切换时需要密码
换个身份执行命令:
su [-] Username -c 'COMMAND'
选项:-l --login
su -l Username 相当于 su -UserName
passwd:设置密码(修改指定用户的密码)
-d:删除指定用户密码
-l:锁定指定用户
-u:解锁指定用户
-e:强制用户下次登录修改密码
-f:强制操作
-n:(mindays)指定最短使用期限
-x:(maxdays)最大使用期限
-w:(warndays)提前多少天开始警告
-i:(inactivedays)非活动期限
--stdin:从标准输入接收用户密码
echo “PASSWORD” | passwd --stdin USERNAME
chage:修改用户密码 [OPTION]...LOGIN
-d LAST DAY
-E --expiredate EXPIRE_DATE
-I --inactive INACTIVE
-m --mindays MIN_DAYS
-M --maxdays MAX_DAYS
-W --warndays WARN_DAYS
示例:
chage -d 0 tom 下次登入强制设置密码
chage -m 0 -M 42 -W 14 -I 7 tom
chage -E 2016-09-10 tom
三、组的管理
1.组group
Linux组:Groupname/GID
管理员组:root, 0
普通组:
系统组:1-499(CENTOS6);1-999(CENTOS7)
普通组:500+(CENTOS6); 1000+(CENTOS7)
2.组的类别
Linux组的类别
主要组(primary group):用户必须属于一个且只有一个主组
私有组:组名同用户名,且仅包含一个用户
附加组(supplementary group):一个用户可以属于零个或多个辅助组
3.组的配置文件
Linux组的主要配置文件:
/etc/group:组及其属性信息
/etc/gshadow:组密码及其相关属性
4.group文件格式
群组名称:
群组密码:通常不需要设定,密码被记录在/etc/gshadow
GID:就是群组的ID
以当前组为附加组的用户列表(分隔符为逗号)
5.gshadow文件格式
群组名称
群组密码
组管理员列表:组管理员的列表,更改组密码和成员
以当前组为附加组的用户列表(分隔符为逗号)
组管理
groupadd 创建组
-g:指定创建组的GID
-r:创建系统组
groupmod 修改组
-n:修改组名
-g:修改新的组GID
groupdel 删除组
gpasswd 修改组密码
-a:将用户添加到指定组
-d:将用户从指定组删除
-A:设置有管理权限的用户列表
newgrp 临时切换主组,如果用户不在此组中则需要密码,否则不需要
groupmems 管理和查看组成员
-g, --group groupname 更改为指定组 (只有root)
-a, --add username 指定用户加入组
-d, --delete username 从组中删除用户
-p, --purge 从组中清除所有成员
-l, --list 显示组成员列表
groups 查看用户所属组列表
四、用户相关命令操作
vipw== nano /etc/passwd
vigr== vi /etc/group
pwck:格式检查
grpck:组格式检查
chfn:指定个人信息
chsh:-s 修改用户默认登录的shell
finger:查找用户信息
pwunconv:将加密密码在passwd文件中显示
pwconv: 将passwd文件中的密码位显示为x
五、文件权限
文件属性
 文件属性
文件属性文件属性操作
reset 回复显示字符
文件的权限主要针对三类对象进行定义
owner: 属主, u group: 属组, g other: 其他, o
每个文件针对每类访问者都定义了三种权限
r: Readable w: Writable x: eXcutable
文件:
r: 可使用文件查看类工具获取其内容
w: 可修改其内容
x: 可以把此文件提请内核启动为一个进程
目录:
r: 可以使用ls查看此目录中文件列表
w: 可在此目录中创建文件,也可删除此目录中的文件
x: 可以使用ls -l查看此目录中文件列表,可以cd进入此目录
X:只给目录x权限,不给文件x权限
文件权限操作命令
chmod(change mode)
方法1:mode 法
chomd :who opt per file
who :u g o
opt:+ - =
per:r w x X
方法2:数字法
u g o
rwx rw- r--
111 110 100
7 6 4
偶数没有执行权限,基数有执行权限
X对目录添加执行权限(对已有执行权限文件添加执行权限)
方法3:参考
--reference(参考)=f1 f2 f3(即参考f1)
-R递归
umask
(内部命令)生产数字 (更改文件默认文件权限):mask(掩码)本质功能:取消对应的权限
文件夹默认755 文件默认644
umask+defaul=dir(目录(文件夹))777
umask+defaul=dir(文件)666 对结果观察,偶不变 基加1(对文件)
-p 显示命令 umask
-s 切换模式法输出 直接写默认权限
更改文件放在 家目录下.bashrc
系统文件在/etc/bashrc
文件目录权限对文件的影响
- 普通用户不能改文件所有者
- 普通用户想改所属组必须在组里
- 读写权限对于root不生效,但是执行权限对root生效
- 读权限对于二进制程序不是必须的
- 操作文件需要的是文件夹的权限
- 对目录来讲没有执行权限,不能cd进去,不能查看目录中文件的详细属性,也不能读文件
六、特殊权限
SUID,GGID,Sticky
SUID=4 当一个用户去运行这个程序时,他会继承该进程(二进制)所有者的权限;只适合二进制可执行的程序
chmod u+s FILE...
chmod u-s FILE...
SGID=2 当一个文件去运行这个程序时,他会继承该程序(二进制)所属组的权限;作用于目录,此目录新建的文件继承目录的所属组
chmod g+s FILE...
chmod g-s FILE...
chmod g+s DIR...
chmod g-s DIR...
Sticky=1 粘滞位 作用于目录(文件夹),此目录的文件只能被所有者删除
chmod o+t DIR...
chmod o-t DIR...
s为有s权限 S为没有x权限
特定权限
chattr :设置文件特定权限,防止误操作
+i:锁定文件,不可删除,修改
-i:解锁文件
+a:锁定文件,可以追加
-A:锁定文件读时间,可以降低系统负载
lsattr :查看锁定文件状态
setfacl :设定访问控制列表
-m u|g:USER:0|rwx FILE 添加 d 给文件夹设置默认acl权限
-x u|g:USER|GROUP 删除
mask:限高线 -m mask::rwx
-b FILE:清空所有acl权限
-R 递归
-M file.acl 批量设置
-X 批量删除
--set-file=- 参考前边的权限设置指定文件
ACL:
Access Control List,实现灵活的权限管理
除了文件的所有者,所属组和其它人,可以对更多的用户设置权限
CentOS7 默认创建的xfs和ext4文件系统具有ACL功能
CentOS7 之前版本,默认手工创建的ext4文件系统无ACL功能,需手动增加
tune2fs –o acl /dev/sdb1
mount –o acl /dev/sdb1 /mnt/test
ACL生效顺序:所有者,自定义用户,自定义组,其他人
为多用户或者组的文件和目录赋予访问权限rwx
ACL文件上的group权限是mask 值(自定义用户,自定义组,拥有组的最大权限),而非传统的组权限
getfacl 可看到特殊权限:flags
通过ACL赋予目录默认x权限,目录内文件也不会继承x权限
base ACL 不能删除
setfacl -k dir 删除默认ACL权限
setfacl –b file1清除所有ACL权限
getfacl:查看文件的访问控制列表v
getfacl file1 | setfacl --set-file=- file2 复制file1的acl权限给file2
七、练习
1、创建用户gentoo,附加组为bin和root,默认shell为/bin/csh,注释信息为“Gentoo Distribution”

[root@centos6 ~]#useradd -s /bin/csh -G bin,root -c "Gentoo Distribution" gentoo
[root@centos6 ~]#id gentoo
uid=506(gentoo) gid=509(gentoo) groups=509(gentoo),0(root),1(bin)
[root@centos6 ~]#finger gentoo
Login: gentoo                     Name: Gentoo Distribution
Directory: /home/gentoo                 Shell: /bin/csh
Never logged in.
No mail.
No Plan.
2、创建下面的用户、组和组成员关系
名字为webs的组
用户nginx使用webs作为附属组
用户varnish,也使用webs作为附属组
用户mysql,不可交互登录系统,且不是webs的成员,nginx,varnish,mysql密码都是magedu
[root@centos6 ~]#groupadd webs
[root@centos6 ~]#useradd -G webs varnish
useradd: warning: the home directory already exists.
Not copying any file from skel directory into it.
Creating mailbox file: File exists
[root@centos6 ~]#useradd -G webs nginx
useradd: warning: the home directory already exists.
Not copying any file from skel directory into it.
Creating mailbox file: File exists
[root@centos6 ~]#useradd -s /sbin/nologin mysql
echo magedu | passwd --stdin nginx
Changing password for user nginx.
passwd: all authentication tokens updated successfully.
[root@centos6 ~]#echo magedu | passwd --stdin varnish
Changing password for user varnish.
passwd: all authentication tokens updated successfully.
echo magedu | passwd --stdin mysql
Changing password for user mysql.
passwd: all authentication tokens updated successfully.
3、当用户docker对/testdir目录无执行权限时,意味着无法做那些操作?
[root@centos6 /data]#ls -ld /testdir/
drw-r--rw- 2 444 root 4096 Apr  1 14:11 /testdir/
[docker@centos6 /data]$ll -a /testdir/
ls: cannot access /testdir/..: Permission denied
ls: cannot access /testdir/.: Permission denied
total 0
d????????? ? ? ? ?            ? .
d????????? ? ? ? ?            ? ..
[docker@centos6 /data]$cd /testdir/
bash: cd: /testdir/: Permission denied
4、当用户mongodb对/testdir目录无读权限时,意味着无法做那些操作?
[root@centos6 /data]#useradd mongodb
[root@centos6 /data]#chmod o-r+x /testdir/
[root@centos6 /data]#ls -ld /testdir/
drw-r---wx 2 444 root 4096 Apr  1 14:11 /testdir/
[mongodb@centos6 /data]$cd /testdir/
[mongodb@centos6 /testdir]$ll
ls: cannot open directory .: Permission denied
[mongodb@centos6 /testdir]$touch test1
[mongodb@centos6 /testdir]$rm test1
5、当用户redis对/testdir目录无写权限时,该目录下的只读文件file1是否可修改和删除?
[root@centos6 /testdir]#ll
total 0
-rw-r--r-- 1 root root 0 Apr  1 14:37 file1
[root@centos6 /testdir]#su redis
[redis@centos6 /testdir]$rm file1
rm: remove write-protected regular empty file `file1'? y
rm: cannot remove `file1': Permission denied
6、当用户zabbix对/testdir目录有写和执行权限时,该目录下的只读文件file1是否可修改和删除?
[root@centos6 /data]#ls -ld /testdir/
drw-r---wx 2 444 root 4096 Apr  1 14:37 /testdir/
[root@centos6 /data]#su zabbix
[zabbix@centos6 /data]$cd /testdir/
[zabbix@centos6 /testdir]$ls
ls: cannot open directory .: Permission denied
[zabbix@centos6 /testdir]$rm file1
rm: remove write-protected regular empty file `file1'? n
[zabbix@centos6 /testdir]$vim file1
[zabbix@centos6 /testdir]$rm file1
rm: remove write-protected regular empty file `file1'? y
7、复制/etc/fstab文件到/var/tem下,设置文件所有者为tomcat读写权限,所属组为apps组有读写权限,其他人无权限。
 1 [root@centos6 /data]#groupadd apps
 2 [root@centos6 /data]#useradd -g apps tomcat
 3 useradd: warning: the home directory already exists.
 4 Not copying any file from skel directory into it.
 5 Creating mailbox file: File exists
 6 [root@centos6 /data]#cp /etc/fstab /var/tem
 7 cp: overwrite `/var/tem'? y
 8 [root@centos6 /tem]#chmod -x /tem/
 9 [root@centos6 /tem]#chmod o-r /tem/
10 [root@centos6 /tem]#chown tomcat /tem
11 [root@centos6 /tem]#chgrp apps /tem
12 [root@centos6 /tem]#ll -ld
13 drw-r-----. 2 tomcat apps 4096 Mar 29 20:33
8、误删除了用户git家目录,清重建并恢复该用户家目录及相应的权限属性
[root@centos6 /home]#mkdir git
[root@centos6 /home]#cp -r /etc/skel /home/git
[root@centos6 /home]#chown -R git.git /home/git
[root@centos6 /home]#chmod 700 /home/git/

