Ruby on Rails 单元测试
Ruby on Rails 单元测试
为什么要写测试文件?
软件开发中,一个重要的环节就是编写测试文件,对代码进行单元测试,确保程序各部分功能执行正确。但是,这一环节很容易被我们轻视,认为进行单元测试的必要性不大,最主要的一个原因是需要耗费大量时间。显然,这种观点是很浅显的,Michael Hartl 在他的《Ruby on Rails 教程——通过 Rails 学习 Web 开发》中指出编写自动化测试主要有三个好处:
- 测试能避免回归(regression)问题,即由于某些原因之前能用的功能不能用了;
- 有测试在,重构(改变实现方式,但功能不变)时更有自信;
- 测试是应用代码的客户,因此可以协助我们设计,以及决定如何与系统的其他组件交互。
也就是说,我们也许能够保证第一遍书写的代码的正确性,但我们难以保证日后对代码进行数次迭代更新,优化之后,它仍然能够保持最初的正确性。因为随着设计的不断深入,我们应对的情况会越来越复杂,这时候单元测试的重要性就显得尤为重要,代码的正确性很多时候就要通过单元测试来维持。
何时进行测试,何时不需要测试?
同上,Michael 在他的 Rails 教程中指出:
- 与应用代码相比,如果测试代码特别简短,倾向于先编写测试
- 如果对想实现的功能不是特别清楚,倾向于先编写应用代码,然后再编写测试,并改进实现方式
- 安全是头等大事,保险起见,要为安全相关的功能先编写测试
- 只要发现一个问题,就编写一个测试重现这种问题,避免回归,然后再编写应用代码修正问题
- 尽量不为以后可能修改的代码(例如 HTML 结构的细节)编写测试
- 重构之前要编写测试,集中测试容易出错的代码。
以此次 Rails 开发为例,我们主要编写了控制器和模型测试文件。
Ruby on Rails 的模型测试
在 Rails 中编写测试非常方便,生成模型和控制器时,已经在 ./test 路径下生成了各种测试代码骨架。即便是大范围重构后,只需运行测试就能确保实现了所需功能。Rails 中的测试还可以模拟浏览器请求,无需打开浏览器就能测试程序的响应。
test 文件夹内容如下:
$ ls -F test
controllers/  helpers/    mailers/    test_helper.rb
fixtures/    integration/  models/
models 文件夹存放模型测试,controllers 文件夹存放控制器测试,integration 文件夹存放多个控制器之间交互的测试。fixtures 文件夹中存放固件,用于提供初始的测试数据,固件相互独立,一个文件对应一个模型,使用 YAML 格式编写。在运行测试之前,Rails 会把预先定义好的数据导入测试数据库。
test_helper.rb 文件中保存测试的默认设置。
以一次测试为例,test/controllers/club_management_controller_test.rb 中,测试新增的社团活动评价功能:
test 'should evaluate activity' do
    # 根据fixtures中的yaml文件获取活动信息
    activity = activities(:basketball)
    # 定义评价信息
    club = clubs(:basketball_club)
    reason = 'nice'
    suggestion = 'no suggestion'
    # 向相应的路由post评价请求,将评价信息作为参数传递
    put activity_evaluate_path(club_id: club.id, activity_id: activity.id),
        params: { rank: 233, reason: reason, suggestion: suggestion }
    # 断言HTML响应,200表示操作应成功
    assert_response 200
    puts JSON.parse(@response.body)['data']
    # 模拟浏览器响应,应该与上面传递的信息一致
    assert_equal 10, JSON.parse(@response.body)['data']['rank']
    assert_equal reason, JSON.parse(@response.body)['data']['reason']
    assert_equal suggestion, JSON.parse(@response.body)['data']['suggestion']
    put activity_evaluate_path(club_id: club.id, activity_id: activity.id),
        params: { rank: -8 }
    assert_response 200
    assert_equal 0, JSON.parse(@response.body)['data']['rank']
  end
在此次测试中,activity 与 club 数据均已在 fixtures/*.yml 中定义好,fixtures/activities.yml 如下
basketball:
  name: 篮球赛
  start_time: 2100-04-13 03:04:48
  end_time: 2100-04-13 03:04:48
  act_date: 2020-05-20
  beg_time: 2020-05-20 13:14:02
  fin_time: 2020-05-20 13:14:10
  position: MyString
  description: MyText
  max_people_limit: 1
  need_enroll: true
  review_state: 0
fixtures/clubs.yml 如下
basketball_club:
  name: 篮球社
  english_name: basketball_club
  introduction: play basketball
  level: 3
  club_category: sport
  is_related_to_wechat: false
  tags_json: '{}'
  has_activities_applying: 0
  has_activities_unevaluated: 0
同时,需要定义社团和活动的所属关系,在 fixtures/club_to_activities.yml 中:
···
five:
  club: basketball_club
  activity: basketball
之所以需要定义这种关系,是因为活动不能架空,活动应该有其相应的举办社团。我们在对活动进行操作时,这两项是必不可少的,社团和活动都要存在。Rails 为控制器提供了这种逻辑检验方法 before_action ,在 app/controllers/club_management_controller.rb 中:
before_action :_find_club, only:
      %i[club_profile club_update activity_index activity_create activity_profile activity_update activity_evaluate article_index article_create article_profile article_update activity_review]
  before_action :_find_activity, only: %i[activity_profile activity_update activity_evaluate activity_review]
private def _find_activity
	# 寻找活动的代码段
end
private def _find_club
	# 寻找社团的代码段
end
这段代码的意义已经在英文命名中体现出来了,只有在进行 [···] 这些操作之前时才执行 find 方法,从而保证逻辑的正确性。这种检验方法也使得我们不用每一次都手动调用 find 方法再进行判断,方便快捷又清晰。
但是,现在还没有万事大吉,因为还没有登录,没有任何权限,无法进行操作。同上,Rails 在 test 中也为我们提供了 setup 方法,我们只需要重写此方法就可以实现每个 test 块之前的设置工作,setup 方法定义在 Ruby26-x64/lib/ruby/gems/2.6.0/gems/minitest-5.14.1/lib/minitest/test.rb 中定义(不同版本的 ruby 可能路径不同):
##
# Runs before every test. Use this to set up before each test
# run.

def setup; end
app/controllers/club_management_controller.rb 中重写此方法进行管理员登录:
def setup
    @user = users(:three)
    post session_login_path, params:
        {
          username: @user.email,
          password: 'password'
        }
  end
其中 fixtures/users.yml 文件如下:
three:
  username: zkk
  nickname: nick
  real_name: zkr
  student_id: 16029999
  tag: abcd
  role: 3
  password_digest: <%= User.digest('password') %>
  remember_digest: <%= User.digest('password') %>
  open_id: 3
  union_id: 3
  wxid: c3
  session_key: 1001
  college_id: 1
  email: 787797770@qq.com
  political_status_id: 1
  gender: 1
  phone_number: 1334234321
  id_number: 610104199803281547
  status: 1
  avatar_url: https://test.jpg
这时再执行 rails test 就可以开始测试。
上面的一些 .yml 文件中,一些数据不是很规范,但只要能够保证逻辑、格式正确,能够正确使用就可以,如果在此之上进行更规范地编写也是一种可取的做法。
Rails 测试中的断言
在上述测试文件中,用到了许多 assert 的方法,如 assert_equal 判断两个变量是否相等, assert_response 判断 HTML 响应,这也是 Rails 为我们提供的一些便利,其余一些 assert 方法如下所示:
| Assertion | Purpose |
|---|---|
assert( test, [msg] ) |
Ensures that test is true. |
refute( test, [msg] ) |
Ensures that test is false. |
assert_equal( expected, actual, [msg] ) |
Ensures that expected == actual is true. |
refute_equal( expected, actual, [msg] ) |
Ensures that expected != actual is true. |
assert_same( expected, actual, [msg] ) |
Ensures that expected.equal?(actual) is true. |
refute_same( expected, actual, [msg] ) |
Ensures that expected.equal?(actual) is false. |
assert_nil( obj, [msg] ) |
Ensures that obj.nil? is true. |
refute_nil( obj, [msg] ) |
Ensures that obj.nil? is false. |
assert_match( regexp, string, [msg] ) |
Ensures that a string matches the regular expression. |
refute_match( regexp, string, [msg] ) |
Ensures that a string doesn't match the regular expression. |
assert_in_delta( expecting, actual, [delta], [msg] ) |
Ensures that the numbers expected and actual are within delta of each other. |
refute_in_delta( expecting, actual, [delta], [msg] ) |
Ensures that the numbers expected and actual are not within delta of each other. |
assert_throws( symbol, [msg] ) { block } |
Ensures that the given block throws the symbol. |
assert_raises( exception1, exception2, ... ) { block } |
Ensures that the given block raises one of the given exceptions. |
assert_nothing_raised( exception1, exception2, ... ) { block } |
Ensures that the given block doesn't raise one of the given exceptions. |
assert_instance_of( class, obj, [msg] ) |
Ensures that obj is an instance of class. |
refute_instance_of( class, obj, [msg] ) |
Ensures that obj is not an instance of class. |
assert_kind_of( class, obj, [msg] ) |
Ensures that obj is or descends from class. |
refute_kind_of( class, obj, [msg] ) |
Ensures that obj is not an instance of class and is not descending from it. |
assert_respond_to( obj, symbol, [msg] ) |
Ensures that obj responds to symbol. |
refute_respond_to( obj, symbol, [msg] ) |
Ensures that obj does not respond to symbol. |
assert_operator( obj1, operator, [obj2], [msg] ) |
Ensures that obj1.operator(obj2) is true. |
refute_operator( obj1, operator, [obj2], [msg] ) |
Ensures that obj1.operator(obj2) is false. |
assert_send( array, [msg] ) |
Ensures that executing the method listed in array[1] on the object in array[0] with the parameters of array[2 and up] is true. This one is weird eh? |
flunk( [msg] ) |
Ensures failure. This is useful to explicitly mark a test that isn't finished yet. |
除此之外还有一些更加精确的断言方法,详细可以参考有关Rails test的官方手册
A Guide to Testing Rails Applications
测试覆盖率
使用 simplecov,只需要在 Gemfile 文件中为 test 环境添加一行
gem 'simplecov', '~>0.9.0'
再执行 ./bin/bundle install 就可以安装 gem 包。
如上所说 test_helper.rb 文件中保存测试的默认设置,我们只需要在其中加入对包的引入与启动即可:
require 'simplecov'
SimpleCov.start
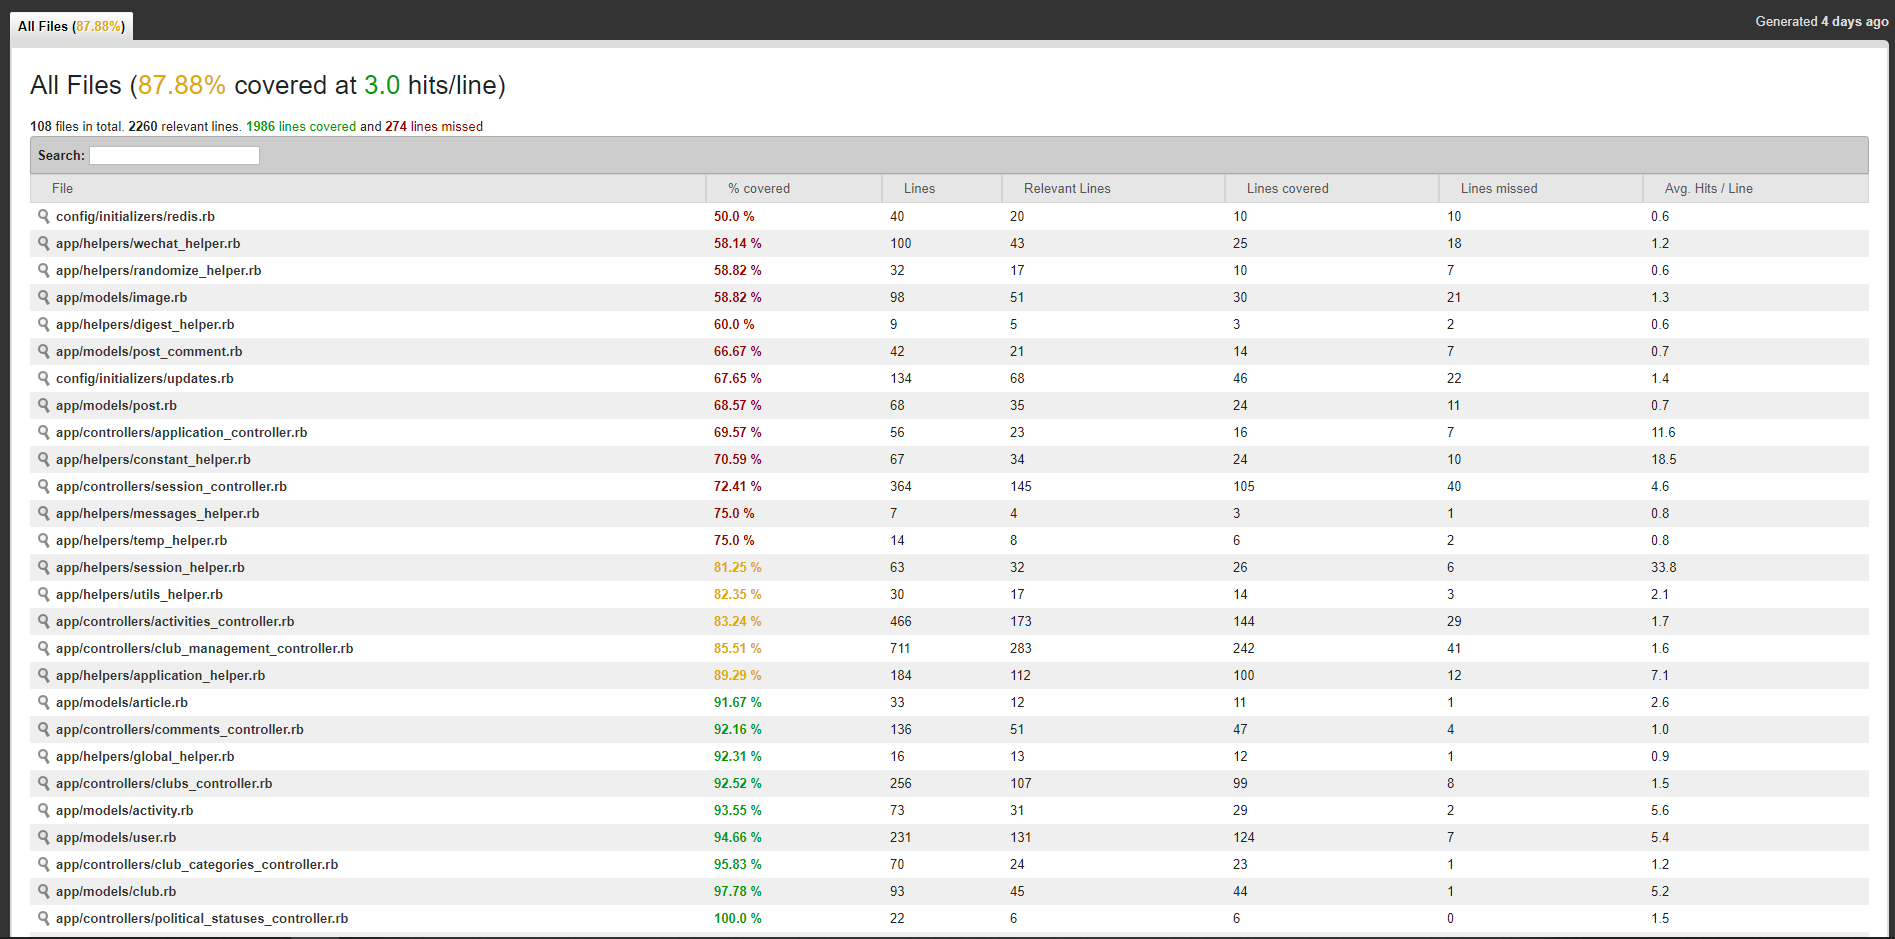
再次运行 rails test 时会在测试结束时显示覆盖率,并在 coverage 文件夹下生成覆盖信息 coverage/index.html,页面如下图所示:

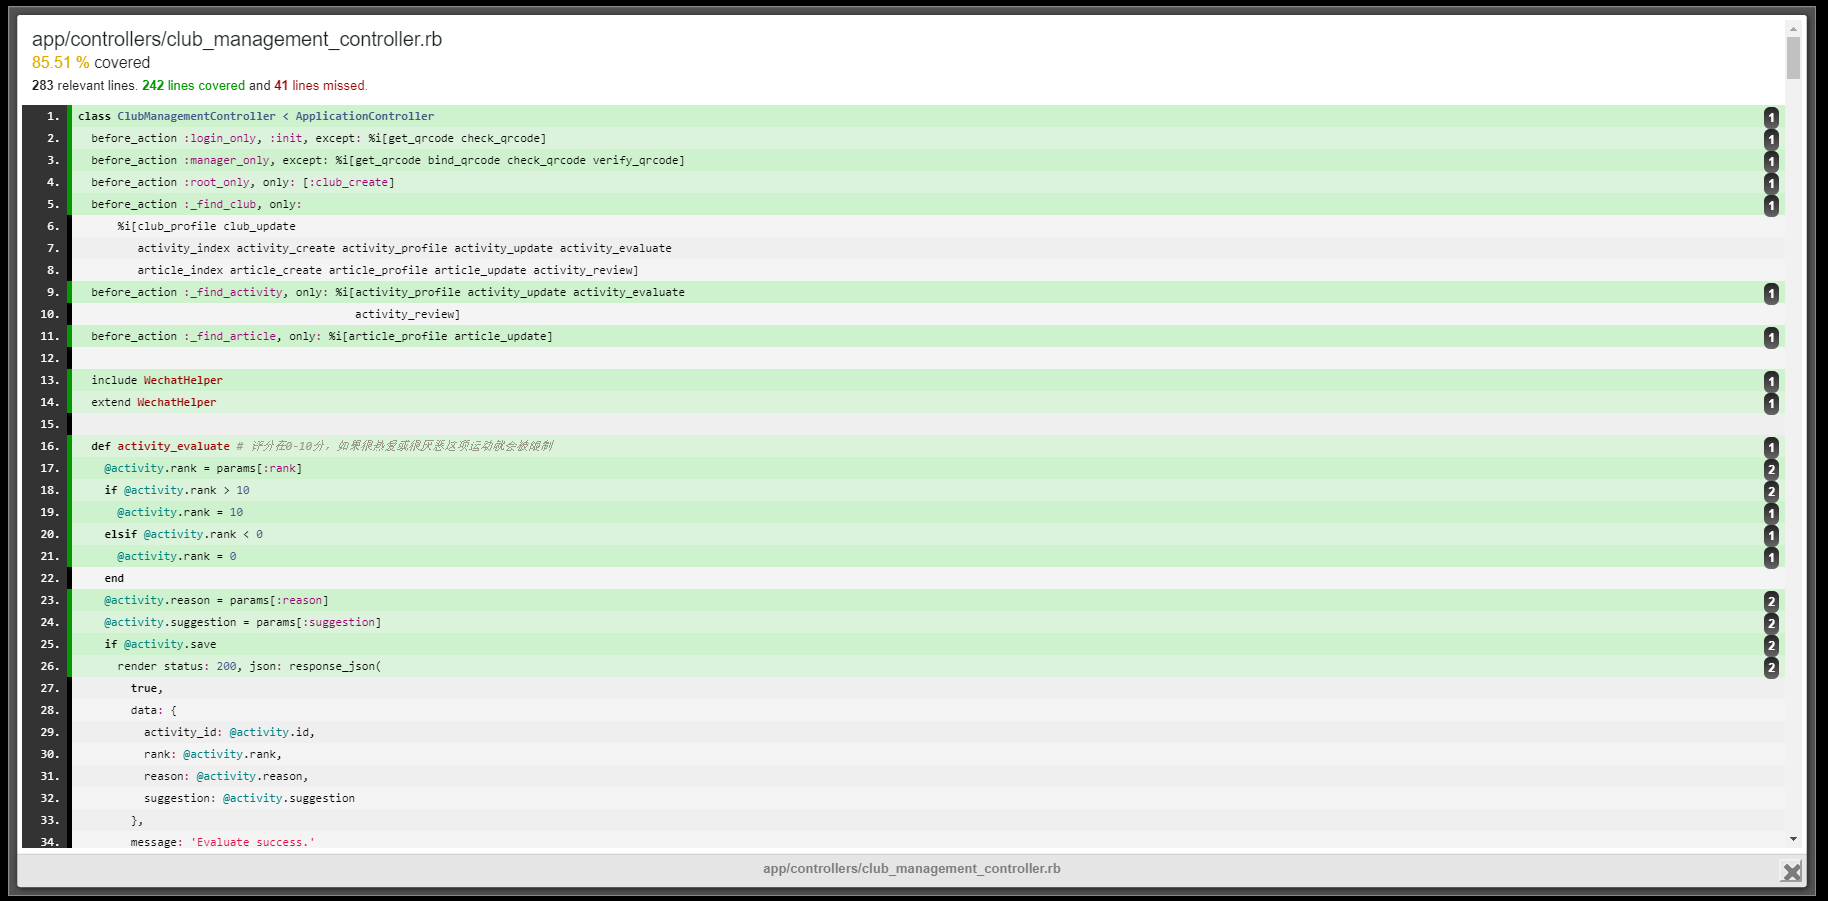
能够看到各个文件的覆盖信息,也可以查看具体文件覆盖信息,如下图所示:

总结
Rails 无论是开发还是测试,都为我们提供了许多便利之处,但如何学会并运用这些便利,是 Rails 学习的一大难点。另外,Ruby 这门语言的更新之快,也让它难以捉摸,它的版本太多,有时最新的版本和之前的并不兼容,也造成了一定的学习困难。总而言之,Ruby 确实是一门博大精深的语言。


