X射线成像(平板+柔性)方法
一、问题提出:
- 1、X射线连续源的Geant4仿真
- 2、基于Geant4的平板和柔性探测器建模实现
- 3、探测器阵列中粒子/能量沉积的多线程收集与输出
- 4、二维数据转化为灰度图片
二、实现过程:
1. X射线连续源产生原理:
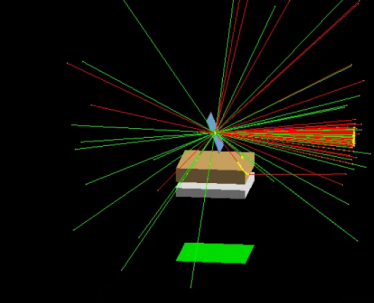
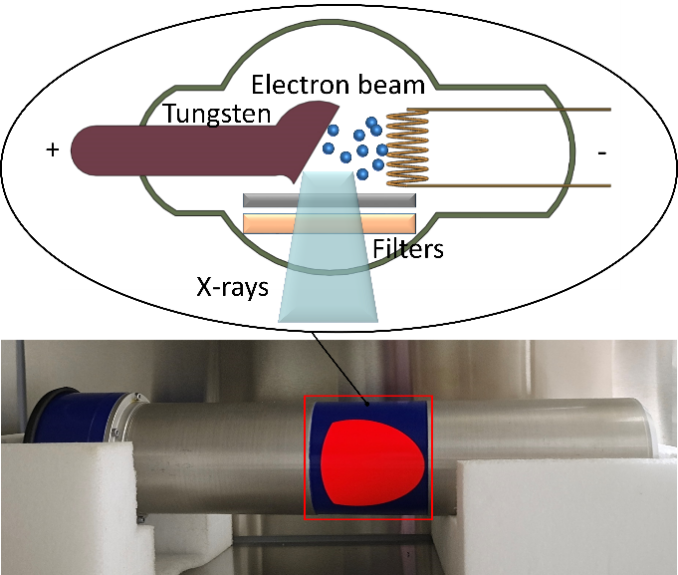
当高速电子与高原子序数靶材碰撞时,会产生X射线。电子的大部分能量用于加热目标材料以产生X射线。一些快速移动的电子深入到目标材料的原子内部,并被其原子核的吸引力吸引到原子核。由于这些力,电子从它们的初始路径被抛出,结果,电子减速,并且它们的能量随着时间的推移而减少。在Geant4中,设置能量可调的连续电子束,钨靶角度设置为65°,经过Be, Al过滤后,最后用探测器接收,并绘制出X射线源分布谱。
| 发射源 | 定向机靶角度 | Be | Al |
|---|---|---|---|
| 电子束 | 65° | 2mm | 4mm |

基于参考文献,实现该能量下与IPEM78的实验X射线能谱的匹配。
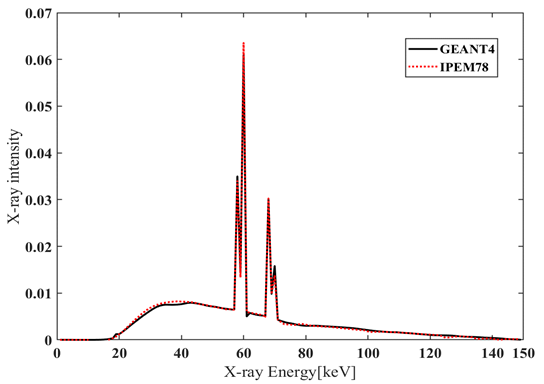
结果显示Geant4模拟与IPEM78得到的实测结果相互匹配,其中60keV附近是钨元素的特征峰。
2. 核心代码
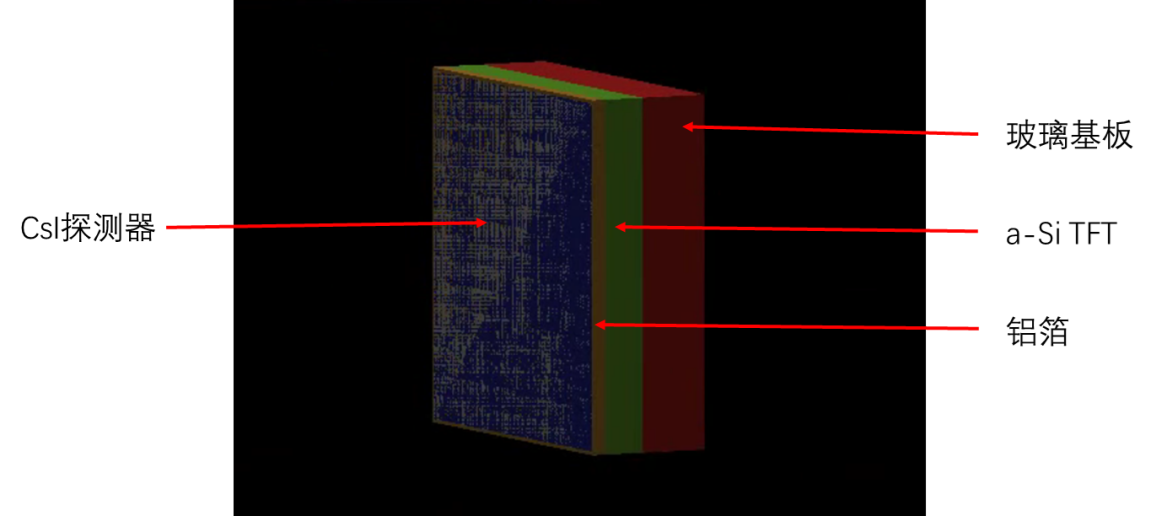
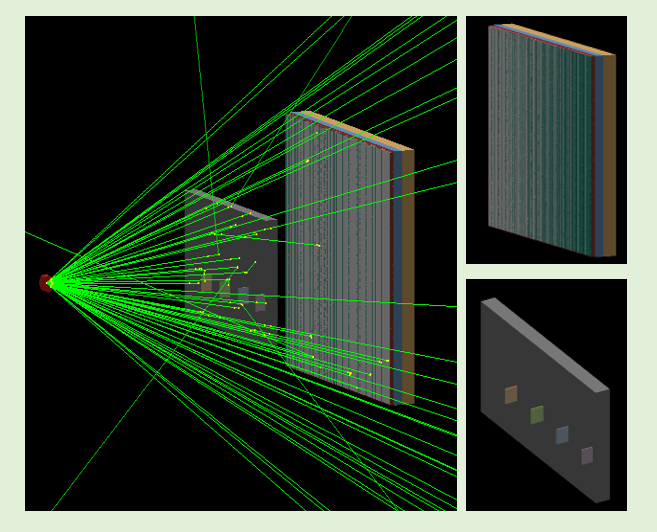
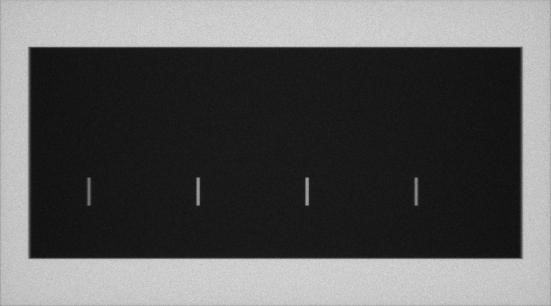
平板探测器在Geant4的建立过程平板探测器和柔性探测器在Geant4中基于基板,建立紧密连接的探测器阵列,实现像素化。其中平板探测器主要包括探测器晶体阵列(NaI,CsI等),TFT阵列,玻璃基板。在Geant4中,探测器阵列的建模过程核心代码如下:
点击查看代码
G4Box* solidModule =
new G4Box("Module",                       // its name
0.5*module_sizeX, 0.5*module_sizeY, 0.5*module_sizeZ); // its size

// logical volume definition (material)
G4LogicalVolume* logicModule =
new G4LogicalVolume(solidModule,   // its solid
air,                  // its material
"Module");            // its name

// physical volume definition (position, relation, copy number)
new G4PVPlacement(0,                        // no rotation
G4ThreeVector(0, 0, DTS*mm),
logicModule,            // its logical volume
"Module",               // its name
logicWorld,             // its mother  volume
false,                  // no boolean operation
2,                      // copy number
fCheckOverlaps);        // checking overlaps

// --- Detector
// --  box
// solid definition (size)
G4Box* solidBox =
new G4Box("Box",                       // its name
0.5*box_sizeX, 0.5*box_sizeY, 0.5*box_sizeZ); // its size

// logical volume definition (material)
logicBox =
new G4LogicalVolume(solidBox,          // its solid
air,              // its material
"Box");            // its name

// physical volume definition (position, relation, copy number)

new G4PVPlacement(0,                        // no rotation
G4ThreeVector(0, 0, 0),
logicBox,            // its logical volume
"Box",               // its name
logicModule,            // its mother  volume
false,                  // no boolean operation
1,                      // copy number
fCheckOverlaps);        // checking overlaps
// --  voxel
// solid definition (size)
G4Box* solidVoxel =
new G4Box("Voxel",                       // its name
0.5*voxel_sizeX, 0.5*voxel_sizeY, 0.5*voxel_sizeZ); // its size

// logical volume definition (material)
logicVoxel =
new G4LogicalVolume(solidVoxel,          // its solid
NaI,                   // its material
"Voxelmax");            // its name

// physical volume definition (position, relation, copy number)
for (G4int i = 0; i < number_of_voxel_dimY ; i++) {
for (G4int j = 0; j < number_of_voxel_dimX ; j++) {
new G4PVPlacement(0,                     // no rotation
G4ThreeVector((j+0.5)*voxel_pitchX-box_sizeX*0.5,
(i+0.5)*voxel_pitchY-box_sizeY*0.5,0), //location
logicVoxel,            // its logical volume
"Voxel",               // its name
logicBox,              // its mother  volume
false,                    // no boolean operation
i*number_of_voxel_dimX+j,      // copy number
0);                       // checking overlaps
}
}
3. 案例介绍
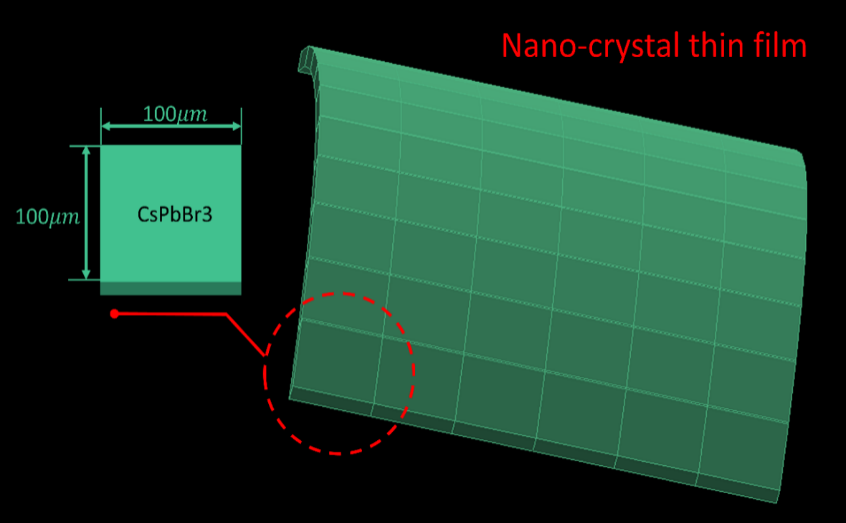
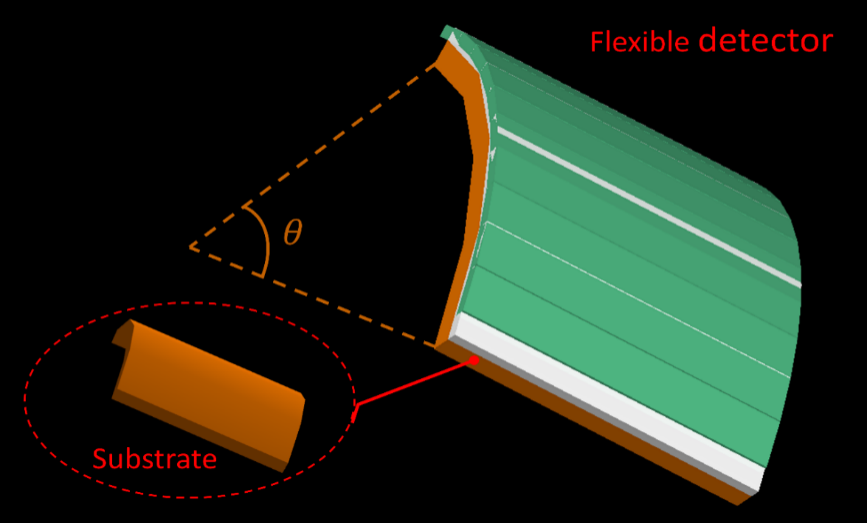
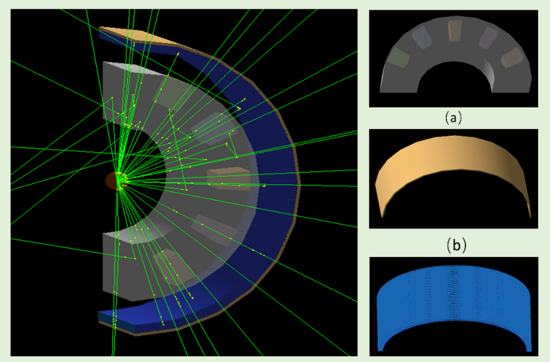
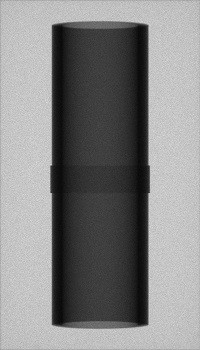
所述X射线柔性探测器包括环状柔性基板及设置在柔性基板上的探测器晶体阵列,探测器晶体阵列尺寸自主可调。由多个探测器晶体依次紧密排布而成,每个探测器为方形,其像素大小为自主可调。其柔性基板选用材料聚乙烯醇( \(PVA\) ) 、聚酯 ( \(PET\) ) 、聚酰亚胺 ( \(PI\) )或聚萘二甲酯乙二醇酯( \(PEN\) ),所述探测器晶体选用\(CsPbBr_{3}\)、\(Cs2TeI_6\)、\(Ni-DABDT\)或\(PbI_2\)均可。本实施例中是以聚酯 (\(PET\), \(C10H8O_4 1.38g/cm^{3}\))或者聚酰亚胺(\(PIs\),\(C_{35}H_{28}N_2O_7\) \(1.47g/cm^{3}\)) 作为衬底。利用有机材料实现角度上的弯曲将其制作成环形,使其轴向上均能与准直器进行对应。探测器晶体选用\(CsPbBr_3\),制作时,通过化学工艺将其喷涂在衬底上即可。
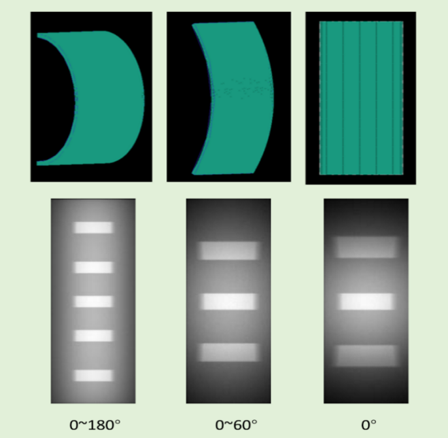
实施例时,为使X射线柔性探测器尺寸最小、成本最低,且具有最优探测效果,需要对单个探测器晶体的空间位置做出要求。具体的:X射线柔性探测器的整体尺寸与单个探测器晶体阵列相对排列位置、探测器的弯曲角度、单个晶体的尺寸大小有关。设单个晶体的三维尺寸分别为dx, dy, dz, 探测器矩阵尺寸为 m×n. 当柔性探测器弯曲角度为θ时, 为了实现紧密排列,对应的每个像素需要旋转的角度为\(dphi_{i,j}\),,相关推导为:
| \(dphi_{i,j}=θ_start+j*θ/n\) | (1) |
|---|
由于晶体具有一定的厚度,探测器弯曲的曲面对应的内径和外径大小分别为$R_1 $和 \(R_2\)。通过计算,可以根据弯曲角度和晶体的尺寸得到对应的曲面内外半径:
| \(R_1=0.5*cryst_{dy}/tan(0.5*(θ/n))\) | (2) |
|---|
| \(R_2=(R_1+cryst_{dy})/tan(0.5*(θ/n))\) | (3) |
|---|
由于阵列依次排列,从而单个晶体在一个完整的探测器阵列中的空间位置可以用公式(4)表示:
| \(Vector_{x,y,z}=((R_1+0.5*cryst_{dz} )*cos(dphi_{i,j} ),(R_1+0.5*cryst_{dz} )*sin(dphi_{i,j} ),i*cryst_{dx} )\) | (4) |
|---|
曲面探测器材料及性能调研
| 样品 | 敏感性 | 像素分辨率(理论可根据实际调整) | 晶体薄膜厚度 | 可用弯曲程度 | 衬底(晶体依附底板材料) |
|---|---|---|---|---|---|
| Ni-DABDT | \(98.6μC Gy_air^(-1) cm^(-2)\) | 150*150μm^2 | 50μm | 未查到 | \(Polyimides(PIs)(C_{35}H_{28}N_2O_7 1.47g/cm^3)\) |
| \(Cs_2TeI_6(4.37g/cm^3)\) | \(76.27μC Gy_{air}^(-1) cm^(-2)\) | 200*200μm^2 | 70μm | 120° | \(Polyimides(PIs)(C_{35}H_{28}N_2O_7 1.47g/cm^3)\) |
| \(钙钛矿(CsPbBr_3)(4.55g/cm^3)\) | \(1450μC Gy_{air}^(-1) cm^(-2)\) | 100*100μm^2 | 20μm | 120° | \(PET衬底(C_{10}H_8O_4 1.38g/cm^3)\) |
| \(a-Se\) | \(114μC Gy_{air}^(-1) cm^(-2)\) | 100*100μm^2 | 100μm | 180° | \(TFT衬底\) |
| \(MOFs\) | \(65.86μC Gy_{air}^(-1) cm^(-2)\) | 250*250μm^2 | 200μm | 180° | \(无衬底\) |
点击查看代码
// full detector
G4Tubs* solidDetector =
new G4Tubs("Detector", ring_R1, ring_R2, 0.5*detector_dZ,-twopi/18, twopi/9);

G4LogicalVolume* logicDetector =
new G4LogicalVolume(solidDetector,       //its solid
air,                 //its material
"Detector");         //its name

// place detector in world
//
G4RotationMatrix detector_Rotation  = G4RotationMatrix();
detector_Rotation.rotateY(-90*deg);
G4ThreeVector detector_position = G4ThreeVector(0,0,DTS);//原先是000
G4Transform3D detector_transform = G4Transform3D( detector_Rotation,detector_position);
new G4PVPlacement(detector_transform,                       //no rotation
logicDetector,           //its logical volume
"Detector",              //its name
logicWorld,              //its mother  volume
false,                   //no boolean operation
0,                       //copy number
fCheckOverlaps);         // checking overlaps

G4Tubs* solidHousing =
new G4Tubs("Housing", ring_R2, ring_R2+0.2*mm, 0.5*detector_dZ, -twopi/18, twopi/9);

G4LogicalVolume* logicHousing =
new G4LogicalVolume(solidHousing,       //its solid
air,                //its material 原先是C35H28N2O7
"Housing");         //its name

G4RotationMatrix Housing_Rotation  = G4RotationMatrix();
Housing_Rotation.rotateY(-90*deg);
G4ThreeVector Housing_position = G4ThreeVector(0,0,DTS);
G4Transform3D Housing_transform = G4Transform3D( Housing_Rotation,Housing_position);
new G4PVPlacement(Housing_transform,                       //no rotation
logicHousing,           //its logical volume
"Housing",              //its name
logicWorld,              //its mother  volume
false,                   //no boolean operation
0,                       //copy number
fCheckOverlaps);         // checking overlaps

G4double gap = 0*mm;        //a gap for wrapping
G4double dX = cryst_dX-gap, dY = cryst_dY-gap;
G4double OG = -0.5*(detector_dZ + cryst_dX);
G4Box* solidCryst = new G4Box("crystal", dX/2, dY/2, cryst_dZ/2);
G4LogicalVolume* logicCryst =
new G4LogicalVolume(solidCryst,          //its solid
                                CsI,           //its material
                                "CrystalLV");        //its name
for (G4int iring = 0; iring < nb_rings ; iring++) {
OG += cryst_dX;
//循环赋值
for (G4int icrys = 0; icrys < nb_cryst ; icrys++) {
G4double phi = icrys*dPhi; //-twopi/18+icrys*dPhi
G4RotationMatrix rotm  = G4RotationMatrix();
//rotm.rotateY(90*deg);
rotm.rotateY(90*deg);
rotm.rotateZ(phi);
//G4ThreeVector uz = G4ThreeVector(std::cos(phi),  std::sin(phi),0.);
G4ThreeVector position = G4ThreeVector((ring_R1+0.5*cryst_dZ)*std::cos(phi),        (ring_R1+0.5*cryst_dZ)*std::sin(phi),OG);
G4Transform3D transform = G4Transform3D(rotm,position);
new G4PVPlacement(transform,             //rotation,position
logicCryst,            //its logical volume
"crystal",             //its name
logicDetector,         //its mother  volume
false,                 //no boolean operation
iring*nb_cryst+icrys,  //copy number
fCheckOverlaps);       // checking overlaps
}
}
4. 多线程代码
Geant4中探测器阵列的数据收集,通过设置二维矩阵,按次序获取每个从灵敏探测器中收集的能量沉积或光子数。为了实现多线程功能,还将每个线程获得的粒子进行对应的加和,最后返回至RunAction.cc文件中输出至txt文件。收集及多线程合并的核心代码如下所示:
点击查看代码
```5. 数据转换
点击查看代码
#Python3.py: 将数据转换成二维图片

import numpy as np
import os,sys
import matplotlib.pylab as plt
import pandas as pd
data_array1=[0 for i in range(1800000)]
def main():
  f = open(r"./result_84.txt")
  #next(f)
  line = f.readline()
  data_list = []
  while line:
     num = list(map(float,line.split()))
     data_list.append(num)
     line = f.readline()
  f.close()
  data_array = np.array(data_list)
  #print(data_array[0,0])
  print(int(len(data_array[:,0])))

  for i in range(int(len(data_array[:,0])/6)):
      data_array1[i]=data_array[i,0]+data_array[i+1800000,0]+data_array[i+1800000*2,0]+data_array[i+1800000*3,0]+data_array[i+1800000*4,0]+data_array[i+1800000*5,0]

  #print(data_array1)
  #data_array = np.array(data_list).reshape(len(data_list),4)
  #print(data_array)
  #x = np.arange(25599+2)
  #y = np.histogram(data_array[:,0],bins=x)[0]
  #min1=min(y)
  #max1=max(y)
  map1 = np.array(data_array1).reshape((1000,1800))
  pd.DataFrame(map1).to_excel('./data11.xlsx')
  pd.DataFrame(map1).to_excel('./data22.xlsx')
  plt.figure()
  plt.pcolor(map1)
  plt.colorbar()
  plt.savefig("heatmap22.jpg")


if __name__=='__main__':
   main()


#Python1.py: 将二维彩色图片转化成灰度图片
#!/usr/bin/python
# -*- coding: utf-8 -*-
import os,sys
import numpy as np
import matplotlib.pylab as plt
import xlrd
import pandas as pd
from PIL import Image

def main():
  readbook = pd.read_excel(r'./data22.xlsx')
  readbook = np.array(readbook)
  max1=readbook.max()
  min1=readbook.min()
  readbook1=(255*(readbook-min1)/(max1-min1)).astype(np.int16)
  #readbook1=map(int,readbook1)
  print(readbook1)
  print(max1)
  print(min1)
  im = Image.fromarray(readbook1)
  im=im.convert("L")
  im.save('123.jpg')


if __name__=='__main__':
   main()
本文作者:Agneau
文字编辑:Geant4Cat
本文链接:https://www.cnblogs.com/Geant4/articles/16419472.html
⛔转载请附上Geant4Cat的原文链接,并通过 E-mail 等方式告知,谢谢!否则举报

 浙公网安备 33010602011771号