Linux下cmake编译流程实践--添加外部库(OpenCV)
OpenCV库的安装
首先下载最新的OpenCV库,OpenCV-4.3.0.解压后,在子目录下创建
mkdir release
cd release
cmake -D CMAKE_BUILD_TYPE=RELEASE -D CMAKE_INSTALL_PREFIX=/usr/local -D WITH_TBB=ON -D BUILD_NEW_PYTHON_SUPPORT=ON -D WITH_V4L=ON -D INSTALL_C_EXAMPLES=ON -D INSTALL_PYTHON_EXAMPLES=ON -D BUILD_EXAMPLES=ON -D WITH_QT=ON -D WITH_GTK=ON -D WITH_OPENGL=ON ..
make -j4
sudo make install
之所以要对cmake 进行配置,是由于在后面使用 cv::imshow的时候有报错:
chasing@chasing:~/opencv_learn/build$ ./Opencv_first
1200	674
terminate called after throwing an instance of 'cv::Exception'
  what():  OpenCV(4.3.0) /home/chasing/opencv-4.3.0/modules/highgui/src/window.cpp:651: error: (-2:Unspecified error) The function is not implemented. Rebuild the library with Windows, GTK+ 2.x or Cocoa support. If you are on Ubuntu or Debian, install libgtk2.0-dev and pkg-config, then re-run cmake or configure script in function 'cvShowImage'

Aborted (core dumped)

CMakeLists.txt的编写
cmake_minimum_required( VERSION 2.8)
set(CMAKE_CXX_FLAGS "-std=c++11")
project(Opencv_learn_project)

find_package(OpenCV REQUIRED)
message("opencv dir = ${OpenCV_INCLUDE_DIRS}")
message("Opencv lib = ${OpenCV_LIBRARIES}")
include_directories(${OpenCV_INCLUDE_DIRS})

add_executable(Opencv_first opencv_first.cpp)
target_link_libraries(Opencv_first ${OpenCV_LIBRARIES})
opencv_first.cpp的编写
#include<iostream>
#include<chrono>  //C++ about the timer
using namespace std;

#include<opencv2/core/core.hpp>
#include<opencv2/highgui/highgui.hpp>

int main(int argc, char** argv)
{
    cv::Mat image;
    image = cv::imread("ubuntu.png");
    if(image.data == nullptr){
        cerr<<argv[1]<<"unexisted!"<<endl;
        return 0;
    }
    cout<<image.cols<<"\t"<<image.rows<<endl;
    cv::imshow("image",image);
    cv::waitKey(0);

    cv::Mat image_another = image;                //直接赋值,对image_another修改,又修改了image的数据
    image_another(cv::Rect(0,0,100,100)).setTo(0);
    cv::imshow("image",image);
    cv::waitKey(0);

    cv::Mat image_clone = image.clone();         //正确的拷贝方式
    image_clone(cv::Rect(0,0,100,100)).setTo(255);
    cv::imshow("image",image);
    cv::imshow("image_clone",image_clone);
    cv::waitKey(0);
    return 0;
}
上述历程完成载入一幅图片,显示一幅图片,图片拷贝,以及图片的修改操作。
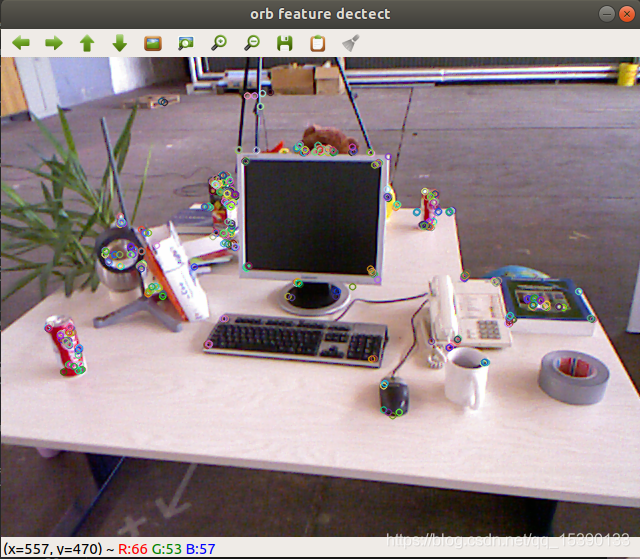
基于OpenCV的ORB角点匹配历程
以下历程源自 《视觉SLAM十四讲》,我这是只是对应验证了下结果。
#include<iostream>
#include<opencv2/core/core.hpp>
#include<opencv2/highgui/highgui.hpp>
#include<opencv2/features2d/features2d.hpp>

using namespace std;
using namespace cv;

int main(int argc, char** argv)
{
    if(argc !=3){
        cout<<"need tow images"<<endl;
        return 1;
    }

    Mat img_1 = imread(argv[1]);
    Mat img_2 = imread(argv[2]);

    std::vector<KeyPoint> keypoints_1, keypoints_2;
    Mat descriptors_1, descriptors_2;
    Ptr<ORB> orb = ORB::create(500,1.2f,8,31,0,2,ORB::HARRIS_SCORE,31,20);

    orb->detect(img_1,keypoints_1);
    orb->detect(img_2,keypoints_2);

    orb->compute(img_1,keypoints_1,descriptors_1);
    orb->compute(img_2,keypoints_2,descriptors_2);

    Mat outimg1;
    drawKeypoints(img_1,keypoints_1,outimg1,Scalar::all(-1),DrawMatchesFlags::DEFAULT);
    imshow("orb feature dectect",outimg1);
    //waitKey(0);

    vector<DMatch> matches;
    BFMatcher matcher(NORM_HAMMING);
    matcher.match(descriptors_1,descriptors_2,matches);

    double min_dist =10000, max_dist = 0;
    for(int i=0;i<descriptors_1.rows;i++){
        double dist = matches[i].distance;
        if(dist<min_dist) min_dist = dist;
        if(dist>max_dist) max_dist = dist;
    }

    printf("--max dist: %f \n", max_dist);
    printf("--min_dist: %f \n", min_dist);

    std::vector<DMatch> good_matches;
    for(int i=0;i<descriptors_1.rows;i++){
        if(matches[i].distance <= max(2*min_dist,30.0)){
            good_matches.push_back(matches[i]);
        }
    }

    Mat img_match;
    Mat img_goodmatch;
    drawMatches(img_1,keypoints_1,img_2,keypoints_2,matches,img_match);
    drawMatches(img_1,keypoints_1,img_2,keypoints_2,good_matches,img_goodmatch);
    imshow("all the matches", img_match);
    imshow("all the good matches", img_goodmatch);
    waitKey(0);
    return 0;
}
输出结果为:


chasing@chasing:~/opencv_learn/build$ ./orb_test 1.png  2.png
--max dist: 94.000000
--min_dist: 4.000000
总结:上述ORB历程中,采用的为OpenCV中集成有的API,且为默认参数,汉明距离。最后对匹配结果进行筛选,保留最小距离为汉明距离2倍的点,得到匹配图2。


 浙公网安备 33010602011771号