代码改变世界

Protocol Buffers简明教程

2018-12-13 12:36  GarfieldEr007  阅读(446)  评论(0编辑  收藏  举报

随着微服务架构的流行,RPC框架渐渐地成为服务框架的一个重要部分。在很多RPC的设计中,都采用了高性能的编解码技术,Protocol Buffers就属于其中的佼佼者。Protocol Buffers是Google开源的一个语言无关、平台无关的通信协议,其小巧、高效和友好的兼容性设计,使其被广泛使用。

概述

protobuf是什么?

Protocol buffers are Google’s language-neutral, platform-neutral, extensible mechanism for serializing structured data – think XML, but smaller, faster, and simpler. You define how you want your data to be structured once, then you can use special generated source code to easily write and read your structured data to and from a variety of data streams and using a variety of languages.

  • Google良心企业出厂的;
  • 是一种序列化对象框架(或者说是编解码框架),其他功能相似的有Java自带的序列化、Facebook的Thrift和JBoss Marshalling等;
  • 通过proto文件定义结构化数据,其他功能相似的比如XML、JSON等;
  • 自带代码生成器,支持多种语言;

核心特点

  • 语言无关、平台无关
  • 简洁
  • 高性能
  • 良好的兼容性

为什么叫“Protocol Buffers”?

官方如是说:

The name originates from the early days of the format, before we had the protocol buffer compiler to generate classes for us. At the time, there was a class called ProtocolBuffer which actually acted as a buffer for an individual method. Users would add tag/value pairs to this buffer individually by calling methods like AddValue(tag, value). The raw bytes were stored in a buffer which could then be written out once the message had been constructed.

Since that time, the “buffers” part of the name has lost its meaning, but it is still the name we use. Today, people usually use the term “protocol message” to refer to a message in an abstract sense, “protocol buffer” to refer to a serialized copy of a message, and “protocol message object” to refer to an in-memory object representing the parsed message.

“变态的”性能表现

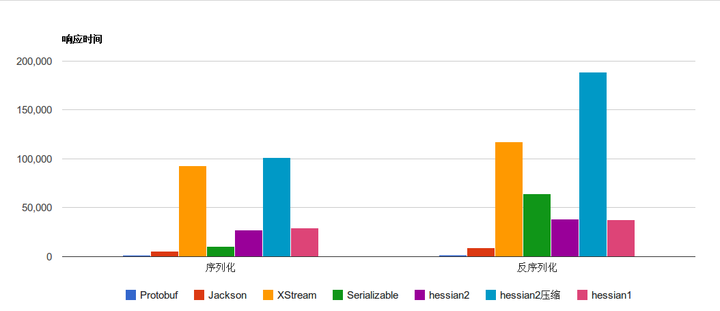
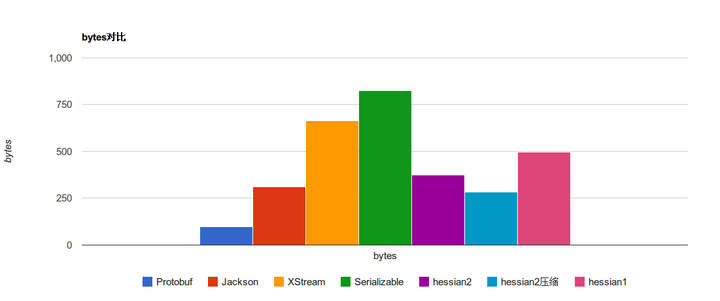
有位网友曾经做过各种通用序列化协议技术的对比,我这里直接拿来给大家感受一下:

序列化响应时间对比
序列化bytes对比
具体的数字

快速开始

以下示例源码已上传至github:ginobefun/learning_projects

新建一个maven项目并添加依赖

<?xml version="1.0" encoding="UTF-8"?>
<project xmlns="http://maven.apache.org/POM/4.0.0"
         xmlns:xsi="http://www.w3.org/2001/XMLSchema-instance"
         xsi:schemaLocation="http://maven.apache.org/POM/4.0.0 http://maven.apache.org/xsd/maven-4.0.0.xsd">
    <modelVersion>4.0.0</modelVersion>

    <groupId>com.ginobefunny.learning</groupId>
    <artifactId>leanring-protobuf</artifactId>
    <version>1.0-SNAPSHOT</version>

    <dependencies>
        <dependency>
            <groupId>com.google.protobuf</groupId>
            <artifactId>protobuf-java</artifactId>
            <version>3.2.0</version>
        </dependency>
    </dependencies>
</project>

新建protobuf的消息定义文件addressbook.proto

syntax = "proto3"; // 声明为protobuf 3定义文件
package tutorial;

option java_package = "com.ginobefunny.learning.protobuf.message"; // 声明生成消息类的java包路径
option java_outer_classname = "AddressBookProtos";  // 声明生成消息类的类名

message Person {
  string name = 1;
  int32 id = 2;
  string email = 3;

  enum PhoneType {
    MOBILE = 0;
    HOME = 1;
    WORK = 2;
  }

  message PhoneNumber {
    string number = 1;
    PhoneType type = 2;
  }

  repeated PhoneNumber phones = 4;
}

message AddressBook {
  repeated Person people = 1;
}

使用protoc工具生成消息对应的Java类

  • 已发布版本中下载protoc工具,比如protoc-3.2.0-win32;
  • 解压后将bin目录添加到path路径;
  • 执行以下protoc命令生成Java类:
protoc -I=. --java_out=src/main/java addressbook.proto

编写测试类写入和读取序列化文件

  • AddPerson类通过用户每次添加一个联系人,并序列化保存到指定文件中。
public class AddPerson {

    // 通过用户输入构建一个Person对象
    static AddressBookProtos.Person promptForAddress(BufferedReader stdin,
                                                     PrintStream stdout) throws IOException {
        AddressBookProtos.Person.Builder person = AddressBookProtos.Person.newBuilder();

        stdout.print("Enter person ID: ");
        person.setId(Integer.valueOf(stdin.readLine()));

        stdout.print("Enter name: ");
        person.setName(stdin.readLine());

        stdout.print("Enter email address (blank for none): ");
        String email = stdin.readLine();
        if (email.length() > 0) {
            person.setEmail(email);
        }

        while (true) {
            stdout.print("Enter a phone number (or leave blank to finish): ");
            String number = stdin.readLine();
            if (number.length() == 0) {
                break;
            }

            AddressBookProtos.Person.PhoneNumber.Builder phoneNumber =
                    AddressBookProtos.Person.PhoneNumber.newBuilder().setNumber(number);

            stdout.print("Is this a mobile, home, or work phone? ");
            String type = stdin.readLine();
            if (type.equals("mobile")) {
                phoneNumber.setType(AddressBookProtos.Person.PhoneType.MOBILE);
            } else if (type.equals("home")) {
                phoneNumber.setType(AddressBookProtos.Person.PhoneType.HOME);
            } else if (type.equals("work")) {
                phoneNumber.setType(AddressBookProtos.Person.PhoneType.WORK);
            } else {
                stdout.println("Unknown phone type.  Using default.");
            }

            person.addPhones(phoneNumber);
        }

        return person.build();
    }

    // 加载指定的序列化文件(如不存在则创建一个新的),再通过用户输入增加一个新的联系人到地址簿,最后序列化到文件中
    public static void main(String[] args) throws Exception {
        if (args.length != 1) {
            System.err.println("Usage:  AddPerson ADDRESS_BOOK_FILE");
            System.exit(-1);
        }

        AddressBookProtos.AddressBook.Builder addressBook = AddressBookProtos.AddressBook.newBuilder();

        // Read the existing address book.
        try {
            addressBook.mergeFrom(new FileInputStream(args[0]));
        } catch (FileNotFoundException e) {
            System.out.println(args[0] + ": File not found.  Creating a new file.");
        }

        // Add an address.
        addressBook.addPeople(promptForAddress(new BufferedReader(new InputStreamReader(System.in)),
                        System.out));

        // Write the new address book back to disk.
        FileOutputStream output = new FileOutputStream(args[0]);
        addressBook.build().writeTo(output);
        output.close();
    }
}
  • ListPeople类读取序列化文件并输出所有联系人信息。
public class ListPeople {

    // 打印地址簿中所有联系人信息
    static void print(AddressBookProtos.AddressBook addressBook) {
        for (AddressBookProtos.Person person: addressBook.getPeopleList()) {
            System.out.println("Person ID: " + person.getId());
            System.out.println("  Name: " + person.getName());
            if (!person.getPhonesList().isEmpty()) {
                System.out.println("  E-mail address: " + person.getEmail());
            }

            for (AddressBookProtos.Person.PhoneNumber phoneNumber : person.getPhonesList()) {
                switch (phoneNumber.getType()) {
                    case MOBILE:
                        System.out.print("  Mobile phone #: ");
                        break;
                    case HOME:
                        System.out.print("  Home phone #: ");
                        break;
                    case WORK:
                        System.out.print("  Work phone #: ");
                        break;
                }
                System.out.println(phoneNumber.getNumber());
            }
        }
    }

    // 加载指定的序列化文件,并输出所有联系人信息
    public static void main(String[] args) throws Exception {
        if (args.length != 1) {
            System.err.println("Usage:  ListPeople ADDRESS_BOOK_FILE");
            System.exit(-1);
        }

        // Read the existing address book.
        AddressBookProtos.AddressBook addressBook =
                AddressBookProtos.AddressBook.parseFrom(new FileInputStream(args[0]));

        print(addressBook);
    }
}

验证效果

先添加一个联系人Gino

再添加一个联系人Slightly

最后显示所有联系人信息

实例小结

  • 通过以上的例子我们能大概感受到开发protobuf序列化的大致步骤:定义proto文件、生成对应的Java类文件、通过消息类的构造器构造对象并通过writeTo序列化、通过parseFrom反序列化对象;
  • 如果查看中间序列化的文件,我们可以发现protobuf序列化的二进制文件非常紧凑,因此文件更小,传输性能更好。

深入学习

关于proto文件

protobuf版本

  • protobuf现在主流的有2.X和3.X版本,两者之间相差比较大,对于刚采用的建议使用3.X版本;
  • 如果采用3.X版本,需要再proto文件第一个非注释行声明(就像我们上面的例子那样),因为protobuf默认认为是2.X版本;

message结构

  • 在一个proto文件中可以包含多个message定义,message之间可以互相引用,message还可以嵌套message和枚举类;
  • 一个message通常包含一至多个字段;
  • 每个字段包含以下几个部分:字段描述符(可选)、字段类型、字段名称和字段对应的Tag;

字段描述符

字段描述符用于描述字段出现的频率,有以下两个可选值:

  • singular:表示出现0次或1次;如果没有声明描述符,默认为singular;
  • repeated:表示出现0次或多次;

字段类型

  • 基本数据类型:包括double、float、bool、string、bytes、int32、int64、uint32、uint64、sint32、sint64、fixed32、fixed64、sfixed32、sfixed64;
  • 引用其他message类型:这个就有点像我们Java里面的对象引用的方式;
  • 枚举类型:对于枚举类型,protobuf有个约束:枚举的第一项对应的值必须为0;下面是一个包含枚举类型的消息定义:
message SearchRequest {
  string query = 1;
  int32 page_number = 2;
  int32 result_per_page = 3;
  enum Corpus {
    UNIVERSAL = 0;
    WEB = 1;
    IMAGES = 2;
    LOCAL = 3;
    NEWS = 4;
    PRODUCTS = 5;
    VIDEO = 6;
  }
  Corpus corpus = 4;
}

字段对应的Tag

  • 对应同一个message里面的字段,每个字段的Tag是必须唯一数字;
  • Tag主要用于说明字段在二进制文件的对应关系,一旦指定字段为对应的Tag,不应该在后续进行变更;
  • 对于Tag的分配,1~15只用一个byte进行编码(因此应该留给那些常用的字段),16~2047用两个byte进行编码,最大支持到536870911,但是中间有一段(19000~19999)是protobuf内部使用的;
  • 可以通过reserved关键字来预留Tag和字段名,还有一种场景是如果某个字段已经被废弃了不希望后续被采用,也可以用reserved关键字声明;

字段的默认值

protobuf 2.X版本是支持在字段中声明默认值的,但是在3.X版本中去掉了默认值的定义,主要是为了区别用户是否设置了一个和默认值一样的值的情况。对于3.X版本,protobuf采用以下规则处理默认值:

  • 对应string类型,默认值为一个空字符串;
  • 对于bytes类型,默认值为一个空的byte数组;
  • 对于bool类型,默认值为false;
  • 对于数值类型,默认值为0;
  • 对于枚举类型,默认值为第一项,也即值为0的那个枚举值;
  • 对于引用其他message类型:其默认值和对应的语言是相关的;

Map字段类型

  • protobuf也支持定义Map类型的字段,但是对于Map的key的类型只能是整数型(包括各种int32和int64)和string类型;
  • Map类型不能定义为repeated;
  • Map类型的数据是无序的;
  • 以下是一个Map类型的字段定义示例:
map<string, Project> projects = 3;

导入其他proto文件

  • 可以通过import关键字导入其他proto文件,从而重用message类型;下面是一个import的示例:
import "myproject/other_protos.proto";

如果proto中的message要扩展怎么办?

proto具有很好的扩展性,但是也要遵循以下原则:

  • 不能修改原有字段的Tag;
  • 如果新增一个字段,对于老的二进制序列化文件处理时会给这个字段增加默认值;如果是升级了proto文件而没有升级对应的代码,则新的字段会被忽略;
  • 可以删除字段,但是对应的Tag不应该再被使用,否则对于之前的二进制序列化消息处理时对应关系出现问题;
  • int32、uint32、int64、uint64和bool类型是相互兼容的,这意味着你可以在他们之间修改类型而不会有兼容性问题;

Any消息类型

  • protobuf内置了一些通用的消息类型,Any就是其他的一种,通过查看它的proto文件可以看到它包含了一个URL标识符和一个byte数组;
  • 在使用Any消息类型之前,需要通过import “google/protobuf/any.proto”;导入proto文件定义;

Oneof关键字

  • oneof关键字用于声明一组字段中,必须要有一个字段被赋值;通常比如我们在登陆的时候,可以用手机号、邮箱和用户名登陆,这种时候就可以使用oneof来定义;
  • 当我们对oneof其中一个字段赋值时,其他字段的值将会被清空;所以只有最后一次赋值是有效的;
  • 下面是一个oneof的示例:
message LoginMessage {
  oneof user_identifier {
    string user_name = 4;
    string phone_num = 5;
    string user_email = 6;
  }

  string password = 10;
}

定义服务

  • 在proto文件中还允许定义RPC服务,以下是一个示例:
service SearchService {
  rpc Search (SearchRequest) returns (SearchResponse);
}

小结

  • 随着微服务架构的流行,RPC框架渐渐地成为服务框架的一个重要部分。在很多RPC的设计中,都采用了高性能的编解码技术,protobuf就属于其中的佼佼者;
  • protobuf相对于其他编解码框架,有着非常惊人的性能表现;
  • 通过一个简单的实例,我们了解如果使用protobuf进行序列化和数据交互;
  • 最后,我们列举了一些重要的特性和配置说明,这些在我们使用protobuf中都会给频繁使用;
  • 后续学习:后面我会根据所学的Netty和protobuf知识,开发一个简单的RPC框架。

参考资料

 from:https://zhuanlan.zhihu.com/p/25174418