SpringBoot笔记(7)
一、单元测试
1、JUnit5简介
Spring Boot 2.2.0 版本开始引入 JUnit 5 作为单元测试默认库
作为最新版本的JUnit框架,JUnit5与之前版本的Junit框架有很大的不同。由三个不同子项目的几个不同模块组成。
JUnit 5 = JUnit Platform + JUnit Jupiter + JUnit Vintage
JUnit Platform: Junit Platform是在JVM上启动测试框架的基础,不仅支持Junit自制的测试引擎,其他测试引擎也都可以接入。
JUnit Jupiter: JUnit Jupiter提供了JUnit5的新的编程模型,是JUnit5新特性的核心。内部 包含了一个测试引擎,用于在Junit Platform上运行。
JUnit Vintage: 由于JUint已经发展多年,为了照顾老的项目,JUnit Vintage提供了兼容JUnit4.x,Junit3.x的测试引擎。
注意:
SpringBoot 2.4 以上版本移除了默认对 Vintage 的依赖。如果需要兼容junit4需要自行引入(不能使用junit4的功能 @Test)
<dependency>
    <groupId>org.junit.vintage</groupId>
    <artifactId>junit-vintage-engine</artifactId>
    <scope>test</scope>
    <exclusions>
        <exclusion>
            <groupId>org.hamcrest</groupId>
            <artifactId>hamcrest-core</artifactId>
        </exclusion>
    </exclusions>
</dependency>
2、使用
<dependency>
  <groupId>org.springframework.boot</groupId>
  <artifactId>spring-boot-starter-test</artifactId>
  <scope>test</scope>
</dependency>
现在版本:
@SpringBootTest
class Boot05WebAdminApplicationTests {


    @Test
    void contextLoads() {

    }
}
SpringBoot整合Junit以后。
- 编写测试方法:@Test标注(注意需要使用junit5版本的注解)
- Junit类具有Spring的功能,@Autowired、比如 @Transactional 标注测试方法,测试完成后自动回滚
3、常用注解
JUnit5的注解与JUnit4的注解有所变化
https://junit.org/junit5/docs/current/user-guide/#writing-tests-annotations
- @Test :表示方法是测试方法。但是与JUnit4的@Test不同,他的职责非常单一不能声明任何属性,拓展的测试将会由Jupiter提供额外测试
- @ParameterizedTest :表示方法是参数化测试,下方会有详细介绍
- @RepeatedTest :表示方法可重复执行,下方会有详细介绍
- @DisplayName :为测试类或者测试方法设置展示名称
- @BeforeEach :表示在每个单元测试之前执行
- @AfterEach :表示在每个单元测试之后执行
- @BeforeAll :表示在所有单元测试之前执行
- @AfterAll :表示在所有单元测试之后执行
- @Tag :表示单元测试类别,类似于JUnit4中的@Categories
- @Disabled :表示测试类或测试方法不执行,类似于JUnit4中的@Ignore
- @Timeout :表示测试方法运行如果超过了指定时间将会返回错误
- @ExtendWith :为测试类或测试方法提供扩展类引用
4、断言
断言(assertions)是测试方法中的核心部分,用来对测试需要满足的条件进行验证。这些断言方法都是 org.junit.jupiter.api.Assertions 的静态方法。JUnit 5 内置的断言可以分成如下几个类别:
检查业务逻辑返回的数据是否合理。
所有的测试运行结束以后,会有一个详细的测试报告;
1、简单断言
用来对单个值进行简单的验证。如:
| 方法 | 说明 |
|---|---|
| assertEquals | 判断两个对象或两个原始类型是否相等 |
| assertNotEquals | 判断两个对象或两个原始类型是否不相等 |
| assertSame | 判断两个对象引用是否指向同一个对象 |
| assertNotSame | 判断两个对象引用是否指向不同的对象 |
| assertTrue | 判断给定的布尔值是否为 true |
| assertFalse | 判断给定的布尔值是否为 false |
| assertNull | 判断给定的对象引用是否为 null |
| assertNotNull | 判断给定的对象引用是否不为 null |
@Test
@DisplayName("simple assertion")
public void simple() {
     assertEquals(3, 1 + 2, "simple math");
     assertNotEquals(3, 1 + 1);

     assertNotSame(new Object(), new Object());
     Object obj = new Object();
     assertSame(obj, obj);

     assertFalse(1 > 2);
     assertTrue(1 < 2);

     assertNull(null);
     assertNotNull(new Object());
}
2、数组断言
通过 assertArrayEquals 方法来判断两个对象或原始类型的数组是否相等
@Test
@DisplayName("array assertion")
public void array() {
 assertArrayEquals(new int[]{1, 2}, new int[] {1, 2});
}
3、组合断言
assertAll 方法接受多个 org.junit.jupiter.api.Executable 函数式接口的实例作为要验证的断言,可以通过 lambda 表达式很容易的提供这些断言
@Test
@DisplayName("assert all")
public void all() {
 assertAll("Math",
    () -> assertEquals(2, 1 + 1),
    () -> assertTrue(1 > 0)
 );
}
4、异常断言
在JUnit4时期,想要测试方法的异常情况时,需要用@Rule注解的ExpectedException变量还是比较麻烦的。而JUnit5提供了一种新的断言方式Assertions.assertThrows() ,配合函数式编程就可以进行使用。
@Test
@DisplayName("异常测试")
public void exceptionTest() {
    ArithmeticException exception = Assertions.assertThrows(
           //扔出断言异常
            ArithmeticException.class, () -> System.out.println(1 % 0));

}
5、超时断言
Junit5还提供了Assertions.assertTimeout() 为测试方法设置了超时时间
@Test
@DisplayName("超时测试")
public void timeoutTest() {
    //如果测试方法时间超过1s将会异常
    Assertions.assertTimeout(Duration.ofMillis(1000), () -> Thread.sleep(500));
}
6、快速失败
通过 fail 方法直接使得测试失败
@Test
@DisplayName("fail")
public void shouldFail() {
 fail("This should fail");
}
5、前置条件(assumptions)
JUnit 5 中的前置条件(assumptions【假设】)类似于断言,不同之处在于不满足的断言会使得测试方法失败,而不满足的前置条件只会使得测试方法的执行终止。前置条件可以看成是测试方法执行的前提,当该前提不满足时,就没有继续执行的必要。
@DisplayName("前置条件")
public class AssumptionsTest {
 private final String environment = "DEV";

 @Test
 @DisplayName("simple")
 public void simpleAssume() {
    assumeTrue(Objects.equals(this.environment, "DEV"));
    assumeFalse(() -> Objects.equals(this.environment, "PROD"));
 }

 @Test
 @DisplayName("assume then do")
 public void assumeThenDo() {
    assumingThat(
       Objects.equals(this.environment, "DEV"),
       () -> System.out.println("In DEV")
    );
 }
}
assumeTrue 和 assumFalse 确保给定的条件为 true 或 false,不满足条件会使得测试执行终止。assumingThat 的参数是表示条件的布尔值和对应的 Executable 接口的实现对象。只有条件满足时,Executable 对象才会被执行;当条件不满足时,测试执行并不会终止。
6、嵌套测试
JUnit 5 可以通过 Java 中的内部类和@Nested 注解实现嵌套测试,从而可以更好的把相关的测试方法组织在一起。在内部类中可以使用@BeforeEach 和@AfterEach 注解,而且嵌套的层次没有限制。
@DisplayName("A stack")
class TestingAStackDemo {

    Stack<Object> stack;

    @Test
    @DisplayName("is instantiated with new Stack()")
    void isInstantiatedWithNew() {
        new Stack<>();
    }

    @Nested
    @DisplayName("when new")
    class WhenNew {

        @BeforeEach
        void createNewStack() {
            stack = new Stack<>();
        }

        @Test
        @DisplayName("is empty")
        void isEmpty() {
            assertTrue(stack.isEmpty());
        }

        @Test
        @DisplayName("throws EmptyStackException when popped")
        void throwsExceptionWhenPopped() {
            assertThrows(EmptyStackException.class, stack::pop);
        }

        @Test
        @DisplayName("throws EmptyStackException when peeked")
        void throwsExceptionWhenPeeked() {
            assertThrows(EmptyStackException.class, stack::peek);
        }

        @Nested
        @DisplayName("after pushing an element")
        class AfterPushing {

            String anElement = "an element";

            @BeforeEach
            void pushAnElement() {
                stack.push(anElement);
            }

            @Test
            @DisplayName("it is no longer empty")
            void isNotEmpty() {
                assertFalse(stack.isEmpty());
            }

            @Test
            @DisplayName("returns the element when popped and is empty")
            void returnElementWhenPopped() {
                assertEquals(anElement, stack.pop());
                assertTrue(stack.isEmpty());
            }

            @Test
            @DisplayName("returns the element when peeked but remains not empty")
            void returnElementWhenPeeked() {
                assertEquals(anElement, stack.peek());
                assertFalse(stack.isEmpty());
            }
        }
    }
}
二、Profile环境切换
1、Profile功能
为了方便多环境适配,springboot简化了profile功能。
1、application-profile功能
-
默认配置文件 application.yaml;任何时候都会加载
-
指定环境配置文件 application-{env}.yaml
-
激活指定环境
-
- 配置文件激活:spring.profiles.active=。。。
- 命令行激活:java -jar xxx.jar --spring.profiles.active=prod --person.name=haha
-
-
- 修改配置文件的任意值,命令行优先
-
-
默认配置与环境配置同时生效
-
同名配置项,profile配置优先
2、@Profile条件装配功能
@Configuration(proxyBeanMethods = false)
@Profile("production")
public class ProductionConfiguration {

    // ...

}
3、profile分组
spring.profiles.group.production[0]=proddb
spring.profiles.group.production[1]=prodmq

使用:--spring.profiles.active=production  激活
三、外部化配置
1、配置源
- Default properties (specified by setting
SpringApplication.setDefaultProperties). @PropertySourceannotations on your@Configurationclasses. Please note that such property sources are not added to theEnvironmentuntil the application context is being refreshed. This is too late to configure certain properties such aslogging.*andspring.main.*which are read before refresh begins.- Config data (such as
application.propertiesfiles) - A
RandomValuePropertySourcethat has properties only inrandom.*. - OS environment variables.
- Java System properties (
System.getProperties()). - JNDI attributes from
java:comp/env. ServletContextinit parameters.ServletConfiginit parameters.- Properties from
SPRING_APPLICATION_JSON(inline JSON embedded in an environment variable or system property). - Command line arguments.
propertiesattribute on your tests. Available on@SpringBootTestand the test annotations for testing a particular slice of your application.@TestPropertySourceannotations on your tests.- Devtools global settings properties in the
$HOME/.config/spring-bootdirectory when devtools is active.
2、外部配置源(常用)
常用:Java属性文件、YAML文件、环境变量、命令行参数;
3、配置文件查找位置
(1) classpath 根路径
(2) classpath 根路径下config目录
(3) jar包当前目录
(4) jar包当前目录的config目录
(5) /config子目录的直接子目录
4、配置文件加载顺序:
- 当前jar包内部的application.properties和application.yml
- 当前jar包内部的application-{profile}.properties 和 application-{profile}.yml
- 引用的外部jar包的application.properties和application.yml
- 引用的外部jar包的application-{profile}.properties 和 application-{profile}.yml
5、覆盖规则
指定环境优先,外部优先,后面的可以覆盖前面的同名配置项
四、自定义starter
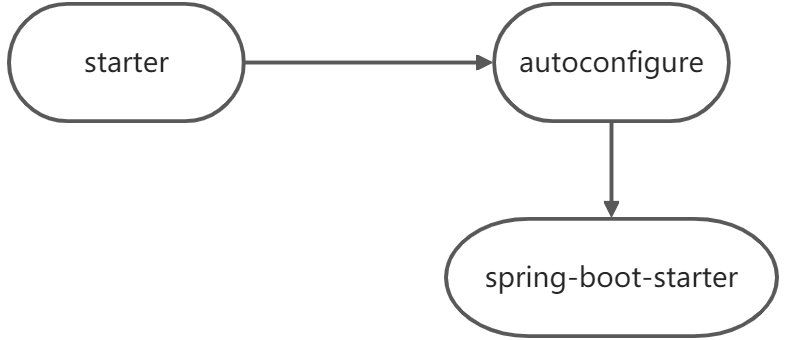
1、starter启动原理
- starter-pom引入 autoconfigurer 包
-
autoconfigure包中配置使用 META-INF/spring.factories 中 EnableAutoConfiguration 的值,使得项目启动加载指定的自动配置类
-
编写自动配置类 xxxAutoConfiguration -> xxxxProperties
-
- @Configuration
- @Conditional
- @EnableConfigurationProperties
- @Bean
- ......
引入starter --- xxxAutoConfiguration --- 容器中放入组件 ---- 绑定xxxProperties ---- 配置项
2、自定义starter
atguigu-hello-spring-boot-starter(启动器)
atguigu-hello-spring-boot-starter-autoconfigure(自动配置包)
五、SpringBoot启动原理
Spring原理【Spring注解】、SpringMVC原理、自动配置原理、SpringBoot原理
1、SpringBoot启动过程
-
创建 SpringApplication
-
- 保存一些信息。
- 判定当前应用的类型。ClassUtils。Servlet
- bootstrappers****:初始启动引导器(List
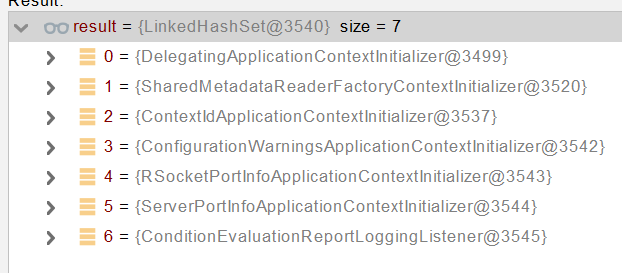
):去spring.factories文件中找 org.springframework.boot.Bootstrapper - 找 ApplicationContextInitializer;去spring.factories****找 ApplicationContextInitializer
-
-
- List<ApplicationContextInitializer<?>> initializers
-
-
- 找 ApplicationListener ;应用监听器。去spring.factories****找 ApplicationListener
-
-
- List<ApplicationListener<?>> listeners
-
-
运行 SpringApplication
-
- StopWatch
- 记录应用的启动时间
- 创建引导上下文(Context环境)****createBootstrapContext()
-
-
- 获取到所有之前的 bootstrappers 挨个执行 intitialize() 来完成对引导启动器上下文环境设置
-
-
- 让当前应用进入headless模式。java.awt.headless
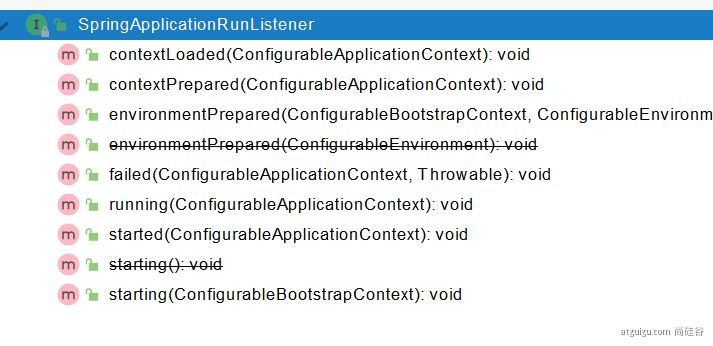
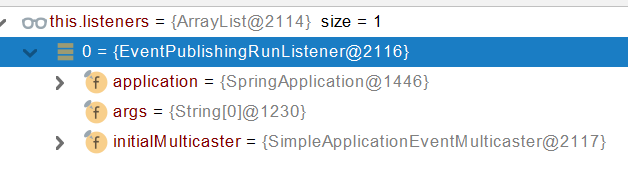
- 获取所有 RunListener****(运行监听器)【为了方便所有Listener进行事件感知】
-
-
- getSpringFactoriesInstances 去spring.factories****找 SpringApplicationRunListener.
-
-
- 遍历 SpringApplicationRunListener 调用 starting 方法;
-
-
- 相当于通知所有感兴趣系统正在启动过程的人,项目正在 starting。
-
-
- 保存命令行参数;ApplicationArguments
- 准备环境 prepareEnvironment();
-
-
- 返回或者创建基础环境信息对象。StandardServletEnvironment
- 配置环境信息对象。
-
-
-
-
- 读取所有的配置源的配置属性值。
-
-
-
-
- 绑定环境信息
- 监听器调用 listener.environmentPrepared();通知所有的监听器当前环境准备完成
-
-
- 创建IOC容器(createApplicationContext())
-
-
- 根据项目类型(Servlet)创建容器,
- 当前会创建 AnnotationConfigServletWebServerApplicationContext
-
-
- 准备ApplicationContext IOC容器的基本信息 prepareContext()
-
-
- 保存环境信息
- IOC容器的后置处理流程。
- 应用初始化器;applyInitializers;
-
-
-
-
- 遍历所有的 ApplicationContextInitializer 。调用 initialize.。来对ioc容器进行初始化扩展功能
- 遍历所有的 listener 调用 contextPrepared。EventPublishRunListenr;通知所有的监听器contextPrepared
-
-
-
-
- 所有的监听器 调用 contextLoaded。通知所有的监听器 contextLoaded;
-
-
- 刷新IOC容器。refreshContext
-
-
- 创建容器中的所有组件(Spring注解)
-
-
- 容器刷新完成后工作?afterRefresh
- 所有监听 器 调用 listeners.started(context); 通知所有的监听器 started
- 调用所有runners;callRunners()
-
-
- 获取容器中的 ApplicationRunner
- 获取容器中的 CommandLineRunner
- 合并所有runner并且按照@Order进行排序
- 遍历所有的runner。调用 run 方法
-
-
- 如果以上有异常,
-
-
- 调用Listener 的 failed
-
-
- 调用所有监听器的 running 方法 listeners.running(context); 通知所有的监听器 running
- running如果有问题。继续通知 failed 。****调用所有 Listener 的 failed;****通知所有的监听器 failed
public interface Bootstrapper {

    /**
     * Initialize the given {@link BootstrapRegistry} with any required registrations.
     * @param registry the registry to initialize
     */
    void intitialize(BootstrapRegistry registry);

}
@FunctionalInterface
public interface ApplicationRunner {

    /**
     * Callback used to run the bean.
     * @param args incoming application arguments
     * @throws Exception on error
     */
    void run(ApplicationArguments args) throws Exception;

}
@FunctionalInterface
public interface CommandLineRunner {

    /**
     * Callback used to run the bean.
     * @param args incoming main method arguments
     * @throws Exception on error
     */
    void run(String... args) throws Exception;

}

