

iOS之集成GoogleMap定位、搜索注意事项
简介:
最近花了些时间看了GoogleMap官方文件并集成到国际版app中,网上关于GoogleMap for iOS的讲解相对Android来说少一点,比较有帮助的几乎全是英文文档。下面是我开发过程中遇到的坑、以及采用的解决方法。
集成GoogleMap步骤:
1、Cocoapods导入
   pod 'GoogleMaps', '~> 2.7.0'  #谷歌地图
   pod 'GooglePlaces', '= 2.7.0'
   pod 'GooglePlacePicker', '= 2.7.0'
2、获取API密匙(前提是已经在GoogleMapSDK中创建好自己的应用)
3、配置plist文件搭建定位环境
4、调用代理方法实现需求
tips:pod 'GoogleMaps'、pod 'GooglePlaces'、pod 'GooglePlacePicker'这三个框架。(GoogleMaps:显示基本的定位功能;GooglePlaces:实现搜索功能,官方文档叫做地点自动完成;GooglePlacePicker:是实现获取某个POI的的详细信息,比如名字、详细地址、路线等)
景点(POI)包括公园、学校和政府大楼,等等。 另外,如果地图类型为 kGMSTypeNormal,商家景点默认将显示在地图上。 商家景点表示商店、餐馆和酒店之类的商家。
按照 Google Places API 中的定义,一个 POI 对应于一个地点。 例如,休闲公园为景点,但喷泉之类的地点通常不属于景点(除非它们具有国家或历史意义)。
配置plist文件:
打开plist的代码源文件,输入:
<key>NSLocationAlwaysAndWhenInUseUsageDescription</key>
<string>XXX needs to use your location information to provide location services</string>
<key>NSLocationWhenInUseUsageDescription</key>
<string>XXX needs to use your location information to provide location services</string>
<key>NSLocationWhenInUseUsageDescription - 2</key>
<string>XXX needs to use your location information to provide location services</string>
定位:
一、在AppDelegate 头文件 导入框架
#import <GoogleMaps/GoogleMaps.h>
#import <CoreLocation/CoreLocation.h>
二、向您的 application:didFinishLaunchingWithOptions: 方法添加以下内容,使用我们刚才获取到的 API 密钥替代 YOUR_API_KEY:
[GMSServices provideAPIKey:@"YOUR_API_KEY"]; //启动Google地图
tips:这一步是在启动app的时候,GoogleMap准备代理工作。
三、在我们需要显示地图的控制器调用API方法
@property (nonatomic,strong) CLLocationManager *locationManager;//地图定位对象
@property (nonatomic,strong) GMSMapView *mapView;//地图
@property (nonatomic,strong) GMSMarker *marker;//大头针
@property (nonatomic,strong) GMSPlacesClient * placesClient;//可以获取某个地方的信息
//注册的代理
@interface TestMapViewController ()
<CLLocationManagerDelegate,GMSMapViewDelegate,GMSAutocompleteViewControllerDelegate>
tips:这是在控制器.h文件声明的属性。
(一)初始化一个地图对象
GMSMapView:是控制地图的外观类
GMSCameraPosition:是控制地图要显示的内容类
 GMSCameraPosition *camera = [GMSCameraPosition cameraWithLatitude:-23.12960481
                                                            longitude:113.30887721
                                                                 zoom:Level];
    self.mapView = [GMSMapView mapWithFrame:CGRectZero camera:camera];
    self.mapView.delegate = self; //注册代理属性
    self.mapView.settings.compassButton = YES;//显示指南针
    [self.view addSubview:self.mapView];
tips:上面的经纬度可以随便传一个,之后会获取到新的经纬度并更新位置。Level是地图的比例伸缩度,值越大,地图的拉伸就越大。
(二)初始化一个定位管理者对象
if (self.locationManager == nil) {
        self.locationManager = [[CLLocationManager alloc]init];
    }
    self.locationManager.delegate = self;
    [self.locationManager requestAlwaysAuthorization];//授权方式,如果在后台也需要定位,那就选择 requestAlwaysAuthorization。
    self.locationManager.desiredAccuracy = kCLLocationAccuracyBest;//最精确的定位
    self.locationManager.distanceFilter = kCLDistanceFilterNone; // 默认是kCLDistanceFilterNone,也可以设置其他值,表示用户移动的距离小于该范围内就不会接收到通知
    [self.locationManager startUpdatingLocation];
tips:CLLocationManager 是负责获取用户行为的类,列如获取用户当前位置信息。更多详细信息请阅览CLLocationManager。里面讲解CLLocationManager的一些应用场景并有代码实例。
运行app:这时候我们会看到并没有实景地图出来,原因是:前面提到的GMSCameraPosition类,我们并没有在定位成功之后将定位内容赋它。
GMSCameraPosition类,它是负责显示定位内容的。很重要!
(三)在定位成功的API代理方法中,获取经纬度并转成影像赋值
- (void)locationManager:(CLLocationManager *)manager didUpdateLocations:(NSArray<CLLocation *> *)locations{

    CLLocation *curLocation = [locations lastObject];
    // 通过location  或得到当前位置的经纬度
    CLLocationCoordinate2D curCoordinate2D = curLocation.coordinate;
    GMSCameraPosition *camera = [GMSCameraPosition cameraWithLatitude:curCoordinate2D.latitude longitude:curCoordinate2D.longitude zoom:Level];
    CLLocationCoordinate2D position2D = CLLocationCoordinate2DMake(curLocation.coordinate.latitude, curLocation.coordinate.longitude);
    self.mapView.camera = camera;//这句话很重要很重要,将我们获取到的经纬度转成影像并赋值给地图的camera属性

    [self.locationManager stopUpdatingLocation];//定位成功后停止定位

}
tips:locationManager: didUpdateLocations: 代理方法是GoogleMap 中实现定位成功后回调的代理方法,你可以在这里获取到经纬度。如果代码走不到这个代理方法,有可能是plist文件没有配置,或者没有定义代理属性。
运行app:这时候地图就出来了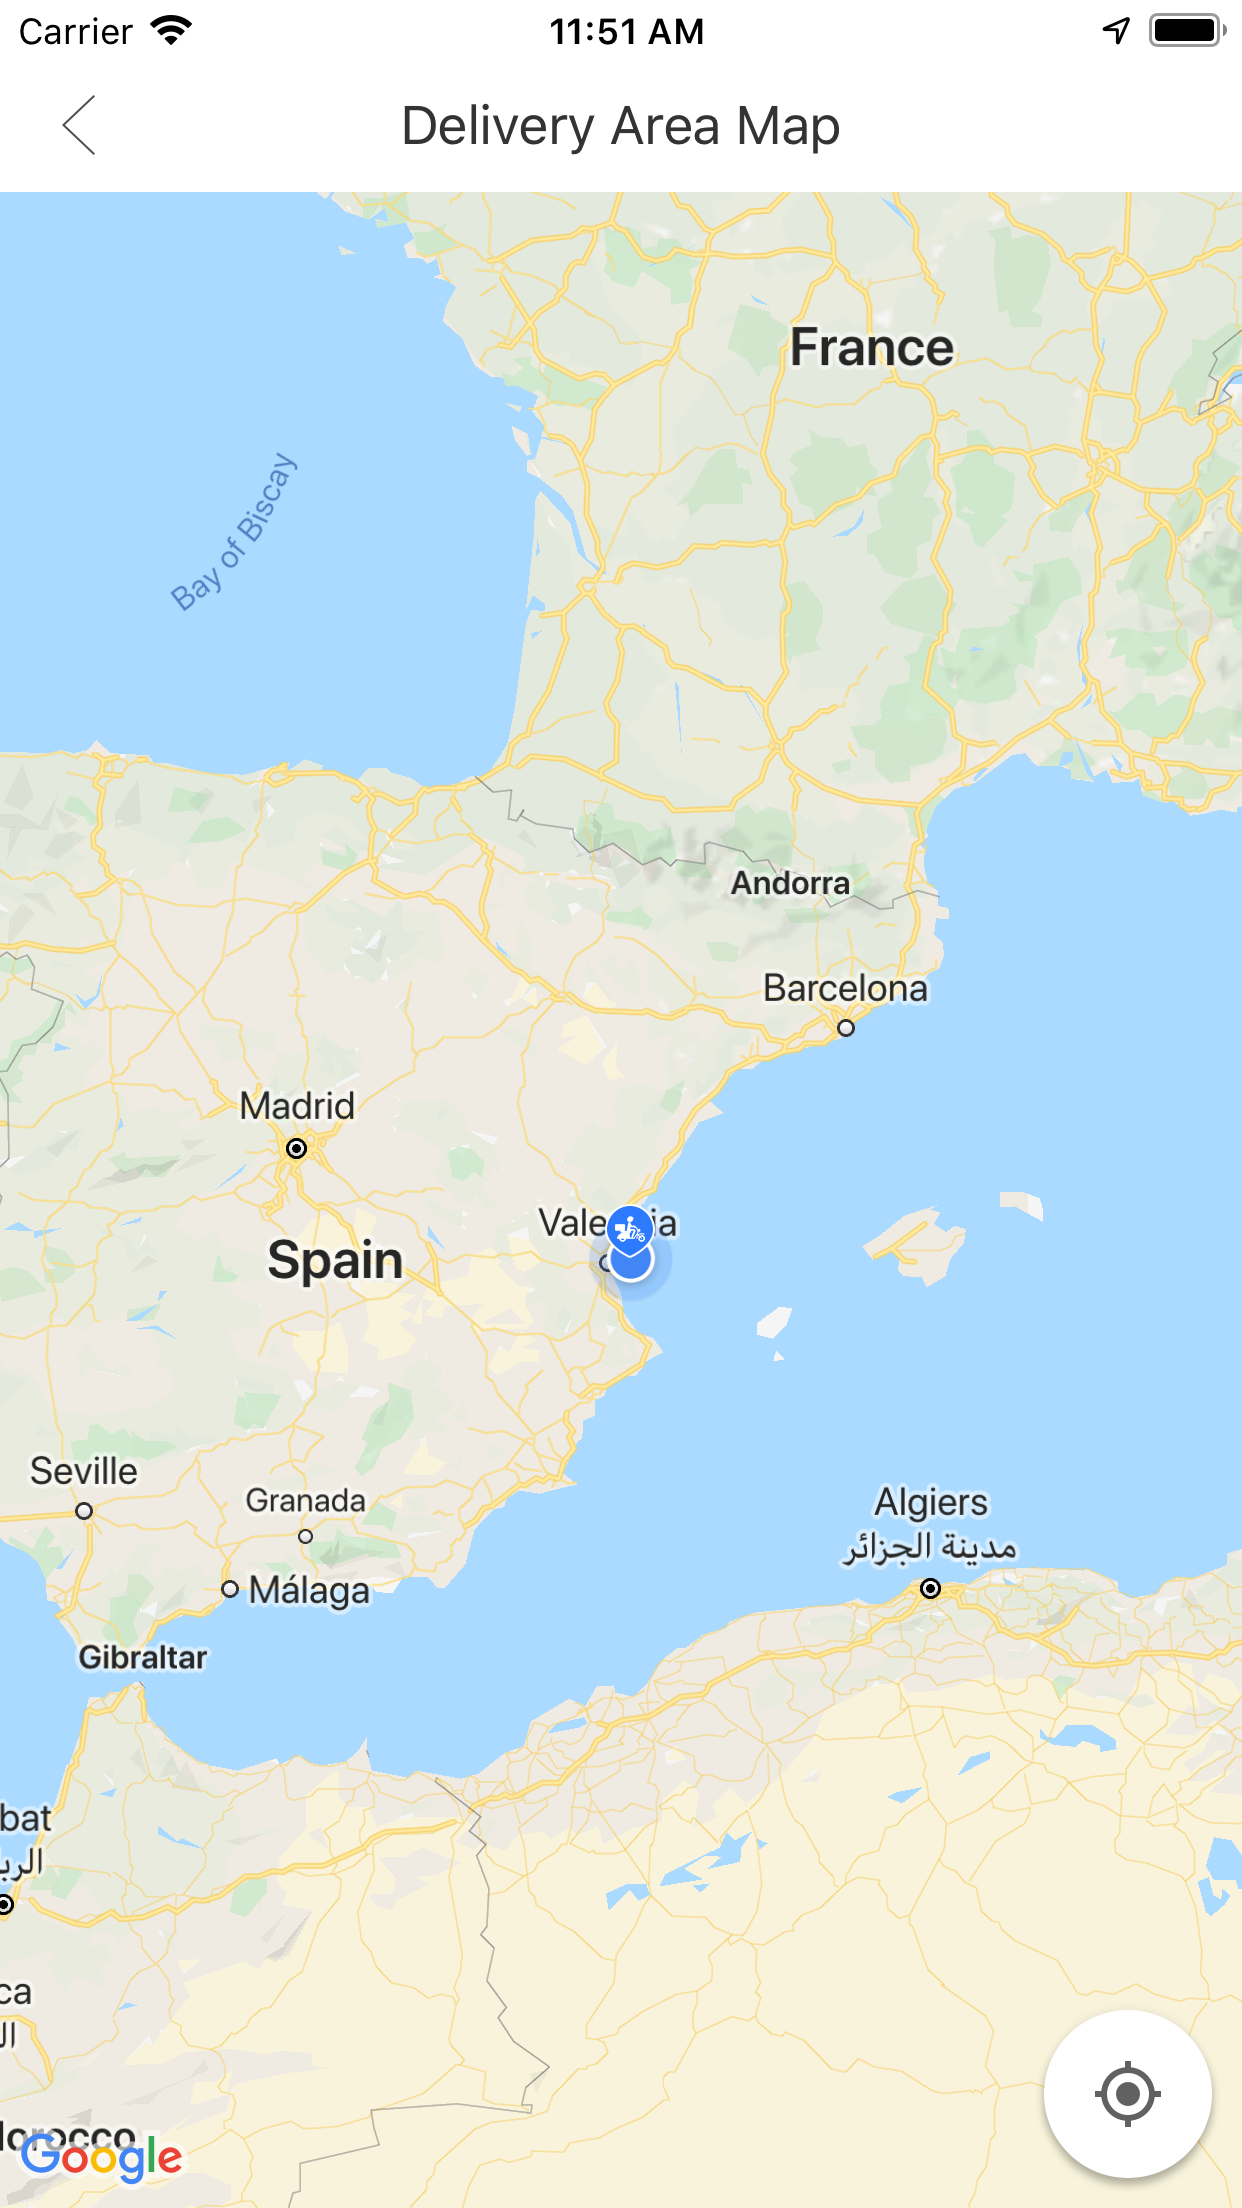
添加大头针
GMSMarker类是负责显示大头针,默认是红色,你可以自定义大头针,用图片或者改变颜色,具体看官方文档GMSMarker。
 self.marker = [GMSMarker markerWithPosition:position2D];
 self.marker.map = self.mapView;
tips:position2D是在定位成功之后转换得到的CLLocationCoordinate2D属性经纬度值。
小坑提示:这时候有可能会出现,定位成功之后出现多个大头针。原因是:进行定位的时候,map获取多个预测位置,从而产生生成多个大头针的现象。解决办法:在每次生成大头针之前先清除之前的那个,只生成最精准的最后一个。
  [self.marker.map clear];
    self.marker.map = nil;
反编码(经纬度转成具体位置):
    CLGeocoder *geocoder = [[CLGeocoder alloc]init];
    //反地理编码
    [geocoder reverseGeocodeLocation:curLocation completionHandler:^(NSArray<CLPlacemark *> * _Nullable placemarks, NSError * _Nullable error) {

        if (error) {
        }else{

              CLPlacemark *placemark = [placemarks objectAtIndex:0];//第一个位置是最精确的
                //赋值详细地址
                DLog(@"placemark---路号name:%@-市locality:%@-区subLocality:%@-省administrativeArea:%@-路thoroughfare:%@",placemark.name,placemark.locality,placemark.subLocality,placemark.administrativeArea,placemark.thoroughfare);

      }];
这时候就已经可以获取到具体的国家、省、市、区、街道了。
补充:反编码是获取不到POI位置的(我获取不到)。这时候可以使用
 self.placesClient = [GMSPlacesClient sharedClient];//获取某个地点的具体信息

    [self.placesClient currentPlaceWithCallback:^(GMSPlaceLikelihoodList *likelihoodList, NSError *error) {
        if (error != nil) {
            DLog(@"Current Place error %@", [error localizedDescription]);
            return;
        }

//        for (GMSPlaceLikelihood *likelihood in likelihoodList.likelihoods) {
//            GMSPlace* place = likelihood.place;
//            NSLog(@"Current Place name %@ at likelihood %g", place.name, likelihood.likelihood);
//            NSLog(@"Current Place address %@", place.formattedAddress);
//            NSLog(@"Current Place attributions %@", place.attributions);
//            NSLog(@"Current PlaceID %@", place.placeID);
//        }

         //这里就可以获取到POI的名字了
         //这里做一些你想做的事

    }];
点击地图并移动大头针
这里是用到GMSMapViewDelegate的代理回调
回调1:这里是点击地图上的某个点API返回的代理方法,在这个代理方法,你可以获取经纬度去反编译地址
- (void)mapView:(GMSMapView *)mapView didTapAtCoordinate:(CLLocationCoordinate2D)coordinate{

    //点击一次先清除上一次的大头针
    [self.marker.map clear];
    self.marker.map = nil;
    // 通过location  或得到当前位置的经纬度
    GMSCameraPosition *camera = [GMSCameraPosition cameraWithLatitude:coordinate.latitude longitude:coordinate.longitude zoom:Level];
    CLLocationCoordinate2D position2D = CLLocationCoordinate2DMake(coordinate.latitude,coordinate.longitude);
    self.mapView.camera = camera;
    //大头针
    self.marker = [GMSMarker markerWithPosition:position2D];
    self.marker.map = self.mapView;

    CLLocation *curLocation = [[CLLocation alloc]initWithLatitude:coordinate.latitude longitude:coordinate.longitude];

    CLGeocoder *geocoder = [[CLGeocoder alloc]init];
    //反地理编码
    [geocoder reverseGeocodeLocation:curLocation completionHandler:^(NSArray<CLPlacemark *> * _Nullable placemarks, NSError * _Nullable error) {

        if (error) {

            DLog(@"error.description:%@",error.description);

        }else{

            CLPlacemark *placemark = [placemarks objectAtIndex:0];

            //赋值详细地址
            DLog(@"placemark---路号name:%@-市locality:%@-区subLocality:%@-省administrativeArea:%@-路thoroughfare:%@",placemark.name,placemark.locality,placemark.subLocality,placemark.administrativeArea,placemark.thoroughfare);

    }];

}
回调2:这里也是点击地图上的某个点API返回的代理方法
- (void)mapView:(GMSMapView *)mapView
didTapPOIWithPlaceID:(NSString *)placeID
           name:(NSString *)name
       location:(CLLocationCoordinate2D)location{
}
tips:值得注意的,两者的区别是:第二个点击代理方法是当你点击POI的时候才会回调,会返回place的name、ID、经纬度;第一个代理方法是只要点击地图任意一个位置就会回调,只会返回经纬度。也就是:每一次的点击,只会执行其中一个代理方法。
搜索:
搜索功能在官方文档是叫做“自动完成”,即你输入一部分的文本,GoogleMap会根据你的文本预测出地点并自动填充返回,具体请看官方文档自动完成
效果如图: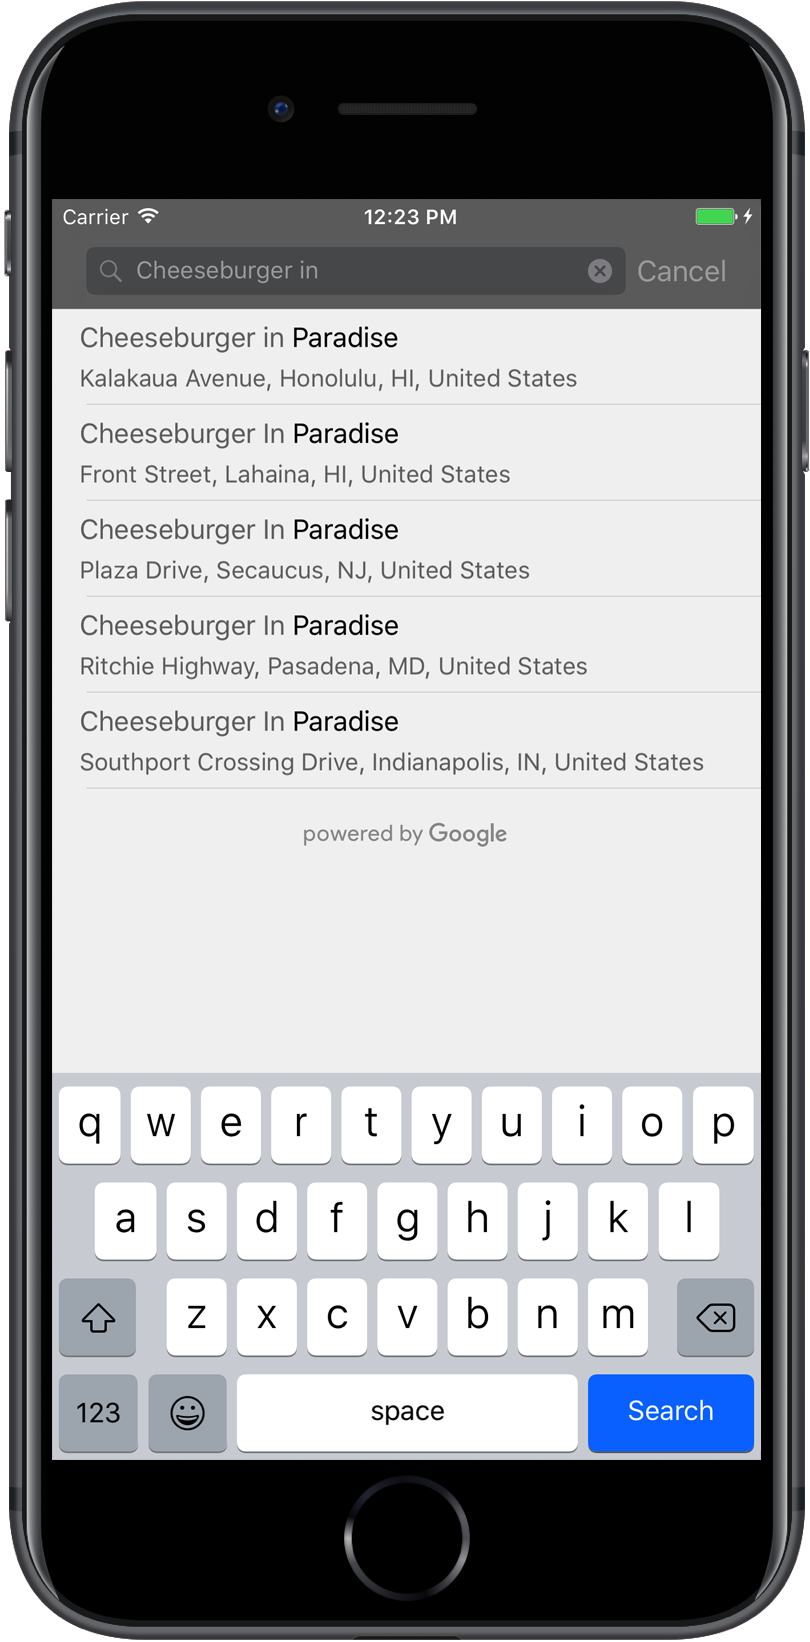
这里你需要做的步骤跟做“定位”的一样:
(1)获取APIKEY
(2) 在application:didFinishLaunchingWithOptions: 注册密匙
[GMSPlacesClient provideAPIKey:@"YOUR_API_KEY"]; //地点:搜索功能
(3) 创建搜索UI并调用代理方法获取API自动填充的结果数组集
导入头文件
#import <GooglePlaces/GooglePlaces.h>
小坑提示: GMSPlacesClient跟GMSServices的密匙是不一样的,密匙不对的话,会出现反复调用viewController:didFailAutocompleteWithError:的现象。
tips:搭建搜索UI有几种方式:1)搜索框直接创建在导航栏 2)搜索栏创建在视图顶部 3)自定义。根据你的需求用代码~
(一)这里是第一种方式(搜索框直接创建在导航栏):
    GMSAutocompleteViewController *acController = [[GMSAutocompleteViewController alloc] init];
    acController.delegate = self;
    [self presentViewController:acController animated:YES completion:nil];
tips:这里就可以直接往搜索框编辑文字,API会直接给你返回搜索结果集合
(二)调用API代理方法:
// Handle the user's selection.  这是用户选择搜索中的某个地址后返回的结果回调方法
- (void)viewController:(GMSAutocompleteViewController *)viewController
didAutocompleteWithPlace:(GMSPlace *)place {

    [self dismissViewControllerAnimated:YES completion:nil];

    [self.marker.map clear];
    self.marker.map = nil;
    // 通过location  或得到当前位置的经纬度
    GMSCameraPosition *camera = [GMSCameraPosition cameraWithLatitude:place.coordinate.latitude longitude:place.coordinate.longitude zoom:Level];
    CLLocationCoordinate2D position2D = CLLocationCoordinate2DMake(place.coordinate.latitude,place.coordinate.longitude);
    self.marker = [GMSMarker markerWithPosition:position2D];
    self.mapView.camera = camera;
    self.marker.map = self.mapView;

    self.locationLabel.text = place.name;
    self.locationDetailLabel.text = place.formattedAddress;

}
tips:这个代理方法实现的是,当用户在搜索集中选择了在某一个结果返回地图,并定位添加大头针。
自动填充失败的回调:
- (void)viewController:(GMSAutocompleteViewController *)viewController
didFailAutocompleteWithError:(NSError *)error {
    [self dismissViewControllerAnimated:YES completion:nil];
    // TODO: handle the error.
    DLog(@"Error: %@", [error description]);
}
tips:自动填充失败后你可以在这里做一些事,默认是不管的。
补充:搜索栏的外观是可以自定义的,你可以设置成跟自己的app一样的风格~具体请看设置 UI 控件样式属性
到这里,搜索功能就算完成了。
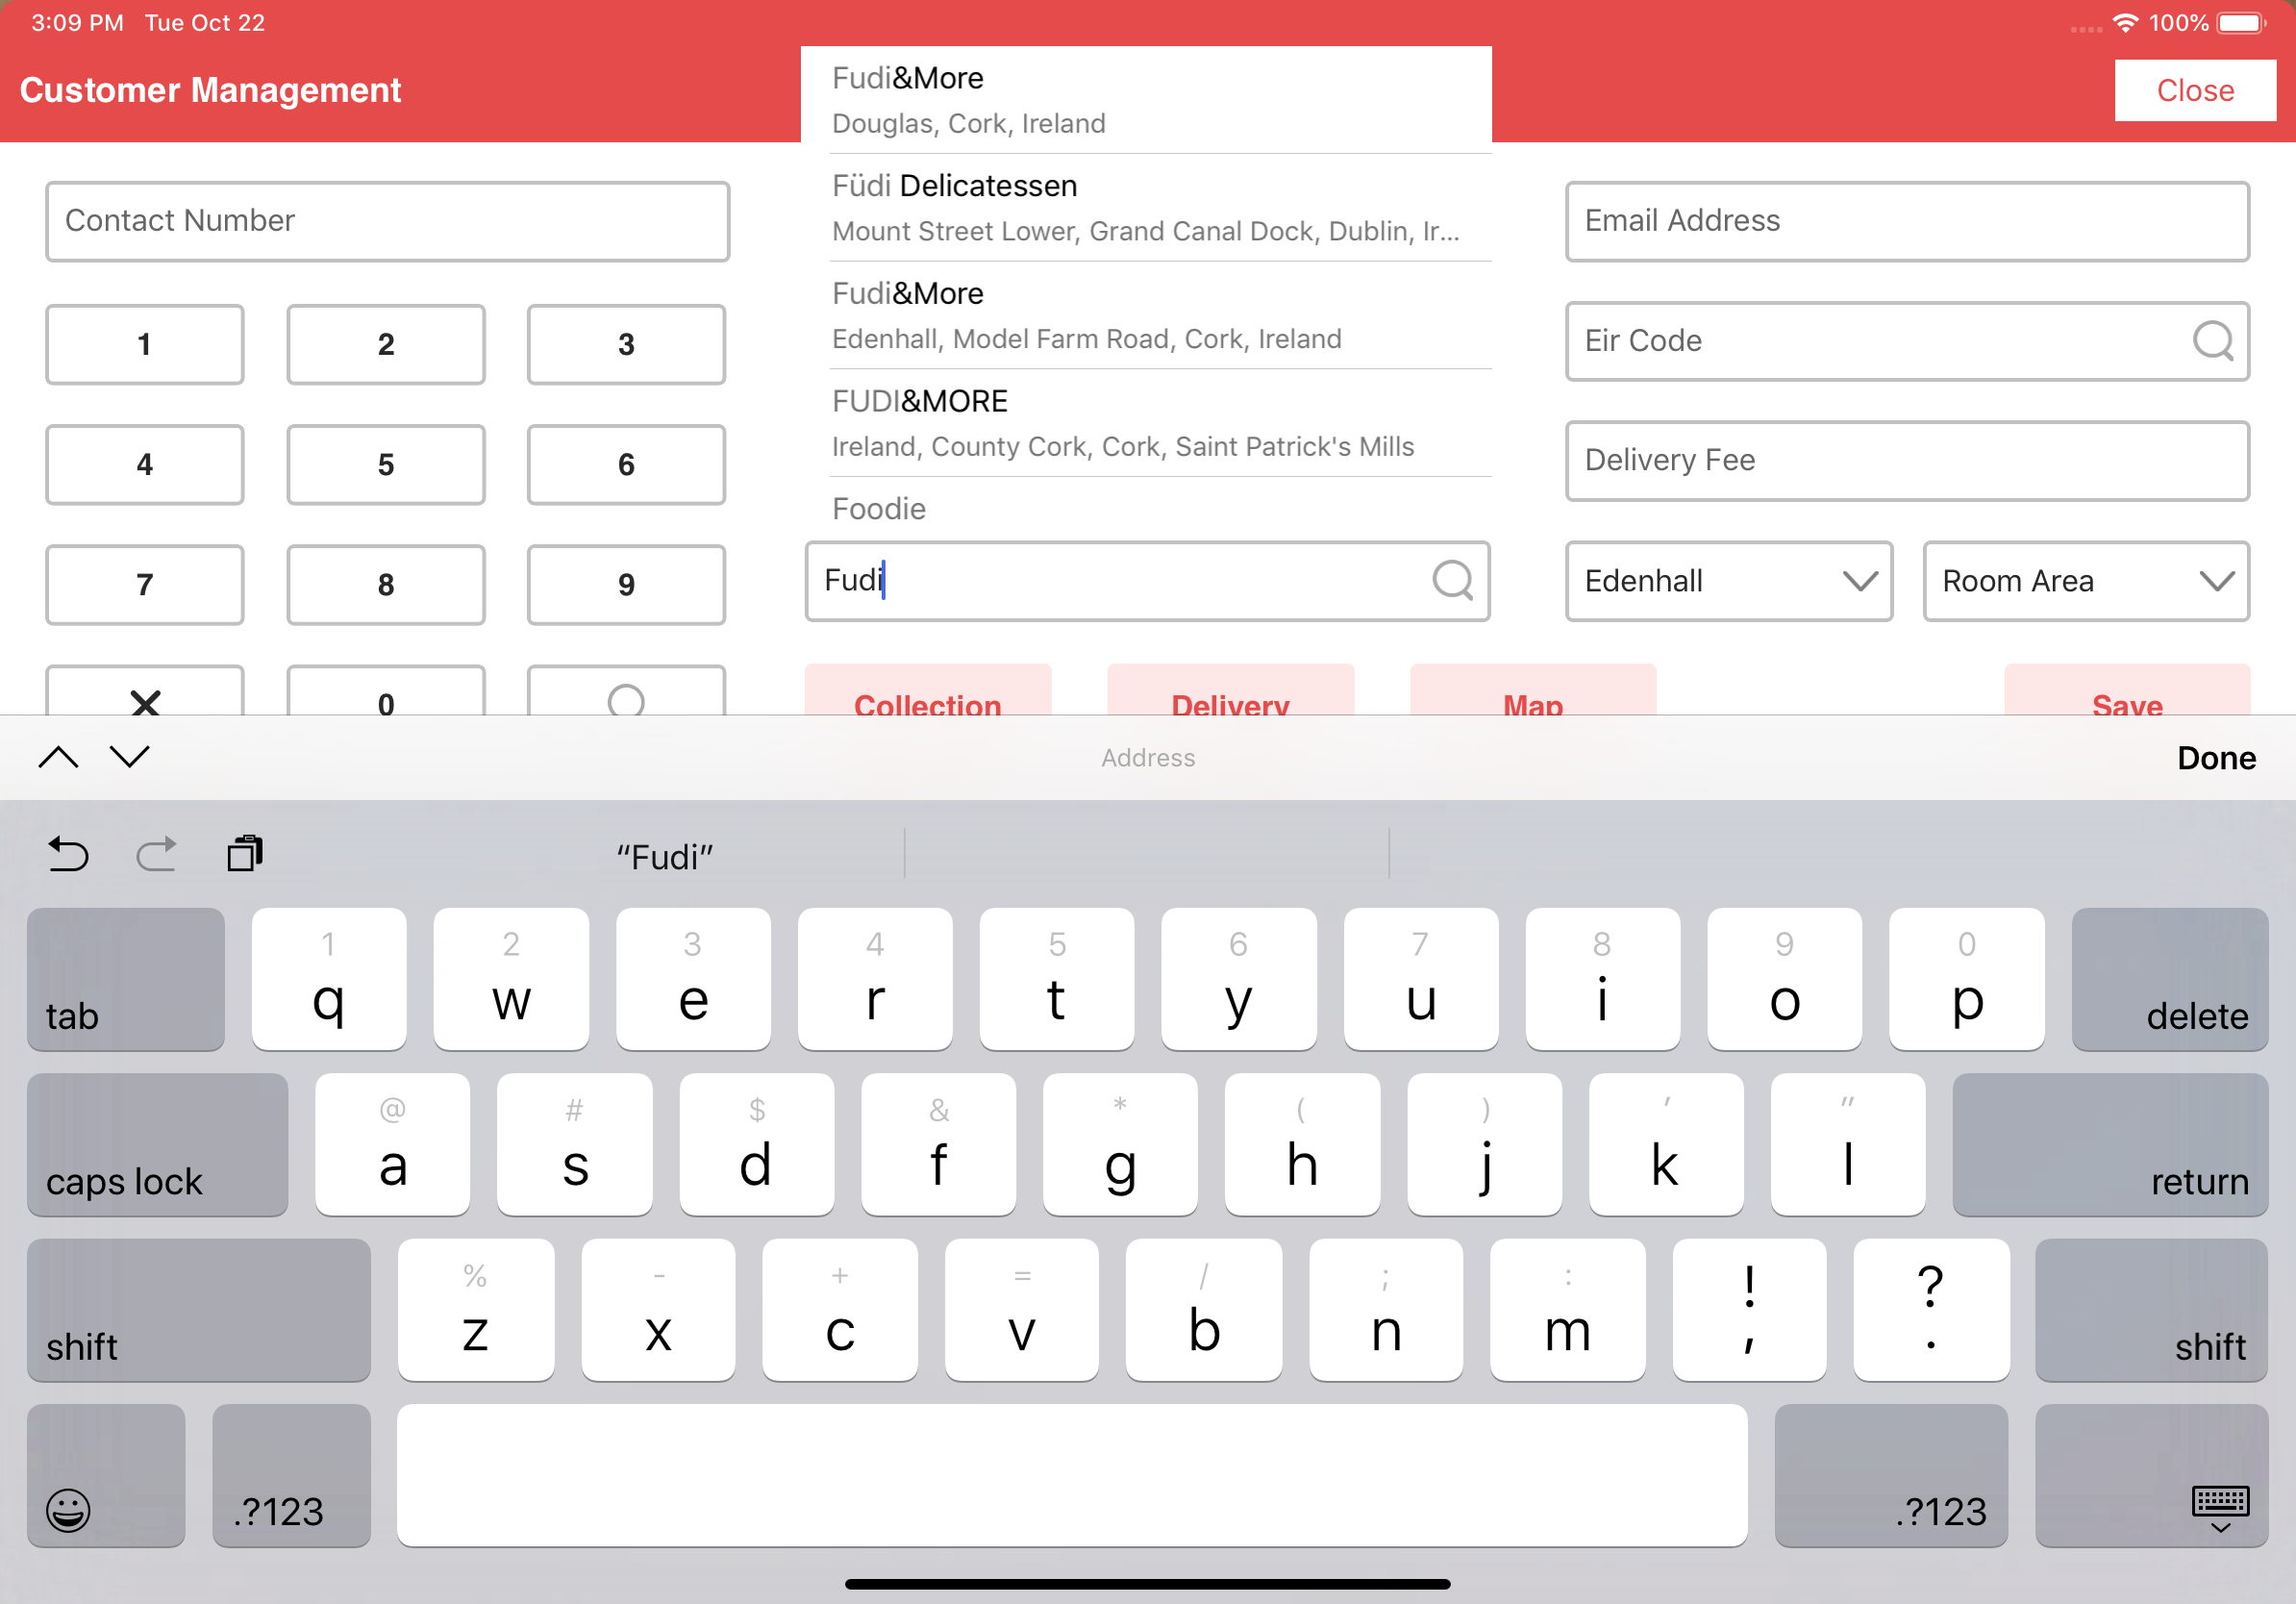
封装搜索弹框视图:
效果图:
.h文件
#import <UIKit/UIKit.h>

typedef void(^ReturnBackInfo)(id data);

NS_ASSUME_NONNULL_BEGIN

@interface ZYSerachAddressAlert : UIView

//选择的地址信息回调
@property (nonatomic, copy) ReturnBackInfo backAddress;
//输入的关键字
- (void)keyWordsChange:(NSString *)keywords;
//显示
- (void)ShowAlert;
//隐藏
- (void)HideAlert;

@end

NS_ASSUME_NONNULL_END
.m文件
#import "ZYSerachAddressAlert.h"
//google地图
#import <GooglePlaces/GooglePlaces.h>

@interface ZYSerachAddressAlert() <GMSAutocompleteTableDataSourceDelegate>
//是否显示
@property (nonatomic, assign) BOOL isShow;
/**谷歌地图自送搜索数据源类*/
@property (nonatomic, strong) GMSAutocompleteTableDataSource *tableDataSource;

@property (nonatomic, strong) UITableView *tableView;

@end

@implementation ZYSerachAddressAlert

- (UITableView *)tableView {
    if (!_tableView) {
        _tableView = [[UITableView alloc] initWithFrame:CGRectZero style:UITableViewStylePlain];
        _tableView.delegate = self.tableDataSource;
        _tableView.dataSource = self.tableDataSource;
    }
    return _tableView;
}

- (instancetype)initWithFrame:(CGRect)frame {
    if (self = [super initWithFrame:frame]) {

        CGFloat Y = [[UIApplication sharedApplication] statusBarFrame].size.height;

        CGFloat W = (kDeviceWidth) / 3.0;
        self.frame = CGRectMake(W + kWidthScale(16), Y, W -kWidthScale(33) , 208 - Y + kHeightScale(39) + 20);
        self.backgroundColor = [UIColor whiteColor];

        //google自动搜索数据源
        self.tableDataSource = [[GMSAutocompleteTableDataSource alloc] init];
        self.tableDataSource.delegate = self; //设置代理GMSAutocompleteTableDataSourceDelegate

        //限制搜索结果
        GMSAutocompleteFilter *filter = [[GMSAutocompleteFilter alloc] init];
        filter.country = @"IE"; //(只搜索爱尔兰国的)
        self.tableDataSource.autocompleteFilter = filter;

        self.tableDataSource.tableCellBackgroundColor = [UIColor whiteColor];

        self.tableView.frame = self.bounds;
        [self addSubview:self.tableView];
    }
    return self;
}

- (void)ShowAlert {
    self.isShow = YES;
    self.hidden = NO;
    [[UIApplication sharedApplication].keyWindow addSubview:self];
}

- (void)HideAlert {
    self.isShow = NO;
    self.hidden = YES;
    [self removeFromSuperview];
}

- (void)dealloc {
    JGLog(@"销毁了");
//    [self.tableView removeFromSuperview];
}

- (void)keyWordsChange:(NSString *)keywords {

    if (!self.isShow) {
        [self ShowAlert];
    }
    //输入框内容发生变回就会触发该方法
    //触发搜索回调方法
    [self.tableDataSource sourceTextHasChanged:keywords];
}

#pragma mark -  GMSAutocompleteTableDataSourceDelegate
//!!!!:搜索
//@required点击搜索结果代理上面的cell的时候会被调用
//要干什么:回收键盘,给textField赋值,隐藏搜索结果控制器
- (void)tableDataSource:(GMSAutocompleteTableDataSource *)tableDataSource
didAutocompleteWithPlace:(GMSPlace *)place {
    JGLog(@"xxxx:%@--%@",place.name,place.formattedAddress);

    [self HideAlert];

    if (self.backAddress) {
        self.backAddress(place);
    }
}

- (void)tableDataSource:(GMSAutocompleteTableDataSource *)tableDataSource
didFailAutocompleteWithError:(NSError *)error {
    JGLog(@"yyyy:%@",[error localizedDescription]);
}

//请求到数据的回调
//加载数据显示菊花
- (void)didRequestAutocompletePredictionsForTableDataSource:
(GMSAutocompleteTableDataSource *)tableDataSource {

    [UIApplication sharedApplication].networkActivityIndicatorVisible = YES;

    [self.tableView reloadData];
}

//要干什么:回收键盘,隐藏菊花
- (void)didUpdateAutocompletePredictionsForTableDataSource:(GMSAutocompleteTableDataSource *)tableDataSource {
    [UIApplication sharedApplication].networkActivityIndicatorVisible = NO;
    [self.tableView reloadData];
}

/*
// Only override drawRect: if you perform custom drawing.
// An empty implementation adversely affects performance during animation.
- (void)drawRect:(CGRect)rect {
    // Drawing code
}
*/

@end
这里是官方中文文档 GoogleMap for iOS
这里是官方中文文档 Google Places API

 浙公网安备 33010602011771号