

ZABBIX6.0+TSDB+psql+grafana出图+微信报警使用时序数据库(基于ubtun20.04)
环境:
ubtun20.04+ zabbix6.05
postgresql-14 + timescaledb-2-postgresql-14
配置文件位置
pspl 远程连接配置文件:
vim /etc/postgresql/14/main/pg_hba.conf
psql主配置文件:
vim /etc/postgresql/14/main/postgresql.conf
zabbix后端日志目录
后端日志查看目录:cat /var/log/zabbix/zabbix_server.log
前端日志查看目录:
TSDB官网配置:https://www.zabbix.com/documentation/current/zh/manual/appendix/install/timescaledb

1. 安装配置pgsql
 1.创建文件库配置 / Create the file repository configuration:
sudo sh -c 'echo "deb http://apt.postgresql.org/pub/repos/apt $(lsb_release -cs)-pgdg main" > /etc/apt/sources.list.d/pgdg.list'

2.导入仓库签名密钥(GPG 密钥) / Import the repository signing key:
wget --quiet -O - https://www.postgresql.org/media/keys/ACCC4CF8.asc | sudo apt-key add -

3.更新套餐列表 / Update the package lists:
sudo apt update

注:此处要给执行权限
root@gegewu1:/etc/apt/sources.list.d# ls
docker.list  docker.list.save  pgdg.list  zabbix.list  zabbix.list.dpkg-old
root@gegewu1:/etc/apt/sources.list.d# chmod a+x pgdg.list
root@gegewu1:/etc/apt/sources.list.d# ls
docker.list  docker.list.save  pgdg.list  zabbix.list  zabbix.list.dpkg-old

否则会提示网络不可达......

4.安装最新版本的 PostgreSQL / Install the latest version of PostgreSQL.
# 如果您想要特定的版本,请使用‘PostgreSQL-12’或类似版本代替‘PostgreSQL’ / If you want a specific version, use 'postgresql-12' or similar instead of 'postgresql':
sudo apt -y install postgresql

显示绑定依赖关系就是源有问题换源即可。
推荐换源:中科大
deb https://mirrors.ustc.edu.cn/ubuntu/ bionic main restricted universe multiverse
deb-src https://mirrors.ustc.edu.cn/ubuntu/ bionic main restricted universe multiverse
deb https://mirrors.ustc.edu.cn/ubuntu/ bionic-updates main restricted universe multiverse
deb-src https://mirrors.ustc.edu.cn/ubuntu/ bionic-updates main restricted universe multiverse
deb https://mirrors.ustc.edu.cn/ubuntu/ bionic-backports main restricted universe multiverse
deb-src https://mirrors.ustc.edu.cn/ubuntu/ bionic-backports main restricted universe multiverse
deb https://mirrors.ustc.edu.cn/ubuntu/ bionic-security main restricted universe multiverse
deb-src https://mirrors.ustc.edu.cn/ubuntu/ bionic-security main restricted universe multiverse
deb https://mirrors.ustc.edu.cn/ubuntu/ bionic-proposed main restricted universe multiverse
deb-src https://mirrors.ustc.edu.cn/ubuntu/ bionic-proposed main restricted universe multiverse

(1)备份原镜像源文件:mv /etc/apt/sources.list /etc/apt/sources.list.bak;
(2)创建编辑/etc/apt/sources.list新文件: sudo vim /etc/apt/sources.list ;
(3)选择上面任一镜像源地址粘贴,保存退出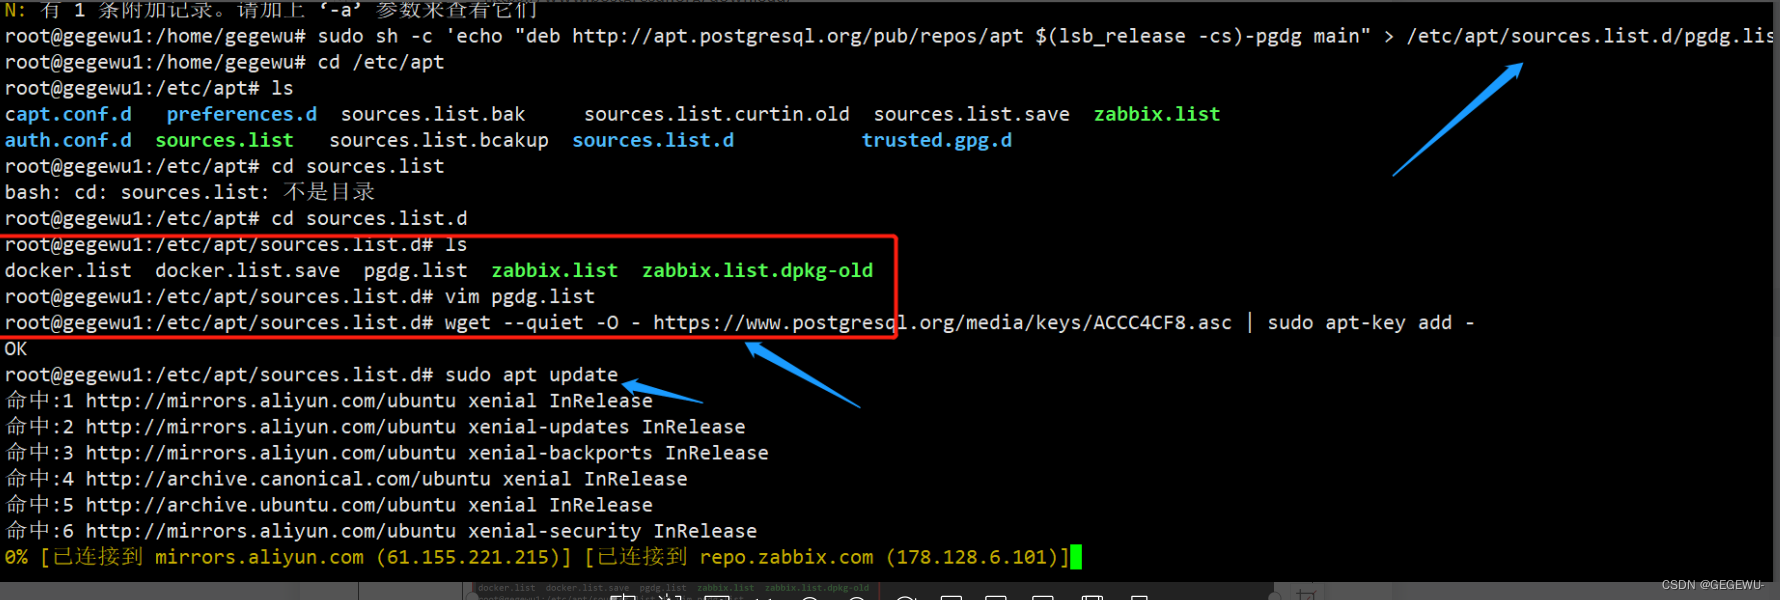
2. 安装详情:
oot@gegewu1:/etc/apt# sudo apt -y install postgresql
正在读取软件包列表... 完成
正在分析软件包的依赖关系树
正在读取状态信息... 完成
将会同时安装下列软件:
  libffi6 libjson-perl libllvm10 libpq5 libtinfo5 pgdg-keyring postgresql-14 postgresql-client-14 postgresql-client-common postgresql-common sysstat
建议安装:
  postgresql-doc postgresql-doc-14 isag
推荐安装:
  libjson-xs-perl
下列【新】软件包将被安装:
  libffi6 libjson-perl libllvm10 libpq5 libtinfo5 pgdg-keyring postgresql postgresql-14 postgresql-client-14 postgresql-client-common postgresql-common
  sysstat
升级了 0 个软件包,新安装了 12 个软件包,要卸载 0 个软件包,有 3 个软件包未被升级。
需要下载 33.8 MB 的归档。
解压缩后会消耗 137 MB 的额外空间。
获取:1 https://mirrors.ustc.edu.cn/ubuntu bionic-updates/main amd64 libtinfo5 amd64 6.1-1ubuntu1.18.04 [80.3 kB]
获取:2 https://mirrors.ustc.edu.cn/ubuntu bionic/main amd64 libffi6 amd64 3.2.1-8 [17.9 kB]
获取:3 https://mirrors.ustc.edu.cn/ubuntu bionic/universe amd64 libjson-perl all 2.97001-1 [73.3 kB]
获取:4 https://mirrors.ustc.edu.cn/ubuntu bionic-updates/main amd64 libllvm10 amd64 1:10.0.0-4ubuntu1~18.04.2 [15.4 MB]
获取:5 http://apt.postgresql.org/pub/repos/apt focal-pgdg/main amd64 libpq5 amd64 14.3-1.pgdg20.04+1 [171 kB]
获取:6 http://apt.postgresql.org/pub/repos/apt focal-pgdg/main amd64 pgdg-keyring all 2018.2 [10.7 kB]
获取:7 http://apt.postgresql.org/pub/repos/apt focal-pgdg/main amd64 postgresql-client-common all 241.pgdg20.04+1 [92.1 kB]
获取:8 http://apt.postgresql.org/pub/repos/apt focal-pgdg/main amd64 postgresql-client-14 amd64 14.3-1.pgdg20.04+1 [1,621 kB]
获取:9 http://apt.postgresql.org/pub/repos/apt focal-pgdg/main amd64 postgresql-common all 241.pgdg20.04+1 [230 kB]
获取:10 http://apt.postgresql.org/pub/repos/apt focal-pgdg/main amd64 postgresql-14 amd64 14.3-1.pgdg20.04+1 [15.8 MB]
获取:11 http://apt.postgresql.org/pub/repos/apt focal-pgdg/main amd64 postgresql all 14+241.pgdg20.04+1 [66.7 kB]
获取:12 https://mirrors.ustc.edu.cn/ubuntu bionic-updates/main amd64 sysstat amd64 11.6.1-1ubuntu0.1 [295 kB]
已下载 33.8 MB,耗时 16秒 (2,051 kB/s)
正在预设定软件包 ...
正在选中未选择的软件包 libtinfo5:amd64。
(正在读取数据库 ... 系统当前共安装有 78940 个文件和目录。)
准备解压 .../00-libtinfo5_6.1-1ubuntu1.18.04_amd64.deb  ...
正在解压 libtinfo5:amd64 (6.1-1ubuntu1.18.04) ...
正在选中未选择的软件包 libffi6:amd64。
准备解压 .../01-libffi6_3.2.1-8_amd64.deb  ...
正在解压 libffi6:amd64 (3.2.1-8) ...
正在选中未选择的软件包 libjson-perl。
准备解压 .../02-libjson-perl_2.97001-1_all.deb  ...
正在解压 libjson-perl (2.97001-1) ...
正在选中未选择的软件包 libllvm10:amd64。
准备解压 .../03-libllvm10_1%3a10.0.0-4ubuntu1~18.04.2_amd64.deb  ...
正在解压 libllvm10:amd64 (1:10.0.0-4ubuntu1~18.04.2) ...
正在选中未选择的软件包 libpq5:amd64。
准备解压 .../04-libpq5_14.3-1.pgdg20.04+1_amd64.deb  ...
正在解压 libpq5:amd64 (14.3-1.pgdg20.04+1) ...
正在选中未选择的软件包 pgdg-keyring。
准备解压 .../05-pgdg-keyring_2018.2_all.deb  ...
正在解压 pgdg-keyring (2018.2) ...
正在选中未选择的软件包 postgresql-client-common。
准备解压 .../06-postgresql-client-common_241.pgdg20.04+1_all.deb  ...
正在解压 postgresql-client-common (241.pgdg20.04+1) ...
正在选中未选择的软件包 postgresql-client-14。
准备解压 .../07-postgresql-client-14_14.3-1.pgdg20.04+1_amd64.deb  ...
正在解压 postgresql-client-14 (14.3-1.pgdg20.04+1) ...
正在选中未选择的软件包 postgresql-common。
准备解压 .../08-postgresql-common_241.pgdg20.04+1_all.deb  ...
正在添加 通过 postgresql-common 从 /usr/bin/pg_config 到 /usr/bin/pg_config.libpq-dev 的转移
正在解压 postgresql-common (241.pgdg20.04+1) ...
正在选中未选择的软件包 postgresql-14。
准备解压 .../09-postgresql-14_14.3-1.pgdg20.04+1_amd64.deb  ...
正在解压 postgresql-14 (14.3-1.pgdg20.04+1) ...
正在选中未选择的软件包 postgresql。
准备解压 .../10-postgresql_14+241.pgdg20.04+1_all.deb  ...
正在解压 postgresql (14+241.pgdg20.04+1) ...
正在选中未选择的软件包 sysstat。
准备解压 .../11-sysstat_11.6.1-1ubuntu0.1_amd64.deb  ...
正在解压 sysstat (11.6.1-1ubuntu0.1) ...
正在设置 pgdg-keyring (2018.2) ...
Removing apt.postgresql.org key from trusted.gpg: OK
正在设置 libpq5:amd64 (14.3-1.pgdg20.04+1) ...
正在设置 libffi6:amd64 (3.2.1-8) ...
正在设置 libjson-perl (2.97001-1) ...
正在设置 libtinfo5:amd64 (6.1-1ubuntu1.18.04) ...
正在设置 sysstat (11.6.1-1ubuntu0.1) ...

Creating config file /etc/default/sysstat with new version
update-alternatives: 使用 /usr/bin/sar.sysstat 来在自动模式中提供 /usr/bin/sar (sar)
Created symlink /etc/systemd/system/multi-user.target.wants/sysstat.service → /lib/systemd/system/sysstat.service.
正在设置 postgresql-client-common (241.pgdg20.04+1) ...
正在设置 postgresql-client-14 (14.3-1.pgdg20.04+1) ...
update-alternatives: 使用 /usr/share/postgresql/14/man/man1/psql.1.gz 来在自动模式中提供 /usr/share/man/man1/psql.1.gz (psql.1.gz)
正在设置 libllvm10:amd64 (1:10.0.0-4ubuntu1~18.04.2) ...
正在设置 postgresql-common (241.pgdg20.04+1) ...
Adding user postgres to group ssl-cert

Creating config file /etc/postgresql-common/createcluster.conf with new version
Building PostgreSQL dictionaries from installed myspell/hunspell packages...
Removing obsolete dictionary files:
Created symlink /etc/systemd/system/multi-user.target.wants/postgresql.service → /lib/systemd/system/postgresql.service.
正在设置 postgresql-14 (14.3-1.pgdg20.04+1) ...
Creating new PostgreSQL cluster 14/main ...
/usr/lib/postgresql/14/bin/initdb -D /var/lib/postgresql/14/main --auth-local peer --auth-host scram-sha-256 --no-instructions
属于此数据库系统的文件宿主为用户 "postgres".
此用户也必须为服务器进程的宿主.
数据库簇将使用本地化语言 "en_US.UTF-8"进行初始化.
默认的数据库编码已经相应的设置为 "UTF8".
缺省的文本搜索配置将会被设置到"english"

禁止为数据页生成校验和.

修复已存在目录 /var/lib/postgresql/14/main 的权限 ... 成功
正在创建子目录 ... 成功
选择动态共享内存实现 ......posix
选择默认最大联接数 (max_connections) ... 100
选择默认共享缓冲区大小 (shared_buffers) ... 128MB
选择默认时区 ... Asia/Shanghai
创建配置文件 ... 成功
正在运行自举脚本 ...成功
正在执行自举后初始化 ...成功
同步数据到磁盘...成功
update-alternatives: 使用 /usr/share/postgresql/14/man/man1/postmaster.1.gz 来在自动模式中提供 /usr/share/man/man1/postmaster.1.gz (postmaster.1.gz)
正在设置 postgresql (14+241.pgdg20.04+1) ...
正在处理用于 systemd (245.4-4ubuntu3.11) 的触发器 ...
正在处理用于 man-db (2.9.1-1) 的触发器 ...
正在处理用于 libc-bin (2.31-0ubuntu9.2) 的触发器 ...
3. 安装方式2
通过 Ubuntu 存储库安装 PostgreSQL
在 shell 终端中采用如下命令安装:
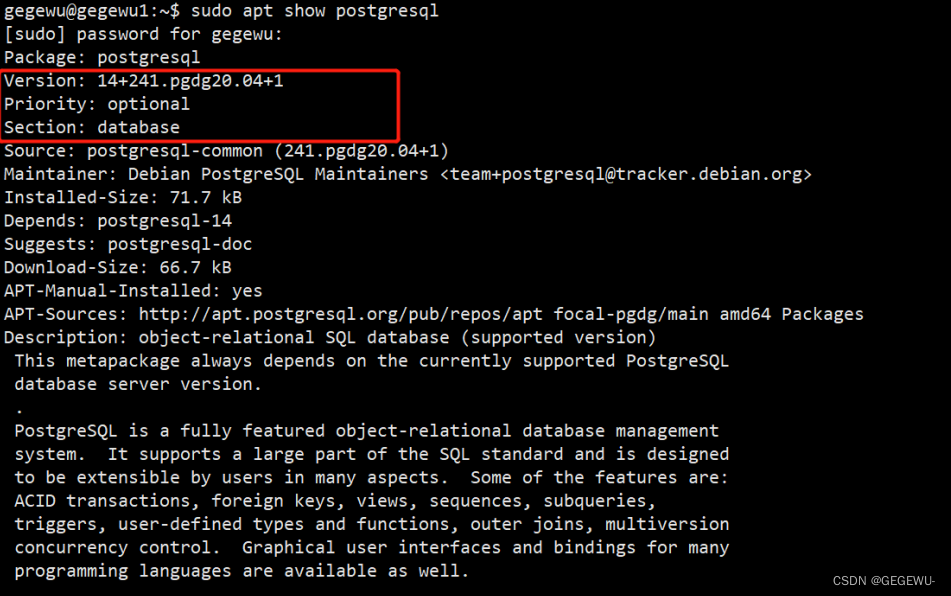
- sudo apt show postgresql 查看版本
1. sudo apt update
2. sudo apt install postgresql postgresql-contrib
 根据提示输入你的密码,依据于你的网速情况,程序将在几秒到几分钟安装完成。说到这一点,随时检查 Ubuntu 中的各种网络带宽。

什么是 postgresql-contrib ?

postgresql-contrib 或者说 contrib 包,包含一些不属于 PostgreSQL 核心包的实用工具和功能。在大多数情况下,最好将 contrib 包与 PostgreSQL 核心一起安装。

或者
1.查看 ubuntu提供的 PostgreSQL 版本:apt-cache show postgresql
2.安装:sudo apt-get install postgresql
3.或者: sudo apt install postgresql postgresql-contrib
验证安装:sudo -u postgres psql -c "SELECT version();"
一旦安装完成, PostgreSQL 服务将会自动启动。使用 psql工具通过连接 PostgreSQL 数据库并且打印它的版本来验证安装

安装成功
5. 访问psql
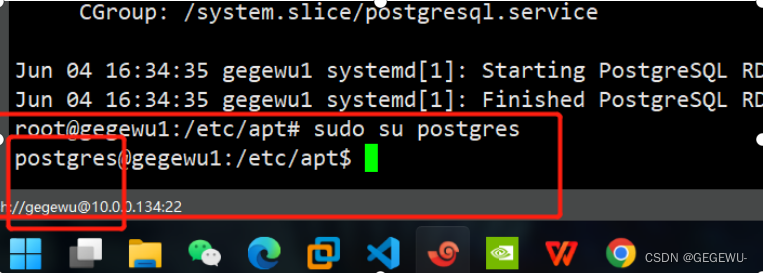
两种方式访问  PostgreSQL 服务器
为了以 postgres 用户身份登录 PostgreSQL 服务器,首先切换用户,然后使用 psql工具访问 PostgreSQL。
1. sudo su - postgres  切换用户

2. psql  进入 PostgreSQL Shell

3. \q    退出 PostgreSQL Shell

你也可以不切换用户,而使用 sudo 命令访问 PostgreSQL。
sudo -u postgres psql
 注:通常 postgres 用户仅应用于本地使用,正式生产环境可以使用 postgres 账户重新创建账户,授权角色信息并指定db数据库;
6. 启动psql的方式
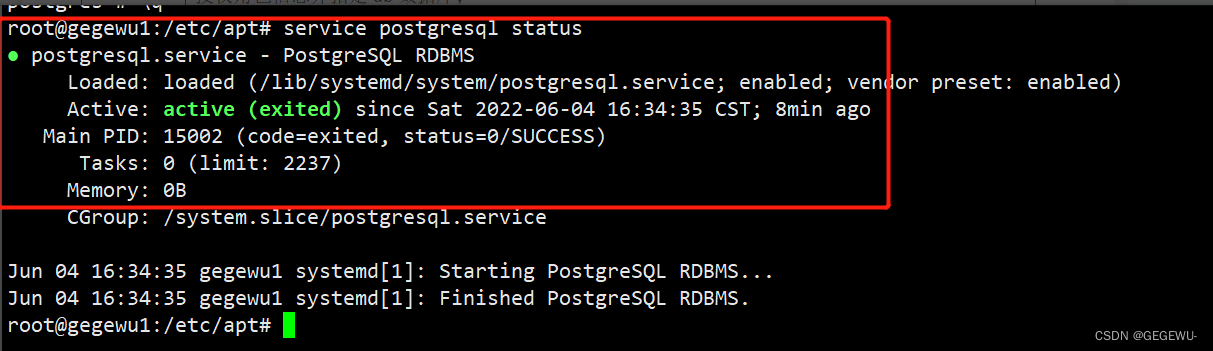
1. 启动、关闭或重启 postgresql。输入 service postgresql 并按回车将列出所有选项。
$  service postgresql
Usage: /etc/init.d/postgresql {start|stop|restart|reload|force-reload|status} [version ..]
/etc/init.d/postgresql  start

1.  service postgresql start|stop|restart|reload|force-reload|status
默认情况下,PostgreSQL 会创建一个拥有所权限的特殊用户 postgres。要实际使用 PostgreSQL,你必须先登录该账户 =》#
sudo su postgres
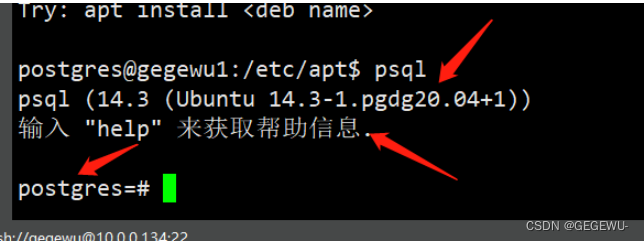
psql
现在,使用 psql 命令来启动 PostgreSQL Shell,会显示 postgress=# 提示符,如下所示:
psql常用控制台命令:
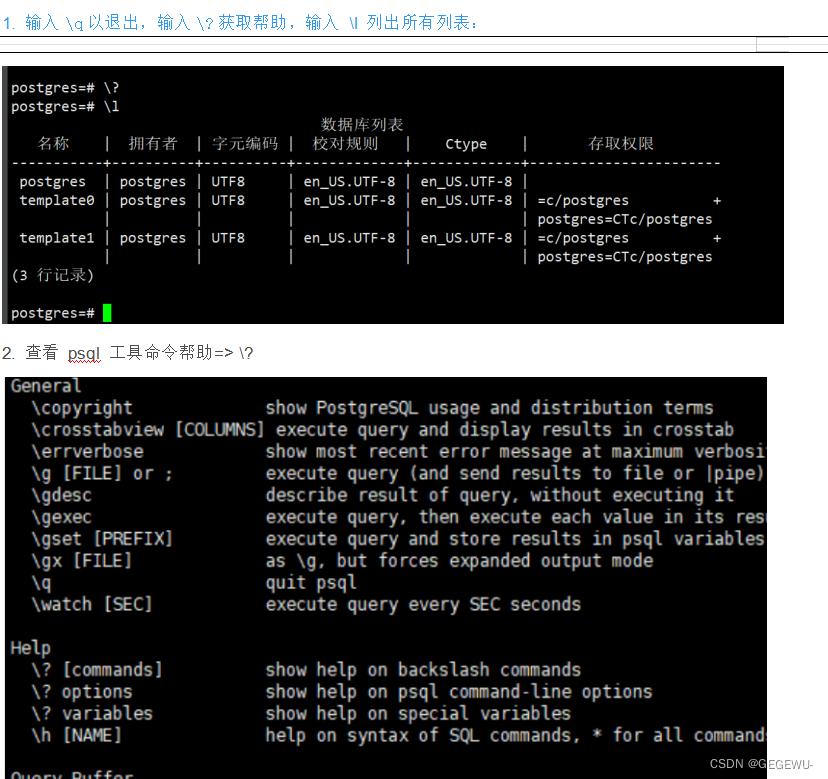
psql 控制台命令:除了前面已经用到的 \password命令(设置密码)和 \q命令(退出)以外,控制台还提供一系列其他命令。
\h:查看SQL命令的解释,比如\h select。
\?:查看psql命令列表。
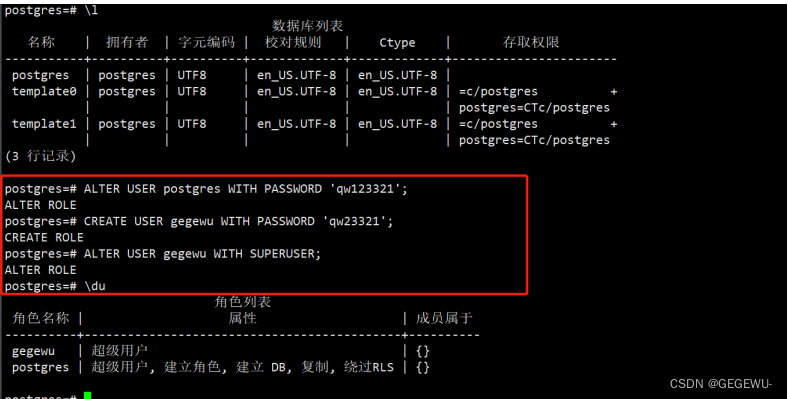
\l:列出所有数据库。
\c [database_name]:连接其他数据库。
\d:列出当前数据库的所有表格。
\d [table_name]:列出某一张表格的结构。
\du:列出所有用户。
\e:打开文本编辑器。
\conninfo:列出当前数据库和连接的信息。
一. 你可以使用以下命令更改任何用户(包括 postgres)的密码:
1. ALTER USER postgres WITH PASSWORD 'my_password'; 更改密码
建议新建一个zabbix用户并给他开通超级管理员权限
建议你另外创建一个用户(不建议使用默认的 postgres 用户)。为此,请使用以下命令:
2. CREATE USER my_user WITH PASSWORD 'my_password';
3. ALTER USER my_user WITH SUPERUSER; 添加超级用户管理员权限
输入 \du 命令查看 PostgreSQL 用户:
如果创建的用户不想使用,可以使用 DROP 命令删除用户:
DROP USER my_user;  删除用户
要使用其他用户登录,使用 \q 命令退出,然后使用以下命令登录:
psql -U my_user
 可以使用 -d 参数直接连接数据库:
psql -U my_user -d my_db
例子: psql -U zabbix -d zabbix
你可以使用其他已存在的用户调用 PostgreSQL。例如,我使用 ubuntu 登录,从终端执行以下命名:
psql -U ubuntu -d postgres
关于报错:
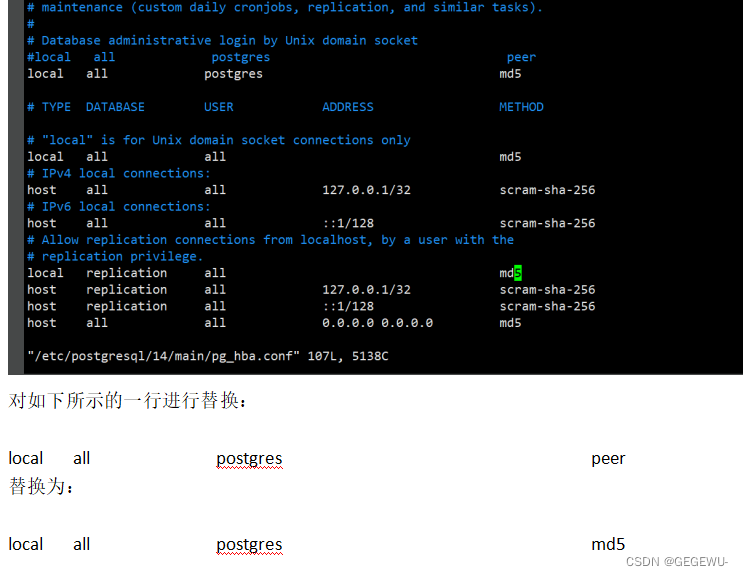
连接不上时 报错:sorry, too many clients already
解决如下:
场景
项目 postgres 连接不上, 所有连接报错 :psql: FATAL: sorry, too many clients already

原由
程序使用连接未及时释放, 连接一直处于 idle 状态

处理方式
1、 程序里面未释放的连接, 在使用后及时释放;
2、 postgres 连接数默认最大 100个,在配置文件修改该参数;
postgres.conf max_connection = 1000 修改后重启生效;
3、 postgres 设置 idle 状态连接回收, 该状态默认不开启;
postgres.conf idle_in_transaction_session_timeout=20000; 修改为idle 状态 20s 后回收该连接; 修改后重启;


注意:你必须指定一个数据库(默认情况下,它将尝试将你连接到与登录的用户名相同的数据库)。

如果遇到如下错误:
————————————————
psql: FATAL:  Peer authentication failed for user "my_user"
确保以正确的用户身份登录,并使用管理员权限编辑

/etc/postgresql/14/main/postgresql.conf

注意:用你的版本替换 14(例如 12)。

将里面的peer全部改为md5 如图:
然后重启 PostgreSQL:
sudo service postgresql restart / sudo /etc/init.d/postgresql restart
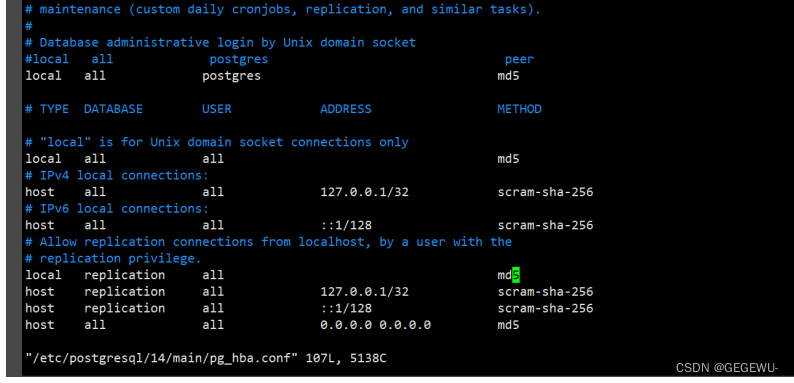
设置远程连接PSQL
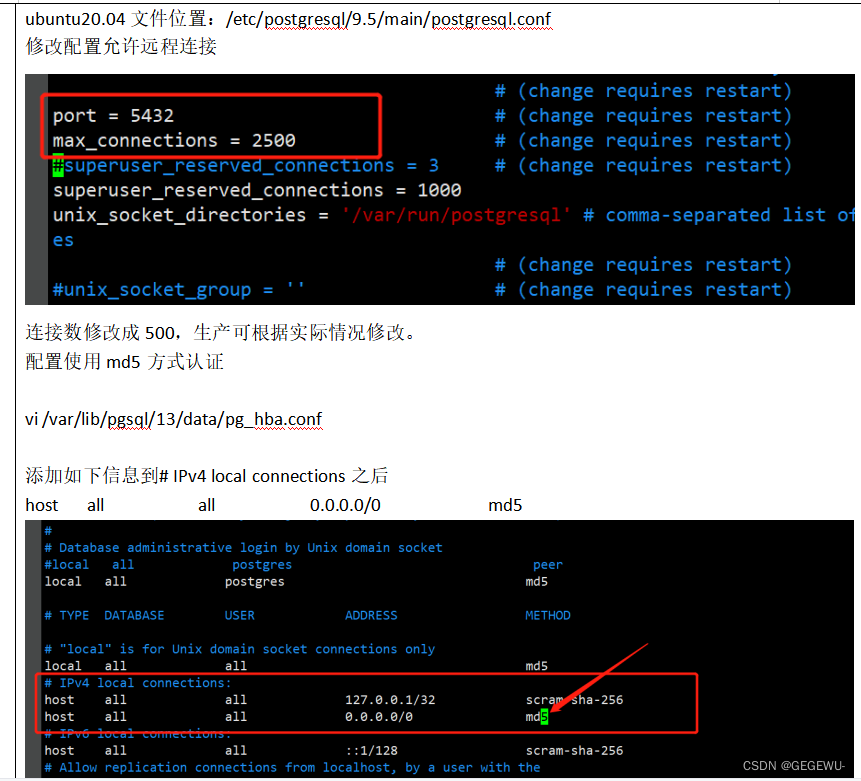
ubuntu20.04文件位置:/etc/postgresql/13/main/pg_hba.conf
修改配置允许远程连接
连接数修改成500,生产可根据实际情况修改。
配置使用md5方式认证
vi /var/lib/pgsql/13/data/pg_hba.conf
1. 添加如下信息到# IPv4 local connections之后
host all all 0.0.0.0/0 md5
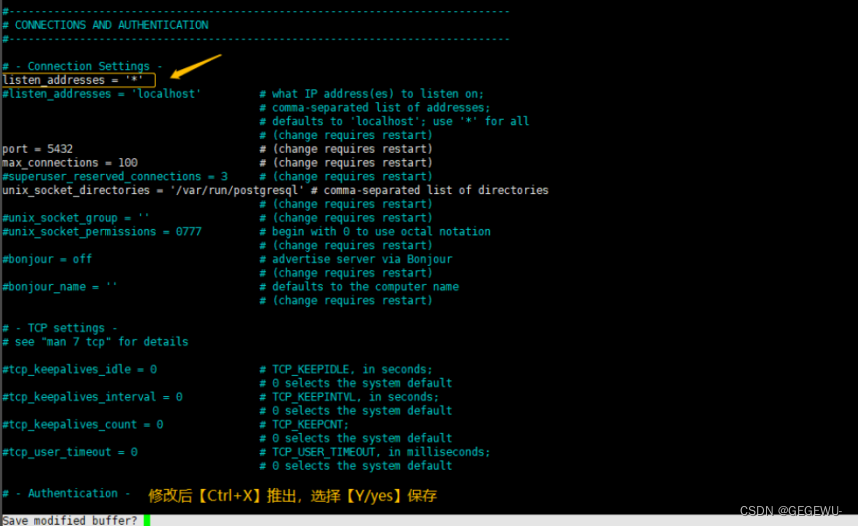
2. 修改配置文件:vim /etc/postgresql/14/main/postgresql.conf
默认情况下,PostgreSQL 服务器仅仅监听本地网络接口:127.0.0.1。
5.1 配置 PostgreSQL 服务器允许远程访问,编辑【postgresql.conf】文件
为了允许远程访问你的 PostgreSQL 服务器,打开配置文件【postgresql.conf】并且在【CONNECTIONS AND AUTHENTICATION】一节添加【listen_addresses = '*'】。
使用如下命令查看【postgresql.conf】配置信息
sudo nano /etc/postgresql/12/main/postgresql.conf
3. 重启:sudo service postgresql restart
综上小总结若不做以下配置则zabbix前端页面会无法连接数据库:
1. vi /var/lib/pgsql/13/data/pg_hba.conf
添加如下信息到# IPv4 local connections之后
host all all 0.0.0.0/0 md52. 程序里面未释放的连接, 在使用后及时释放;
3. postgres 连接数默认最大 100个,在配置文件修改该参数;
postgres.conf max_connection = 1000 修改后重启生效;
4. postgres 设置 idle 状态连接回收, 该状态默认不开启;
postgres.conf idle_in_transaction_session_timeout=20000; 修改为idle 状态 20s 后回收该连接; 修改后重启-------------------------------------------------------------------------------->
此时安装完成:
7. 安装完成查询相关包
dpkg -l|grep postg

二. 配置安装tinmeSDB时序数据库
1. 参考:
TSDB官方安装文档源码安装:
https://docs.timescale.com/install/latest/self-hosted/installation-source/#install-self-hosted-timescaledb-from-source
在基于 Debian 的系统上安装自托管 TimescaleDB
https://docs.timescale.com/install/latest/self-hosted/installation-debian/#install-self-hosted-timescaledb-on-debian-based-systems
1.在命令提示符下,以 root 身份添加 PostgreSQL 第三方存储库以获取最新的 PostgreSQL 软件包:

apt install gnupg postgresql-common apt-transport-https lsb-release wget

2.运行 PostgreSQL 存储库设置脚本:

/usr/share/postgresql-common/pgdg/apt.postgresql.org.sh	  #直接回车

执行此脚本详情:"
root@gegewu1:/usr/share/postgresql-common/pgdg# ls
apt.postgresql.org.asc  apt.postgresql.org.gpg  apt.postgresql.org.sh
root@gegewu1:/usr/share/postgresql-common/pgdg# ./apt.postgresql.org.sh
This script will enable the PostgreSQL APT repository on apt.postgresql.org on
your system. The distribution codename used will be focal-pgdg.

Press Enter to continue, or Ctrl-C to abort.

Writing /etc/apt/sources.list.d/pgdg.list ...
Importing repository signing key ...
OK

Running apt-get update ...
命中:1 https://mirrors.aliyun.com/docker-ce/linux/ubuntu focal InRelease
命中:2 https://mirrors.tuna.tsinghua.edu.cn/ubuntu bionic InRelease
命中:3 https://mirrors.tuna.tsinghua.edu.cn/ubuntu bionic-updates InRelease
命中:4 https://mirrors.tuna.tsinghua.edu.cn/ubuntu bionic-backports InRelease
命中:5 https://mirrors.tuna.tsinghua.edu.cn/ubuntu bionic-security InRelease
命中:6 https://repo.zabbix.com/zabbix/6.0/ubuntu bionic InRelease
命中:8 http://apt.postgresql.org/pub/repos/apt focal-pgdg InRelease
命中:7 https://packagecloud.io/timescale/timescaledb/ubuntu focal InRelease
正在读取软件包列表... 完成

You can now start installing packages from apt.postgresql.org.

Have a look at https://wiki.postgresql.org/wiki/Apt for more information;
most notably the FAQ at https://wiki.postgresql.org/wiki/Apt/FAQ
此时说明执行成功。

"
----------------------------------------------------------------------------->

3.添加 TimescaleDB 第三方存储库:

echo "deb https://packagecloud.io/timescale/timescaledb/ubuntu/ $(lsb_release -c -s) main" > /etc/apt/sources.list.d/timescaledb.list

4.安装 Timescale GPG 密钥

wget --quiet -O - https://packagecloud.io/timescale/timescaledb/gpgkey | apt-key add -

5.更新您的本地存储库列表:

apt update

6.安装 TimescaleDB:

apt install timescaledb-2-postgresql-14
timescaledb安装详情:
root@gegewu1:~# apt install timescaledb-2-postgresql-14
正在读取软件包列表... 完成
正在分析软件包的依赖关系树
正在读取状态信息... 完成
下列软件包是自动安装的并且现在不需要了:
libmysqlclient20
使用'apt autoremove'来卸载它(它们)。
将会同时安装下列软件:
timescaledb-2-loader-postgresql-14 timescaledb-toolkit-postgresql-14 timescaledb-tools
建议安装:
libpq-dev
下列【新】软件包将被安装:
timescaledb-2-loader-postgresql-14 timescaledb-2-postgresql-14 timescaledb-toolkit-postgresql-14 timescaledb-tools
升级了 0 个软件包,新安装了 4 个软件包,要卸载 0 个软件包,有 13 个软件包未被升级。
需要下载 10.0 MB 的归档。
解压缩后会消耗 63.4 MB 的额外空间。
您希望继续执行吗? [Y/n] y
获取:1 https://packagecloud.io/timescale/timescaledb/ubuntu focal/main amd64 timescaledb-2-loader-postgresql-14 amd64 2.7.0~ubuntu20.04 [119 kB]
获取:2 https://packagecloud.io/timescale/timescaledb/ubuntu focal/main amd64 timescaledb-2-postgresql-14 amd64 2.7.0~ubuntu20.04 [7,062 kB]
获取:3 https://packagecloud.io/timescale/timescaledb/ubuntu focal/main amd64 timescaledb-tools amd64 0.12.0~ubuntu20.04 [1,875 kB]
获取:4 https://packagecloud.io/timescale/timescaledb/ubuntu focal/main amd64 timescaledb-toolkit-postgresql-14 amd64 1:1.7.0~ubuntu20.04 [974 kB]
已下载 10.0 MB,耗时 35秒 (289 kB/s)
正在选中未选择的软件包 timescaledb-2-loader-postgresql-14。
(正在读取数据库 ... 系统当前共安装有 81067 个文件和目录。)
准备解压 .../timescaledb-2-loader-postgresql-14_2.7.0~ubuntu20.04_amd64.deb ...
正在解压 timescaledb-2-loader-postgresql-14 (2.7.0~ubuntu20.04) ...
正在选中未选择的软件包 timescaledb-2-postgresql-14。
准备解压 .../timescaledb-2-postgresql-14_2.7.0~ubuntu20.04_amd64.deb ...
正在解压 timescaledb-2-postgresql-14 (2.7.0~ubuntu20.04) ...
正在选中未选择的软件包 timescaledb-tools。
准备解压 .../timescaledb-tools_0.12.0~ubuntu20.04_amd64.deb ...
正在解压 timescaledb-tools (0.12.0~ubuntu20.04) ...
正在选中未选择的软件包 timescaledb-toolkit-postgresql-14。
准备解压 .../timescaledb-toolkit-postgresql-14_1%3a1.7.0~ubuntu20.04_amd64.deb ...
正在解压 timescaledb-toolkit-postgresql-14 (1:1.7.0~ubuntu20.04) ...
正在设置 timescaledb-tools (0.12.0~ubuntu20.04) ...
正在设置 timescaledb-2-loader-postgresql-14 (2.7.0~ubuntu20.04) ...
正在设置 timescaledb-toolkit-postgresql-14 (1:1.7.0~ubuntu20.04) ...
正在设置 timescaledb-2-postgresql-14 (2.7.0~ubuntu20.04) ...
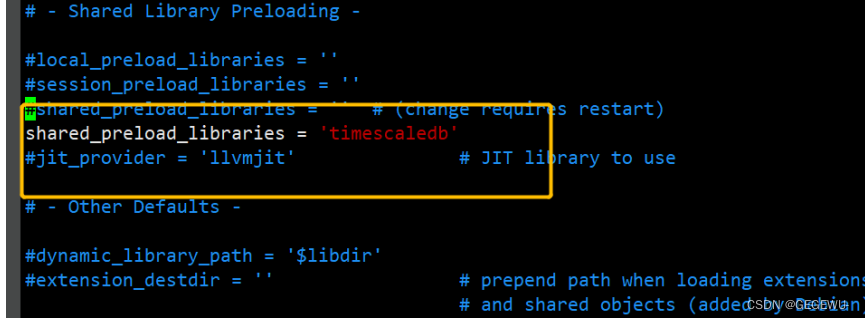
RECOMMENDED: Run 'timescaledb-tune' (installed as part of the
timescaledb-tools package, a recommended dependency) to update your
config settings for TimescaleDB:
timescaledb-tune --quiet --yes
IF NOT, you need to update your postgresql.conf file to load TimescaleDB
by adding 'timescaledb' to your shared_preload_libraries.
Find the line below and change the value as shown (uncomment if needed):
shared_preload_libraries = 'timescaledb'
正在处理用于 postgresql-common (241.pgdg20.04+1) 的触发器 ...
Building PostgreSQL dictionaries from installed myspell/hunspell packages...
Removing obsolete dictionary files:
root@gegewu1:~#
此时先配置好zabbix6.0:
1. 创建zabbix数据库以及zabbix psql用户
2. 设置timescaledb为psql数据库扩展
3. 导入zabbix数据库文件:/usr/share/doc/zabbix-sql-scripts/postgresql/server.sql.gz
4.导入timescaledb.sql
注:一定要注意顺序
sudo -u postgres createuser --pwprompt zabbix #创建zabbix用户连续两次输入密码。
2. 设置timesdb为psql扩展
官网配置:https://www.zabbix.com/documentation/current/zh/manual/appendix/install/timescaledb
执行之前先手动添加:vim /etc/postgresql/14/main/postgresql.conf
否则可能会出现报错:
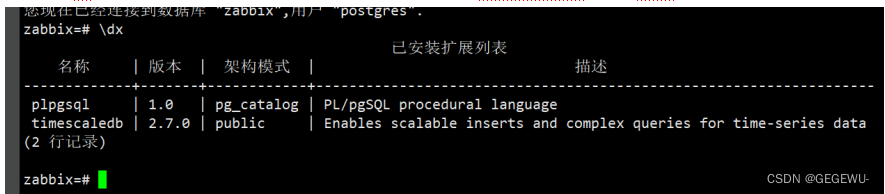
您现在已经连接到数据库 "zabbix",用户 "postgres".
zabbix=# CREATE EXTENSION IF NOT EXISTS timescaledb CASCADE;
FATAL: extension "timescaledb" must be preloaded
提示: Please preload the timescaledb library via shared_preload_libraries.
This can be done by editing the config file at: /etc/postgresql/14/main/postgresql.conf
and adding 'timescaledb' to the list in the shared_preload_libraries config.
# Modify postgresql.conf:
shared_preload_libraries = 'timescaledb'
Another way to do this, if not preloading other libraries, is with the command:
echo "shared_preload_libraries = 'timescaledb'" >> /etc/postgresql/14/main/postgresql.conf
(Will require a database restart.)
If you REALLY know what you are doing and would like to load the library without preloading, you can disable this check with:
SET timescaledb.allow_install_without_preload = 'on';
服务器意外地关闭了联接
这种现象通常意味着服务器在处理请求之前
或者正在处理请求的时候意外中止
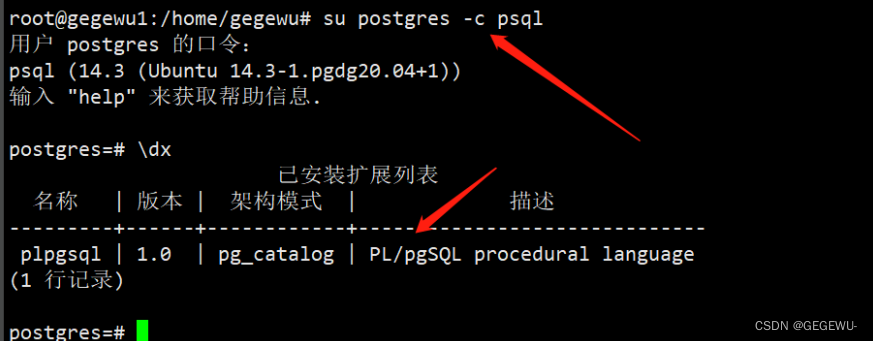
与服务器的连接已断开,正在试图重置: 完成。sudo -u postgres psql
一 . 设置timesdb为psql扩展
   1.  sudo -u postgres psql
用户 postgres 的口令:
psql (14.3 (Ubuntu 14.3-1.pgdg20.04+1))
输入 "help" 来获取帮助信息.

   2. postgres=# \c zabbix 切换用户

您现在已经连接到数据库 "zabbix",用户 "postgres".
   3. zabbix=# CREATE EXTENSION IF NOT EXISTS timescaledb CASCADE;  #设置zabbix数据库TSDB插件
WARNING:
WELCOME TO
 _____ _                               _     ____________
|_   _(_)                             | |    |  _  \ ___ \
  | |  _ _ __ ___   ___  ___  ___ __ _| | ___| | | | |_/ /
  | | | |  _ ` _ \ / _ \/ __|/ __/ _` | |/ _ \ | | | ___ \
  | | | | | | | | |  __/\__ \ (_| (_| | |  __/ |/ /| |_/ /
  |_| |_|_| |_| |_|\___||___/\___\__,_|_|\___|___/ \____/
               Running version 2.7.0
For more information on TimescaleDB, please visit the following links:

 1. Getting started: https://docs.timescale.com/timescaledb/latest/getting-started
 2. API reference documentation: https://docs.timescale.com/api/latest
 3. How TimescaleDB is designed: https://docs.timescale.com/timescaledb/latest/overview/core-concepts

Note: TimescaleDB collects anonymous reports to better understand and assist our users.
For more information and how to disable, please see our docs https://docs.timescale.com/timescaledb/latest/how-to-guides/configuration/telemetry.

CREATE EXTENSION
zabbix=#
看到上图说明配置成功
注: \dx 您可以在提示符处使用命令检查是否安装了 TimescaleDB 扩展psql。
如果没有设置timesdb是这样的:
此时初始化TSDB配置:
初始化配置:
sudo timescaledb-tune 或者 sudo timescaledb-tune --quiet --yes
如果是第一次安装建议:sudo timescaledb-tune --quiet --yes
配置详情:
root@telegraf:/tmp# sudo timescaledb-tune
Using postgresql.conf at this path:
/etc/postgresql/14/main/postgresql.conf

Is this correct? [(y)es/(n)o]:
Is this correct? [(y)es/(n)o]: y
Writing backup to:
/tmp/timescaledb_tune.backup202206100952

success: shared_preload_libraries is set correctly

Tune memory/parallelism/WAL and other settings? [(y)es/(n)o]: y
Recommendations based on 15.63 GB of available memory and 8 CPUs for PostgreSQL 14

Memory settings recommendations
success: memory settings are already tuned

Parallelism settings recommendations
success: parallelism settings are already tuned

WAL settings recommendations
success: WAL settings are already tuned

Miscellaneous settings recommendations
Current:
max_connections = 1000
Recommended:
max_connections = 100
Is this okay? [(y)es/(s)kip/(q)uit]: y
success: miscellaneous settings will be updated
生效配置:
sudo systemctl restart postgresql.service

导入TimescleDB表配置sql
cat timescaledb.sql |sudo -u zabbix psql zabbix
或
zcat /usr/share/doc/zabbix-sql-scripts/postgresql/timescaledb.sql.gz | sudo -u zabbix psql zabbix
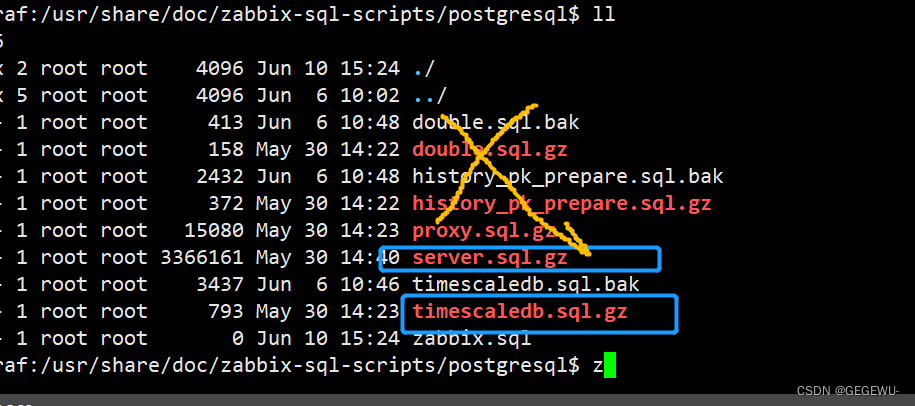
特别注意:导入时序数据timescaledb.sql表时此目录旁边还有其他各种sql文件 这些sql文件只有两个是 需要用的即:timescalesql 和 server.sql 其他的都是用来迷惑人的。
三. 安装配置zabbix+psdb+TSDB
----------------------------
Install and configure Zabbix server for your platform
一. Install Zabbix repository
产品手册
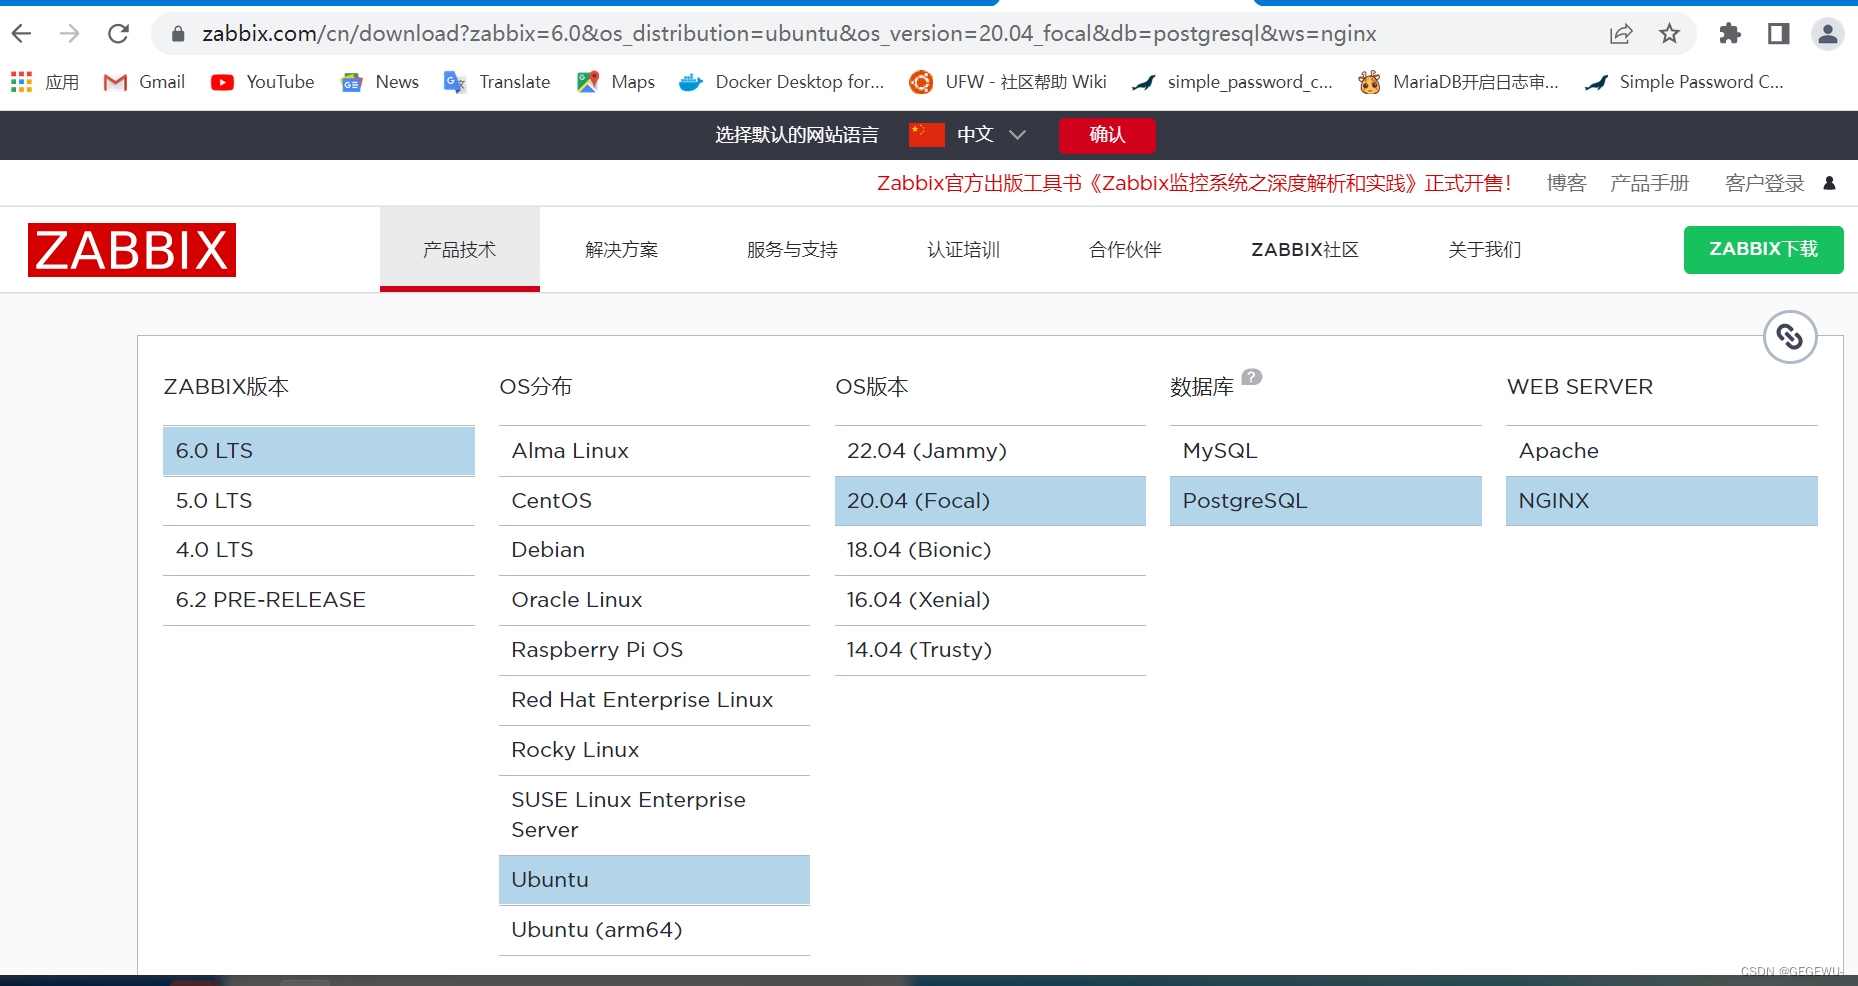
1. wget https://repo.zabbix.com/zabbix/6.0/ubuntu/pool/main/z/zabbix-release/zabbix-release_6.0-1+ubuntu20.04_all.deb
2. dpkg -i zabbix-release_6.0-1+ubuntu20.04_all.deb
3. apt update
二. 安装Zabbix server,Web前端,agent
1. apt install zabbix-server-pgsql zabbix-frontend-php php7.4-pgsql zabbix-nginx-conf
zabbix-sql-scripts zabbix-agent
三. 创建初始数据库
产品手册
Make sure you have database server up and running.
在数据库主机上运行以下代码。
1. sudo -u postgres createuser --pwprompt zabbix
2. sudo -u postgres createdb -O zabbix zabbix
四.导入初始架构和数据,系统将提示您输入新创建的密码。
1. zcat /usr/share/doc/zabbix-sql-scripts/postgresql/server.sql.gz | sudo -u zabbix psql zabbix
五. 为Zabbix server配置数据库
1.编辑配置文件 /etc/zabbix/zabbix_server.conf
DBPassword=password
e. 为Zabbix前端配置PHP
五.编辑配置文件 /etc/zabbix/nginx.conf, uncomment and set 'listen' and 'server_name' directives.
# listen 80;
# server_name example.com;
六. 启动Zabbix server和agent进程
启动Zabbix server和agent进程,并为它们设置开机自启:
# systemctl restart zabbix-server zabbix-agent nginx php7.4-fpm
# systemctl enable zabbix-server zabbix-agent nginx php7.4-fpm
七. 配置Zabbix前端
连接到新安装的Zabbix前端: http://server_ip_or_name
根据Zabbix文件里步骤操作: Installing frontend
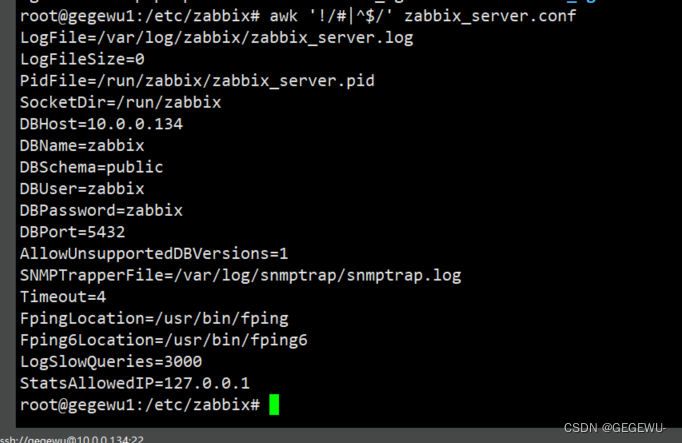
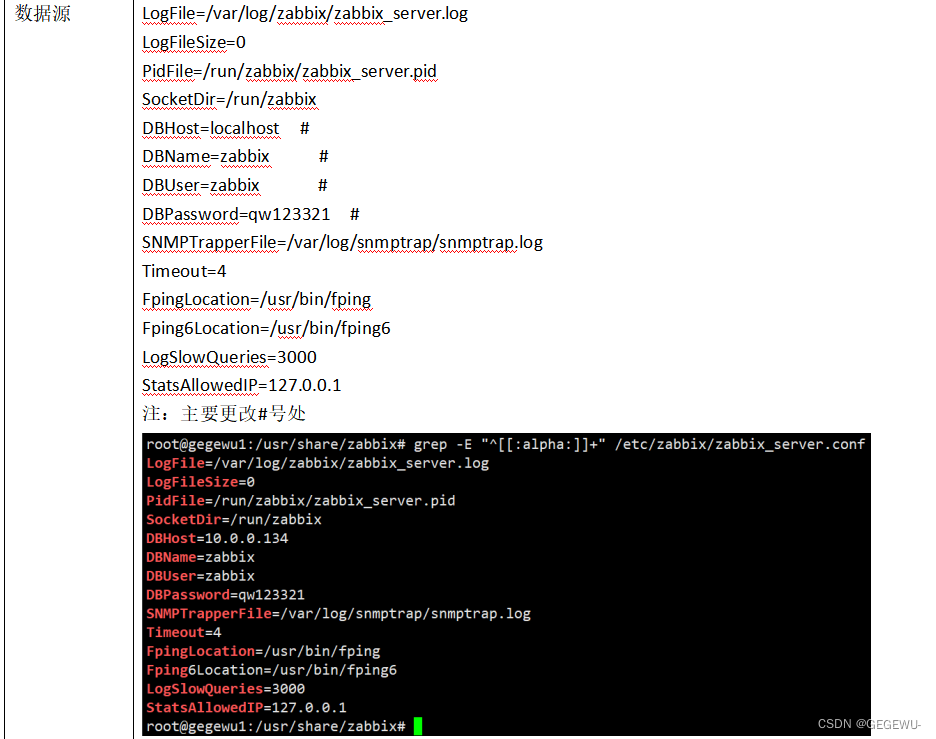
zabbix连接数据库配置:
注:有时候需要手动加端口选项
一般配置:
# DBHost=localhost
DBHost=[pgsql-ip]
### Option: DBName
# the tnsnames.ora file or set to empty string; also see the TWO_TASK environment variable if DBName is set to
# DBName=
DBName=zabbix
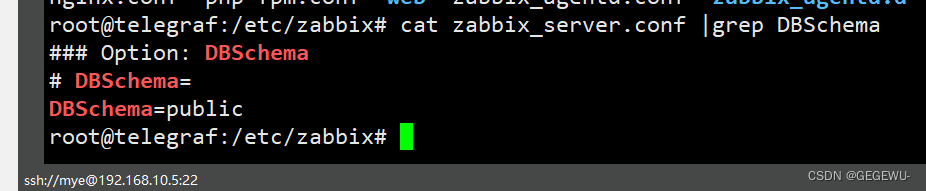
### Option: DBSchema
# DBSchema=
DBSchema=public
### Option: DBUser
# DBUser=
DBUser=zabbix
### Option: DBPassword
# DBPassword=
DBPassword=zabbix
### Option: DBSocket
# DBSocket=
### Option: DBPort
# DBPort=
DBPort=5432
完成之后重启服务:
# systemctl restart zabbix-server zabbix-agent nginx php7.4-fpm
# systemctl enable zabbix-server zabbix-agent nginx php7.4-fpm
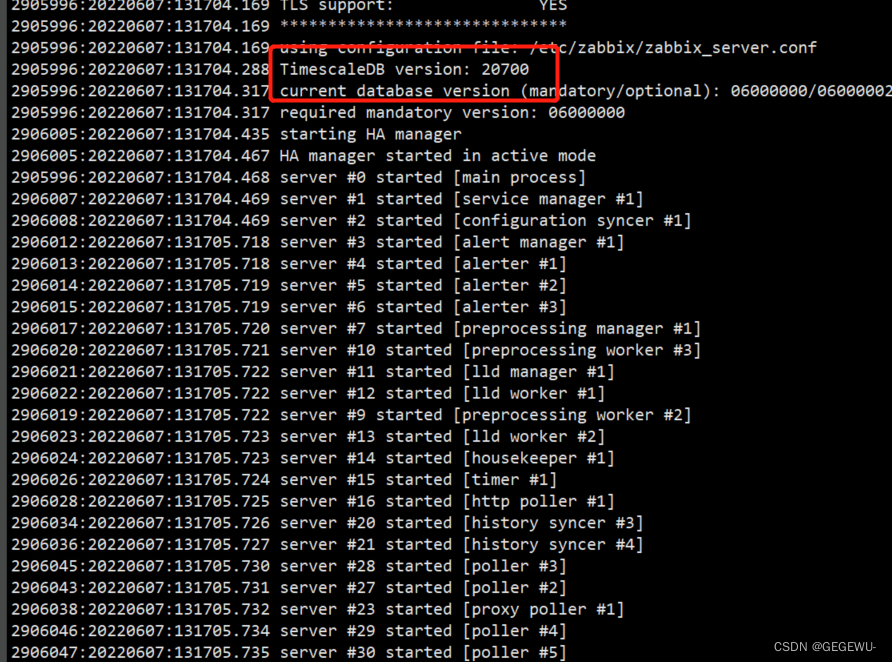
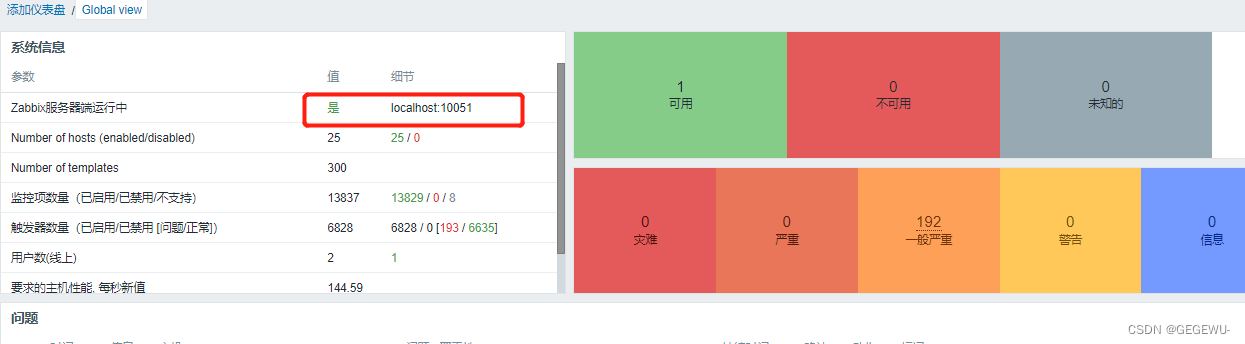
重启后此时观察日志发现Timesdb已经起来:
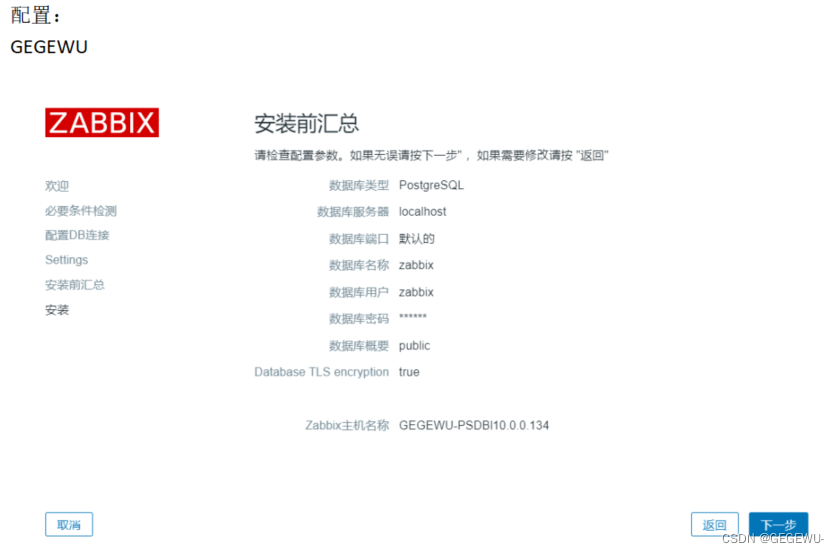
此时配置前端:
最后导入数据库:timescaledb.sql
zcat /usr/share/doc/zabbix-sql-scripts/postgresql/timescaledb.sql.gz | sudo -u zabbix psql zabbix
详情如下:
root@telegraf:/usr/share/doc/zabbix-sql-scripts/postgresql# zcat /usr/share/doc/zabbix-sql-scripts/postgresql/timescaledb.sql.gz | sudo -u zabbix psql zabbix
Password for user zabbix:
NOTICE: PostgreSQL version 14.3 (Ubuntu 14.3-1.pgdg20.04+1) is valid
NOTICE: TimescaleDB extension is detected
NOTICE: TimescaleDB version 2.7.0 is valid
NOTICE: migrating data to chunks
DETAIL: Migration might take a while depending on the amount of data.
NOTICE: migrating data to chunks
DETAIL: Migration might take a while depending on the amount of data.
NOTICE: migrating data to chunks
DETAIL: Migration might take a while depending on the amount of data.
NOTICE: migrating data to chunks
DETAIL: Migration might take a while depending on the amount of data.
NOTICE: migrating data to chunks
DETAIL: Migration might take a while depending on the amount of data.
NOTICE: migrating data to chunks
DETAIL: Migration might take a while depending on the amount of data.
NOTICE: TimescaleDB is configured successfully
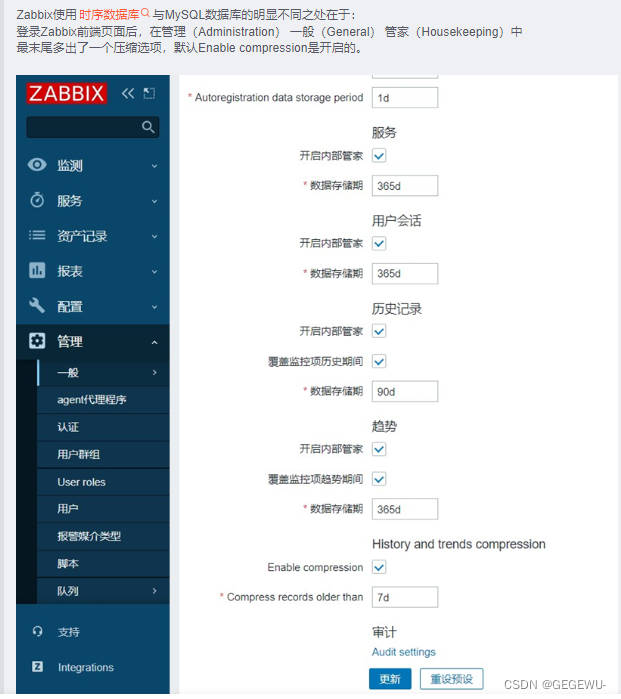
DO这样就完成了zabbix的历史数据往timescaledb数据库配置迁移。
在zabbix web的housekeeper中,多了两项配置,支持对历史记录进行压缩,压缩了可达到90%以上,建议启用,可极大地节省存储空间
注:没有设置timesdb前zabbix-web页面此两个选项是无法操作的
配置好之后便可以操作。

成功!
Tips
我们可以打开timescaledb.sql,可以看到,sql文件中,创建了7张表,并且每个86400秒(即1天)进行数据轮切,如果希望更短时间,可以在导入前修改此文件。
期间小插曲
1. PostgreSQL连接数满了
现象
205:20210817:105226.207 database is down: reconnecting in 10 seconds
180:20210817:105226.208 [Z3001] connection to database 'zabbix' failed: [0] FATAL: remaining connection slots are reserved for non-replication superuser connections
解决
增加PostgreSQL的最大连接数
在PostgreSQL安装目录中找到postgresql.conf 文件,修改其中的 max_connections 为200,默认为20,然后重启postgresql服务。
程序使用连接未及时释放, 连接一直处于 idle 状态

处理方式
1、 程序里面未释放的连接, 在使用后及时释放;
2、 postgres 连接数默认最大 100个,在配置文件修改该参数:postgres.conf
    max_connection = 1000 修改后重启生效;
3、 postgres 设置 idle 状态连接回收, 该状态默认不开启:postgres.conf
    idle_in_transaction_session_timeout=20000; 修改为idle 状态 20s 后回收该连接;

修改后重启;sudo service postgresql restart / systemctl restart postgresql

参考大神:https://blog.csdn.net/bushiyao_/article/details/120841712
2. 在启用timescale插件时,使用zabbix用户登录执行时报错
现象
Must be superuser to create this extension
解决
按照出错提示,使用PostgreSQL超级用户,切换到zabbix库,即可为zabbix用户的zabbix库启用timescale特性
3. 无法登录 psql -u zabbix -d zabbix
sudo vim /etc/postgresql/14/main/pg_hba.conf
peer改为md5
4. zabbix-server 服务总是stop
现象:
2904747:20220607:131116.745 __mem_malloc: skipped 10 asked 162664 skip_min 752 skip_max 36496
2904747:20220607:131116.745 [file:dbconfig.c,line:89] __zbx_mem_realloc(): out of memory (requested 162664 bytes)
2904747:20220607:131116.745 [file:dbconfig.c,line:89] __zbx_mem_realloc(): please increase CacheSize configuration parameter
2904747:20220607:131116.745 === memory statistics for configuration cache ===
2904747:20220607:131116.745 free chunks of size     24 bytes:      122
2904747:20220607:131116.745 free chunks of size >= 256 bytes:       10
2904747:20220607:131116.745 min chunk size:         24 bytes
2904747:20220607:131116.745 max chunk size:      36496 bytes
2904747:20220607:131116.745 memory of total size 29192048 bytes fragmented into 272626 chunks
2904747:20220607:131116.745 of those,      80528 bytes are in      132 free chunks
2904747:20220607:131116.745 of those,   29111520 bytes are in   272494 used chunks
2904747:20220607:131116.745 of those,    4362000 bytes are used by allocation overhead
2904747:20220607:131116.745 ================================
2904747:20220607:131116.745 === Backtrace: ===
2904747:20220607:131116.747 16: /usr/sbin/zabbix_server: configuration syncer [syncing configuration](zbx_backtrace+0x52) [0x55e48bdeb6e1]
2904747:20220607:131116.747 15: /usr/sbin/zabbix_server: configuration syncer [syncing configuration](__zbx_mem_realloc+0x164) [0x55e48bde626a]
2904747:20220607:131116.747 14: /usr/sbin/zabbix_server: configuration syncer [syncing configuration](+0x1f424b) [0x55e48bd6624b]
2904747:20220607:131116.747 13: /usr/sbin/zabbix_server: configuration syncer [syncing configuration](zbx_hashset_reserve+0xc3) [0x55e48bdf1f0d]
2904747:20220607:131116.747 12: /usr/sbin/zabbix_server: configuration syncer [syncing configuration](zbx_hashset_insert_ext+0xf3) [0x55e48bdf218d]
2904747:20220607:131116.747 11: /usr/sbin/zabbix_server: configuration syncer [syncing configuration](zbx_hashset_insert+0x31) [0x55e48bdf2098]
2904747:20220607:131116.747 10: /usr/sbin/zabbix_server: configuration syncer [syncing configuration](DCfind_id+0xb4) [0x55e48bd66b2f]
2904747:20220607:131116.747 9: /usr/sbin/zabbix_server: configuration syncer [syncing configuration](+0x201a79) [0x55e48bd73a79]
2904747:20220607:131116.747 8: /usr/sbin/zabbix_server: configuration syncer [syncing configuration](DCsync_configuration+0x13ee) [0x55e48bd76b16]
2904747:20220607:131116.747 7: /usr/sbin/zabbix_server: configuration syncer [syncing configuration](dbconfig_thread+0x149) [0x55e48bbef851]
2904747:20220607:131116.747 6: /usr/sbin/zabbix_server: configuration syncer [syncing configuration](zbx_thread_start+0x3b) [0x55e48bdfcdd8]
2904747:20220607:131116.747 5: /usr/sbin/zabbix_server: configuration syncer [syncing configuration](+0x6984f) [0x55e48bbdb84f]
2904747:20220607:131116.747 4: /usr/sbin/zabbix_server: configuration syncer [syncing configuration](MAIN_ZABBIX_ENTRY+0x87c) [0x55e48bbdcb4c]
2904747:20220607:131116.747 3: /usr/sbin/zabbix_server: configuration syncer [syncing configuration](daemon_start+0x3ca) [0x55e48bdeb204]
2904747:20220607:131116.747 2: /usr/sbin/zabbix_server: configuration syncer [syncing configuration](main+0x34d) [0x55e48bbdaec2]
2904747:20220607:131116.747 1: /lib/x86_64-linux-gnu/libc.so.6(__libc_start_main+0xf3) [0x7f12759410b3]
2904747:20220607:131116.747 0: /usr/sbin/zabbix_server: configuration syncer [syncing configuration](_start+0x2e) [0x55e48bbd9b2e]
2904735:20220607:131116.755 One child process died (PID:2904747,exitcode/signal:1). Exiting ...
2904744:20220607:131116.755 HA manager has been paused
2904744:20220607:131116.762 HA manager has been stopped
2904735:20220607:131116.764 Zabbix Server stopped. Zabbix 6.0.5 (revision 8da3e1f8419).
原因:
__zbx_mem_malloc(): out of memory (requested 80 bytes) __zbx_mem_malloc(): please increase CacheSize configuration parameter 看样子像是CacheSize满了,看看是增大空间还是清除缓存
解决方法
1. 增大缓存空间
解决办法:
vim /etc/zabbix/zabbix_server.conf编辑配置文件,修改VMwareCacheSize与CacheSize参数;

VMwareCacheSize=2G
CacheSize=8G
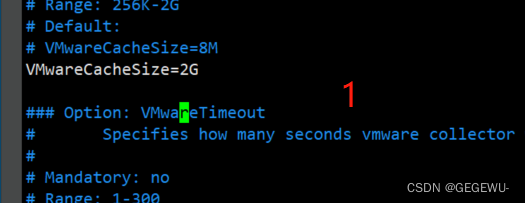
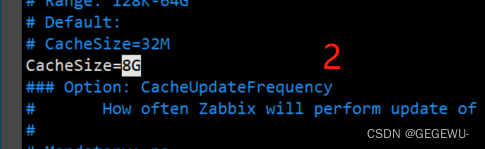
最后重启服务: systemctl restart zabbix-server
成功!
方法2: 清理zabbix缓存
八. 与grafana绘图连用
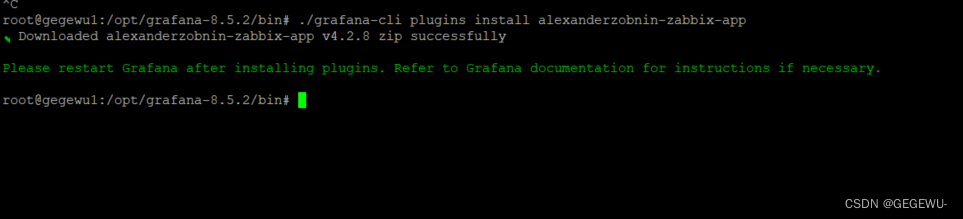
1. 需要安装zabbix插件
命令:./grafana-cli plugins install alexanderzobnin-zabbix-app


也可想安装什么插件自己上grafana官网下载
详情:安装zabbix插件详情
root@gegewu1:/opt/grafana-8.5.2/bin# ./grafana-cli plugins install alexanderzobnin-zabbix-app
✔ Downloaded alexanderzobnin-zabbix-app v4.2.8 zip successfully

Please restart Grafana after installing plugins. Refer to Grafana documentation for instructions if necessary.

root@gegewu1:/opt/grafana-8.5.2/bin#
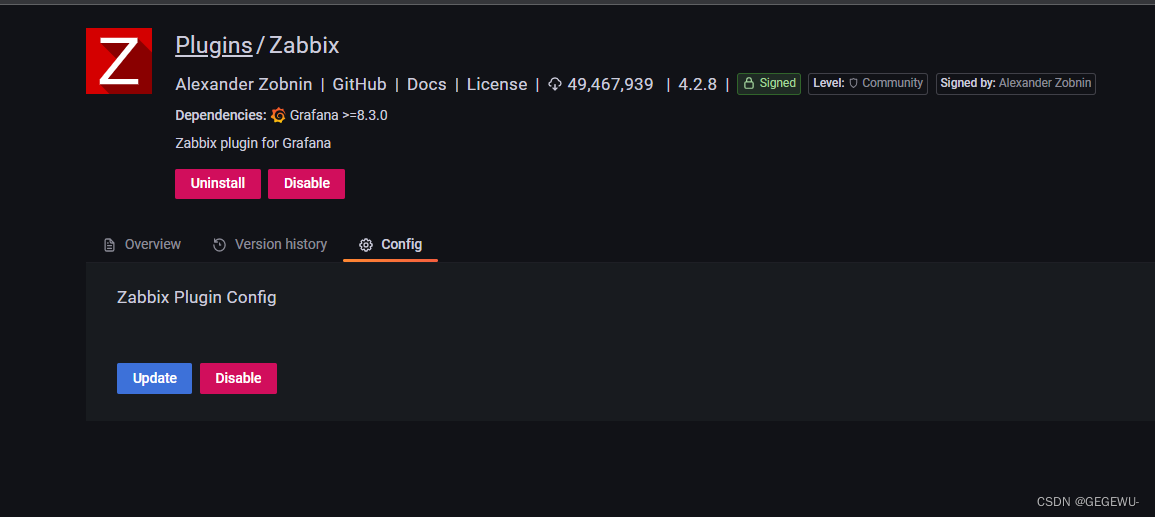
2. 安装好之后web页面plubin搜索zabbix出现下图 然后点击enable 即完成
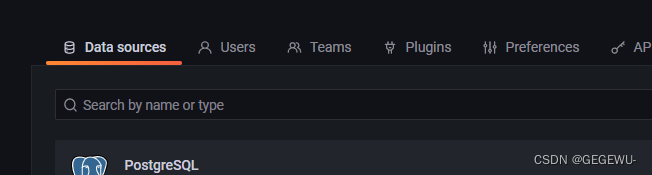
3. 此时选择add databases 导入配置的zabbix-api数据源
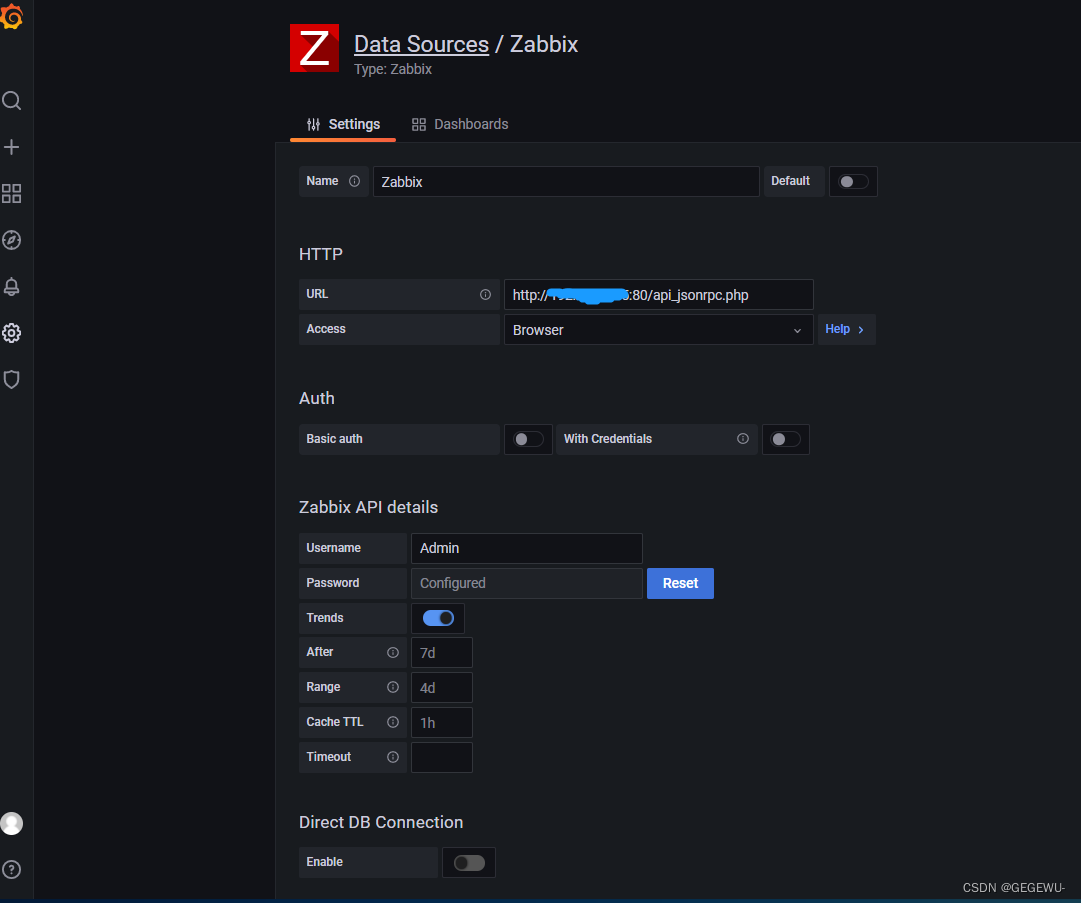
4.. HTTP
usr: http://ip:port/api_jsonrpc.php
5. Zabbix API details
下面写zabbix-web页面登录账户以及密码
默认为:Admin zabbix
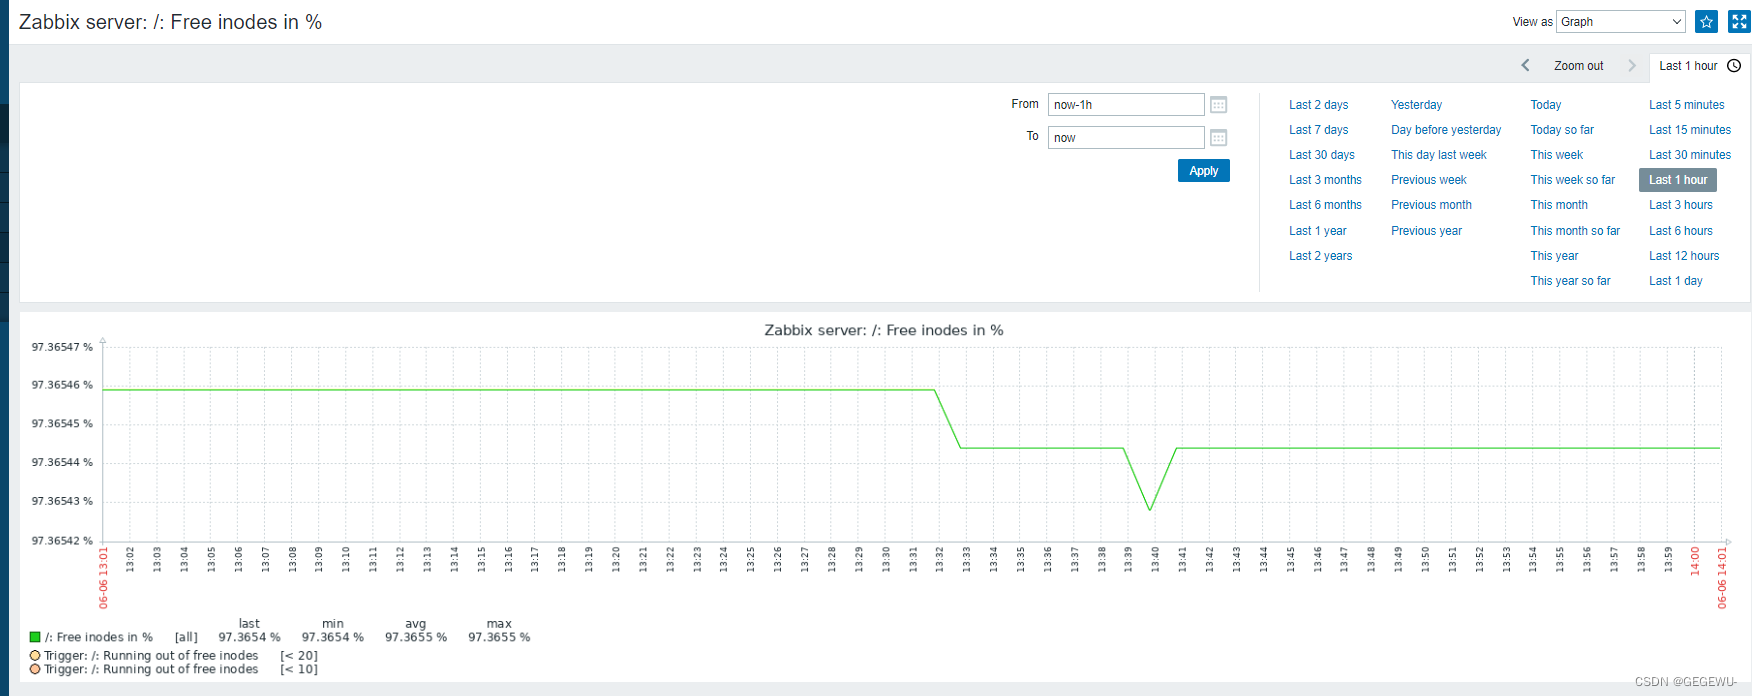
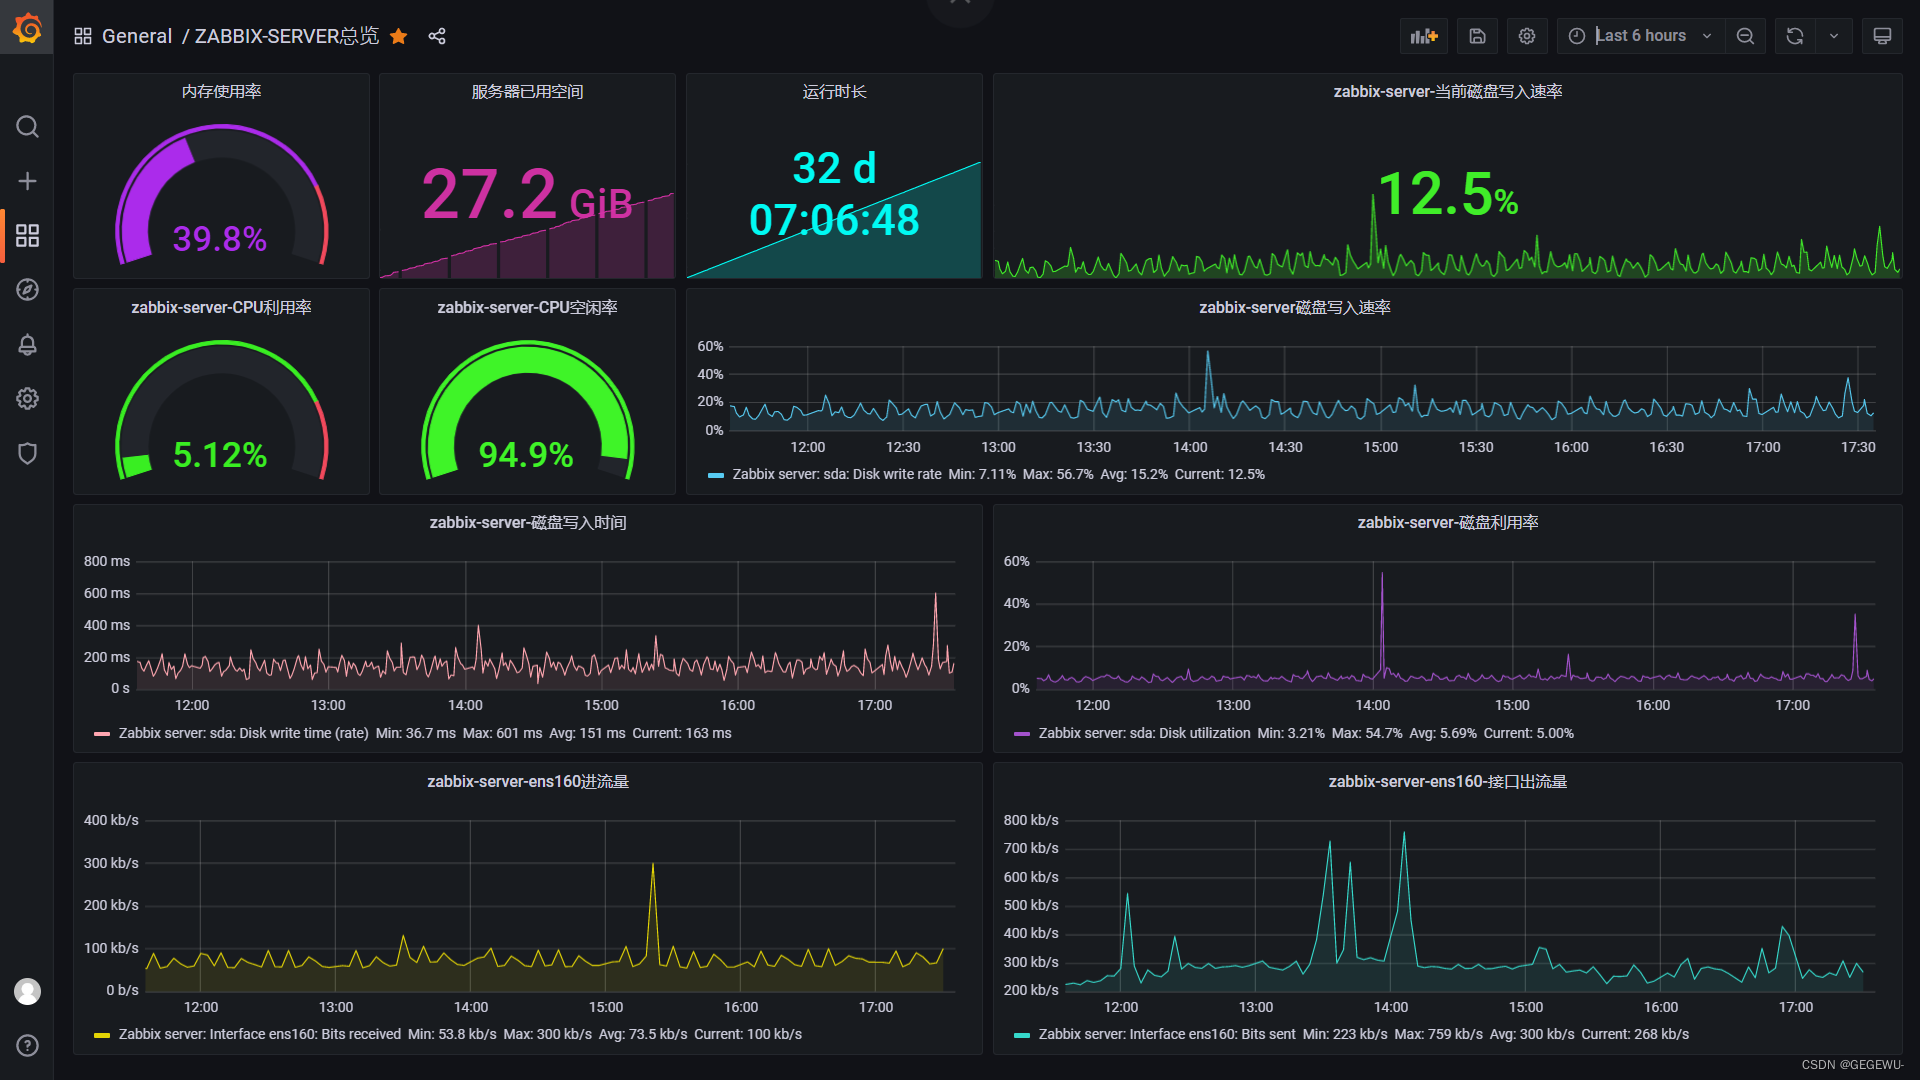
出图效果:

十. 微信报警
1. 后端配置
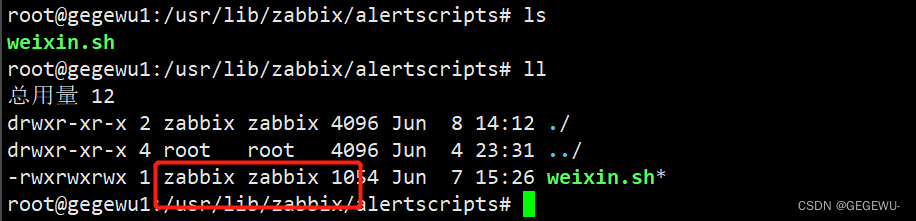
语言:shell
脚本:/usr/lib/zabbix/alertscripts/weixin.sh
组名改为:zabbix:zabbix
chmod a+x weixin.sh 赋予执行权限
脚本内容:
#!/bin/bash
CorpID="ww83dd7b81f692579d"     # 你的企业id
Secret="LSwoGzg-lXJFbvsddsC0n-zNEMlHIXKFkSztBptbgAfLrps"    #你的SecretID
GURL="https://qyapi.weixin.qq.com/cgi-bin/gettoken?corpid=$CorpID&corpsecret=$Secret"
Token=$(/usr/bin/curl -s -G $GURL |awk -F\": '{print $4}'|awk -F\" '{print $2}')
# echo $Token
PURL="https://qyapi.weixin.qq.com/cgi-bin/message/send?access_token=$Token"

function body(){
        local int agentid=1000002               # 你的agentdid
        local UserID="@all"                 # 发送的用户ID
        local PartyID=2                  # 部门ID
        local Msg=$(echo "$@" | cut -d" " -f3-) # 发送给所有人
        printf '{\n'
        printf '\t"touser": "'"$UserID"\"",\n"
        printf '\t"toparty": "'"$PartyID"\"",\n"
        printf '\t"msgtype": "text",\n'
        printf '\t"agentid": "'"$agentid"\"",\n"
        printf '\t"text": {\n'
        printf '\t\t"content": "'"$Msg"\""\n"
        printf '\t},\n'
        printf '\t"safe":"0"\n'
        printf '}\n'
}
/usr/bin/curl --data-ascii "$(body $1 $2 $3)" $PURL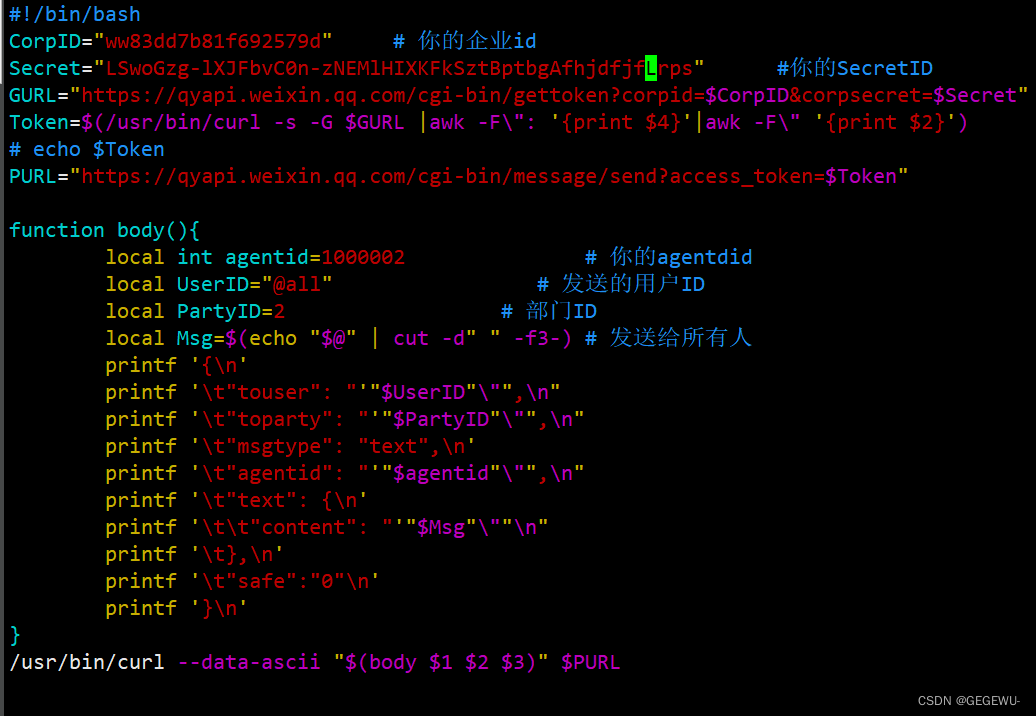
测试脚本可用性:
测试:
[root@133 scripts]# ./weixin.sh test {"errcode":0,"errmsg":"ok","invaliduser":""}
# 此时微信就会收到信息‘errmsg:ok’
说明脚本可用!测试成功!

以上微信报警后端配置完毕!
2. 前端zabbix-web页面配置
(1)管理-用户
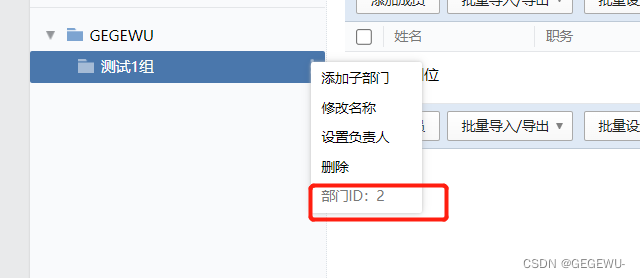
特别说明:收件人-2 2 为报警机器人所在的b部门id
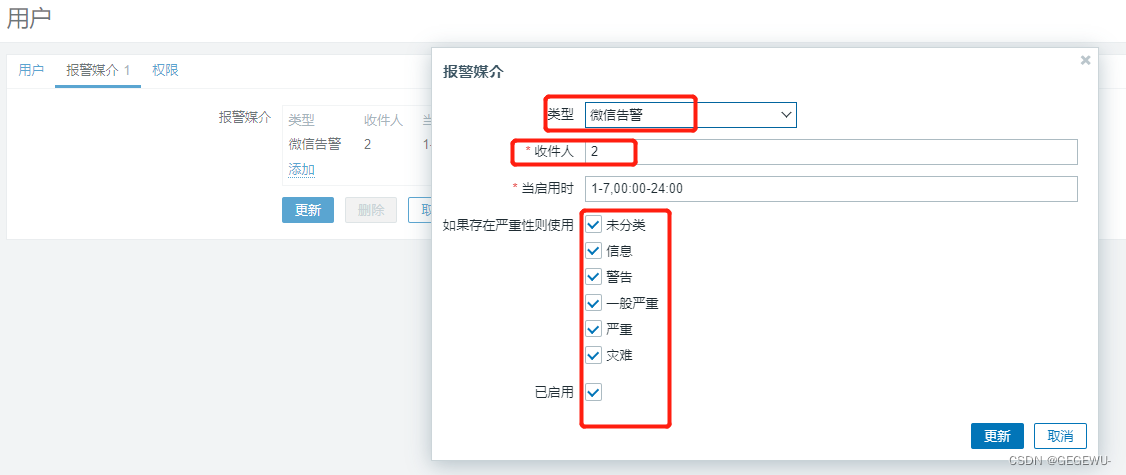
配置好之后显示这样:

(2). 管理-报警媒介类型-创建媒体类型
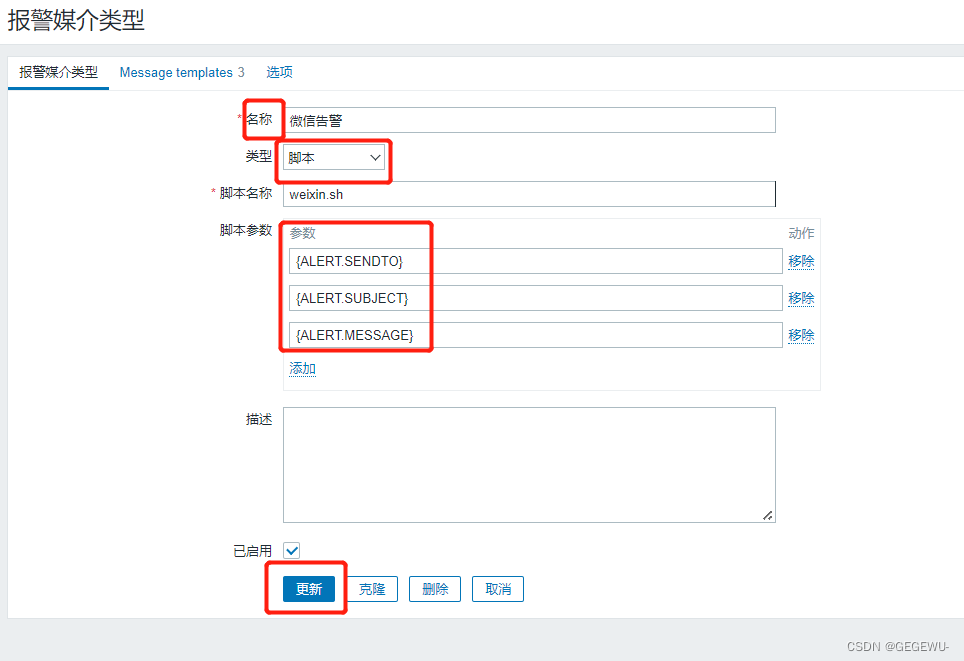
1. 设置默认报警发送信息message templates 3 点击添加-选择 问题
主题:
故障{TRIGGER.STATUS},机器:{HOSTNAME1}发生: {TRIGGER.NAME}故障!


消息:

告警机器:{HOSTNAME1}
告警主机:{HOST.NAME}
告警时间:{EVENT.DATE} {EVENT.TIME}
告警等级:{TRIGGER.SEVERITY}
告警信息: {TRIGGER.NAME}
告警项目:{TRIGGER.KEY1}
问题详情:{ITEM.NAME}:{ITEM.VALUE}
当前状态:{TRIGGER.STATUS}:{ITEM.VALUE1}
事件ID:{EVENT.ID}
2. 点击选择:problem recovery
主题:
恢复{TRIGGER.STATUS}, 机器:{HOSTNAME1}: {TRIGGER.NAME}已恢复!

消息:
告警机器:{HOSTNAME1}
告警主机:{HOST.NAME}
告警时间:{EVENT.DATE} {EVENT.TIME}
告警等级:{TRIGGER.SEVERITY}
告警信息: {TRIGGER.NAME}
告警项目:{TRIGGER.KEY1}
问题详情:{ITEM.NAME}:{ITEM.VALUE}
当前状态:{TRIGGER.STATUS}:{ITEM.VALUE1}
事件ID:{EVENT.ID}
设置好后样式:


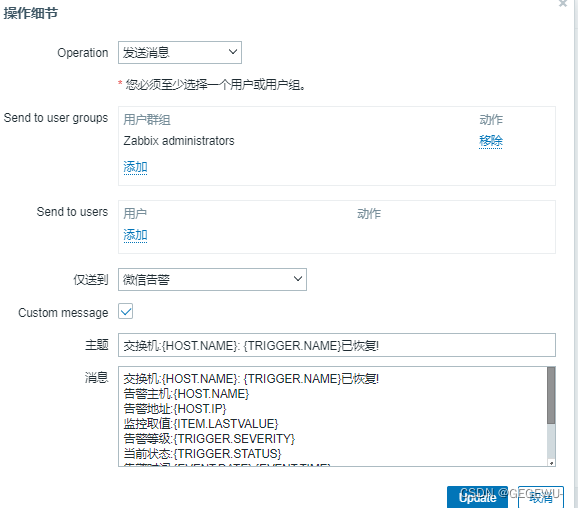
(3). 配置-动作-Tigger actions 创建动作微信告警
1.动作
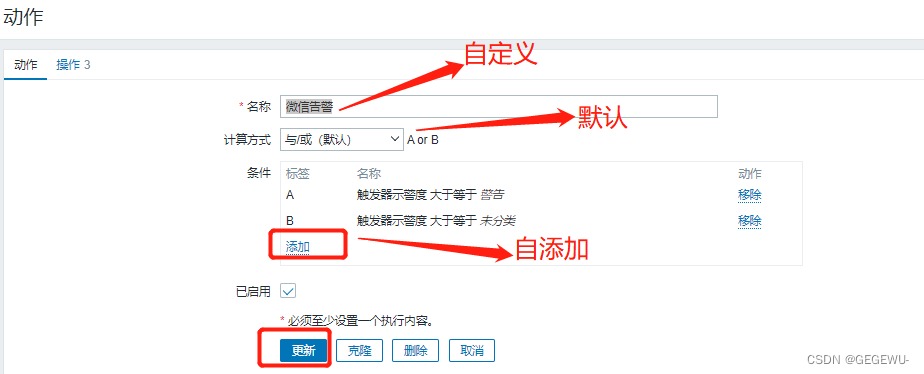
2.操作
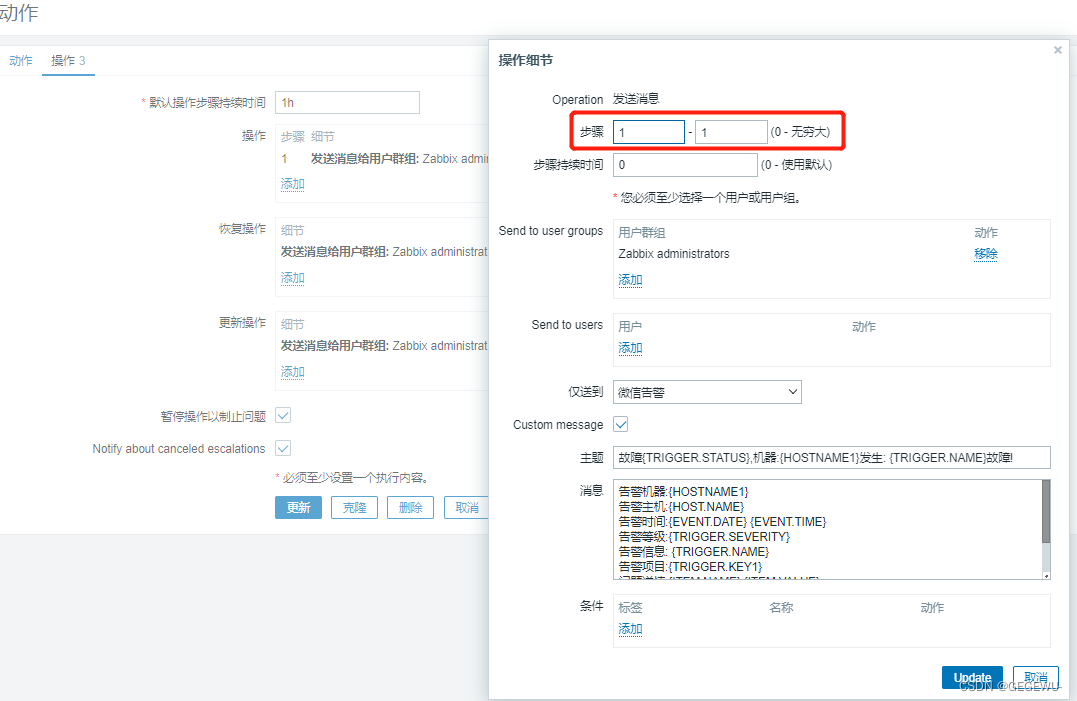
1. 操作 添加

步骤选择:1-1

步骤时间:0 (默认)

用户群组默认管理员群组 :Zabbix administrators

仅发送到:微信告警

cus message

主题:
故障{TRIGGER.STATUS},机器:{HOSTNAME1}发生: {TRIGGER.NAME}故障!

消息:
告警机器:{HOSTNAME1}
告警主机:{HOST.NAME}
告警时间:{EVENT.DATE} {EVENT.TIME}
告警等级:{TRIGGER.SEVERITY}
告警信息: {TRIGGER.NAME}
告警项目:{TRIGGER.KEY1}
问题详情:{ITEM.NAME}:{ITEM.VALUE}
当前状态:{TRIGGER.STATUS}:{ITEM.VALUE1}
事件ID:{EVENT.ID}
2. 恢复操作
主题:
机器:{HOST.NAME}: {TRIGGER.NAME}已恢复!

消息:
机器:{HOST.NAME}: {TRIGGER.NAME}已恢复!
告警主机:{HOST.NAME}
告警地址:{HOST.IP}
监控取值:{ITEM.LASTVALUE}
告警等级:{TRIGGER.SEVERITY}
当前状态:{TRIGGER.STATUS}
告警时间:{EVENT.DATE} {EVENT.TIME}
恢复时间:{EVENT.RECOVERY.DATE} {EVENT.RECOVERY.TIME}
持续时间:{EVENT.AGE}
事件ID:{EVENT.ID}
或报警模板2自行配置
默认接收人:
故障{TRIGGER.STATUS},机器:{HOSTNAME1}发生: {TRIGGER.NAME}故障!

默认信息:
告警机器:{HOSTNAME1}
告警时间:{EVENT.DATE} {EVENT.TIME}
告警等级:{TRIGGER.SEVERITY}
告警信息: {TRIGGER.NAME}
告警项目:{TRIGGER.KEY1}
问题详情:{ITEM.NAME}:{ITEM.VALUE}
当前状态:{TRIGGER.STATUS}:{ITEM.VALUE1}
事件ID:{EVENT.ID}

设置恢复:
恢复:恢复主旨:恢复{TRIGGER.STATUS}, 机器:{HOSTNAME1}: {TRIGGER.NAME}已恢复!

恢复信息:
告警机器:{HOSTNAME1}
告警时间:{EVENT.DATE} {EVENT.TIME}
告警等级:{TRIGGER.SEVERITY}
告警信息: {TRIGGER.NAME}
告警项目:{TRIGGER.KEY1}
问题详情:{ITEM.NAME}:{ITEM.VALUE}
当前状态:{TRIGGER.STATUS}:{ITEM.VALUE1}
事件ID:{EVENT.ID}
注:更新操作暂时不写。
此时点击启用新创建的微信告警:即启用动作

当有报警产生时查看报表--动作日志
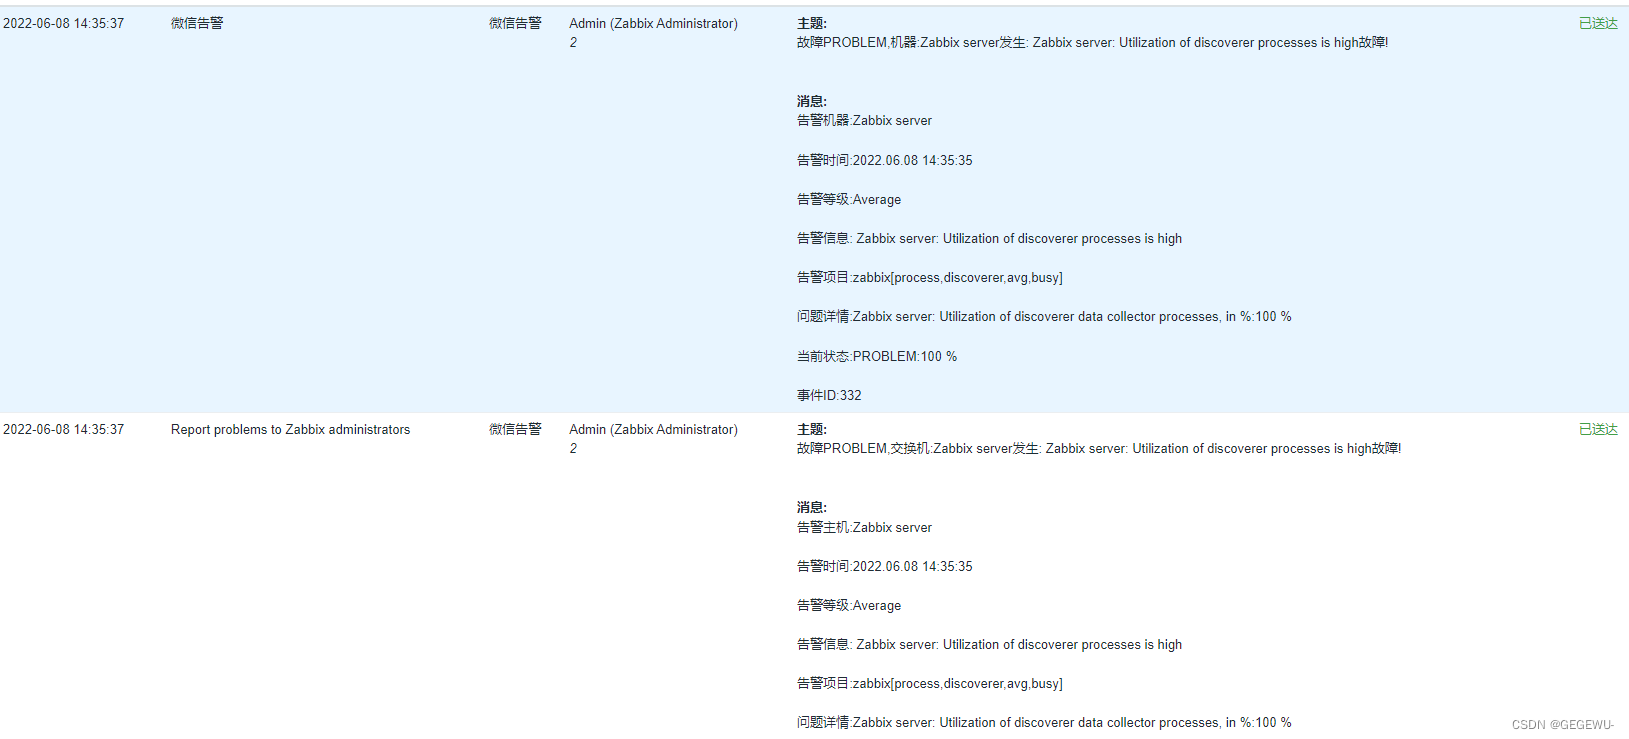
此时成功!
优秀博客参考链接:
1. https://blog.csdn.net/xiaojinran/article/details/119827435?utm_source=app&app_version=5.5.0&code=app_1562916241&uLinkId=usr1mkqgl919blen
2. https://cloud.tencent.com/developer/article/1941527
3.https://blog.csdn.net/lx3leon/article/details/124864508?ops_request_misc=%257B%2522request%255Fid%2522%253A%2522165467887116781818745889%2522%252C%2522scm%2522%253A%252220140713.130102334.pc%255Fall.%2522%257D&request_id=165467887116781818745889&biz_id=0&utm_medium=distribute.pc_search_result.none-task-blog-2~all~first_rank_ecpm_v1~rank_v31_ecpm-2-124864508-null-null.142^v11^pc_search_result_control_group,157^v13^control&utm_term=zabbix%E6%97%B6%E5%BA%8F%E6%95%B0%E6%8D%AE%E5%BA%93&spm=1018.2226.3001.4187
效果:
到此时序数据库版zabbix6.0构建完毕 成功!
