

Android 滑动效果基础篇(三)—— Gallery仿图像集浏览
Android系统自带一个Gallery浏览图片的应用,通过手指拖动时能够非常流畅的显示图片,用户交互和体验都很好。
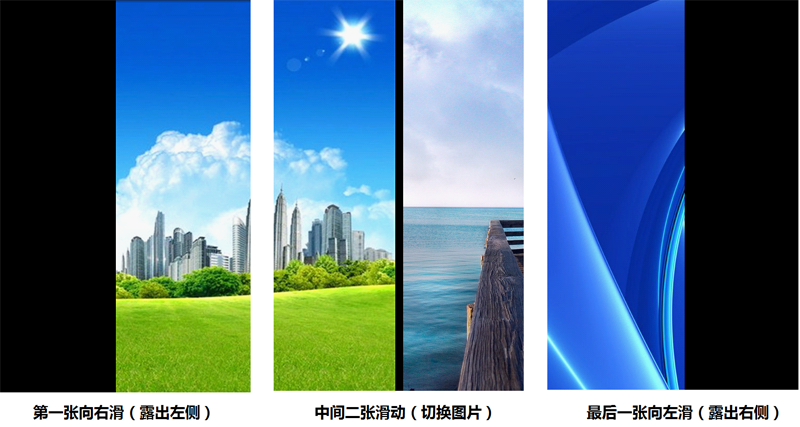
本示例就是通过Gallery和自定义的View,模仿实现一个仿Gallery图像集的图片浏览效果。效果图如下:
1、基本原理
在 Activity 中实现 OnGestureListener 的接口 onFling() 手势事件,通过自定义的 View 绘制draw() 图片
2、Activity
Activity中,通过onTouchEvent() 注册 myGesture.onTouchEvent(event)
- @Override
- public boolean onTouchEvent(MotionEvent event) {
- switch (event.getAction()) {
- case MotionEvent.ACTION_UP:
- flingView.onFling(0); // 手指抬起后,重置滑动距离offsetX = 0
- break;
- }
- return myGesture.onTouchEvent(event);
- }
接着实现接口OnGestureListener 的 onScroll()方法,给继承自View的 FlingView 的handleScroll()成员方法传递滑动参数,获取滑动的x轴距离
- @Override
- public boolean onScroll(MotionEvent e1, MotionEvent e2, float distanceX, float distanceY) {
- flingView.handleScroll(-1 * (int) distanceX);
- return true;
- }
接着实现接口OnGestureListener 的 OnFling()方法,给继承自View的 FlingView 的onFling()成员方法传递滑动参数,获取手势的速度
- @Override
- public boolean onFling(MotionEvent e1, MotionEvent e2, float velocityX, float velocityY) {
- flingView.onFling((int) - velocityX);
- return true;
- }
3、FlingView
FlingView中,获取来自Activity中的手势速度
- public void onFling(int paramFloat1) {
- if (offsetX > GalleryDemoActivity.deviceScreenWidth / 5) {
- if (fBitmap != null) {
- isFling = true;
- isFlingRight = true;
- }
- } else if (offsetX < -GalleryDemoActivity.deviceScreenWidth / 5) {
- if (nBitmap != null) {
- isFling = true;
- isFlingLeft = true;
- }
- }
- // 开始动画效果
- startAnimation(new MyAnimation());
- }
在滑动过程中,通过实现View的Draw()方法绘制图片,注意:此时需要同时绘制当前图片(获取焦点)和下一张图片(即将获取焦点)共两张图片
- @Override
- public void draw(Canvas canvas) {
- Paint paint = new Paint();
- Rect rect = new Rect();
- canvas.drawColor(Color.BLACK);
- // 绘制当前图片
- if (bitmap != null) {
- int left = offsetX;
- int top = offsetY;
- int right = offsetX + GalleryDemoActivity.deviceScreenWidth;
- int bottom = offsetY + GalleryDemoActivity.deviceScreenHeight;
- rect.set(left, top, right, bottom);
- canvas.drawBitmap(bitmap, null, rect, paint);
- }
- // 绘制下一张图片
- if (offsetX < 0) { // 向左滑动
- if (nBitmap != null) {
- int left = GalleryDemoActivity.deviceScreenWidth + 15 + offsetX;
- int top = 0;
- int right = left + GalleryDemoActivity.deviceScreenWidth;
- int bottom = GalleryDemoActivity.deviceScreenHeight;
- rect.set(left, top, right, bottom);
- canvas.drawBitmap(nBitmap, null, rect, paint);
- }
- } else if (offsetX > 0) { // 向右滑动
- if (fBitmap != null) {
- int left = -GalleryDemoActivity.deviceScreenWidth - 15 + offsetX;
- int top = 0;
- int right = left + GalleryDemoActivity.deviceScreenWidth;
- int bottom = GalleryDemoActivity.deviceScreenHeight;
- rect.set(left, top, right, bottom);
- canvas.drawBitmap(fBitmap, null, rect, paint);
- }
- }
- }
在滑动图片结束后,需要做滑动动画后的处理,重新设置当前图片和当前图片的上一张和下一张的状态,为下次滑动做准备
- @Override
- protected void onAnimationEnd() {
- if (isFlingRight) { // 向右滑动,position减1
- nBitmap = bitmap;
- bitmap = fBitmap;
- fBitmap = null;
- postion = postion - 1;
- } else if (isFlingLeft) { // 向左滑动,position加1
- fBitmap = bitmap;
- bitmap = nBitmap;
- nBitmap = null;
- postion = postion + 1;
- }
- isFlingRight = false;
- isFlingLeft = false;
- isFling = false;
- offsetX = 0;
- if (fBitmap == null && offsetX == 0) { // 如果前一张图片为空(向右滑),则重置前一张图片(position - 1)
- if (postion > 0) {
- fBitmap = getBitmap(postion - 1);
- }
- } else if (nBitmap == null && offsetX == 0) { // 如果后一张图片为空(向左滑),则重置后一张图片(position + 1)
- if (postion < bitmaps.length - 1) {
- nBitmap = getBitmap(postion + 1);
- }
- }
- clearAnimation();
- }
4、手势坐标介绍
本示例中,用到了OnGestureListener接口的onScroll()和OnFling()方法,涉及到了Android系统坐标及触摸MotionEvent e1和e2、速度velocityX、velocityY等值
Android屏幕坐标系如下图(左)

(1)MotionEvent中 e1是手指第一次按上屏幕的起点,e2是抬起手指离开屏幕的终点,根据上图Android屏幕坐标系可知:
手指向右滑动,终点(e2)在起点(e1)的右侧,有e2.getX() - e1.getX() 大于0
手指向左滑动,终点(e2)在起点(e1)的左侧,有e2.getX() - e1.getX() 小于0
手指向下滑动,终点(e2)在起点(e1)的下侧,有e2.getY() - e1.getY() 大于0
手指向上滑动,终点(e2)在起点(e1)的上侧,有e2.getY() - e1.getY() 小于0
(2)onScroll(MotionEvent e1, MotionEvent e2, float distanceX, float distanceY)
distanceX,是前后两次call的X距离,不是e2与e1的水平距离
distanceX,是前后两次call的Y距离,不是e2与e1的垂直距离
具体数值的方向,请详见上图(中)
(3)onFling(MotionEvent e1, MotionEvent e2, float velocityX, float velocityY)
velocityX,是X轴的每秒速度
velocityY,是Y轴的每秒速度
具体数值的方向,请详见上图(右)
仔细观察可以发现:velocityX、velocityY的方向与distanceX、distanceY方向正好相反

 浙公网安备 33010602011771号